

如何手势控制鼠标
电子说
描述
步骤1:安装Anaconda和需要的软件包
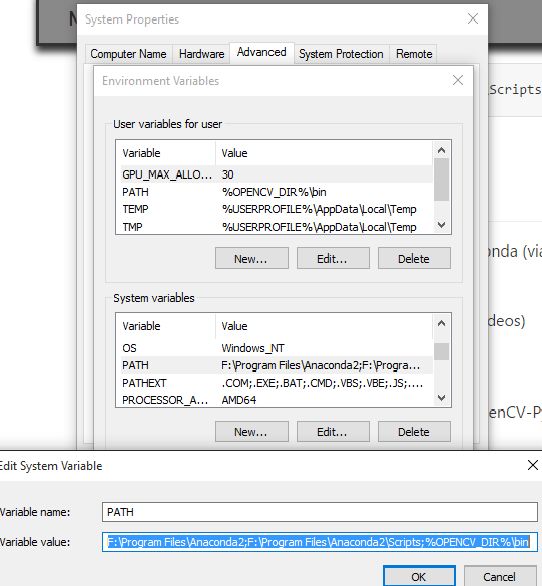
Anaconda本质上是一个包装精美的Python IDE,随附了大量有用的软件包,如NumPy,Pandas,IPython笔记本等似乎在科学界的各个地方都值得推荐。查看Anaconda以安装它。
所需的软件包:
PyAutoGUI
OpenCv
安装上述软件包:
OpenCV:
点击此链接逐步安装for opencv
PyAutoGUI:
PyAutoGUI是一个Python模块,用于以编程方式控制鼠标和键盘。
PyAutoGUI可以从 pip 工具中安装
打开你的anaconda命令提示并粘贴它:
pip install PyAutoGUI
现在我们准备好了代码。..。..
第2步:技术概述
它本质上是一个程序,它应用图像处理,检索必要的数据,并根据预定义的概念将其实现到计算机的鼠标接口。
代码是用Python编写的。它使用跨平台图像处理模块OpenCV,并使用Python特定库PyAutoGUI实现鼠标操作。
处理网络摄像头的视频捕获,仅提取三个彩色指尖。他们的中心是用矩量法计算的,根据它们的相对位置决定要执行什么动作。
第3步:视频入门
目标一:
cv2.VideoCapture()
从中捕获视频相机
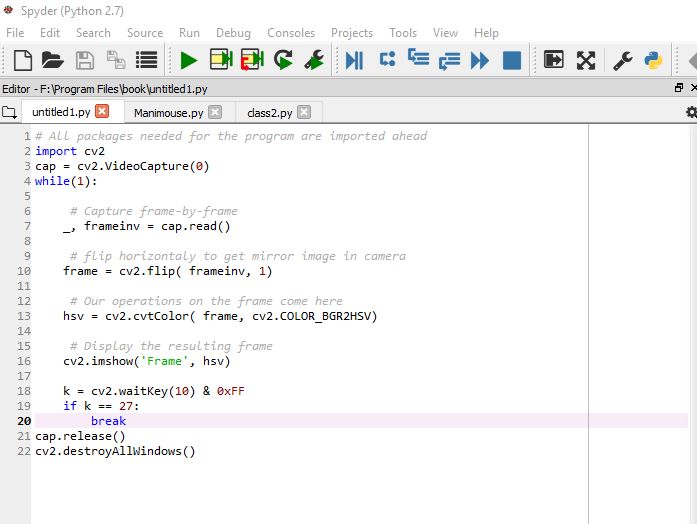
通常,我们必须使用相机捕捉直播。 OpenCV为此提供了一个非常简单的接口。让我们从相机中捕捉视频(我正在使用笔记本电脑的内置网络摄像头),将其转换为灰度视频并显示它。入门只是一项简单的任务。要捕获视频,您需要创建一个VideoCapture对象。它的参数可以是设备索引或视频文件的名称。设备索引只是指定哪个摄像头的数量。通常会连接一台摄像机(如我的情况)。所以我只传递0(或-1)。您可以通过传递1来选择第二个摄像头,依此类推。之后,您可以逐帧捕获。但最后,不要忘记发布捕获。
我们要做的第一件事就是将捕获的视频转换为HSV格式。
代码:
# All packages needed for the program are imported ahead
import cv2
cap = cv2.VideoCapture(0)
while(1):
# Capture frame-by-frame
_, frameinv = cap.read()
# flip horizontaly to get mirror image in camera
frame = cv2.flip( frameinv, 1)
# Our operations on the frame come here
hsv = cv2.cvtColor( frame, cv2.COLOR_BGR2HSV)
# Display the resulting frame
cv2.imshow(‘Frame’, hsv)
k = cv2.waitKey(10) & 0xFF
if k == 27:
break
cap.release()
cv2.destroyAllWindows()
第4步:颜色范围
目标二:
calibrateColor()
校准颜色范围
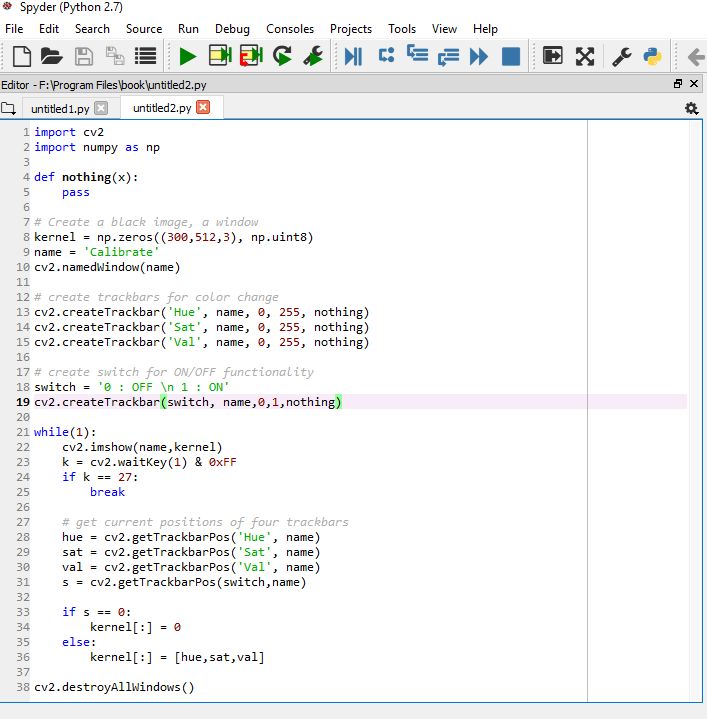
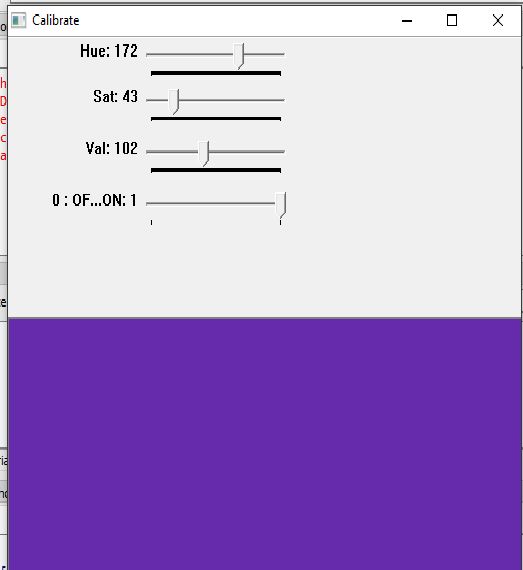
现在,用户可以分别校准他的三个手指的颜色范围。这可以通过在程序开头三次调用 calibrateColor()函数来完成。
用户也可以选择使用默认设置。
代码:
import cv2
import numpy as np
def nothing(x):
pass
# Create a black image, a window
kernel = np.zeros((300,512,3), np.uint8)
name = ‘Calibrate’
cv2.namedWindow(name)
# create trackbars for color change
cv2.createTrackbar(‘Hue’, name, 0, 255, nothing)
cv2.createTrackbar(‘Sat’, name, 0, 255, nothing)
cv2.createTrackbar(‘Val’, name, 0, 255, nothing)
# create switch for ON/OFF functionality
switch = ‘0 : OFF 1 : ON’
cv2.createTrackbar(switch, name,0,1,nothing)
while(1):
cv2.imshow(name,kernel)
k = cv2.waitKey(1) & 0xFF
if k == 27:
break
# get current positions of four trackbars
hue = cv2.getTrackbarPos(‘Hue’, name)
sat = cv2.getTrackbarPos(‘Sat’, name)
val = cv2.getTrackbarPos(‘Val’, name)
s = cv2.getTrackbarPos(switch,name)
if s == 0:
kernel[:] = 0
else:
kernel[:] = [hue,sat,val]
cv2.destroyAllWindows()
第5步:删除噪音&在视频源中定义函数
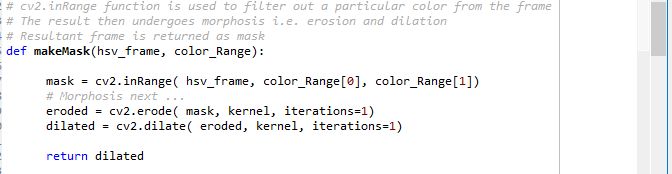
取决于校准,只使用 cv2.inRange()功能逐一从视频中提取三个指尖。为了消除视频输入中的噪声,我们应用两步态射,即侵蚀和扩张。 然后发送程序中称为掩码的噪声滤波图像以定位中心。
# cv2.inRange function is used to filter out a particular color from the frame
# The result then undergoes morphosis i.e. erosion and dilation
# Resultant frame is returned as mask
def makeMask(hsv_frame, color_Range):
mask = cv2.inRange( hsv_frame, color_Range[0], color_Range[1])
# Morphosis next 。..
eroded = cv2.erode( mask, kernel, iterations=1)
dilated = cv2.dilate( eroded, kernel, iterations=1)
return dilated
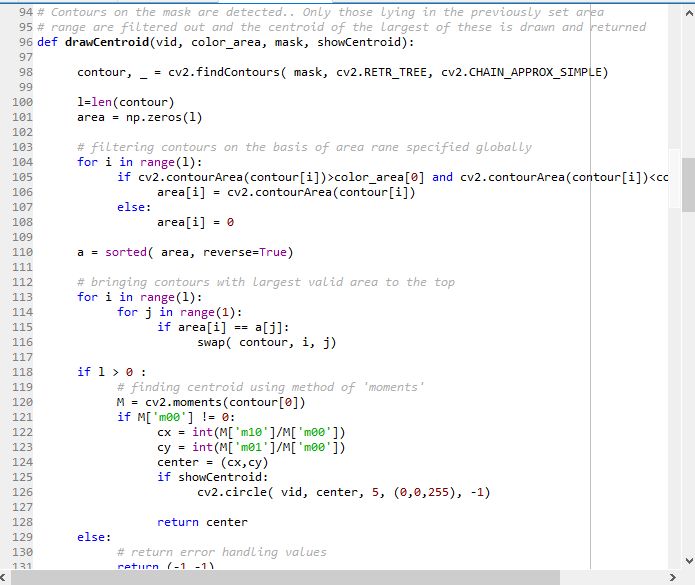
三个中心的位置包括:
在与该颜色范围相关的遮罩中查找轮廓。
使用区域过滤器丢弃不相关区域的轮廓。
在剩余的轮廓中找到最大的轮廓,并应用力矩的方法找到它的中心。
然后是定义光标在屏幕上的位置的步骤。黄色的拇指负责光标的位置。为此目的使用了以下技术:
通常我们使用的网络摄像头以640x480像素的分辨率捕获视频。假设此帧线性映射到1920x1080像素显示屏幕。如果我们有一个惯用右手的用户,他会发现与右边缘相比,访问屏幕的左边缘会感觉不舒服。访问屏幕的底部也会在手腕处产生压力。
我们意识到,不是将整个视频帧映射到屏幕,我们宁愿考虑更偏向右侧的矩形子部分(考虑右手用户)和帧的上部以便改进安慰。测量480x270像素的子部分然后以比例因子4线性映射到屏幕。
# Contours on the mask are detected.。 Only those lying in the previously set area
# range are filtered out and the centroid of the largest of these is drawn and returned
def drawCentroid(vid, color_area, mask, showCentroid):
contour, _ = cv2.findContours( mask, cv2.RETR_TREE, cv2.CHAIN_APPROX_SIMPLE)
l=len(contour)
area = np.zeros(l)
# filtering contours on the basis of area rane specified globally
for i in range(l):
if cv2.contourArea(contour[i])》color_area[0] and cv2.contourArea(contour[i])
# bringing contours with largest valid area to the top
for i in range(l):
for j in range(1):
if area[i] == a[j]:
swap( contour, i, j)
if l 》 0 :
# finding centroid using method of ‘moments’
M = cv2.moments(contour[0])
if M[‘m00’] != 0:
cx = int(M[‘m10’]/M[‘m00’])
cy = int(M[‘m01’]/M[‘m00’])
center = (cx,cy)
if showCentroid:
cv2.circle( vid, center, 5, (0,0,255), -1)
return center
else:
# return error handling values
return (-1,-1)
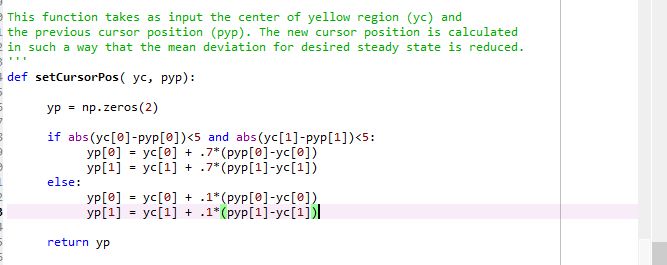
由于网络摄像头捕获的噪声和手中的振动,中心保持不变围绕一个平均位置振动。在按比例放大时,这些振动会对光标位置的准确性产生很多问题。为了减少光标中的抖动,我们使用光标的差分位置分配。我们将新中心与光标的先前位置进行比较。如果差异小于5个像素,则通常是由于噪声。因此,新光标位置更倾向于前一个。但是,先前位置和新中心的较大差异被视为自愿移动,新光标位置设置为接近新中心。有关详细信息,请通过代码中的setCursorPosition()函数。
‘’‘
This function takes as input the center of yellow region (yc) and
the previous cursor position (pyp)。 The new cursor position is calculated
in such a way that the mean deviation for desired steady state is reduced.
’‘’
def setCursorPos( yc, pyp):
yp = np.zeros(2)
if abs(yc[0]-pyp[0])《5 and abs(yc[1]-pyp[1])《5:
yp[0] = yc[0] + .7*(pyp[0]-yc[0])
yp[1] = yc[1] + .7*(pyp[1]-yc[1])
else:
yp[0] = yc[0] + .1*(pyp[0]-yc[0])
yp[1] = yc[1] + .1*(pyp[1]-yc[1])
return yp
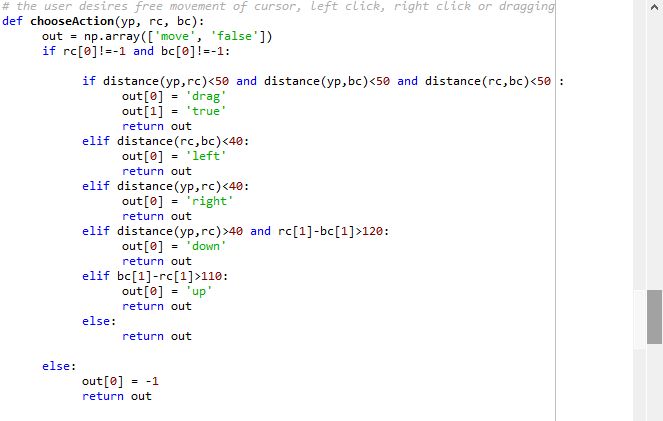
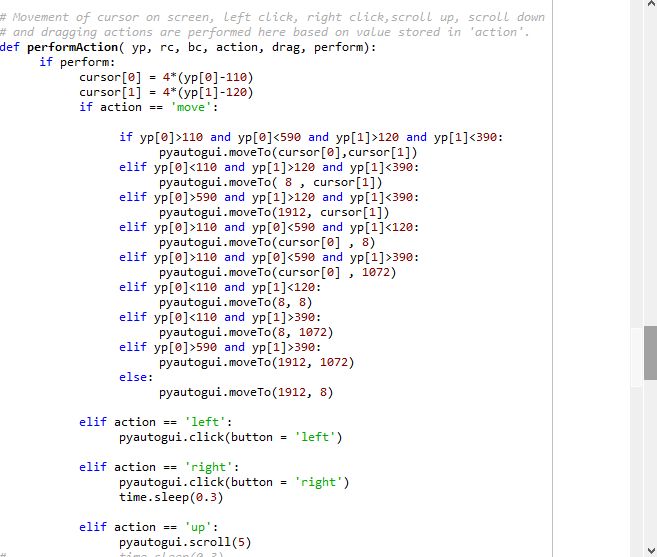
现在发送三个中心,根据
的相对位置决定需要执行哪些操作。这是在代码中的chooseAction()函数中完成的。根据其输出,performAction()函数使用PyAutoGUI库执行以下任一操作:
自由光标移动
左键单击
右键单击
拖动/选择
向上滚动
向下滚动
# Depending upon the relative positions of the three centroids, this function chooses whether
# the user desires free movement of cursor, left click, right click or dragging
def chooseAction(yp, rc, bc):
out = np.array([‘move’, ‘false’])
if rc[0]!=-1 and bc[0]!=-1:
if distance(yp,rc)《50 and distance(yp,bc)《50 and distance(rc,bc)《50 :
out[0] = ‘drag’
out[1] = ‘true’
return out
elif distance(rc,bc)《40:
out[0] = ‘right’
return out
elif distance(yp,rc)《40:
out[0] = ‘left’
return out
elif distance(yp,rc)》40 and rc[1]-bc[1]》120:
out[0] = ‘down’
return out
elif bc[1]-rc[1]》110:
out[0] = ‘up’
return out
else:
return out
else:
out[0] = -1
return out def performAction( yp, rc, bc, action, drag, perform):
if perform:
cursor[0] = 4*(yp[0]-110)
cursor[1] = 4*(yp[1]-120)
if action == ‘move’:
if yp[0]》110 and yp[0]《590 and yp[1]》120 and yp[1]《390:
pyautogui.moveTo(cursor[0],cursor[1])
elif yp[0]《110 and yp[1]》120 and yp[1]《390:
pyautogui.moveTo( 8 , cursor[1])
elif yp[0]》590 and yp[1]》120 and yp[1]《390:
pyautogui.moveTo(1912, cursor[1])
elif yp[0]》110 and yp[0]《590 and yp[1]《120:
pyautogui.moveTo(cursor[0] , 8)
elif yp[0]》110 and yp[0]《590 and yp[1]》390:
pyautogui.moveTo(cursor[0] , 1072)
elif yp[0]《110 and yp[1]《120:
pyautogui.moveTo(8, 8)
elif yp[0]《110 and yp[1]》390:
pyautogui.moveTo(8, 1072)
elif yp[0]》590 and yp[1]》390:
pyautogui.moveTo(1912, 1072)
else:
pyautogui.moveTo(1912, 8)
elif action == ‘left’:
pyautogui.click(button = ‘left’)
elif action == ‘right’:
pyautogui.click(button = ‘right’)
time.sleep(0.3)
elif action == ‘up’:
pyautogui.scroll(5)
# time.sleep(0.3)
elif action == ‘down’:
pyautogui.scroll(-5)
# time.sleep(0.3)
elif action == ‘drag’ and drag == ‘true’:
global y_pos
drag = ‘false’
pyautogui.mouseDown()
while(1):
k = cv2.waitKey(10) & 0xFF
changeStatus(k)
_, frameinv = cap.read()
# flip horizontaly to get mirror image in camera
frame = cv2.flip( frameinv, 1)
hsv = cv2.cvtColor( frame, cv2.COLOR_BGR2HSV)
b_mask = makeMask( hsv, blue_range)
r_mask = makeMask( hsv, red_range)
y_mask = makeMask( hsv, yellow_range)
py_pos = y_pos
b_cen = drawCentroid( frame, b_area, b_mask, showCentroid)
r_cen = drawCentroid( frame, r_area, r_mask, showCentroid)
y_cen = drawCentroid( frame, y_area, y_mask, showCentroid)
if py_pos[0]!=-1 and y_cen[0]!=-1:
y_pos = setCursorPos(y_cen, py_pos)
performAction(y_pos, r_cen, b_cen, ‘move’, drag, perform)
cv2.imshow(‘Frame’, frame)
if distance(y_pos,r_cen)》60 or distance(y_pos,b_cen)》60 or distance(r_cen,b_cen)》60:
break
pyautogui.mouseUp()
-
DIY一只可以当鼠标用的手套2015-11-18 0
-
手势识别控制器制作2021-09-07 0
-
arduino手势控制小车2022-08-09 0
-
基于arduino设计的手势控制小车2023-09-25 0
-
使用Arduino和PAJ7620手势传感器制作手势控制机器人2023-09-27 0
-
用a4纸自制一款手势鼠标项目2023-10-10 0
-
鼠标控制器参考设计2009-08-03 335
-
图解Windows 8系统手势操作2012-08-17 3298
-
黑科技!隔空雷达手势控制的耳机也来了2019-11-13 705
-
手势隔空控制电脑(附制作方法)2021-12-08 729
-
用手势识别模块+STM32单片机+模拟键盘鼠标模块做一个手势刷抖音2021-12-24 696
-
arduino手势控制车2022-07-26 280
-
手势控制锁开源分享2022-12-29 225
-
手势控制的轮椅开源分享2023-01-31 226
-
手势控制电源板2023-06-20 298
全部0条评论

快来发表一下你的评论吧 !
