

Arduino单位转换器的制作
电子说
描述
第1步:成分:
电子产品
Arduino
面包板
LCD *
2个50k电位器
150欧姆电阻
跳线,以及成吨的跳线!
如果您不想使用LCD,则必须使用串行监视器。无论在哪里看到lcd.print,只需将其更改为Serial.print即可。而不是lcd.begin更改为Serial.begin(9600);。
步骤2:LCD
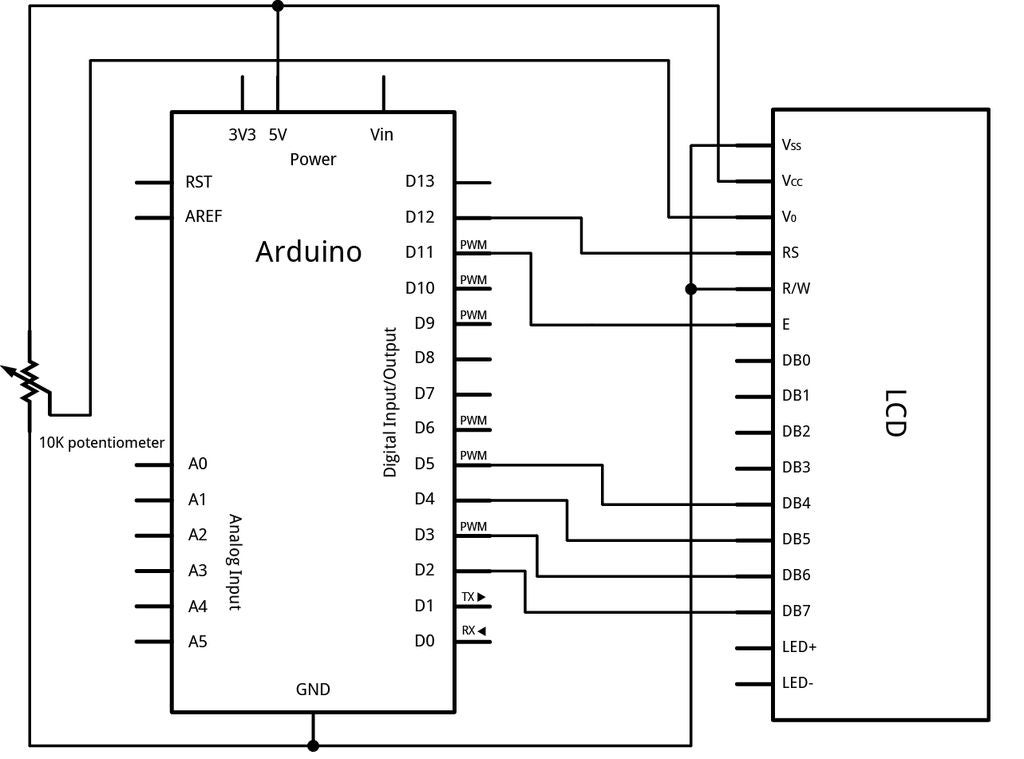
所以我要做的第一件事是去Arduino网站,看看如何连接我的LCD屏幕。我已附上原理图。
要使LCD上的背光引脚(K)接地,并通过150欧姆电阻将LCD上的引脚(A)连接到Arduino上的引脚10。
了解如何使用此LCD屏幕,因此我在此提供了一些信息。 Arduino已经为LCD提供了一个库,因此我们需要包含它。为此,我们可以在设置之前输入代码, #include 。现在包括我们的LCD库。接下来要做的是告诉Arduino我们将哪些引脚连接到LCD。为此,请在设置功能 LiquidCrystal lcd(12,11,5,5,4,3,2);之前键入此代码; 这些是Arduino通过PIN将数据发送到LCD的引脚。
所以这是到目前为止的草图。 #include
LiquidCrystal lcd(12, 11, 5, 4, 3, 2);
现在,让我们学习一些有关使用LCD功能的知识。
lcd.begin(16,2);//这是用于设置列数和行数。如果您查看图片2和3,则可以看到列的数量,而在图片3中,可以看到行的数量。
lcd.print(“”);//这就是我们在屏幕上打印文本的方式。您的文字放在引号之间。引号是必需的。
lcd.clear();//这就是我们清除屏幕上所有文本的方式。
lcd.setCursor(0,1);//这就是我们将文本放在第二行的方式。
因此,请充分利用所有这些。连接屏幕,然后输入此代码。 #include
LiquidCrystal lcd(12, 11, 5, 4, 3, 2);
int lcdbl = 10; // lcdbl=LCD Backlight: hooking up the lcdbacklight to pin 10
void setup()
{
lcd.begin(16,2);
digitalWrite(lcdbl, HIGH); // turning on the backlight
pinMode(lcdbl, OUTPUT); // set pin 11 to output
lcd.print(“I‘m cool!”);
}
void loop()
{
}
如果将其复制,粘贴到草图中并上传到板上,则应该会看到LCD亮起,并且出现文本“我很酷”。
:
我所看到的只是白色方块,或者屏幕只是蓝色(或您的LCD背光颜色)!
屏幕不亮!
解决方案:
将电位器一直转到一侧,然后再转到另一侧。您应该看到文本出现。如果是这样,请慢慢调整电位器,直到文本清除为止
确保所有连接正确。
确保将[lcdbl]设置为[OUTPUT]
现在,让我们在底部一行添加一些文本。如果您还记得,我们需要偏移光标。通过键入lcd.setCursor(0,1);
请参阅修改后的代码。 #include
LiquidCrystal lcd(12, 11, 5, 4, 3, 2);
int lcdbl = 10; // lcdbl=LCD Backlight: hooking up the lcdbacklight to pin 10
void setup()
{
lcd.begin(16,2);
digitalWrite(lcdbl, HIGH);
pinMode(lcdbl, OUTPUT); // set pin 11 to output
lcd.print(“I’m cool!”);
lcd.setCursor(0,1); // set the text below to the second row
lcd.print(“In my dreams :(”);
}
void loop()
{
}
将此上传到您的Arduino,看看会发生什么!
步骤3:连接第二个电位计
好吧,既然我们知道如何使用LCD,我们需要移动一个。第一步是连接第二个电位器。我们将两个外部引脚连接到5v和GND,将中间引脚连接到Arduino引脚A0。
现在,我们当然需要使用Arduino进行设置。方法如下:
int sensorValue = analogRead(A0); // read the input on analog pin 0:
float inches = sensorValue * (500 / 1023.0); // Convert the analog reading (which goes from 0 - 1023) to a value (0-500);
让我们更详细地检查这一行
int sensorValue = AnalogRead(A0)-我们将单词‘sensorValue’设置为相等从引脚A0到模拟读数。
浮点英寸= sensorValue *(500/1023.0); -我们将“英寸”一词设置为等于我们的新读数(0-500);如果您想要锅调整脚的数量,可以将“ inches”(英寸)改为“ feet”(英尺)。
基本上,所有这些操作都告诉Arduino我们在引脚A0处有一个模拟读数(从0-1023开始)。下一行用于将读数(0-1023)转换为我们喜欢的值,在这种情况下为500。我们需要将其放入循环块中。到目前为止,这就是我们的代码。
#include
LiquidCrystal lcd(12, 11, 5, 4, 3, 2);
int lcdbl = 10; // lcdbl=LCD Backlight: hooking up the lcdbacklight to pin 10
void setup()
{
lcd.begin(16,2);
digitalWrite(lcdbl, HIGH);
pinMode(lcdbl, OUTPUT); // set pin 11 to output
}
void loop()
{
int sensorValue = analogRead(A0); // read the input on analog pin 0:
float inches = sensorValue * (500 / 1023);
}
注意,我已经摆脱了测试文本。我真的不认为我们会需要它:D。
步骤4:将底池值打印到LCD
我们需要告诉LCD打印一些东西,但是我们告诉它打印什么呢?我们要做的是键入 lcd.print( inches );现在为什么要英寸?好吧,请记住,我们将A0的模拟读取命名为“英寸”,这就是我们应该输入的内容。请勿使用引号,因为引号仅用于放置文本。
#include
LiquidCrystal lcd(12, 11, 5, 4, 3, 2);
int lcdbl = 10; // lcdbl=LCD Backlight: hooking up the lcdbacklight to pin 10
void setup()
{
lcd.begin(16,2);
digitalWrite(lcdbl, HIGH);
pinMode(lcdbl, OUTPUT); // set pin 11 to output
}
void loop()
{
int sensorValue = analogRead(A0); // read the input on analog pin 0:
float inches = sensorValue * (500 / 1023.0);
lcd.print(inches);
}
因此,我们应该将读数打印到LCD上!!因此,上传代码!但是,哦,不!整个屏幕上只是一大堆数字!为什么会这样呢?仔细研究我们的代码,我们看到此函数在循环部分中,因此其中的任何操作都将不断重复。如果您注意到,没有延迟或中断,那么它将疯狂地打印到我们的LCD上。这就是我们要解决的难题。我们将使用一个简单的lcd.clear函数来清除屏幕,然后添加一个小的延迟。现在它将打印英寸数,等待一秒钟,清除屏幕,然后重复上述步骤直到下一次重置。因此,我们的新代码将如下所示。
#include
LiquidCrystal lcd(12, 11, 5, 4, 3, 2);
int lcdbl = 10; // lcdbl=LCD Backlight: hooking up the lcdbacklight to pin 10
void setup()
{
lcd.begin(16,2);
digitalWrite(lcdbl, HIGH);
pinMode(lcdbl, OUTPUT); // set pin 11 to output
}
void loop()
{
int sensorValue = analogRead(A0); // read the input on analog pin 0:
float inches = sensorValue * (500 / 1023.0);
lcd.print(inches);
delay(100);
lcd.clear();
}
因此,现在要做的是打印数量AnalogRead值(英寸),将其在LCD上放置100毫秒,清除它,然后重新开始。现在,您应该可以转动电位计,并实时了解最新情况。现在将旋钮调大,例如350。
第5步:数学!
现在是时候做一点数学了。我希望我的Arduino告诉我有几英寸,然后让屏幕变黑,然后告诉我有几英尺。为了找出以英寸为单位的英尺,我们需要除以12。因此,这就是我们要设置代码行的方式。
feet = (inches / 12);
如果我们想将英寸转换为厘米,我们可以这样做:
centimeters = (inches * 2.54);
所以我们的代码看起来像这样。注意,我已将草图插入 int英尺; 如果您不这样做,则会收到一条错误消息,如图所示。您必须定义什么是“脚”。下面的代码应执行以下操作:
显示英寸数,其后带有单词“ inchs”。
清除屏幕
在其后显示带有“ foot”字样的英尺数。
如果像我一样将英寸保留为350英寸步骤4,每英尺的数量应为29。
#include
LiquidCrystal lcd(12, 11, 5, 4, 3, 2);
int lcdbl = 10; // lcdbl=LCD Backlight: hooking up the lcdbacklight to pin 10
int feet;
int wait = 3000; // assign the word “wait” to 3000 milliseconds
void setup()
{
lcd.begin(16,2);
digitalWrite(lcdbl, HIGH);
pinMode(lcdbl, OUTPUT); // set pin 11 to output
}
void loop()
{
int sensorValue = analogRead(A0); // read the input on analog pin 0:
float inches = sensorValue * (500 / 1023.0);
delay(1000);
lcd.print(inches);
lcd.print(“ inches:”);
delay(wait);
lcd.clear();
delay(1000);
feet = (inches / 12); // conversion from feet to inches Here this is telling Arduino that
// feet is equal to inches divided by 12
lcd.print(feet);
lcd.print(“ feet:”);
delay(wait);
lcd.clear();
delay(1000);
}
步骤6:更多编程。 。
到目前为止,草图的问题是无法通过实时更新更改英寸。上面的代码只会打印一次英寸数。现在,这对于英尺的数量或我们要转换的尺寸都可以,但是对于我们的变量,这太可怕了!我们甚至无法选择想要的英寸数!为了解决这个问题,我使用了一个小程序将数据(英寸)打印到LCD上并将其清除了50次,这使我根据锅的转动次数有了一个相当不错的数字变化。下面的代码将块之间的所有代码重复50次,并且将延迟设置为100,即大约5秒(50 * 100)。
for(int i=0; i《50; ++i)
{
int sensorValue = analogRead(A0); // read the input on analog pin 0:
float inches = sensorValue * (500 / 1023.0);
lcd.print(“Adjust the knob”);
lcd.setCursor(0,1);
lcd.print(inches);
delay(100);
lcd.clear();
}
在上面的草图中,仅看到一次英寸数,它将重复多次,使您可以在更新时看到它(与转动第二个底池一致)。
上传以下代码应执行以下操作:
“欢迎使用单位转换器!”
“调整旋钮”,使其下方具有英寸数。这将显示5秒钟。开锅!
打印英寸数
清除
打印英寸数
返回“调整旋钮”
#include
LiquidCrystal lcd(12, 11, 5, 4, 3, 2);
int lcdbl = 10; // lcdbl=LCD Backlight: hooking up the lcdbacklight to pin 10
int feet;
int wait = 3000; // assign the word “wait” to 3000 milliseconds
void setup()
{
lcd.begin(16,2);
digitalWrite(lcdbl, HIGH);
pinMode(lcdbl, OUTPUT); // set pin 11 to output
lcd.print(“Welcome to the”);
lcd.setCursor(0,1); // the cursor is like the rows on your LCD. After this, it will print
// the text on the bottom line of your LCD screen.
lcd.print(“unit converter!”);
delay(wait); /* if you look here, intead of the usual time in milliseconds
it says “wait”。 If we look what “wait” is, at the beginning of the code,
we see that “wait” is assigned to 3000 milliseconds, so whenever I type in
delay(wait); it wil have a delay of 3000 milliseconds, or 3 seconds. */
lcd.clear();
delay(1000);
}
void loop()
{
for(int i=0; i《50; ++i)
{
int sensorValue = analogRead(A0); // read the input on analog pin 0:
float inches = sensorValue * (500 / 1023.0);
lcd.print(“Adjust the knob”);
lcd.setCursor(0,1);
lcd.print(inches);
delay(100);
lcd.clear();
}
int sensorValue = analogRead(A0); // read the input on analog pin 0:
float inches = sensorValue * (500 / 1023.0);
delay(1000);
lcd.print(inches);
lcd.print(“ inches:”);
delay(wait);
lcd.clear();
delay(1000);
feet = (inches / 12); // conversion from feet to inches Here this is telling Arduino that
// feet is equal to inches divided by 12
lcd.print(feet);
lcd.print(“ feet:”);
delay(wait);
lcd.clear();
delay(1000);
}
步骤7:添加更多数学!
这是Arduino将英寸的长度转换为英尺,码,厘米和米。然后返回“调整旋钮”。继续阅读整个代码,并确保您理解所有内容。
我将英尺,码,厘米和米的换算值添加了。不要忘记在草图的开头定义这些内容。
yards = (feet / 3);
centimeters = (inches * 2.54);
meters = (centimeters * 100);
Iint feet;
int yards;
long inches;
long centimeters;
long meters;
int lcdbl = 10; // set the backlight pin to pin 10
int wait = 3000; // assign the word “wait” to 3000 milliseconds
#include
LiquidCrystal lcd(12, 11, 5, 4, 3, 2);
void setup()
{
lcd.begin(16,2); // columns, rows. use 16,2 for a 16x2 LCD, etc.
pinMode(lcdbl, OUTPUT); // setting the lcdbl (lcd backlight) pin to an OUPUT
analogWrite(lcdbl, 255); // set the backlight brightness to on
lcd.print(“Welcome to the”);
lcd.setCursor(0,1); // the cursor is like the rows on your LCD. After this, it will print
// the text on the bottom line of your LCD screen.
lcd.print(“unit converter!”);
delay(wait); /* if you look here, intead of the usual time in milliseconds
it says “wait”。 If we look what “wait” is, at the beginning of the code,
we see that “wait” is assigned to 3000 milliseconds, so whenever I type in
delay(wait); it wil have a delay of 3000 milliseconds, or 3 seconds. */
lcd.clear();
delay(1000);
int sensorValue = analogRead(A0); // read the input on analog pin 0:
float inches = sensorValue * (100 / 1023.0); // Convert the analog reading
}
// the loop routine runs over and over again forever:
void loop()
{
for(int i=0; i《50; ++i)
{
int sensorValue = analogRead(A0); // read the input on analog pin 0:
float inches = sensorValue * (500 / 1023.0);
lcd.print(“Adjust the knob”);
lcd.setCursor(0,1);
lcd.print(inches);
delay(100);
lcd.clear();
}
int sensorValue = analogRead(A0); // read the input on analog pin 0:
float inches = sensorValue * (500 / 1023.0);
// for feet
lcd.print(inches);
lcd.print(“ inches:”);
delay(wait);
lcd.clear();
delay(1000);
// for feet
feet = (inches / 12); // conversion from feet to inches Here this is telling Arduino that
// inches is equal to feet times 12
lcd.print(feet);
lcd.print(“ feet:”);
delay(wait);
lcd.clear();
delay(1000);
yards = (feet / 3); // conversion to yards
lcd.print(yards);
lcd.print(“ yards:”);
delay(wait);
lcd.clear();
delay(1000);
centimeters = (inches * 2.54); // conversion to centimeters
lcd.print(centimeters);
lcd.setCursor(0,1);
lcd.print(“centimeters”);
delay(wait);
lcd.clear();
delay(1000);
meters = (centimeters / 100); // conversion to meters
lcd.print(meters);
lcd.print(“ meters”);
delay(wait);
lcd.clear();
delay(1000);
}
以下是上述草图的概述:
启动时,“欢迎使用单位转换器”
“调整旋钮”,其下方的英寸数。转动旋钮!
显示英寸数
显示英尺数
显示厘米数
显示数量或米
责任编辑:wv
-
145. 逐次比较型AD转换器#AD转换器电路设计快学 2022-07-29
-
147. AD转换器的主要技术指标#AD转换器电路设计快学 2022-07-29
-
Buck转换器如何工作油泼辣子 2023-11-18
-
V/F转换器(电压或电流转为单位脉冲信号)2009-07-10 0
-
A/D转换器的量化单位的选取2016-11-26 0
-
怎样去制作一个电流电压转换器呢2021-10-15 0
-
顺向式电力转换器之制作与设计2009-04-12 627
-
推挽式电力转换器之制作2009-11-20 608
-
顺向式电力转换器的制作2009-11-20 334
-
USB隔离协议转换器制作说明2017-10-30 638
-
Arduino控制的DC DC降压转换器2022-08-10 435
-
使用Arduino构建一个摩尔斯电码转换器2022-08-29 3056
-
使用Arduino作为USB到TTL转换器的方法2022-11-09 1548
-
使用Arduino和N沟道MOSFET制作一个降压转换器电路2022-12-29 3223
-
制作netcdf数据:如何转换时间变量的单位?2023-05-30 452
全部0条评论

快来发表一下你的评论吧 !
