

怎样将Atmega32与Arduino IDE结合使用
电子说
描述
步骤1:
Atmega32微控制器。 :)
程序员(Arduino IDE认可的任何程序员)。我使用USBasp编程器。
用于Atmega32微控制器(面包板,stribpoard或经典开发板)上电的最小设置。
我们不需要全部,上面的照片仅作示例。
步骤2:软件设置
下载此说明文件附带的zip文件。
在arduino文件夹。.. arduino-1.5.2 hardware arduino avr boards.txt中找到文件board.txt
从zip存档面板中添加信息。 txt 到原始的 boards.tx t
在。.. arduino-1.5.2 hardware arduino中创建一个名为 mega32 的文件夹 avr variants
从zip文件中复制文件 pins_arduino.h 到在步骤4中创建的文件夹中。
启动Arduino IDE并选择开发板。
选择程序员
稍后编辑:
我删除了最初找到的github projet的链接。只要源发生了变化并且不适合此说明。
在作者:Eric Conner的消息后,我放回了我最初在其中找到该库的github项目的链接:
https://github.com/eaconner/ATmega32-Arduino
注意:本文所附的ZIP文件 是上述库的旧版本。
。随着时间的流逝,在收到一些反馈后,我注意到github的来源已更改。
此外,在注释中的 中,您会看到对某些错误的引用,以及如何更正错误。
本文和评论的答案与此处附加的版本有关,而不是github(较新)版本。
第3步:完成。
已完成。
现在您可以尝试一些Arduino中已经存在的简单示例。
要
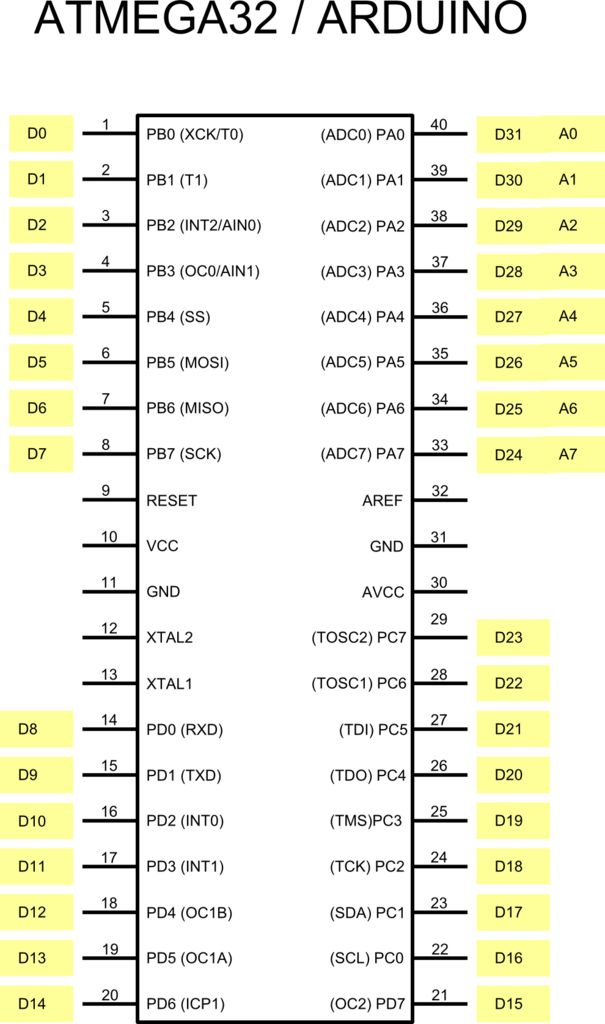
这里是眨眼的例子:Files-》 Examples-》 Basics-》 Blink
Pin13 Arduino == Pin19( PD5)Atmega32
/*Blink
Turns on an LED on for one second, then off for one second, repeatedly.
This example code is in the public domain.
*/
// Pin 13 has an LED connected on most Arduino boards.
// give it a name:
int led = 13;
// the setup routine runs once when you press reset:
void setup() {
// initialize the digital pin as an output.
pinMode(led, OUTPUT);
}
// the loop routine runs over and over again forever:
void loop() {
digitalWrite(led, HIGH); // turn the LED on (HIGH is the voltage level)
delay(1000); // wait for a second
digitalWrite(led, LOW); // turn the LED off by making the voltage LOW
delay(1000); // wait for a second
}
经过一番评论后,我在文件pins_arduino.h中发现了两个错误
因此我将发布这里的错误和正确的值。
SCL和SDA的错误定义
const static uint8_t SDA = 8; //wrong
const static uint8_t SCL = 9; //wrong
必须在以下位置更改:
const static uint8_t SDA = 17; //correct
const static uint8_t SCL = 16; //correct
我不是github上的项目的作者,它的更改可能超出我的控制。
因此,请使用此说明中附带的代码并进行上述修改。
更新:
为串行库正常工作亩在更改文件 HardwareSerial.cpp
。.. arduino-1.5.8 hardware arduino avr cores arduino HardwareSerial.cpp 后, strong》
将替换为:
#if defined(__AVR_ATmega8__)
config |= 0x80; // select UCSRC register (shared with UBRRH)
#endif
替换为:
#if defined(__AVR_ATmega8__) || defined(__AVR_ATmega32__) || defined(__AVR_ATmega16__)
config |= 0x80; // select UCSRC register (shared with UBRRH)
#endif
-
ATmega32应用 流水灯2011-07-27 0
-
求ATMEGA32最小系统图2013-04-12 0
-
ATmega32机器人系统电子电路是什么?2019-09-19 0
-
请问ATmega32与ATmega32A有什么区别?2020-11-11 0
-
利用Arduino IDE对ATMEGA8等单片机编程 精选资料分享2021-07-13 0
-
为什么希望使用Arduino IDE对ATMEGA8进行编程?2021-07-27 0
-
Arduino与STM32的结合2021-08-12 0
-
如何在没有任何类型的Arduino IDE或Arduino硬件的情况下将ESP-01连接到ATMega328P / ATMega8 micros?2023-06-07 0
-
基于ATMEGA32的指纹识别防盗门锁的设计2009-06-16 815
-
Atmega32帖片转直插2016-06-03 606
-
嘉源ATMEGA32最小系统空板2016-09-12 942
-
ATmega32的遥控采摘机器人设计2017-10-31 948
-
如何使用Arduino IDE编程ATMEGA322019-10-30 6134
-
使用Arduino IDE编程ATmega82022-10-19 704
-
将ATtiny85与Arduino IDE结合使用2023-02-10 604
全部0条评论

快来发表一下你的评论吧 !
