

如何使用LCD1602显示字符和字符串
电子说
描述
步骤1:组件:
-Arduino Uno开发板* 1
-USB电缆* 1
-LCD1602 * 1
-电位计(50kΩ)* 1
-面包板* 1
-跳线
步骤2:原理
通常,LCD1602具有并行端口,也就是说,它将同时控制多个引脚。 LCD1602可以分为八端口和四端口连接。如果使用八端口连接,则Arduino Uno板的所有数字端口几乎全部被占用。如果要连接更多的传感器,将没有可用的端口。因此,这里使用四端口连接是为了更好的应用。
LCD1602的引脚及其功能
VSS:接地”
VDD:连接到+ 5V电源
VO:调整对比度
RS:寄存器选择引脚,用于控制将数据写入LCD存储器的位置。您可以选择保存屏幕上显示内容的数据寄存器,也可以选择指令寄存器,LCD控制器在其中查找有关下一步操作的指令。
R/W:A读/写入引脚以在读取和写入模式之间进行选择
E:启用引脚,当接收到高电平(1)时读取信息。当信号从高电平变为低电平时,将执行指令。
D0-D7:读取和写入数据
A和K:控制LCD背光的引脚。将K连接至GND,将A连接至3.3v。打开背光灯,您会在相对黑暗的环境中看到清晰的字符。
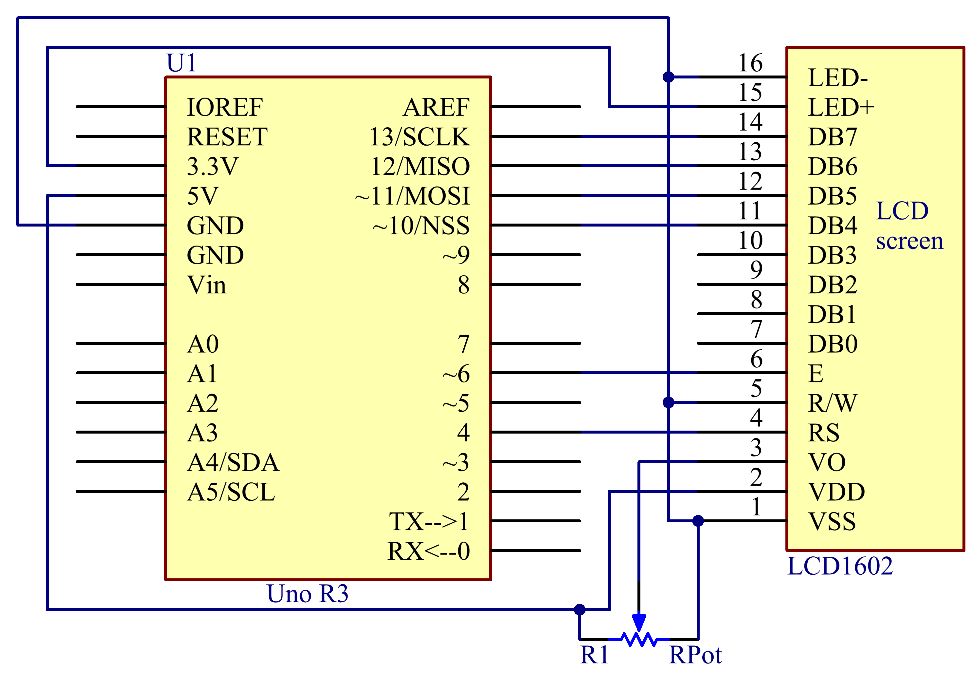
步骤3:原理图
步骤4:步骤
将K连接至GND,将A连接至3.3 V,然后LCD1602的背光将打开。将VSS连接至GND,将LCD1602连接至电源。将VO连接到电位计的中间引脚-可以调节屏幕显示的对比度。将RS连接到D4,将R/W引脚连接到GND,这意味着您可以将字符写入LCD1602。将E连接到引脚6,LCD1602上显示的字符由D4-D7控制。对于编程,通过调用函数库对其进行了优化。
步骤1:
构建电路。
步骤2:
下载来自https://github.com/primerobotics/Arduino的代码
步骤3:
将草图上传到Arduino Uno开发板
单击“上传”图标将代码上传到控制板上。
如果窗口底部的
出现“完成上传”,则表示草图已成功上传。
注意:您可能需要调整LCD1602上的电位计,直到其清晰显示为止。
第5步:代码
//LCD1602
//You should now
see your LCD1602 display the flowing characters “PRIMEROBOTICS” and
“hello, world”
//Email:info@primerobotics.in
//Website:www.primerobotics.in
#include
// include the library code
/**********************************************************/
char
array1[]=“ PrimeRobotics
”; //the string to print on
the LCD
char
array2[]=“hello, world!
”; //the string to print on
the LCD
int tim =
250; //the value of delay time
// initialize the library
with the numbers of the interface pins
LiquidCrystal
lcd(4, 6, 10, 11, 12, 13);
/*********************************************************/
void setup()
{
lcd.begin(16, 2); // set up the LCD‘s number of columns and
rows:
}
/*********************************************************/
void loop()
{
lcd.setCursor(15,0); // set the cursor to column 15, line 0
for ( int positionCounter1 = 0;
positionCounter1 《 26; positionCounter1++)
{
lcd.scrollDisplayLeft(); //Scrolls the contents of the display one
space to the left.
lcd.print(array1[positionCounter1]); // Print a message to the LCD.
delay(tim); //wait for 250 microseconds
}
lcd.clear(); //Clears the LCD screen and positions the
cursor in the upper-left corner.
lcd.setCursor(15,1); // set the cursor to column 15, line 1
for (int positionCounter2 = 0;
positionCounter2 《 26; positionCounter2++)
{
lcd.scrollDisplayLeft(); //Scrolls the contents of the display one
space to the left.
lcd.print(array2[positionCounter2]); // Print a message to the LCD.
delay(tim); //wait for 250 microseconds
}
lcd.clear(); //Clears the LCD screen and positions the
cursor in the upper-left corner.
}
/**********************************************************/
步骤6:代码分析
责任编辑:wv
-
Lcd1602液晶显示程序2018-07-19 0
-
小白求助,求分享单片机控制LCD1602显示屏动态显示字符串2021-10-13 0
-
LCD1602显示字符的相关资料推荐2022-01-14 0
-
LCD1602显示字符或字符串2022-01-27 0
-
51单片机驱动LCD1602只能显示单字符是为什么?2023-11-09 0
-
F2812驱动液晶模块LCD1602显示字符字符串自定义字符例程LCD16022013-06-06 1285
-
通用型LCD1602自定义字符的显示2014-02-12 35337
-
LCD1602显示汉字2015-11-09 923
-
Proteus之字符式LCD显示字符串2016-04-18 655
-
LCD1602自定义显示字符及汉字2018-06-26 1466
-
使用51单片机驱动LCD1602显示字符串的程序和电路图免费下载2019-07-16 810
-
PIC单片机实现LCD1602滚动显示字符串2021-11-16 745
-
3. 51——LCD1602显示 字符、字符串、数字2021-12-04 960
-
LCD1602字符串显示(STM32F103)2022-01-13 770
-
08-LCD1602显示字符2022-01-14 312
全部0条评论

快来发表一下你的评论吧 !
