

如何使用Arduino Nano和DVD驱动器步进电机制造自己的CNC机器
电子说
描述
第1步:简介
会尝试解释如何使用Arduino Nano和DVD驱动器步进电机制造自己的 CNC机器。如今,对于创建者而言,CNC机床已经成为一个非常有趣的话题。
在开始构建过程之前,这个可指导的项目由JLCPCB赞助。我已经订购了JLCPCB的现成PCB,价格仅为2美元。
步骤2:必需的零件
要制造此数控机床,我使用了以下零件:
1)1 x Arduino Nano
2)2 x L293D电机驱动器IC =它驱动步进电机。
3)1 x LM7805稳压器 =它为电路板提供5伏电源。
4)2 x 16引脚IC基座
5)1个 1K电阻
6)1个 LED
7)2 x DVD驱动器步进电机 =您可以从旧的DVD驱动器中获得步进电机。
8)1 x Tower Pro SG90微型伺服电机
9)2 x 15个2.54mm母头连接器
10)1 x 3针2.54mm母头连接器
11)2 x 4针Relimate插头连接器
12)2 x 4针Relimate插头连接器
13)2 x 2针Relimate公头连接器
注意:图库中列出了所有必需的部件,因此请务必将其检出!
步骤3:电路图和PCB制作
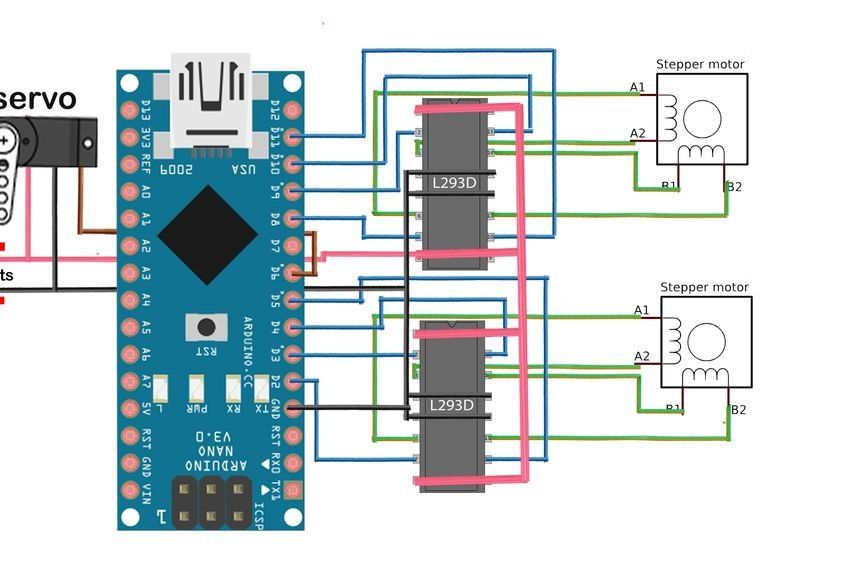
电路图如图所示。为该电路制作PCB时,我使用JLCPCB网站从其网站上订购在线PCB,
首先转到JLCPCB,然后单击立即购买,然后上传您的Gerber文件,我已提供了Gerber文件供打印。上传完成后,您可以检查PCB的外观。然后进一步处理以订购 PCB(仅售2美元)。而已。
步骤4:构建过程
在印刷电路板上,首先将所有零件安装在其位置,然后将它们焊接在正确的位置,如图所示。如图所示,将四线焊接到连接器的步进电机上。焊接完成后,现在您可以安装其他组件,例如Arduino Nano,驱动器IC和连接器,如图所示。
将DVD步进电机,伺服电机和电源线的公连接器连接到PCB上正确的母连接器中。
现在是时候将代码上传到 Arduino Nano 。
第5步:将代码上传到Arduino Nano
首先从Arduino网站下载Arduino IDE软件。然后打开Arduino IDE软件。并复制粘贴代码。
然后转到工具》选择 Arduino开发板,在本例中为Arduino Nano。
,然后从工具菜单中选择正确的端口。
完成将您的代码上传到Arduino Nano。
#include
#include
#define LINE_BUFFER_LENGTH 512
const int penZUp = 80;
const int penZDown = 40;
const int penServoPin = 6;
const int stepsPerRevolution = 20;
Servo penServo;
Stepper myStepperY(stepsPerRevolution, 2,3,4,5);
Stepper myStepperX(stepsPerRevolution, 8,9,10,11);
struct point {
float x;
float y;
float z;
};
struct point actuatorPos;
float StepInc = 1;
int StepDelay = 0;
int LineDelay = 50;
int penDelay = 50;
float StepsPerMillimeterX = 6.0;
float StepsPerMillimeterY = 6.0;
float Xmin = 0;
float Xmax = 40;
float Ymin = 0;
float Ymax = 40;
float Zmin = 0;
float Zmax = 1;
float Xpos = Xmin;
float Ypos = Ymin;
float Zpos = Zmax;
boolean verbose = false;
void setup() {
Serial.begin( 9600 );
penServo.attach(penServoPin);
penServo.write(penZUp);
delay(200);
myStepperX.setSpeed(250);
myStepperY.setSpeed(250);
Serial.println(“Mini CNC Plotter alive and kicking!”);
Serial.print(“X range is from ”);
Serial.print(Xmin);
Serial.print(“ to ”);
Serial.print(Xmax);
Serial.println(“ mm.”);
Serial.print(“Y range is from ”);
Serial.print(Ymin);
Serial.print(“ to ”);
Serial.print(Ymax);
Serial.println(“ mm.”);
}
void loop()
{
delay(200);
char line[ LINE_BUFFER_LENGTH ];
char c;
int lineIndex;
bool lineIsComment, lineSemiColon;
lineIndex = 0;
lineSemiColon = false;
lineIsComment = false;
while (1) {
while ( Serial.available()》0 ) {
c = Serial.read();
if (( c == ‘ ’) || (c == ‘ ’) ) {
if ( lineIndex 》 0 ) {
line[ lineIndex ] = ‘’;
if (verbose) {
Serial.print( “Received : ”);
Serial.println( line );
}
processIncomingLine( line, lineIndex );
lineIndex = 0;
}
else {
}
lineIsComment = false;
lineSemiColon = false;
Serial.println(“ok”);
}
else {
if ( (lineIsComment) || (lineSemiColon) ) { // Throw away all comment characters
if ( c == ‘)’ ) lineIsComment = false; // End of comment. Resume line.
}
else {
if ( c 《= ‘ ’ ) { // Throw away whitepace and control characters
}
else if ( c == ‘/’ ) { // Block delete not supported. Ignore character.
}
else if ( c == ‘(’ ) { // Enable comments flag and ignore all characters until ‘)’ or EOL.
lineIsComment = true;
}
else if ( c == ‘;’ ) {
lineSemiColon = true;
}
else if ( lineIndex 》= LINE_BUFFER_LENGTH-1 ) {
Serial.println( “ERROR - lineBuffer overflow” );
lineIsComment = false;
lineSemiColon = false;
}
else if ( c 》= ‘a’ && c 《= ‘z’ ) { // Upcase lowercase
line[ lineIndex++ ] = c-‘a’+‘A’;
}
else {
line[ lineIndex++ ] = c;
}
}
}
}
}
}
void processIncomingLine( char* line, int charNB ) {
int currentIndex = 0;
char buffer[ 64 ]; // Hope that 64 is enough for 1 parameter
struct point newPos;
newPos.x = 0.0;
newPos.y = 0.0;
// Needs to interpret
// G1 for moving
// G4 P300 (wait 150ms)
// G1 X60 Y30
// G1 X30 Y50
// M300 S30 (pen down)
// M300 S50 (pen up)
// Discard anything with a (
// Discard any other command!
while( currentIndex 《 charNB ) {
switch ( line[ currentIndex++ ] ) { // Select command, if any
case ‘U’:
penUp();
break;
case ‘D’:
penDown();
break;
case ‘G’:
buffer[0] = line[ currentIndex++ ]; // /! Dirty - Only works with 2 digit commands
// buffer[1] = line[ currentIndex++ ];
// buffer[2] = ‘’;
buffer[1] = ‘’;
switch ( atoi( buffer ) ){ // Select G command
case 0: // G00 & G01 - Movement or fast movement. Same here
case 1:
// /! Dirty - Suppose that X is before Y
char* indexX = strchr( line+currentIndex, ‘X’ ); // Get X/Y position in the string (if any)
char* indexY = strchr( line+currentIndex, ‘Y’ );
if ( indexY 《= 0 ) {
newPos.x = atof( indexX + 1);
newPos.y = actuatorPos.y;
}
else if ( indexX 《= 0 ) {
newPos.y = atof( indexY + 1);
newPos.x = actuatorPos.x;
}
else {
newPos.y = atof( indexY + 1);
indexY = ‘’;
newPos.x = atof( indexX + 1);
}
drawLine(newPos.x, newPos.y );
// Serial.println(“ok”);
actuatorPos.x = newPos.x;
actuatorPos.y = newPos.y;
break;
}
break;
case ‘M’:
buffer[0] = line[ currentIndex++ ]; // /! Dirty - Only works with 3 digit commands
buffer[1] = line[ currentIndex++ ];
buffer[2] = line[ currentIndex++ ];
buffer[3] = ‘’;
switch ( atoi( buffer ) ){
case 300:
{
char* indexS = strchr( line+currentIndex, ‘S’ );
float Spos = atof( indexS + 1);
// Serial.println(“ok”);
if (Spos == 30) {
penDown();
}
if (Spos == 50) {
penUp();
}
break;
}
case 114: // M114 - Repport position
Serial.print( “Absolute position : X = ” );
Serial.print( actuatorPos.x );
Serial.print( “ - Y = ” );
Serial.println( actuatorPos.y );
break;
default:
Serial.print( “Command not recognized : M”);
Serial.println( buffer );
}
}
}
}
void drawLine(float x1, float y1) {
if (verbose)
{
Serial.print(“fx1, fy1: ”);
Serial.print(x1);
Serial.print(“,”);
Serial.print(y1);
Serial.println(“”);
}
if (x1 》= Xmax) {
x1 = Xmax;
}
if (x1 《= Xmin) {
x1 = Xmin;
}
if (y1 》= Ymax) {
y1 = Ymax;
}
if (y1 《= Ymin) {
y1 = Ymin;
}
if (verbose)
{
Serial.print(“Xpos, Ypos: ”);
Serial.print(Xpos);
Serial.print(“,”);
Serial.print(Ypos);
Serial.println(“”);
}
if (verbose)
{
Serial.print(“x1, y1: ”);
Serial.print(x1);
Serial.print(“,”);
Serial.print(y1);
Serial.println(“”);
}
// Convert coordinates to steps
x1 = (int)(x1*StepsPerMillimeterX);
y1 = (int)(y1*StepsPerMillimeterY);
float x0 = Xpos;
float y0 = Ypos;
// Let‘s find out the change for the coordinates
long dx = abs(x1-x0);
long dy = abs(y1-y0);
int sx = x0
long i;
long over = 0;
if (dx 》 dy) {
for (i=0; i=dx) {
over-=dx;
myStepperY.step(sy);
}
delay(StepDelay);
}
}
else {
for (i=0; i=dy) {
over-=dy;
myStepperX.step(sx);
}
delay(StepDelay);
}
}
if (verbose)
{
Serial.print(“dx, dy:”);
Serial.print(dx);
Serial.print(“,”);
Serial.print(dy);
Serial.println(“”);
}
if (verbose)
{
Serial.print(“Going to (”);
Serial.print(x0);
Serial.print(“,”);
Serial.print(y0);
Serial.println(“)”);
}
delay(LineDelay);
Xpos = x1;
Ypos = y1;
}
void penUp() {
penServo.write(penZUp);
delay(LineDelay);
Zpos=Zmax;
if (verbose) {
Serial.println(“Pen up!”);
}
}
void penDown() {
penServo.write(penZDown);
delay(LineDelay);
Zpos=Zmin;
if (verbose) {
Serial.println(“Pen down.”);
}
}
第6步:下载处理软件
首先从It’s网站下载处理软件。
复制将以下代码粘贴到处理软件中。
然后运行程序。您会看到新对话框打开。现在将arduino nano连接到台式机。
按P按钮选择您的arduino nano板可用的端口。
然后按G按钮上传测试Gerber文件。
import java.awt.event.KeyEvent;
import javax.swing.JOptionPane;
import processing.serial.*;
Serial port = null;
// select and modify the appropriate line for your operating system
// leave as null to use interactive port (press ‘p’ in the program)
String portname = null;
//String portname = Serial.list()[0]; // Mac OS X
//String portname = “/dev/ttyUSB0”; // Linux
//String portname = “COM6”; // Windows
boolean streaming = false;
float speed = 0.001;
String[] gcode;
int i = 0;
void openSerialPort()
{
if (portname == null) return;
if (port != null) port.stop();
port = new Serial(this, portname, 9600);
port.bufferUntil(‘ ’);
}
void selectSerialPort()
{
String result = (String) JOptionPane.showInputDialog(frame,
“Select the serial port that corresponds to your Arduino board.”,
“Select serial port”,
JOptionPane.QUESTION_MESSAGE,
null,
Serial.list(),
0);
if (result != null) {
portname = result;
openSerialPort();
}
}
void setup()
{
size(600, 400);
openSerialPort();
}
void draw()
{
background(155);
fill(0);
int y = 24, dy = 12;
text(“INSTRUCTIONS”, 12, y); y += dy;
text(“p: select serial port”, 12, y); y += dy;
text(“1: set speed to 0.001 inches (1 mil) per jog”, 12, y); y += dy;
text(“2: set speed to 0.010 inches (10 mil) per jog”, 12, y); y += dy;
text(“3: set speed to 0.100 inches (100 mil) per jog”, 12, y); y += dy;
text(“arrow keys: jog in x-y plane”, 12, y); y += dy;
text(“page up & page down: jog in z axis”, 12, y); y += dy;
text(“$: display grbl settings”, 12, y); y+= dy;
text(“h: go home”, 12, y); y += dy;
text(“0: zero machine (set home to the current location)”, 12, y); y += dy;
text(“g: stream a g-code file”, 12, y); y += dy;
text(“x: stop streaming g-code (this is NOT immediate)”, 12, y); y += dy;
y = height - dy;
text(“current jog speed: ” + speed + “ inches per step”, 12, y); y -= dy;
text(“current serial port: ” + portname, 12, y); y -= dy;
}
void keyPressed()
{
if (key == ‘1’) speed = 0.001;
if (key == ‘2’) speed = 0.01;
if (key == ‘3’) speed = 0.1;
if (!streaming) {
if (keyCode == LEFT) port.write(“G91 G20 G00 X-” + speed + “ Y0.000 Z0.000 ”);
if (keyCode == RIGHT) port.write(“G91 G20 G00 X” + speed + “ Y0.000 Z0.000 ”);
if (keyCode == UP) port.write(“G91 G20 G00 X0.000 Y” + speed + “ Z0.000 ”);
if (keyCode == DOWN) port.write(“G91 G20 G00 X0.000 Y-” + speed + “ Z0.000 ”);
if (keyCode == KeyEvent.VK_PAGE_UP) port.write(“G91 G20 G00 X0.000 Y0.000 Z” + speed + “ ”);
if (keyCode == KeyEvent.VK_PAGE_DOWN) port.write(“G91 G20 G00 X0.000 Y0.000 Z-” + speed + “ ”);
if (key == ‘h’) port.write(“G90 G20 G00 X0.000 Y0.000 Z0.000 ”);
if (key == ‘v’) port.write(“$0=75 $1=74 $2=75 ”);
//if (key == ‘v’) port.write(“$0=100 $1=74 $2=75 ”);
if (key == ‘s’) port.write(“$3=10 ”);
if (key == ‘e’) port.write(“$16=1 ”);
if (key == ‘d’) port.write(“$16=0 ”);
if (key == ‘0’) openSerialPort();
if (key == ‘p’) selectSerialPort();
if (key == ‘) port.write(“$ ”);
}
if (!streaming && key == ’g‘) {
gcode = null; i = 0;
File file = null;
println(“Loading file.。.”);
selectInput(“Select a file to process:”, “fileSelected”, file);
}
if (key == ’x‘) streaming = false;
}
void fileSelected(File selection) {
if (selection == null) {
println(“Window was closed or the user hit cancel.”);
} else {
println(“User selected ” + selection.getAbsolutePath());
gcode = loadStrings(selection.getAbsolutePath());
if (gcode == null) return;
streaming = true;
stream();
}
}
void stream()
{
if (!streaming) return;
while (true) {
if (i == gcode.length) {
streaming = false;
return;
}
if (gcode[i].trim().length() == 0) i++;
else break;
}
println(gcode[i]);
port.write(gcode[i] + ’ ‘);
i++;
}
void serialEvent(Serial p)
{
String s = p.readStringUntil(’ ‘);
println(s.trim());
if (s.trim().startsWith(“ok”)) stream();
if (s.trim().startsWith(“error”)) stream(); // XXX: really?
}
步骤7:将Gerber文件上传到Arduino开发板
按下G按钮后,您可以将Gerber文件上传到开发板上。而已。现在您的CNC机床将完成其工作。
步骤8:CNC机床
就是这样。这是CNC机床的最终结果。
-
TMC2160电机驱动器2020-08-31 0
-
Arduino UNO+TB6600驱动器控制步进电机的正反转2021-06-28 0
-
Arduino CNC电机扩展板详解2021-06-29 0
-
arduino如何驱动步进电机2021-07-08 0
-
如何使用TB6600微步进驱动器和Arduino控制步进电机2021-07-08 0
-
如何利用Arduino+TB6600驱动模块控制减速步进电机2021-08-31 0
-
如何使用Arduino和步进电机制作3D打印装饰时钟2022-06-29 0
-
七特步进电机驱动器型号2018-11-21 1549
-
arduino+A4889+步进电机2021-11-22 789
-
Arduino半步步进电机驱动器L298N2022-12-09 472
-
基于Arduino的迷你CNC 2D绘图仪2022-12-20 270
-
Arduino CNC电机扩展板详解(A4988驱动42步进电机)2023-03-20 425
-
步进电机与Arduino使用教程2023-03-23 188
-
使用电位器和Arduino实现步进电机控制2023-03-24 273
-
步进电机用什么控制 如何选择步进电机驱动器2023-09-14 1009
全部0条评论

快来发表一下你的评论吧 !
