

PyPortall图像查看器的使用
电子说
描述
概述
在PyPortal显示器上关注Adafruit的最新新功能!
此PyPortal图像查看器项目使用CircuitPython和ESP32 WiFi协处理器来获取最新图像,名称以及Adafruit的New New最新产品的简短URL,因此您将始终了解商店中最新,最酷的商品。
零件
AdaBox011-PyPortal
产品ID:4061
借助PyPortal,您可以走到办公桌外-到达星星和更远的地方!该ADABOX具有易于使用的新型IoT设备,可让您自定义和创建。..
缺货
缺货
或在下面获取单独的零件:
Adafruit PyPortal-由CircuitPython支持的Internet显示
产品ID:4116
PyPortal,使用物联网设备,使您可以在几分钟之内为“物联网”创建所有事物。制作自定义触摸屏界面。..
$ 54.95
进货
添加到购物车
Adafruit PyPortal桌面支架外壳套件
产品ID:4146
PyPortal是我们易于使用的IoT设备,可让您在数分钟内为“物联网”创建所有东西。创建小口袋。..
$ 9.95
进货
添加到购物车
粉红色和紫色编织USB A到Micro B电缆-2一米长
产品ID:4148
该电缆具有粉红色和紫色编织的类似Blinka的图案,非常时尚!首先让我们谈一下覆盖层和包覆成型。我们将这些颜色制成自定义颜色,。..
$ 3.95
入库存
添加到购物车
安装CircuitPython
CircuitPython是MicroPython的派生版,旨在简化低成本微控制器上的实验和教学。它不需要任何前期桌面软件下载,因此比以往任何时候都更容易获得原型。只需复制并编辑 CIRCUITPY “闪存”驱动器上的文件即可进行迭代。
以下说明将向您展示如何安装CircuitPython。如果您已经安装了CircuitPython,但希望对其进行更新或重新安装,则同样的步骤也适用!
设置CircuitPython快速入门!
请遵循以下快速逐步操作以获取超快速的Python功能:)
通过CircuitPython.org为该板下载最新版本的CircuitPython
点击上面的链接,为PyPortal下载最新版本的CircuitPython。
下载并将其保存到您的桌面(或方便的任何地方)。
使用已知良好的USB电缆将PyPortal插入计算机。
A很多人最终使用仅可充电的USB电缆,这非常令人沮丧!因此,请确保您拥有知道对数据同步有用的USB电缆。
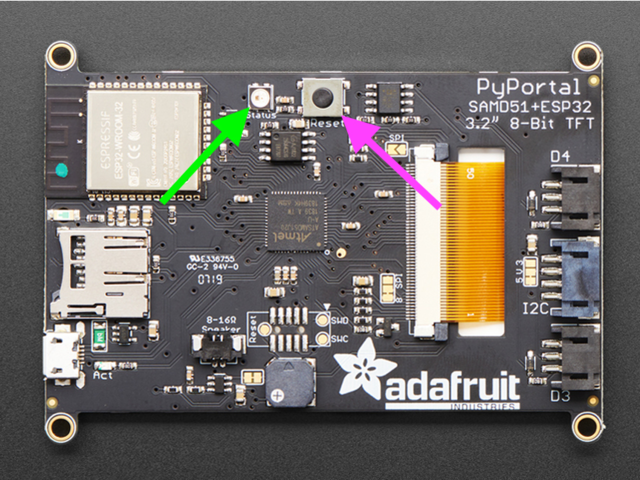
双击中间顶部顶部的重置按钮(洋红色箭头)在板上,您将看到NeoPixel RGB LED(绿色箭头)变为绿色。如果它变成红色,请检查USB电缆,尝试使用另一个USB端口,等等。注意:USB接口旁边的红色小LED指示灯将呈红色闪烁。没关系!
如果第一次双击不起作用,请重试。有时可能需要一些尝试才能使节奏正确!
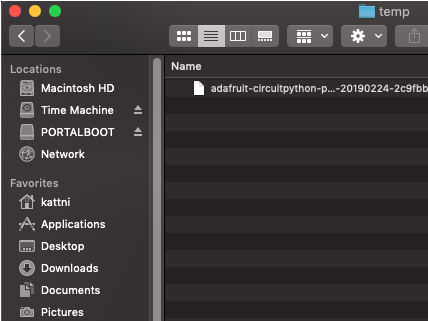
您将看到一个名为 PORTALBOOT 。
将 adafruit-circuitpython-pyportal- .uf2 文件拖到 PORTALBOOT。
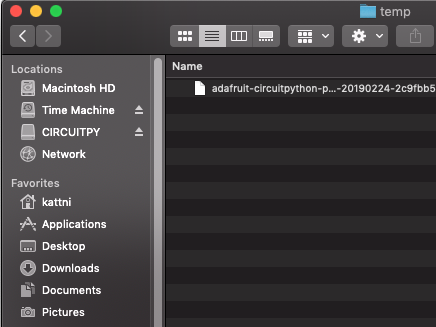
LED将闪烁。然后, PORTALBOOT 驱动器将消失,并且将出现一个名为 CIRCUITPY 的新磁盘驱动器。
如果未在板上添加任何代码,唯一存在的文件是 boot_out.txt 。这是绝对正常的!是时候添加您的 code.py 并开始使用它了!
就这样,您完成了! :)
PyPortal默认文件
单击下面的按钮,下载PyPortal附带的文件的zip。
PyPortal默认文件
PyPortal CircuitPython设置
要在CircuitPython中使用PyPortal的所有出色功能,必须首先安装许多库。本页涵盖了该过程。
Adafruit CircuitPython捆绑包
下载Adafruit CircuitPython库捆绑包。您可以在此处找到最新版本:
最新的Adafruit CircuitPython库包
下载 adafruit-circuitpython-bundle-4。 x-mpy-*。zip 捆绑zip文件,然后解压缩同名文件夹。在内部,您会找到一个 lib 文件夹。您有两个选择:
您可以将 lib 文件夹添加到您的 CIRCUITPY 驱动器中。这将确保您拥有所有驱动程序。但是这将占用8 MB磁盘上的一堆空间
根据需要添加每个库,这将减少空间使用量,但您需要
至少,我们推荐以下库,实际上我们比推荐的要多。基本上是必需的。因此,立即抓住它们并将它们安装到 CIRCUITPY/lib !
adafruit_esp32spi -这是一个库,可通过ESP32进行互联网访问使用(您猜对了!)SPI传输。 Internet所需的任何东西都需要使用它
adafruit_requests -该库使我们能够执行HTTP请求并从服务器获取响应。 GET/POST/PUT/PATCH-它们都在这里!
adafruit_pyportal -这是我们友好的包装器库,可处理很多项目,显示图形和文本,从互联网上获取数据。
adafruit_touchscreen -一个用于从电阻式触摸屏读取触摸的库。
adafruit_cursorcontrol -用于读取PyGamer和PyBadge游戏杆和按钮的库。为您处理所有图形,按钮阅读和操纵杆移动。
adafruit_io -该库有助于将PyPortal连接到我们的免费数据记录和查看服务
adafruit_imageload -任何图形所需的图像显示助手!
adafruit_display_text -毫不奇怪,它在屏幕上显示文本
adafruit_bitmap_font -我们拥有精美的字体支持,并且易于制作新字体。该库读取并解析字体文件。
adafruit_slideshow -用于制作图像幻灯片-方便快速显示图形和声音
neopixel -用于控制板载新像素
adafruit_adt7410 -用于从板载Analog Devices ADT7410精密温度传感器读取温度的库
adafruit_sdcard -支持从板载SD卡插槽中读取/写入数据。
adafruit_bus_device -对I2C/SPI的低级支持
Internet连接!
一旦您安装了CircuitPython安装程序和库,我们就可以将您的电路板连接到Internet。请注意,目前不支持访问企业级安全的WiFi网络,仅支持需要SSID和密码的WiFi网络。
要建立连接,您需要先创建一个秘密文件。
什么是机密文件?
我们希望人们在构建CircuitPython WiFi小部件时共享大量项目。我们要避免的是人们不小心共享了他们的密码或秘密令牌和API密钥。因此,我们设计了所有示例,以使用 CIRCUITPY 驱动器中的secrets.py文件来保存秘密/私有/自定义数据。这样,您就可以共享您的主项目,而不必担心意外共享私有内容。
您的 secrets.py 文件应如下所示:
下载:文件
复制代码
# This file is where you keep secret settings, passwords, and tokens!
# If you put them in the code you risk committing that info or sharing it
secrets = {
‘ssid’ : ‘home ssid’,
‘password’ : ‘my password’,
‘timezone’ : “America/New_York”, # http://worldtimeapi.org/timezones
‘github_token’ : ‘fawfj23rakjnfawiefa’,
‘hackaday_token’ : ‘h4xx0rs3kret’,
}
Inside是一个名为secrets的python字典,每个条目都有一行。每个条目都有一个条目名称(例如‘ssid’),然后是一个冒号以将其与条目键‘home ssid’分开,最后是一个逗号,
至少您需要ssid和password用于您的本地WiFi设置。在创建项目时,您可能需要更多的令牌和密钥,只需一次添加一行即可。例如,请参见其他令牌,例如用于访问github或hackaday API的令牌。其他非机密数据(例如您的时区)也可以在此处,仅因为其称为机密的信息并不意味着您不能在其中包含常规的自定义数据!
有关正确的时区字符串,请查看http://worldtimeapi.org/timezones,请记住,如果未列出您的城市,请在同一时区中查找城市,例如,波士顿,纽约,费城,华盛顿特区和迈阿密都与纽约位于同一时间。
当然,不要共享您的 secrets.py -将其保存在GitHub,Discord或其他项目共享站点之外。
连接到WiFi
好,现在您已设置好机密-您可以连接到Internet。让我们使用ESP32SPI和Requests库-您需要访问CircuitPython捆绑包并安装:
adafruit_bus_device
adafruit_esp32spi
adafruit_requests
neopixel
进入您的lib文件夹。完成后,使用Mu或您喜欢的编辑器加载以下示例:
下载:项目邮编或 esp32spi_simpletest.py | 在Github上查看
复制代码
import board
import busio
from digitalio import DigitalInOut
import adafruit_esp32spi.adafruit_esp32spi_socket as socket
from adafruit_esp32spi import adafruit_esp32spi
import adafruit_requests as requests
print(“ESP32 SPI webclient test”)
TEXT_URL = “http://wifitest.adafruit.com/testwifi/index.html”
JSON_URL = “http://api.coindesk.com/v1/bpi/currentprice/USD.json”
# If you are using a board with pre-defined ESP32 Pins:
esp32_cs = DigitalInOut(board.ESP_CS)
esp32_ready = DigitalInOut(board.ESP_BUSY)
esp32_reset = DigitalInOut(board.ESP_RESET)
# If you have an externally connected ESP32:
# esp32_cs = DigitalInOut(board.D9)
# esp32_ready = DigitalInOut(board.D10)
# esp32_reset = DigitalInOut(board.D5)
spi = busio.SPI(board.SCK, board.MOSI, board.MISO)
esp = adafruit_esp32spi.ESP_SPIcontrol(spi, esp32_cs, esp32_ready, esp32_reset)
requests.set_socket(socket, esp)
if esp.status == adafruit_esp32spi.WL_IDLE_STATUS:
print(“ESP32 found and in idle mode”)
print(“Firmware vers.”, esp.firmware_version)
print(“MAC addr:”, [hex(i) for i in esp.MAC_address])
for ap in esp.scan_networks():
print(“ %s RSSI: %d” % (str(ap[‘ssid’], ‘utf-8’), ap[‘rssi’]))
print(“Connecting to AP.。.”)
while not esp.is_connected:
try:
esp.connect_AP(b‘MY_SSID_NAME’, b‘MY_SSID_PASSWORD’)
except RuntimeError as e:
print(“could not connect to AP, retrying: ”,e)
continue
print(“Connected to”, str(esp.ssid, ‘utf-8’), “ RSSI:”, esp.rssi)
print(“My IP address is”, esp.pretty_ip(esp.ip_address))
print(“IP lookup adafruit.com: %s” % esp.pretty_ip(esp.get_host_by_name(“adafruit.com”)))
print(“Ping google.com: %d ms” % esp.ping(“google.com”))
#esp._debug = True
print(“Fetching text from”, TEXT_URL)
r = requests.get(TEXT_URL)
print(‘-’*40)
print(r.text)
print(‘-’*40)
r.close()
print()
print(“Fetching json from”, JSON_URL)
r = requests.get(JSON_URL)
print(‘-’*40)
print(r.json())
print(‘-’*40)
r.close()
print(“Done!”)
,并将其保存到您的板上,名称为code.py。
第一个连接示例不使用机密文件-您将首先输入SSID/密码来验证连接性!
然后转到此行
esp.connect_AP(b‘MY_SSID_NAME’, b‘MY_SSID_PASSWORD’)
并更改MY_SSID_NAME和 MY_SSID_PASSWORD 设置为您的访问点名称和密码,并将其保留在‘’引号内。 (此示例不使用机密文件,但它也非常独立,因此,如果其他事情似乎不起作用,则可以始终重新加载该文件。您应该获得如下内容:
示例代码。..
使用SPI端口和3个控制引脚通过SPI初始化ESP32:
下载:文件
复制代码
esp32_cs = DigitalInOut(board.ESP_CS)
esp32_ready = DigitalInOut(board.ESP_BUSY)
esp32_reset = DigitalInOut(board.ESP_RESET)
spi = busio.SPI(board.SCK, board.MOSI, board.MISO)
esp = adafruit_esp32spi.ESP_SPIcontrol(spi, esp32_cs, esp32_ready, esp32_reset) esp32_cs = DigitalInOut(board.ESP_CS)
esp32_ready = DigitalInOut(board.ESP_BUSY)
esp32_reset = DigitalInOut(board.ESP_RESET)
spi = busio.SPI(board.SCK, board.MOSI, board.MISO)
esp = adafruit_esp32spi.ESP_SPIcontrol(spi, esp32_cs, esp32_ready, esp32_reset)
告诉我们的requests库我们正在使用的套接字的类型(套接字类型随连接类型而变化-在此示例中,我们将使用adafruit_esp32spi_socket)。还将接口设置为
下载:文件
复制代码
esp requests
验证找到ESP32,检查固件和MAC地址
下载:文件
复制代码
requests.set_socket(socket, esp) requests.set_socket(socket, esp)
扫描它可以看到的所有访问点,并打印出名称和信号强度:
下载:文件
复制代码
if esp.status == adafruit_esp32spi.WL_IDLE_STATUS:
print(“ESP32 found and in idle mode”)
print(“Firmware vers.”, esp.firmware_version)
print(“MAC addr:”, [hex(i) for i in esp.MAC_address]) if esp.status == adafruit_esp32spi.WL_IDLE_STATUS:
print(“ESP32 found and in idle mode”)
print(“Firmware vers.”, esp.firmware_version)
print(“MAC addr:”, [hex(i) for i in esp.MAC_address])
连接到我们在此处定义的AP,然后打印出来本地IP地址,尝试进行域名查找并ping google.com以检查网络连接(请注意,有时ping失败或需要一段时间,这没什么大不了的)
下载:文件
复制代码
for ap in esp.scan_networks():
print(“ %s RSSI: %d” % (str(ap[‘ssid’], ‘utf-8’), ap[‘rssi’])) for ap in esp.scan_networks():
print(“ %s RSSI: %d” % (str(ap[‘ssid’], ‘utf-8’), ap[‘rssi’]))
好的,现在我们进入真正有趣的部分。使用SAMD51或其他大容量RAM(超过32 KB)设备,我们可以做很多巧妙的事情。例如,我们可以像请求一样实现一个接口,这使得获取数据非常简单
从Web URL调用 print(“Connecting to AP.。.”)
esp.connect_AP(b‘MY_SSID_NAME’, b‘MY_SSID_PASSWORD’)
print(“Connected to”, str(esp.ssid, ‘utf-8’), “ RSSI:”, esp.rssi)
print(“My IP address is”, esp.pretty_ip(esp.ip_address))
print(“IP lookup adafruit.com: %s” % esp.pretty_ip(esp.get_host_by_name(“adafruit.com”)))
print(“Ping google.com: %d ms” % esp.ping(“google.com”))
中读取所有文本-您可以传入 print(“Connecting to AP.。.”)
esp.connect_AP(b‘MY_SSID_NAME’, b‘MY_SSID_PASSWORD’)
print(“Connected to”, str(esp.ssid, ‘utf-8’), “ RSSI:”, esp.rssi)
print(“My IP address is”, esp.pretty_ip(esp.ip_address))
print(“IP lookup adafruit.com: %s” % esp.pretty_ip(esp.get_host_by_name(“adafruit.com”)))
print(“Ping google.com: %d ms” % esp.ping(“google.com”))
用于SSL连接的URL
下载:文件
复制代码
requests.get https
或者,如果数据使用结构化JSON,则可以获取json pre -解析为可以轻松查询或遍历的Python字典。 (同样,仅适用于nRF52840,M4和其他高RAM板)
下载:文件
复制代码
TEXT_URL = “http://wifitest.adafruit.com/testwifi/index.html”
print(“Fetching text from”, TEXT_URL)
r = requests.get(TEXT_URL)
print(‘-’*40)
print(r.text)
print(‘-’*40)
r.close() TEXT_URL = “http://wifitest.adafruit.com/testwifi/index.html”
print(“Fetching text from”, TEXT_URL)
r = requests.get(TEXT_URL)
print(‘-’*40)
print(r.text)
print(‘-’*40)
r.close()
Requests
我们已经为Web接口编写了一个类似请求的库,名为Adafruit_CircuitPython_Requests。该库允许您发送HTTP/1.1请求,而无需“设计”它们,并提供了有用的方法来解析服务器的响应。
下载:Project Zip 或 requests_simpletest.py | 在Github上查看
复制代码
JSON_URL = “http://api.coindesk.com/v1/bpi/currentprice/USD.json”
print(“Fetching json from”, JSON_URL)
r = requests.get(JSON_URL)
print(‘-’*40)
print(r.json())
print(‘-’*40)
r.close() JSON_URL = “http://api.coindesk.com/v1/bpi/currentprice/USD.json”
print(“Fetching json from”, JSON_URL)
r = requests.get(JSON_URL)
print(‘-’*40)
print(r.json())
print(‘-’*40)
r.close()
代码首先设置ESP32SPI接口。然后,它使用ESP32 # adafruit_requests usage with an esp32spi_socket
import board
import busio
from digitalio import DigitalInOut
import adafruit_esp32spi.adafruit_esp32spi_socket as socket
from adafruit_esp32spi import adafruit_esp32spi
import adafruit_requests as requests
# If you are using a board with pre-defined ESP32 Pins:
esp32_cs = DigitalInOut(board.ESP_CS)
esp32_ready = DigitalInOut(board.ESP_BUSY)
esp32_reset = DigitalInOut(board.ESP_RESET)
# If you have an externally connected ESP32:
# esp32_cs = DigitalInOut(board.D9)
# esp32_ready = DigitalInOut(board.D10)
# esp32_reset = DigitalInOut(board.D5)
spi = busio.SPI(board.SCK, board.MOSI, board.MISO)
esp = adafruit_esp32spi.ESP_SPIcontrol(spi, esp32_cs, esp32_ready, esp32_reset)
print(“Connecting to AP.。.”)
while not esp.is_connected:
try:
esp.connect_AP(b‘MY_SSID_NAME’, b‘MY_SSID_PASSWORD’)
except RuntimeError as e:
print(“could not connect to AP, retrying: ”,e)
continue
print(“Connected to”, str(esp.ssid, ‘utf-8’), “ RSSI:”, esp.rssi)
# Initialize a requests object with a socket and esp32spi interface
requests.set_socket(socket, esp)
TEXT_URL = “http://wifitest.adafruit.com/testwifi/index.html”
JSON_GET_URL = “http://httpbin.org/get”
JSON_POST_URL = “http://httpbin.org/post”
print(“Fetching text from %s”%TEXT_URL)
response = requests.get(TEXT_URL)
print(‘-’*40)
print(“Text Response: ”, response.text)
print(‘-’*40)
response.close()
print(“Fetching JSON data from %s”%JSON_GET_URL)
response = requests.get(JSON_GET_URL)
print(‘-’*40)
print(“JSON Response: ”, response.json())
print(‘-’*40)
response.close()
data = ‘31F’
print(“POSTing data to {0}: {1}”.format(JSON_POST_URL, data))
response = requests.post(JSON_POST_URL, data=data)
print(‘-’*40)
json_resp = response.json()
# Parse out the ‘data’ key from json_resp dict.
print(“Data received from server:”, json_resp[‘data’])
print(‘-’*40)
response.close()
json_data = {“Date” : “July 25, 2019”}
print(“POSTing data to {0}: {1}”.format(JSON_POST_URL, json_data))
response = requests.post(JSON_POST_URL, json=json_data)
print(‘-’*40)
json_resp = response.json()
# Parse out the ‘json’ key from json_resp dict.
print(“JSON Data received from server:”, json_resp[‘json’])
print(‘-’*40)
response.close()
和# adafruit_requests usage with an esp32spi_socket
import board
import busio
from digitalio import DigitalInOut
import adafruit_esp32spi.adafruit_esp32spi_socket as socket
from adafruit_esp32spi import adafruit_esp32spi
import adafruit_requests as requests
# If you are using a board with pre-defined ESP32 Pins:
esp32_cs = DigitalInOut(board.ESP_CS)
esp32_ready = DigitalInOut(board.ESP_BUSY)
esp32_reset = DigitalInOut(board.ESP_RESET)
# If you have an externally connected ESP32:
# esp32_cs = DigitalInOut(board.D9)
# esp32_ready = DigitalInOut(board.D10)
# esp32_reset = DigitalInOut(board.D5)
spi = busio.SPI(board.SCK, board.MOSI, board.MISO)
esp = adafruit_esp32spi.ESP_SPIcontrol(spi, esp32_cs, esp32_ready, esp32_reset)
print(“Connecting to AP.。.”)
while not esp.is_connected:
try:
esp.connect_AP(b‘MY_SSID_NAME’, b‘MY_SSID_PASSWORD’)
except RuntimeError as e:
print(“could not connect to AP, retrying: ”,e)
continue
print(“Connected to”, str(esp.ssid, ‘utf-8’), “ RSSI:”, esp.rssi)
# Initialize a requests object with a socket and esp32spi interface
requests.set_socket(socket, esp)
TEXT_URL = “http://wifitest.adafruit.com/testwifi/index.html”
JSON_GET_URL = “http://httpbin.org/get”
JSON_POST_URL = “http://httpbin.org/post”
print(“Fetching text from %s”%TEXT_URL)
response = requests.get(TEXT_URL)
print(‘-’*40)
print(“Text Response: ”, response.text)
print(‘-’*40)
response.close()
print(“Fetching JSON data from %s”%JSON_GET_URL)
response = requests.get(JSON_GET_URL)
print(‘-’*40)
print(“JSON Response: ”, response.json())
print(‘-’*40)
response.close()
data = ‘31F’
print(“POSTing data to {0}: {1}”.format(JSON_POST_URL, data))
response = requests.post(JSON_POST_URL, data=data)
print(‘-’*40)
json_resp = response.json()
# Parse out the ‘data’ key from json_resp dict.
print(“Data received from server:”, json_resp[‘data’])
print(‘-’*40)
response.close()
json_data = {“Date” : “July 25, 2019”}
print(“POSTing data to {0}: {1}”.format(JSON_POST_URL, json_data))
response = requests.post(JSON_POST_URL, json=json_data)
print(‘-’*40)
json_resp = response.json()
# Parse out the ‘json’ key from json_resp dict.
print(“JSON Data received from server:”, json_resp[‘json’])
print(‘-’*40)
response.close()
对象初始化request对象。
下载:文件
复制代码
socket esp
带有请求的HTTP GET
代码向Adafruit的WiFi测试网站-http:/发出HTTP GET请求/wifitest.adafruit.com/testwifi/index.html。
为此,我们会将URL传递到import board
import busio
from digitalio import DigitalInOut
import adafruit_esp32spi.adafruit_esp32spi_socket as socket
from adafruit_esp32spi import adafruit_esp32spi
import adafruit_requests as requests
# If you are using a board with pre-defined ESP32 Pins:
esp32_cs = DigitalInOut(board.ESP_CS)
esp32_ready = DigitalInOut(board.ESP_BUSY)
esp32_reset = DigitalInOut(board.ESP_RESET)
# If you have an externally connected ESP32:
# esp32_cs = DigitalInOut(board.D9)
# esp32_ready = DigitalInOut(board.D10)
# esp32_reset = DigitalInOut(board.D5)
spi = busio.SPI(board.SCK, board.MOSI, board.MISO)
esp = adafruit_esp32spi.ESP_SPIcontrol(spi, esp32_cs, esp32_ready, esp32_reset)
print(“Connecting to AP.。.”)
while not esp.is_connected:
try:
esp.connect_AP(b‘MY_SSID_NAME’, b‘MY_SSID_PASSWORD’)
except RuntimeError as e:
print(“could not connect to AP, retrying: ”,e)
continue
print(“Connected to”, str(esp.ssid, ‘utf-8’), “ RSSI:”, esp.rssi)
# Initialize a requests object with a socket and esp32spi interface
requests.set_socket(socket, esp)。我们还将将来自服务器的响应保存到名为import board
import busio
from digitalio import DigitalInOut
import adafruit_esp32spi.adafruit_esp32spi_socket as socket
from adafruit_esp32spi import adafruit_esp32spi
import adafruit_requests as requests
# If you are using a board with pre-defined ESP32 Pins:
esp32_cs = DigitalInOut(board.ESP_CS)
esp32_ready = DigitalInOut(board.ESP_BUSY)
esp32_reset = DigitalInOut(board.ESP_RESET)
# If you have an externally connected ESP32:
# esp32_cs = DigitalInOut(board.D9)
# esp32_ready = DigitalInOut(board.D10)
# esp32_reset = DigitalInOut(board.D5)
spi = busio.SPI(board.SCK, board.MOSI, board.MISO)
esp = adafruit_esp32spi.ESP_SPIcontrol(spi, esp32_cs, esp32_ready, esp32_reset)
print(“Connecting to AP.。.”)
while not esp.is_connected:
try:
esp.connect_AP(b‘MY_SSID_NAME’, b‘MY_SSID_PASSWORD’)
except RuntimeError as e:
print(“could not connect to AP, retrying: ”,e)
continue
print(“Connected to”, str(esp.ssid, ‘utf-8’), “ RSSI:”, esp.rssi)
# Initialize a requests object with a socket and esp32spi interface
requests.set_socket(socket, esp)的变量。
尽管我们从服务器请求数据,但我们还是希望服务器回应。由于我们已经保存了服务器的requests.get(),因此可以将其读回。对我们来说幸运的是,请求将服务器的响应自动解码为人类可读的文本,您可以通过调用response将其读回。
最后,我们将执行一些操作通过调用response进行清理。这样会关闭,删除和收集响应的数据。
下载:文件
复制代码
response.text response.close()
一些服务器使用文本响应,而某些服务器则使用由属性-值对组成的json格式的数据进行响应。/p》
CircuitPython_Requests可以将来自服务器的JSON格式的响应转换为CPython print(“Fetching text from %s”%TEXT_URL)
response = requests.get(TEXT_URL)
print(‘-’*40)
print(“Text Response: ”, response.text)
print(‘-’*40)
response.close()对象。
我们还可以获取和解析 json 数据。我们将发送HTTP Get到一个我们知道的URL,该URL返回一个json格式的响应(而不是文本数据)。
然后,代码调用print(“Fetching text from %s”%TEXT_URL)
response = requests.get(TEXT_URL)
print(‘-’*40)
print(“Text Response: ”, response.text)
print(‘-’*40)
response.close()将响应转换为一个CPython dict.。
下载:文件
复制代码
response.json() dict
带有请求的HTTP POST
请求还可以通过调用print(“Fetching JSON data from %s”%JSON_GET_URL)
response = requests.get(JSON_GET_URL)
print(‘-’*40)
print(“JSON Response: ”, response.json())
print(‘-’*40)
response.close()方法(向其传递一个print(“Fetching JSON data from %s”%JSON_GET_URL)
response = requests.get(JSON_GET_URL)
print(‘-’*40)
print(“JSON Response: ”, response.json())
print(‘-’*40)
response.close()值)将数据发布到服务器。
下载:文件
复制代码
requests.post data
您还可以通过将data = ‘31F’
print(“POSTing data to {0}: {1}”.format(JSON_POST_URL, data))
response = requests.post(JSON_POST_URL, data=data)
print(‘-’*40)
json_resp = response.json()
# Parse out the ‘data’ key from json_resp dict.
print(“Data received from server:”, json_resp[‘data’])
print(‘-’*40)
response.close()传递到data = ‘31F’
print(“POSTing data to {0}: {1}”.format(JSON_POST_URL, data))
response = requests.post(JSON_POST_URL, data=data)
print(‘-’*40)
json_resp = response.json()
# Parse out the ‘data’ key from json_resp dict.
print(“Data received from server:”, json_resp[‘data’])
print(‘-’*40)
response.close()方法中,将json格式的数据发布到服务器。
下载:文件
复制代码
json_data requests.post
高级请求使用情况
要发送自定义HTTP, aders,将响应解析为原始字节还是在CircuitPython代码中处理响应的http状态代码?
我们已经编写了一个示例来显示下面的请求模块的高级用法。
下载:项目Zip 或 requests_advanced.py | 在Github上查看
复制代码
json_data = {“Date” : “July 25, 2019”}
print(“POSTing data to {0}: {1}”.format(JSON_POST_URL, json_data))
response = requests.post(JSON_POST_URL, json=json_data)
print(‘-’*40)
json_resp = response.json()
# Parse out the ‘json’ key from json_resp dict.
print(“JSON Data received from server:”, json_resp[‘json’])
print(‘-’*40)
response.close()
WiFi Manager
这个最简单的示例可行,但有点挑剔-您需要不断检查WiFi状态,并具有许多循环来管理连接和断开连接。对于更高级的用途,我们建议使用WiFiManager对象。它将为您包装连接/状态/请求循环-如果WiFi掉线,则重新连接,如果ESP32进入不良状态,则重置ESP32,等等。
这是一个更高级的示例,其中显示了WiFi管理器以及如何使用一些额外的标题发布数据:
下载:Project Zip 或 esp32spi_aio_post.py | 在Github上查看
复制代码
import board
import busio
from digitalio import DigitalInOut
import adafruit_esp32spi.adafruit_esp32spi_socket as socket
from adafruit_esp32spi import adafruit_esp32spi
import adafruit_requests as requests
# If you are using a board with pre-defined ESP32 Pins:
esp32_cs = DigitalInOut(board.ESP_CS)
esp32_ready = DigitalInOut(board.ESP_BUSY)
esp32_reset = DigitalInOut(board.ESP_RESET)
# If you have an externally connected ESP32:
# esp32_cs = DigitalInOut(board.D9)
# esp32_ready = DigitalInOut(board.D10)
# esp32_reset = DigitalInOut(board.D5)
spi = busio.SPI(board.SCK, board.MOSI, board.MISO)
esp = adafruit_esp32spi.ESP_SPIcontrol(spi, esp32_cs, esp32_ready, esp32_reset)
print(“Connecting to AP.。.”)
while not esp.is_connected:
try:
esp.connect_AP(b‘MY_SSID_NAME’, b‘MY_SSID_PASSWORD’)
except RuntimeError as e:
print(“could not connect to AP, retrying: ”,e)
continue
print(“Connected to”, str(esp.ssid, ‘utf-8’), “ RSSI:”, esp.rssi)
# Initialize a requests object with a socket and esp32spi interface
requests.set_socket(socket, esp)
JSON_GET_URL = “http://httpbin.org/get”
# Define a custom header as a dict.
headers = {“user-agent” : “blinka/1.0.0”}
print(“Fetching JSON data from %s.。.”%JSON_GET_URL)
response = requests.get(JSON_GET_URL, headers=headers)
print(‘-’*60)
json_data = response.json()
headers = json_data[‘headers’]
print(“Response‘s Custom User-Agent Header: {0}”.format(headers[’User-Agent‘]))
print(’-‘*60)
# Read Response’s HTTP status code
print(“Response HTTP Status Code: ”, response.status_code)
print(‘-’*60)
# Read Response, as raw bytes instead of pretty text
print(“Raw Response: ”, response.content)
# Close, delete and collect the response data
response.close()
您会在这里注意到,我们使用secrets.py文件来管理我们的SSID信息。 wifimanager被赋予了ESP32对象,密码和一个用于指示状态的新像素。
请注意,您需要在密码文件中添加一些其他信息,以便代码可以查询Adafruit IO API:
import time
import board
import busio
from digitalio import DigitalInOut
import neopixel
from adafruit_esp32spi import adafruit_esp32spi
from adafruit_esp32spi import adafruit_esp32spi_wifimanager
print(“ESP32 SPI webclient test”)
# Get wifi details and more from a secrets.py file
try:
from secrets import secrets
except ImportError:
print(“WiFi secrets are kept in secrets.py, please add them there!”)
raise
# If you are using a board with pre-defined ESP32 Pins:
esp32_cs = DigitalInOut(board.ESP_CS)
esp32_ready = DigitalInOut(board.ESP_BUSY)
esp32_reset = DigitalInOut(board.ESP_RESET)
# If you have an externally connected ESP32:
# esp32_cs = DigitalInOut(board.D9)
# esp32_ready = DigitalInOut(board.D10)
# esp32_reset = DigitalInOut(board.D5)
spi = busio.SPI(board.SCK, board.MOSI, board.MISO)
esp = adafruit_esp32spi.ESP_SPIcontrol(spi, esp32_cs, esp32_ready, esp32_reset)
“”“Use below for Most Boards”“”
status_light = neopixel.NeoPixel(board.NEOPIXEL, 1, brightness=0.2) # Uncomment for Most Boards
“”“Uncomment below for ItsyBitsy M4”“”
# status_light = dotstar.DotStar(board.APA102_SCK, board.APA102_MOSI, 1, brightness=0.2)
# Uncomment below for an externally defined RGB LED
# import adafruit_rgbled
# from adafruit_esp32spi import PWMOut
# RED_LED = PWMOut.PWMOut(esp, 26)
# GREEN_LED = PWMOut.PWMOut(esp, 27)
# BLUE_LED = PWMOut.PWMOut(esp, 25)
# status_light = adafruit_rgbled.RGBLED(RED_LED, BLUE_LED, GREEN_LED)
wifi = adafruit_esp32spi_wifimanager.ESPSPI_WiFiManager(esp, secrets, status_light)
counter = 0
while True:
try:
print(“Posting data.。.”, end=‘’)
data = counter
feed = ‘test’
payload = {‘value’:data}
response = wifi.post(
“https://io.adafruit.com/api/v2/”+secrets[‘aio_username’]+“/feeds/”+feed+“/data”,
json=payload,
headers={“X-AIO-KEY”:secrets[‘aio_key’]})
print(response.json())
response.close()
counter = counter + 1
print(“OK”)
except (ValueError, RuntimeError) as e:
print(“Failed to get data, retrying ”, e)
wifi.reset()
continue
response = None
time.sleep(15)
您可以转到adafruit.io查看AIO密钥链接获取这两个值并将它们添加到secrets文件中,该文件现在看起来像这样:
下载:文件
复制代码
aio_username aio_key
下一步,设置一个名为Adafruit IO提要# This file is where you keep secret settings, passwords, and tokens!
# If you put them in the code you risk committing that info or sharing it
secrets = {
‘ssid’ : ‘_your_ssid_’,
‘password’ : ‘_your_wifi_password_’,
‘timezone’ : “America/Los_Angeles”, # http://worldtimeapi.org/timezones
‘aio_username’ : ‘_your_aio_username_’,
‘aio_key’ : ‘_your_aio_key_’,
}
如果您不知道如何设置供稿,请遵循此页面并在设置名为。
然后,我们可以有一个简单的循环,用于将数据发布到Adafruit IO,而无需处理连接或初始化硬件!
在Adafruit.io上查看您的测试数据,每次Cir时,您都会看到该值增加cuitPython板向其发布数据!
在CircuitPython中为新的新查看器编码
Adafruit产品API
与PyPortal上的大多数IoT项目一样,我们能够通过REST应用程序编程接口(API)请求的奇妙功能来进行动态数据和图像收集,该请求会返回一个JSON文件。
Adafruit产品API使我们可以轻松地请求有关产品的基本信息,包括其名称,产品URL和产品图片。
Adafruit IO图像转换器服务器
为了使用Adafruit图像转换器,此项目将要求您具有Adafruit IO用户名和密钥。 Adafruit IO是绝对免费的,但是您需要使用Adafruit帐户登录才能使用它。如果您还没有Adafruit登录名,请在此处创建一个登录名。
如果您以前从未使用过Adafruit IO,请查看本指南以获取更多信息。
登录到您的帐户后,您需要在 secrets.py 文件中放置以下两项信息: Adafruit IO用户名和 Adafruit IO键。前往io.adafruit.com,只需点击Adafruit IO页面左侧的查看AIO密钥链接即可获取此信息。
然后将它们添加到 secrets.py 文件,例如:
下载:文件
复制代码
secrets = {
‘ssid’ : ‘your_wifi_ssid’,
‘password : ’your_wifi_password‘,
’aio_username‘ : ’your_aio_username‘,
’aio_key‘ : ’your_big_huge_super_long_aio_key‘
} secrets = {
’ssid‘ : ’your_wifi_ssid‘,
’password : ‘your_wifi_password’,
‘aio_username’ : ‘your_aio_username’,
‘aio_key’ : ‘your_big_huge_super_long_aio_key’
}
此时,请确保您的WiFi SSID和密码也位于 secrets.py中。 。设置时只需执行一次。如果将PyPortal移到其他WiFi服务位置,请使用文本编辑器在此文件中输入新值。
添加CircuitPython代码和资产
在下面的嵌入式代码元素中,单击下载:Project Zip 链接,然后将.zip存档文件保存到您的计算机。
然后解压缩.zip文件,它将解压缩到名为 PyPortal_NewNewNew 的文件夹中。
将 PyPortal_NewNewNew 目录的内容复制到PyPortal的 CIRCUITPY 驱动器中,然后确保将 newnewnew.py 文件重命名为 code.py ,因此它将在PyPortal重新启动时自动运行。
编辑代码
您可以使用任何文本编辑器来编辑 code.py 文件你喜欢吗Adafruit建议安装免费的Mu Python编辑器,因为它超级方便,可以识别Adafruit板,并具有内置的串行监视器/REPL以与板交互。在此处找到有关Mu的更多信息。
启动.py
我们使用一个特殊文件来确保.bmp缓存正确写入闪存。这是您复制到驱动器的 unsafe_boot.py 文件。现在将其重命名为 boot.py 。然后,按PyPortal上的Reset(重置)按钮。
请注意,重新启动过程中会出现这种看上去恐怖的文本,请不要担心,它应该是这样说的!
****************警告******************
使用文件系统作为可写缓存!
这是冒险行为,请备份您的文件!
************** **警告******************
这是 CIRCUITPY 驱动器的最终内容看起来像:
下载:项目Zip 或 newnewnew.py | 在Github上查看
复制代码
import time
import board
import adafruit_pyportal
# We can cycle through the latest featured products
#PRODUCTS_TYPE = “featured”
#or we can view the latest new products
PRODUCTS_TYPE = “new”
# Set up where we‘ll be fetching data from
DATA_SOURCE = “https://www.adafruit.com/api/products?format=micro&”+PRODUCTS_TYPE+“=1&random=1”
# What data we’ll be viewing
IMAGE_LOCATION = [0, “image”]
NAME_LOCATION = [0, “name”]
URL_LOCATION = [0, “url”]
# determine the current working directory needed so we know where to find files
cwd = (“/”+__file__).rsplit(‘/’, 1)[0]
pyportal = adafruit_pyportal.PyPortal(url=DATA_SOURCE,
json_path=(NAME_LOCATION, URL_LOCATION),
status_neopixel=board.NEOPIXEL,
default_bg=cwd+“/new_background.bmp”,
text_font=cwd+“/fonts/Arial-Bold-12.bdf”,
text_position=((5, 35), (5, 225)),
text_color=(0xFFFFFF, 0xFFFFFF),
text_wrap=(35, 35), # characters to wrap
image_json_path=IMAGE_LOCATION,
image_resize=(320, 240),
image_position=(0, 0))
pyportal.preload_font()
while True:
response = None
try:
response = pyportal.fetch()
print(“Response is”, response)
except (IndexError, RuntimeError, ValueError) as e:
print(“Some error occured, retrying! -”, e)
time.sleep(60)
工作方式
“ New New New Product Viewer”的工作方式如下:首先,启动时,它会按照 secrets.py 文件中指定(并经过身份验证)的方式连接到您的Wifi接入点。
背景闪屏
下一步,它会显示 new_background.bmp 图片文件启动屏幕。这是 .bmp 格式的320x240像素RGB 16位光栅图形。
JSON
为了检索图像,我们将查询Adafruit产品API
发出服务器请求时,您将获得一个返回的JSON文件作为响应。
实际上,您可以运行与PyPortal相同的查询来看到结果。复制此链接https://www.adafruit.com/api/products?format=micro&NEW=1&random=1并将其粘贴到浏览器中。
在网络浏览器中输入该链接时,您会看到返回的结果是这样的(返回的产品是随机的,因此您可能会看到与此不同的文件):
下载:文件
复制代码
[
{
“id”: 3315,
“name”: “TFT FeatherWing - 2.4” 320x240 Touchscreen For All Feathers“,
”description“: ”A Feather board without ambition is a Feather board without FeatherWings! Spice up your Feather project with a beautiful 2.4“ touchscreen display shield with built in microSD card socket. This TFT display is 2.4” diagonal with a bright 4 white-LED backlight. You get 240x320 pixels with individual 16-bit color pixel control. It has way more resolution than a black and white 128x64 display. As a bonus, this display comes with a resistive touchscreen attached to it already, so you can detect f.。.“,
”url“: ”http://adafru.it/3315“,
”image“: ”https://cdn-shop.adafruit.com/640x480/3315-03.jpg“
}
] [
{
”id“: 3315,
”name“: ”TFT FeatherWing - 2.4“ 320x240 Touchscreen For All Feathers”,
“description”: “A Feather board without ambition is a Feather board without FeatherWings! Spice up your Feather project with a beautiful 2.4” touchscreen display shield with built in microSD card socket. This TFT display is 2.4“ diagonal with a bright 4 white-LED backlight. You get 240x320 pixels with individual 16-bit color pixel control. It has way more resolution than a black and white 128x64 display. As a bonus, this display comes with a resistive touchscreen attached to it already, so you can detect f.。.”,
“url”: “http://adafru.it/3315”,
“image”: “https://cdn-shop.adafruit.com/640x480/3315-03.jpg”
}
]
结果是一个JSON(JavaScript对象表示法)数组。它由具有五个 key:value 对的单个元素组成。例如,有一个名为name的键,它的值为“TFT FeatherWing - 2.4” 320x240 Touchscreen For All Feathers“
,表示为:
”name“: ”“TFT FeatherWing - 2.4” 320x240 Touchscreen For All Feathers“”
由于此JSON对象数组具有一致的方式将结果返回给我们,因此我们在PyPortal上运行的代码可以
image 键可以很容易地解析数据并显示它!值:“https://cdn-shop.adafruit.com/640x480/3315-03.jpg”
以下是该网址上的图片:
我们还获得了url 键,这是将在屏幕底部显示的简短URL,在这种情况下,“http://adafru.it/3315”
您可以在 code.py 的这一部分中看到它的完成方式:
下载:文件
复制代码
DATA_SOURCE = “https://www.adafruit.com/api/products?format=micro&”+PRODUCTS_TYPE+“=1&random=1”
# What data we‘ll be viewing
IMAGE_LOCATION = [0, “image”]
NAME_LOCATION = [0, “name”]
URL_LOCATION = [0, “url”] DATA_SOURCE = “https://www.adafruit.com/api/products?format=micro&”+PRODUCTS_TYPE+“=1&random=1”
# What data we’ll be viewing
IMAGE_LOCATION = [0, “image”]
NAME_LOCATION = [0, “name”]
URL_LOCATION = [0, “url”]
然后,在pyportal查询中,我们从该URL要求 image 名称以获取.jpe的路径。 g图片文件,以及 name 和 url 值。
下载:文件
复制代码
pyportal = adafruit_pyportal.PyPortal(url=DATA_SOURCE,
json_path=(NAME_LOCATION, URL_LOCATION),
status_neopixel=board.NEOPIXEL,
default_bg=cwd+“/new_background.bmp”,
text_font=cwd+“/fonts/Arial-Bold-12.bdf”,
text_position=((5, 35), (5, 225)),
text_color=(0xFFFFFF, 0xFFFFFF),
text_wrap=(35, 35), # characters to wrap
image_json_path=IMAGE_LOCATION,
image_resize=(320, 240),
image_position=(0, 0)) pyportal = adafruit_pyportal.PyPortal(url=DATA_SOURCE,
json_path=(NAME_LOCATION, URL_LOCATION),
status_neopixel=board.NEOPIXEL,
default_bg=cwd+“/new_background.bmp”,
text_font=cwd+“/fonts/Arial-Bold-12.bdf”,
text_position=((5, 35), (5, 225)),
text_color=(0xFFFFFF, 0xFFFFFF),
text_wrap=(35, 35), # characters to wrap
image_json_path=IMAGE_LOCATION,
image_resize=(320, 240),
image_position=(0, 0))
在while True:的主循环中,代码将查询页面中的JSON数据。
当它获取.jpeg文件的路径时,pyportal库会将其传递给Adafruit IO映像转换器服务器,将文件转换为PyPortal可以显示的格式,即320x240像素RGB 16位.bmp。
然后将该图像缓存到PyPortal的存储中,并显示在PyPortal TFT屏幕上。
然后,使用指定的字体,颜色和PyPortal构造函数中的位置,在图像背景的顶部绘制 name 和 url 值的文本。
注意,我们还要指定text_wrap的数量,以便文本不会被截断。
此消息每分钟更新一次,因此您的“新新新”保持新新!!
责任编辑:wv
- 相关推荐
- IOT
-
qq加密空间日志查看器2009-08-20 0
-
TDMS文件查看器2012-02-17 0
-
汉字内码-区位码查看器2013-03-20 0
-
万能文件查看器下载2007-06-10 754
-
008密码查看器V2.342007-06-10 1708
-
pdf文件查看器免费下载2009-11-08 665
-
ProcessExplorer进程查看器2012-12-07 331
-
宽带密码查看器 1.5 kdmmckq2012-12-11 1144
-
IES 光域网查看器.exe2014-04-08 631
-
TSICT_bom系统主板图纸查看器2016-01-11 1948
-
Delphi教程之数据字典查看器2016-03-31 502
-
proe三维零件查看器免费下载2017-12-08 1416
-
图像查看器IrfanView 4 50已退出2020-07-24 2179
-
IP地址查看器2022-07-08 343
-
Windows照片查看器无法显示此图片如何解决2022-09-19 604
全部0条评论

快来发表一下你的评论吧 !
