

如何在QCC300x上实现I2C功能
描述
本文主要介绍如何在QCC300x上实现I2C功能,只在空白工程上实现相关功能。所用的ADK版本为ADK_QCC300x.WIN.1.0.167。
此方法理论上同样适用于CSR8670/CSR8675。
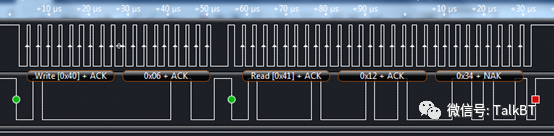
本文实现的功能很简单,通过对IIC设备发起一个读写操作,从设备有ACK即可。因为如果实现了这个基本操作,后续的其他复杂操作就是怎么写代码的问题了。
将数据0x1234写入到芯片的寄存器0x06和0x07中:

从寄存器0x06和0x07中读取:
这里先讲一下硬件,本次测试用的是官方的开发板,在开发板的P00和P01口上挂了一颗IC--TCA9555,它是一颗IO扩展芯片,IIC接口,所以,本次测试正好使用这颗芯片作为测试。
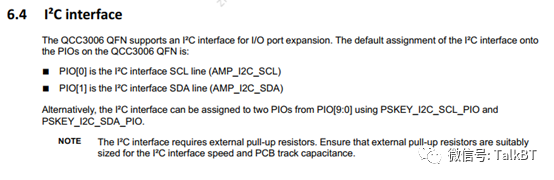
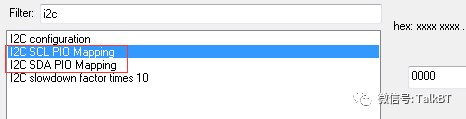
QCC300x的IIC默认配置为P00和P01,当然它也可以改成其他IO:
首先,建立一个空白工程,然后工程属性中有个地方需要改一下:
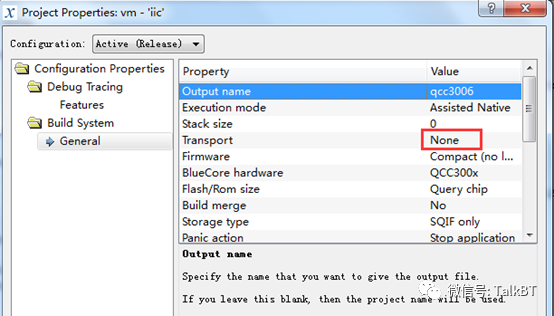
改Transport的原因是因为我们使用P00和P01作为I2C的接口,如果使用其他IO口,这个应该就不用改了。
然后,我们先烧录一下程序,这样它会擦除FLASH并对FLASH进行分区,然后再用pstool merge一下默认的psr程序(这个请参考之前文档)。然后用pstool改以下配置:
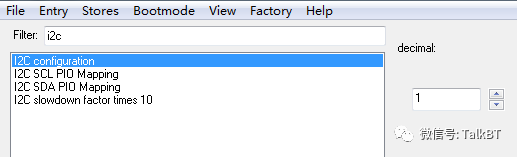
将I2C configuration改为“1”的目的是将IIC的速率切换到400kHz。
下面两个参数是配置I2C接口所对应的IO口的:
这些配置完毕后,保存pskey,然后,开始编写我们的代码。
代码也很简单,就一个main.c文档,代码内容如下:
#include
#include
#include
#include
#include
#include
#include
#include
#include
#define MESSAGE_TX_DATA 0x4000
#define MESSAGE_RX_DATA 0x4001
#define I2C_DEVICE_ADDRESS (0x20<<1)
#define I2C_A_DEVICE_REGISTER 0x06
typedef struct
{
TaskData task;
}I2CTaskData;
I2CTaskData theI2CTaskData;
uint16 i2c_register_data;
static void I2CMessageHandler(Task pTask, MessageId pId,Message pMessage);
static void i2c_example_init(void);
static void i2c_write_16bit_device_register(uint8device_address, uint8 device_register, uint16 data);
static void i2c_read_16bit_device_register(uint8device_address, uint8 device_register, uint16 *data);
int main(void)
{
PRINT(("hello world. "));
i2c_example_init();
/* Start the message scheduler loop */
MessageLoop();
/* Never get here...*/
return 0;
}
void i2c_example_init(void)
{
/* Assign task message handler */
theI2CTaskData.task.handler = I2CMessageHandler;
/* Send MESSAGE_TX_DATA to the task */
MessageSendLater(&theI2CTaskData.task,MESSAGE_TX_DATA, 0, 2000);
/* Send MESSAGE_RX_DATA to the task */
MessageSendLater(&theI2CTaskData.task,MESSAGE_RX_DATA, 0, 1000);
}
void i2c_write_16bit_device_register(uint8device_address, uint8 device_register, uint16 data)
{
uint8 i2c_data[3];
i2c_data[0] = device_register;
i2c_data[1] = (data >> 8) & 0xFF;
i2c_data[2] = data & 0xFF;
/*
I2cTransfer(uint16 address, const uint8 *tx, uint16tx_len, uint8 *rx, uint16 rx_len)
If tx_len is non-zero and rx_len is zero then the sequencereduces to:
- Start condition (S).
- Write slave address and direction byte (address | 0).
- Write tx_len data bytes from the buffer at tx.
- Stop condition (P).
*/
/*I2cTransfer(device_address, i2c_data, 3, NULL, 0);*/
PanicZero(I2cTransfer(device_address, i2c_data, 3, NULL,0));
}
void i2c_read_16bit_device_register(uint8 device_address,uint8 device_register, uint16 *data)
{
uint8 i2c_data[1];
uint8 i2c_rx_data[2];
i2c_data[0] = device_register;
/*
I2cTransfer(uint16 address, const uint8 *tx, uint16tx_len, uint8 *rx, uint16 rx_len)
If tx_len is non-zero and rx_len is non-zero then thesequence is:
- Start condition (S).
- Write slave address and direction byte (address | 0).
- Write tx_len data bytes from the buffer at tx.
- Repeated start condition (Sr).
- Write slave address and direction byte (address | 1).
- Read rx_len bytes into the buffer at rx, acknowledgingall but the final byte.
- Stop condition (P).
*/
/*I2cTransfer(device_address, i2c_data, 1, i2c_rx_data,2);*/
PanicZero(I2cTransfer(device_address, i2c_data, 1,i2c_rx_data, 2));
*data = (i2c_rx_data[0] << 8) + i2c_rx_data[1];
}
void I2CMessageHandler(Task pTask, MessageId pId, MessagepMessage)
{
switch (pId)
{
case MESSAGE_TX_DATA:
/*将数据0x1234写入到寄存器0x06和0x07中*/
i2c_write_16bit_device_register(I2C_DEVICE_ADDRESS,I2C_A_DEVICE_REGISTER,0x1234);
/* Send MESSAGE_TX_DATA to the task */
MessageSendLater(&theI2CTaskData.task,MESSAGE_TX_DATA, 0, 1000);
break;
case MESSAGE_RX_DATA:
/*从寄存器0x06和0x07中读取之前写入的值*/
i2c_read_16bit_device_register(I2C_DEVICE_ADDRESS,I2C_A_DEVICE_REGISTER,&i2c_register_data);
/* Send MESSAGE_RX_DATA to the task */
MessageSendLater(&theI2CTaskData.task,MESSAGE_RX_DATA, 0, 2000);
break;
default:
break;
}
}
也没啥好讲的,直接贴到main.c中,做过嵌入式开发的人,几分钟内就能完全读懂了。跟I2C相关的其实就一个函数:
uint16 I2cTransfer(uint16 address, constuint8 *tx, uint16 tx_len, uint8 *rx, uint16 rx_len);
关于它的解释,可以参考API的说明。
这里再简单讲一下如何用I2cTransfer实现IIC的最基本的两个操作吧。
1.写:
I2cTransfer(device_address, i2c_data, 3, NULL, 0);
以上函数会往device_address的设备将i2c_data数组中的3个字节写入到iic外设中,i2c_data[0]为device_register,然后后面两个字节为数据内容:
i2c_data[0]= device_register;
i2c_data[1]= (data >> 8) & 0xFF;
i2c_data[2] = data & 0xFF;
2.读:
i2c_data[0]= device_register;
I2cTransfer(device_address,i2c_data, 1, i2c_rx_data, 2);
*data = (i2c_rx_data[0] << 8) + i2c_rx_data[1];
以上代码是从device_register位置读取两个字节的标准操作。
更多操作的话,可以参考前面提到的API说明。
最后,编译运行,就能得到文章一开始的结果了。
责任编辑:YYX
-
使用Beaglebone的I2C2014-10-22 0
-
I2C2018-06-24 0
-
在MCP23X17评估板上使用MCP23017,具有I2C板外功能2018-09-04 0
-
I2C代码是如何在和声框架中实现的2019-03-07 0
-
如何在I2C上从外部微控制器运行引导加载程序?2019-07-12 0
-
到底什么是I2C2019-07-23 0
-
高通QCC300x系列蓝牙芯片应用常见问题的解达2020-02-15 0
-
gpio引脚复用i2c功能2020-07-29 0
-
HarmonyOS 驱动平台---I2C2020-09-16 0
-
I2C不迷茫--系列文章讲透I2C2020-09-22 0
-
什么是软件I2C和硬件I2C2021-08-23 0
-
如何在MM32SPIN27上实现硬件I2C从机呢2022-02-11 0
-
如何在内置电容式触摸面板FT5336上测试I2C驱动功能呢?2022-12-09 0
-
如何在PSOC和ST之间实现I2C通信?2023-01-17 0
-
如何在esp8266上启用多个i2c总线?2023-02-24 0
全部0条评论

快来发表一下你的评论吧 !
