

如何基于 ES6 的 JavaScript 进行 TensorFlow.js 的开发
描述
TensorFlow.js 是 TensorFlow 的 JavaScript 版本,支持 GPU 硬件加速,可以运行在 Node.js 或浏览器环境中。它不但支持完全基于 JavaScript 从头开发、训练和部署模型,也可以用来运行已有的 Python 版 TensorFlow 模型,或者基于现有的模型进行继续训练。
TensorFlow.js 支持 GPU 硬件加速。在 Node.js 环境中,如果有 CUDA 环境支持,或者在浏览器环境中,有 WebGL 环境支持,那么 TensorFlow.js 可以使用硬件进行加速。
微信小程序
微信小程序也提供了官方插件,封装了 TensorFlow.js 库,利用小程序 WebGL API 给第三方小程序调用时提供 GPU 加速。
本章,我们将基于 TensorFlow.js 1.0,向大家简单地介绍如何基于 ES6 的 JavaScript 进行 TensorFlow.js 的开发,然后提供两个例子,并基于例子进行详细的讲解和介绍,最终实现使用纯 JavaScript 进行 TensorFlow 模型的开发、训练和部署。
章节代码地址
本章中提到的 JavaScript 版 TensorFlow 的相关代码,使用说明,和训练好的模型文件及参数,都可以在作者的 GitHub 上找到。
地址:https://github.com/huan/tensorflow-handbook-javascript
浏览器中使用 TensorFlow.js 的优势
TensorFlow.js 可以让我们直接在浏览器中加载 TensorFlow,让用户立即通过本地的 CPU/GPU 资源进行我们所需要的机器学习运算,更灵活地进行 AI 应用的开发。
浏览器中进行机器学习,相对比与服务器端来讲,将拥有以下四大优势:
不需要安装软件或驱动(打开浏览器即可使用);
可以通过浏览器进行更加方便的人机交互;
可以通过手机浏览器,调用手机硬件的各种传感器(如:GPS、电子罗盘、加速度传感器、摄像头等);
用户的数据可以无需上传到服务器,在本地即可完成所需操作。
通过这些优势,TensorFlow.js 将给开发者带来极高的灵活性。比如在 Google Creative Lab 在 2018 年 7 月发布的 Move Mirror 里,我们可以在手机上打开浏览器,通过手机摄像头检测视频中用户的身体动作姿势,然后通过对图片数据库中类似身体动作姿势的检索,给用户显示一个最能够和他当前动作相似的照片。在 Move Mirror 的运行过程中,数据没有上传到服务器,所有的运算都是在手机本地,基于手机的 CPU/GPU 完成的,而这项技术,将使 Servreless 与 AI 应用结合起来成为可能。
Move Mirror
https://experiments.withgoogle.com/move-mirror
Move Mirror 所使用的 PoseNet
https://github.com/tensorflow/tfjs-models/tree/master/posenet
TensorFlow.js 环境配置
在浏览器中使用 TensorFlow.js
在浏览器中加载 TensorFlow.js ,最方便的办法是在 HTML 中直接引用 TensorFlow.js 发布的 NPM 包中已经打包安装好的 JavaScript 代码。
在 Node.js 中使用 TensorFlow.js
服务器端使用 JavaScript ,首先需要按照 NodeJS.org 官网的说明,完成安装最新版本的 Node.js 。
然后,完成以下四个步骤即可完成配置:
1. 确认 Node.js 版本(v10 或更新的版本):
$ node --verion v10.5.0 $ npm --version 6.4.1
2. 建立 TensorFlow.js 项目目录:
$ mkdir tfjs $ cd tfjs
3. 安装 TensorFlow.js:
# 初始化项目管理文件 package.json $ npm init -y # 安装 tfjs 库,纯 JavaScript 版本 $ npm install @tensorflow/tfjs # 安装 tfjs-node 库,C Binding 版本 $ npm install @tensorflow/tfjs-node # 安装 tfjs-node-gpu 库,支持 CUDA GPU 加速 $ npm install @tensorflow/tfjs-node-gpu
4. 确认 Node.js 和 TensorFlow.js 工作正常:
$ node > require('@tensorflow/tfjs').version { 'tfjs-core': '1.3.1', 'tfjs-data': '1.3.1', 'tfjs-layers': '1.3.1', 'tfjs-converter': '1.3.1', tfjs: '1.3.1' } >
如果你看到了上面的 tfjs-core, tfjs-data, tfjs-layers 和 tfjs-converter 的输出信息,那么就说明环境配置没有问题了。
然后,在 JavaScript 程序中,通过以下指令,即可引入 TensorFlow.js:
import * as tf from '@tensorflow/tfjs' console.log(tf.version.tfjs) //Output: 1.3.1
使用 import 加载 JavaScript 模块
import 是 JavaScript ES6 版本新开始拥有的新特性。粗略可以认为等价于 require。比如:import * as tf from '@tensorflow/tfjs' 和 const tf = require('@tensorflow/tfjs') 对上面的示例代码是等价的。希望了解更多的读者,可以访问 MDN 文档 (https://developer.mozilla.org/en-US/docs/Web/JavaScript/Reference/Statements/import)。
在微信小程序中使用 TensorFlow.js
TensorFlow.js 微信小程序插件封装了 TensorFlow.js 库,用于提供给第三方小程序调用。
在使用插件前,首先要在小程序管理后台的 “设置 - 第三方服务 - 插件管理” 中添加插件。开发者可登录小程序管理后台,通过 appid _wx6afed118d9e81df9_ 查找插件并添加。本插件无需申请,添加后可直接使用。
例子:TFJS Mobilenet: 物体识别小程序
https://github.com/tensorflow/tfjs-wechat/tree/master/demo/mobilenet
TensorFlow.js 微信小程序官方文档地址
https://mp.weixin.qq.com/wxopen/plugindevdoc?appid=wx6afed118d9e81df9
TensorFlow.js 微信小程序教程
为了推动微信小程序中人工智能应用的发展,Google 专门为微信小程序打造了最新 TensorFlow.js 插件,并联合 Google 认证机器学习专家、微信、腾讯课堂 NEXT 学院,联合推出了 “NEXT 学院:TensorFlow.js 遇到小程序” 课程,帮助小程序开发者带来更加易于上手和流畅的 TensorFlow.js 开发体验。
上述课程主要介绍了如何将 TensorFlow.js 插件嵌入到微信小程序中,并基于其进行开发。课程中以一个姿态检测的模型 PoseNet 作为案例,介绍了 TensorFlow.js 插件导入到微信小程序开发工具中后,在项目开发中的配置,功能调用,加载模型等方法应用;此外,还介绍了在 Python 环境下训练好的模型如何转换并载入到小程序中。
本章作者也参与了课程制作,课程中的案列简单有趣易上手,通过学习,可以快速熟悉 TensorFlow.js 在小程序中的开发和应用。有兴趣的读者可以前往 NEXT 学院,进行后续深度学习。
课程地址
https://ke.qq.com/course/428263
TensorFlow.js 模型部署
在浏览器中加载 Python 模型
一般 TensorFlow 的模型,会被存储为 SavedModel 格式。这也是 Google 目前推荐的模型保存最佳实践。SavedModel 格式可以通过 tensorflowjs-converter 转换器转换为可以直接被 TensorFlow.js 加载的格式,从而在 JavaScript 语言中进行使用。
1. 安装tensorflowjs_converter
$ pip install tensorflowjs
tensorflowjs_converter 的使用细节,可以通过 --help 参数查看程序帮助:
$ tensorflowjs_converter --help
2. 以下我们以 MobilenetV1 为例,看一下如何对模型文件进行转换操作,并将可以被 TensorFlow.js 加载的模型文件,存放到 /mobilenet/tfjs_model 目录下。
转换 SavedModel:将 /mobilenet/saved_model 转换到 /mobilenet/tfjs_model
tensorflowjs_converter --input_format=tf_saved_model --output_node_names='MobilenetV1/Predictions/Reshape_1' --saved_model_tags=serve /mobilenet/saved_model /mobilenet/tfjs_model
转换完成的模型,保存为了两类文件:
model.json:模型架构
group1-shard*of*:模型参数
举例来说,我们对 MobileNet v2 转换出来的文件,如下:
/mobilenet/tfjs_model/model.json /mobilenet/tfjs_model/group1-shard1of5 … /mobilenet/tfjs_model/group1-shard5of5
3. 为了加载转换完成的模型文件,我们需要安装 tfjs-converter 和 @tensorflow/tfjs 模块:
$ npm install @tensorflow/tfjs
4. 然后,我们就可以通过 JavaScript 来加载 TensorFlow 模型了!
import * as tf from '@tensorflow/tfjs' const MODEL_URL = '/mobilenet/tfjs_model/model.json' const model = await tf.loadGraphModel(MODEL_URL) const cat = document.getElementById('cat') model.execute(tf.browser.fromPixels(cat))
转换 TFHub 模型
将 TFHub 模型 https://tfhub.dev/google/imagenet/mobilenet_v1_100_224/classification/1 转换到 /mobilenet/tfjs_model:
tensorflowjs_converter --input_format=tf_hub 'https://tfhub.dev/google/imagenet/mobilenet_v1_100_224/classification/1' /mobilenet/tfjs_model
在 Node.js 中执行原生 SavedModel 模型
除了通过转换工具 tfjs-converter 将 TensorFlow SavedModel、TFHub 模型或 Keras 模型转换为 JavaScript 浏览器兼容格式之外,如果我们在 Node.js 环境中运行,那么还可以使用 TensorFlow C++ 的接口,直接运行原生的 SavedModel 模型。
在 TensorFlow.js 中运行原生的 SavedModel 模型非常简单。我们只需要把预训练的 TensorFlow 模型存为 SavedModel 格式,并通过 @tensorflow/tfjs-node 或 tfjs-node-gpu 包将模型加载到 Node.js 进行推理即可,无需使用转换工具 tfjs-converter。
预训练的 TensorFlow SavedModel 可以通过一行代码在 JavaScript 中加载模型并用于推理:
const model = await tf.node.loadSavedModel(path) const output = model.predict(input)
也可以将多个输入以数组或图的形式提供给模型:
const model1 = await tf.node.loadSavedModel(path1, [tag], signatureKey) const outputArray = model1.predict([inputTensor1, inputTensor2]) const model2 = await tf.node.loadSavedModel(path2, [tag], signatureKey) const outputMap = model2.predict({input1: inputTensor1, input2:inputTensor2})
此功能需要 @tensorflow/tfjs-node 版本为 1.3.2 或更高,同时支持 CPU 和 GPU。它支持在 TensorFlow Python 1.x 和 2.0 版本中训练和导出的 TensorFlow SavedModel。由此带来的好处除了无需进行任何转换,原生执行 TensorFlow SavedModel 意味着您可以在模型中使用 TensorFlow.js 尚未支持的算子。这要通过将 SavedModel 作为 TensorFlow 会话加载到 C++ 中进行绑定予以实现。
使用 TensorFlow.js 模型库
TensorFlow.js 提供了一系列预训练好的模型,方便大家快速地给自己的程序引入人工智能能力。
模型库中模型分类包括图像识别、语音识别、人体姿态识别、物体识别、文字分类等。
模型库 GitHub 地址
https://github.com/tensorflow/tfjs-models
由于这些 API 默认模型文件都存储在谷歌云上,直接使用会导致中国用户无法直接读取。在程序内使用模型 API 时要提供 modelUrl 的参数,可以指向谷歌中国的镜像服务器。
谷歌云的 base url 是 https://storage.googleapis.com,中国镜像的 base url 是 https://www.gstaticcnapps.cn,模型的 url path 是一致的。以 posenet 模型为例:
谷歌云地址
https://storage.googleapis.com/tfjs-models/savedmodel/posenet/mobilenet/float/050/model-stride16.json
中国镜像地址
https://www.gstaticcnapps.cn/tfjs-models/savedmodel/posenet/mobilenet/float/050/model-stride16.json
在浏览器中使用 MobileNet 进行摄像头物体识别
这里我们将通过一个简单的 HTML 页面,来调用 TensorFlow.js 和与训练好的 MobileNet ,在用户的浏览器中,通过摄像头来识别图像中的物体是什么。
1. 我们建立一个 HTML 文件,在头信息中,通过将 NPM 模块转换为在线可以引用的免费服务 unpkg.com,来加载 @tensorflow/tfjs 和 @tensorflow-models/mobilenet 两个 TFJS 模块:
2. 我们声明三个 HTML 元素:用来显示视频的
3. 我们通过 JavaScript ,将对应的 HTML 元素进行初始化:video, image, status 三个变量分别用来对应
运行效果截图如下。可以看到,水杯被系统识别为了 “beer glass” 啤酒杯,置信度 90% :
TensorFlow.js 模型训练 *
与 TensorFlow Serving 和 TensorFlow Lite 不同,TensorFlow.js 不仅支持模型的部署和推断,还支持直接在 TensorFlow.js 中进行模型训练。
在 TensorFlow 基础章节中,我们已经用 Python 实现过,针对某城市在 2013-2017 年的房价的任务,通过对该数据进行线性回归,即使用线性模型 y=ax+b 来拟合上述数据,此处 a 和 b 是待求的参数。
下面我们改用 TensorFlow.js 来实现一个 JavaScript 版本。
首先,我们定义数据,进行基本的归一化操作。
const xsRaw = tf.tensor([2013, 2014, 2015, 2016, 2017]) const ysRaw = tf.tensor([12000, 14000, 15000, 16500, 17500]) // 归一化 const xs = xsRaw.sub(xsRaw.min()) .div(xsRaw.max().sub(xsRaw.min())) const ys = ysRaw.sub(ysRaw.min()) .div(ysRaw.max().sub(ysRaw.min()))
接下来,我们来求线性模型中两个参数 a和 b的值。
使用 loss() 计算损失;使用 optimizer.minimize() 自动更新模型参数。
JavaScript 中的胖箭头函数 (Fat Arrow Function)
从 JavaScript 的 ES6 版本开始,允许使用箭头函数(=>)来简化函数的声明和书写,类似于 Python 中的 lambda 表达式。例如,以下箭头函数:
const sum = (a, b) => { return a + b }
在效果上等价为如下的传统函数:
const sum = function (a, b) { return a + b }
不过箭头函数中没有自己的 this 和 arguments,不可以被当做构造函数 (new),也不可以被当做 Generator (无法使用 yield)。感兴趣的读者可以参考 MDN 文档 以了解更多。
MCN 文档:https://developer.mozilla.org/en-US/docs/Web/JavaScript/Reference/Functions/Arrow_functions
TensorFlow.js 中的 dataSync() 系列数据同步函数
它的作用是把 Tensor 数据从 GPU 中取回来,可以理解为与 Python 中的 .numpy() 功能相当,即将数据取回,供本地显示,或本地计算使用。感兴趣的读者可以参考 TensorFlow.js 文档 以了解更多。
TensorFlow.js 文档:https://js.tensorflow.org/api/latest/#tf.Tensor.dataSync
TensorFlow.js 中的 sub() 系列数学计算函数
TensorFlow.js 支持 tf.sub(a, b) 和 a.sub(b) 两种方法的数学函数调用。其效果是等价的,读者可以根据自己的喜好来选择。感兴趣的读者可以参考 TensorFlow.js 文档 (https://js.tensorflow.org/api/latest/#sub) 以了解更多。
const a = tf.scalar(Math.random()).variable() const b = tf.scalar(Math.random()).variable() // y = a * x + b. const f = (x) => a.mul(x).add(b) const loss = (pred, label) => pred.sub(label).square().mean() const learningRate = 1e-3 const optimizer = tf.train.sgd(learningRate) // 训练模型 for (let i = 0; i < 10000; i++) { optimizer.minimize(() => loss(f(xs), ys)) } // 预测 console.log(`a: ${a.dataSync()}, b: ${b.dataSync()}`) const preds = f(xs).dataSync() const trues = ys.arraySync() preds.forEach((pred, i) => { console.log(`x: ${i}, pred: ${pred.toFixed(2)}, true: ${trues[i].toFixed(2)}`) })
从下面的输出样例中我们可以看到,已经拟合得比较接近了。
a: 0.9339302778244019, b: 0.08108722418546677 x: 0, pred: 0.08, true: 0.00 x: 1, pred: 0.31, true: 0.36 x: 2, pred: 0.55, true: 0.55 x: 3, pred: 0.78, true: 0.82 x: 4, pred: 1.02, true: 1.00
可以直接在浏览器中运行,完整的 HTML 代码如下:
TensorFlow.js 性能对比
关于 TensorFlow.js 的性能,Google 官方做了一份基于 MobileNet 的评测,可以作为参考。具体评测是基于 MobileNet 的 TensorFlow 模型,将其 JavaScript 版本和 Python 版本各运行两百次,其评测结论如下。
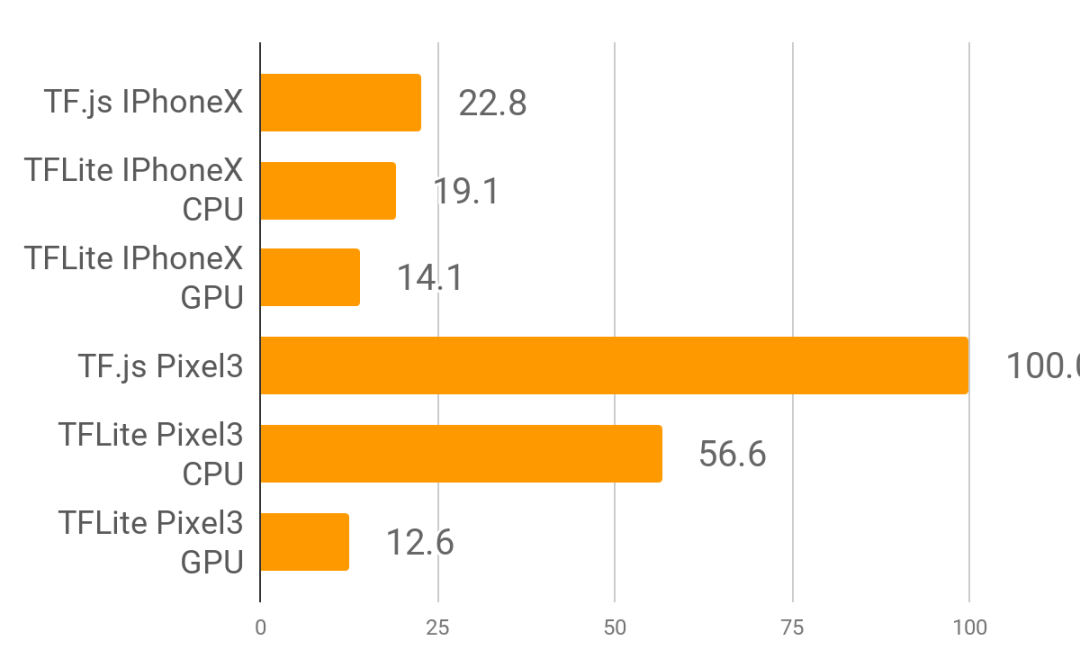
手机浏览器性能:(单位:毫秒 ms)
TensorFlow.js 在手机浏览器中运行一次推理:
在 iPhoneX 上需要时间为 22ms
在 Pixel3 上需要时间为 100ms
与 TensorFlow Lite 代码基准相比,手机浏览器中的 TensorFlow.js 在 IPhoneX 上的运行时间为基准的 1.2 倍,在 Pixel3 上运行的时间为基准的 1.8 倍。
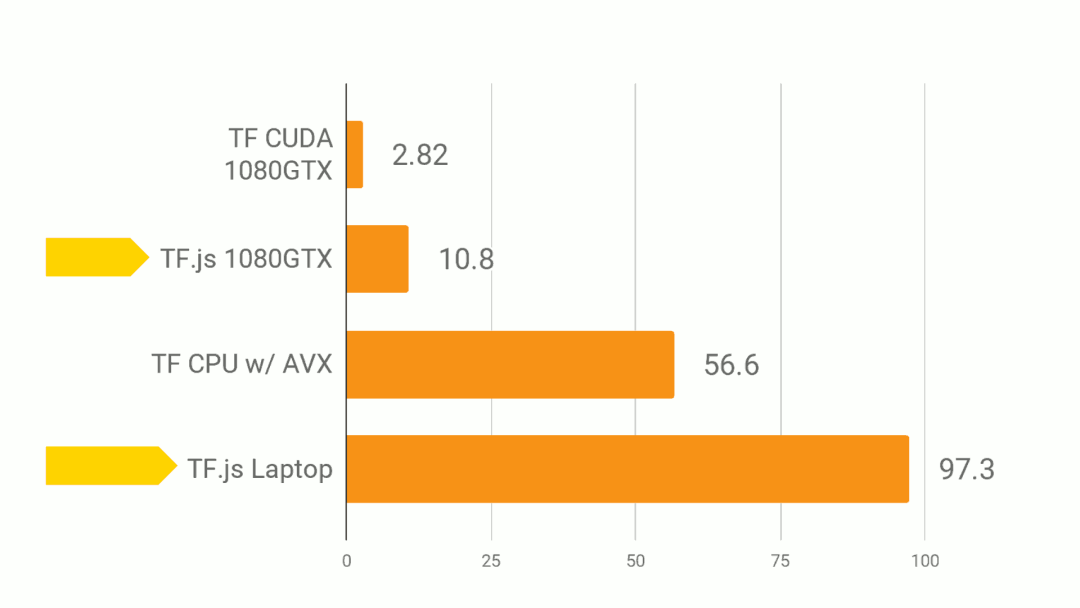
台式机浏览器性能:(单位:毫秒 ms)
在浏览器中,TensorFlow.js 可以使用 WebGL 进行硬件加速,将 GPU 资源使用起来。
TensorFlow.js 在浏览器中运行一次推理:
在 CPU 上需要时间为 97ms
在 GPU (WebGL) 上需要时间为 10ms
与 Python 代码基准相比,浏览器中的 TensorFlow.js 在 CPU 上的运行时间为基准的 1.7 倍,在 GPU (WebGL) 上运行的时间为基准的 3.8 倍。
Node.js 性能:
在 Node.js 中,TensorFlow.js 可以用 JavaScript 加载转换后模型,或使用 TensorFlow 的 C++ Binding ,分别接近和超越了 Python 的性能。
TensorFlow.js 在 Node.js 运行一次推理:
在 CPU 上运行原生模型时间为 19.6ms
在 GPU (CUDA) 上运行原生模型时间为 7.68ms
与 Python 代码基准相比,Node.js 的 TensorFlow.js 在 CPU 和 GPU 上的运行时间都比基准快 4% 。
责任编辑:xj
原文标题:【抽奖送书】简单粗暴 TensorFlow.js:从安装到训练全程实例教学
文章出处:【微信公众号:TensorFlow】欢迎添加关注!文章转载请注明出处。
-
ES6的新特性2019-06-13 0
-
如何深入理解ES6之函数2020-05-22 0
-
ES6中的箭头函数是什么2020-06-12 0
-
怎样通过ES6生成器改善实际代码2021-09-06 0
-
ES6发电机宏观异步和微观异步2021-09-06 0
-
用ES6编写JavaScript函数2021-09-16 0
-
es6语法中函数参数2021-09-16 0
-
嵌入式浏览器内原生javaScript出错的原因2021-12-21 0
-
openharmony ACE开发框架详解2022-04-07 0
-
利用TensorFlow.js,D3.js 和 Web 的力量使训练模型的过程可视化2018-08-08 6685
-
如何使用TensorFlow.js构建这一系统2018-08-19 3351
-
基于tensorflow.js设计、训练面向web的神经网络模型的经验2018-10-18 3884
-
什么叫做JavaScript异步2018-11-14 2745
-
TensorFlow.js制作了一个仅用 200 余行代码的项目2020-05-11 5444
-
ES6标准入门第二版PDF电子书免费下载2021-02-24 697
全部0条评论

快来发表一下你的评论吧 !
