

搭载OpenHarmony2.0的3516开发板上开发的第一个Hap-WIFI
描述
本次将分为上下两篇讲述在搭载 OpenHarmony2.0 的 3516 开发板上开发的第一个 Hap-WIFI,目前 Openharmony2.0 仅支持 JSUI,所以以下内容皆为 JSUI 开发。
源码码已上传至 gitee:
https://gitee.com/panda-coder/open-harmony-apps/tree/master/Wifi
现有不足之处为只能获取到 WiFi 的 ipv6,获取不到 ipv4,已提 issue。也是因为这个原因文章才发出,本想去研究 cpp 源码试着解决问题,奈何能力有限。后续会进一步完善,并加上开启热点等功能。
配置 SDK、开发工具等步骤将不再赘述,请参考:《在OpenHarmony2.0 上安装自己的系统应用》

内容
上篇:
WiFi 的界面排版
WiFi 的 JS-API
下篇:
自定义的键盘组件的开发讲解(OpenHarmony2.0 无系统输入法,input框无法输入)。①键盘的排版。②键盘的特殊功能键。③键盘数据回传-JS 自定义组件的事件传递。
代码目录
src
└─main
├─js
│ └─default
│ ├─common ----------------------- 公共库
│ ├─i18n
│ ├─images ----------------------- 图片资源
│ └─pages ----------------------- 页面及模块
│ ├─index --------------------- 主界面
│ ├─keyboard ------------------ 键盘模块
│ └─wifiItem ------------------ WiFi列表项模块
└─resources
└─base
├─element
└─media
布局排版
①index 主界面
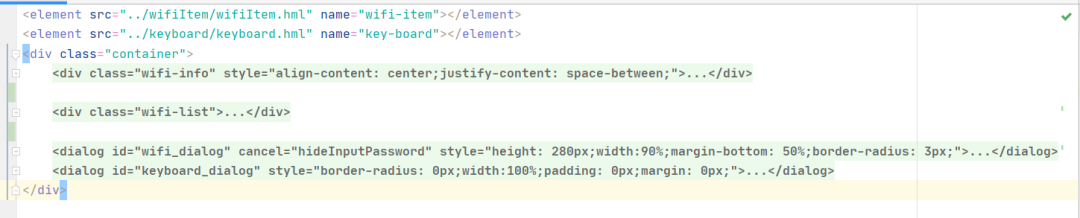
主界面分为上下两部分,上部分为控制显示面板,下部分为 WiFi 列表:
wifi-info 为上部控制面板
wifi-list 为下半部 wifi 列表
dialog 分别为密码弹出/键盘弹窗
②wifi-info
《div class=“wifi-info” style=“align-content: center;justify-content: space-between;”》
《!--左侧wifi图片--》
《div style=“justify-content: center;align-items: center;width: 60%;flex-direction: column;”》
《image src=“。。/。。/images/wifi.png” style=“width:100px;height:100px;”》《/image》
《text style=“color: white;font-size: 30px;margin-top: 6px;”》WLAN 2.4GHz《/text》
《text》{{console}}《/text》
《/div》
《divider vertical=“true” style=“color: white;stroke-width:2px;padding: 30px 0px;”》《/divider》
《!--右侧WiFi详情--》
《div style=“justify-content: center; align-items: center;flex-direction: row;width: 100%;”》
《text style=“color: white;padding: 10px;margin-left: 10px;width: 80%;text-align: start;”》{{state}}《/text》
《switch textoff=“关闭” @change=“wifiSwitchChanged” texton=“开启” showtext=“true” checked=“{{ wifiInfo.isActive }}” style=“font-size: 20px;text-padding:6px;height: 80px;”》《/switch》
《/div》
《/div》
所有的 div 布局排版均为 flex 排版。左侧为一张 WiFi 图片,一段文字说明。console 字段为方便界面调试而使用的字段,默认为空,为空时不显示。
《divider》 为分隔线控件,将左右两侧进行分割右侧为一个 《text》 组件显示状态信息。
如 WiFi 连接/开启状态,该值为 computed 计算值,《switch》 控件进行控制 WiFi 的开启关闭。
③wifi-list
《div class=“wifi-list”》
《refresh refreshing=“{{isSaning}}” @pulldown=“refreshTouched”》
《list if=“{{wifiInfo.scanInfo && wifiInfo.scanInfo.length》0}}” 》
《list-item if=“{{connectItem && connectItem.ssid}}” style=“margin:0px 6px;padding: 10px 6px;width: 100%;justify-content: center;flex-direction: column;”》
《wifi-item @my-touched=“checkedWifi” style=“width: 100%;” value=“{{connectItem}}” checked=“true”》《/wifi-item》
《divider vertical=“false” style=“color: #D4D3D3;stroke-width:2px; margin-top: 6px;padding: 10px;”》《/divider》
《/list-item》
《list-item for=“{{WifiScanList}}” @touchstart=“listItemToucheStart” @touchmove=“itemMoved” tid=“id” style=“margin:0px 6px;padding: 10px 6px;width: 100%;justify-content: center;flex-direction: column;” 》
《wifi-item @my-touched=“checkedWifi” style=“width: 100%;” value=“{{$item}}”》《/wifi-item》
《divider vertical=“false” style=“color: #D4D3D3;stroke-width:2px; margin-top: 6px;padding: 10px;”》《/divider》
《/list-item》
《/list》
《text style=“justify-content: center;width: 100%;color: #959494;text-align: center;” else》当前无可用WIFI,请下拉刷新《/text》
《/refresh》
《/div》
WiFi 列表稍微复杂一点,首先通过 《refresh》 组件做了一个下拉功能,下拉时更新 wifi 扫描列表。
其次通过 list 和 list-item 组件配合将通过接口获取到的 WiFi 对象数组进行显示。
在显示的时候优先显示已连接数据,同时在下面的列表中排除已连接的,list-item 中使用自定义组件 wifi-item,并添加分割线组件进行分隔。
④wifiItem
布局代码:
《div class=“container” @touchend=“boxTouchend”》
《div class=“box”》
《div class=“box-left”》
《text class=“{{checked?‘isChecked’:‘’}}”》{{ssid}}《/text》
《text》{{desc}}《/text》
《/div》
《div class=“box-right”》
《image style=“width: 80px;height:80px;” src=“。。/。。/images/wifi-2.png”》《/image》
《/div》
《/div》《/div》
ischecked 判断当前是否为选中状态,加载选中的样式。
⑤dialog
第一个 dialog 为弹出输入密码框,第二个 dialog 为加载自定义的键盘组件,将在下一节进行讲解。
第一个 dialog:
《dialog id=“wifi_dialog” cancel=“hideInputPassword” style=“height: 280px;width:90%;margin-bottom: 50%;border-radius: 3px;”》
《div style=“flex-direction: column;padding: 12px;”》
《text style=“font-size: 36px;font-weight: bolder;padding: 15px 3px;”》{{checkedWifiName}}《/text》
《div》
《input placeholder=“请输入密码” @touchend=“showKeyBoard” value=“{{wifiPassword}}” style=“border-radius: 3px;”》《/input》
《/div》
《div style=“justify-content: center;”》
《button class=“btn btn-default” @touchend=“connect” 》连 接《/button》
《button class=“btn btn-primary” @touchend=“hideInputPassword”》取 消《/button》
《/div》
《/div》
《/dialog》
需要注意的是,dialog 下只能有一个根节点。input 类型为了方便,未采用密码形式,弱需要设为密码方式,在 input 组件上增加 type=“password” 特性即可,更多类型可参考官方文档。
JS API
WIFI 的官方仓库地址:
https://gitee.com/openharmony/communication_wifi
找到该仓库目录下的 interfaces/kits/jskits/@ohos.wifi.d.ts 文件可以看到对 JS 已提供的 api 接口信息(文件注释非常详细,就不再赘述)。
但需要注意的是,开发中引用 wifi api 并非 @ohos.wifi,而是 @ohos.wifi_native_js。
cpp 位置为 interfaces/innerkits/native_cpp/js_napi/wifi_js.cpp:
static napi_value Init(napi_env env, napi_value exports)
{
napi_property_descriptor desc[] = {
DECLARE_NAPI_FUNCTION(“enableWifi”, EnableWifi),
DECLARE_NAPI_FUNCTION(“disableWifi”, DisableWifi),
DECLARE_NAPI_FUNCTION(“isWifiActive”, IsWifiActive),
DECLARE_NAPI_FUNCTION(“scan”, Scan),
DECLARE_NAPI_FUNCTION(“getScanInfos”, GetScanInfos),
DECLARE_NAPI_FUNCTION(“addDeviceConfig”, AddDeviceConfig),
DECLARE_NAPI_FUNCTION(“connectToNetwork”, ConnectToNetwork),
DECLARE_NAPI_FUNCTION(“connectToDevice”, ConnectToDevice),
DECLARE_NAPI_FUNCTION(“disConnect”, DisConnect),
DECLARE_NAPI_FUNCTION(“getSignalLevel”, GetSignalLevel)
};
NAPI_CALL(env, napi_define_properties(env, exports, sizeof(desc) / sizeof(napi_property_descriptor), desc));
return exports;
}
static napi_module wifiJsModule = {
.nm_version = 1,
.nm_flags = 0,
.nm_filename = NULL,
.nm_register_func = Init,
.nm_modname = “wifi_native_js”,
.nm_priv = ((void *)0),
.reserved = { 0 }
};
编辑:jq
-
【HarmonyOS HiSpark AI Camera试用连载 】使用DevEco Studio开发hello world hap在Hi3516上运行2020-12-02 0
-
OpenHarmony2.0 一站式编译烧录Hi3516(3518))小型系统2021-07-30 0
-
OpenHarmony2.0 一站式编译烧录Hi3516标准系统2021-07-30 0
-
在OpenHarmony2.0 上安装自己的系统应用2021-08-09 0
-
OpenHarmony开发板开启热点2021-12-03 0
-
【OpenHarmony样例】基于Hi3516开发板开发的智能油烟机2022-03-21 0
-
首款搭载 OpenHarmony 3.0 富设备开发板!2022-03-22 0
-
OpenHarmony2.0 Hi3516系列资料下载合集(源码编译+烧录)2022-03-24 0
-
【OpenHarmony开发样例】基于Hi3516开发板开发的智能猫眼2022-03-25 0
-
在OpenHarmony2.0使用HDC工具快速安装可卸载应用的方法2022-04-11 0
-
OpenHarmony2.0编译烧录Hi3516标准系统的过程分享2022-04-19 0
-
求助,请问支持OpenHarmony系统的开发板上使用的工具链是否一样?2022-06-06 0
-
RK2206开发板搭载OpenHarmony操作系统简介2022-07-28 0
-
基于OpenHarmony2.0 Canary在Linux环境下点亮3861开发板2021-06-30 1910
-
OpenHarmony鸿蒙南向开发案例:【智能猫眼(基于3516开发板)】2024-04-19 88
全部0条评论

快来发表一下你的评论吧 !
