

实现printf打印到串口
电子说
描述
嗨,又见面了。九月的秋风吹过,微微凉意。
闲话少叙,回归正题。今天我们继续玩串口,主题包括:
-
实现printf打印到串口。
-
VSPD和串口助手的使用。
-
识别上位机下发的固定多字节命令。
一、 实现printf打印到串口
在C语言程序设计课程,同学们肯定用过printf在控制台打印过“Hello world!”。
printf("Hello world!");
这次,我们用printf在串口打印“Hello world”。我们会付出2K程序空间的代价。但,我乐意!对,我乐意。
还记得吗, printf函数在stdio.h头文件中定义。那我们先添加头文件到主程序代码。
#include "stdio.h"
为了实现printf重定位到串口,即把数据送到串口,我们需要重写putchar函数。putchar定义如下:
char putchar(char c){//初始重新定向到串口uart_sendUchar(c);//返回字符到调用者printfreturn c;}
试一试吧。Hello world代码如下:
#include "uart.h"void main(){float temperature = 21.0/13;unsigned int count = 123;uart_init();printf("Hello world! ");printf("Temperature: %.3f count: %d. ", temperature, count);printf("printf demo. 2022-9-1 Guilin,China.");while(1);}
在main函数,我们首先初始化串口(uart_init),然后打印hello world, 接着是温度(temperature,浮点数,但只打印三位小数)和计数器值(count,整数)。
虚拟终端显示结果如下。

关于printf函数的使用,参考:c stdio.h printf Programming | Library | Reference - Code-Reference.com
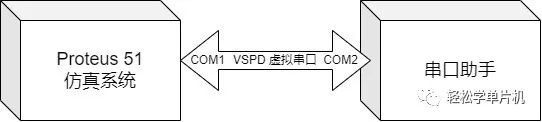
二、 VSPD和串口助手的使用
VSPD是虚拟串口软件,用于在同一台PC调试串口程序。串口通信双方的程序都运行在同一台PC上。
VSPD官网提供14天试用版本,无功能限制。
-
下载并安装VSPD软件,然后添加一个虚拟串口对:COM1-COM2。安装过程略,配置过程如下:
-
修改仿真电路图,删除虚拟终端,添加COMPIM。修改后的仿真电路图如下。注意,连接单片机和COMPIM时,RXD连接RXD,TXD连接TXD,相当于把51单片机的串口绑定到COMPIM。

3. 配置COMPIM,使用虚拟串口对中的一个端口,这里选择了COM1。
4. 修改主函数代码,重新编译。代码如下:
void main(){float temperature = 21.0/13;unsigned int count = 123;uart_init();while(1){printf("Hello world! ");printf("Temperature: %.3f count: %d. ", temperature, count);printf("printf demo. 2022-9-1 Guilin,China.");delayMS(1000);count++;}}
5. 在仿真电路中双击单片机,选择重新编译好的程序。
6. 运行仿真。
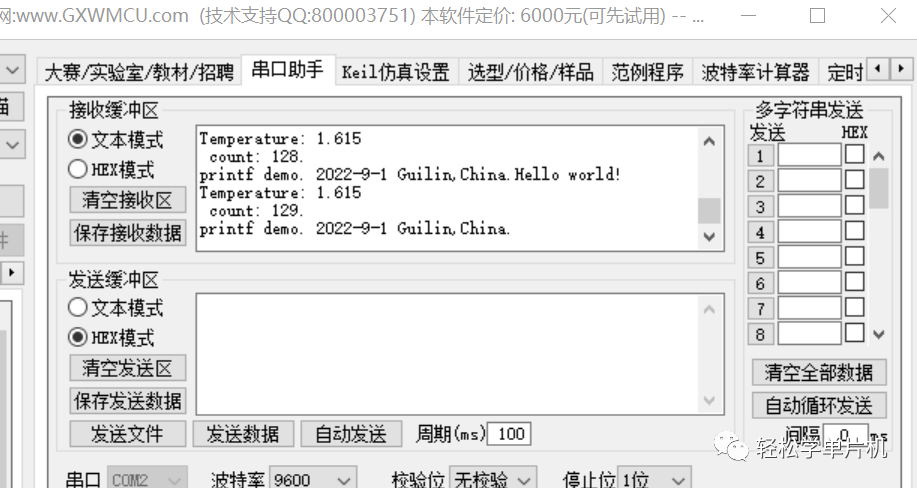
7. 运行STC-ISP烧录软件,切换到串口助手,设置串口,选择COM2(虚拟串口对的另一个),波特率9600,如下图所示。
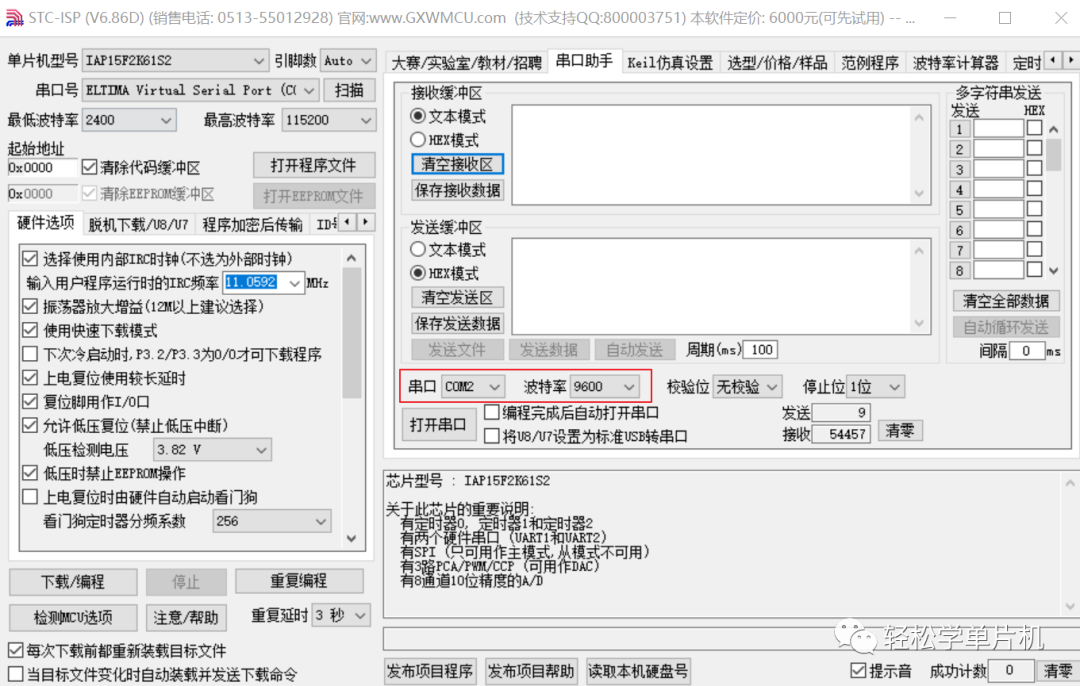
8. 单击串口助手的打开串口按钮。在接收缓冲区可以收到51单片机串口发送的数据。
演示视频:
三、识别上位机下发的固定多字节命令。
来而不往非礼也。下面我们实现单片机接收并执行上位机串口下发的命令。
假设命令是2个字节的,第一个字节表示命令类型,第二个字节表示命令参数,如下表所示。
|
MSB |
LSB |
|
命令类型(1字节) |
命令参数(1字节) |
命令常用于控制单片机外设或设置单片机功能。在本例中,我们计划通过串口助手下发命令控制蜂鸣器和清零count。
具体命令定义如下:
01 00H:关闭蜂鸣器
01 01H:启动蜂鸣器
02 00H:清零count值
F0 0FH:不玩了,关闭串口
如何实现两个字节命令的接收和解释执行呢?
思路:我们知道上位机只会发两个字节的命令数据到单片机,因此可以对串口接收字节进行计数。
当连续收到两个字节时,表示收到命令。然后判断第一个字节获得命令类型,再执行相应动作即可。
unsigned char uart_rx_buffer[2]; //全局变量,串口接收缓存//串口中断函数void isr_uart() interrupt 4{static unsigned char rx_byte_count = 0;if(RI) //收到数据{uart_rx_buffer[rx_byte_count] = SBUF;rx_byte_count++;RI = 0;if(rx_byte_count == 2) //接收到2个字节数据{rx_byte_count = 0;//下面是命令解析及执行~魔幻的if elseif(uart_rx_buffer[0] == 0x01 && uart_rx_buffer[1] == 0x00){beeper_en = 1; //beeper offprintf("执行命令:关闭蜂鸣器! ");}else if (uart_rx_buffer[0] == 0x01 && uart_rx_buffer[1] == 0x01){beeper_en = 0; //beeper onprintf("执行命令:开启蜂鸣器! ");}else if (uart_rx_buffer[0] == 0x02 && uart_rx_buffer[1] == 0x00){count = 0;printf("执行命令:清零count! ");}else if (uart_rx_buffer[0] == 0xF0 && uart_rx_buffer[1] == 0x0F){printf("将关闭串口,再见! ");TR1 = 0;}}}}
编译并仿真,单片机能够正确接收并执行命令,如下。
哈哈,执行完F0 0FH命令,要想再次使用串口,只能重启仿真了。
结束语
今天的内容有点多,结束语就短点吧。
附上本次串口源码,如下。如果你觉得有所帮助,请点赞,请打赏。
如果需要仿真电路和串口工程源码,请在后台留言。
uart.h头文件
//uart.hvoid uart_init(); //串口初始化函数void uart_sendByte(uchar c); //发送单字节函数void uart_sendChar(char c); //发送char数据函数void uart_sendUchar(uchar c); //发送unsigned char数据函数void uart_sendUint(uint num); //发送unsigned int 数据函数void uart_sendInt(int num); //发送int数据函数void uart_sendFloat(float num); //发送float数据函数void uart_sendLong(long num); //发送long数据函数void uart_sendDouble(double num); //发送double数据void uart_sendString(uchar* pStr); //发送字符串函数char putchar(char c); //重写printf的重定向putchar函数
uart.c源码
//串口初始化函数void uart_init(){//串口初始化:工作方式1(10-bit), 9600bps @11.0592MHzSCON = 0x50; //TX and RXEA = 1;ES = 1;TMOD = TMOD|0x20; //定时器T1 8位自动重载TL1 = 0xFD; //初值@9600bpsTH1 = 0xFD;TR1 = 1; //启动定时器T1RI = 0; TI = 0; //清零}//发送char数据函数void uart_sendChar(char c){uchar *p;p = &c;uart_sendUchar(*p);}//发送unsigned char数据函数void uart_sendUchar(uchar c){ES = 0; //关串口中断SBUF = c;while(TI==0); //等待发送完成TI = 0; //清零发送标志ES = 1; //恢复串口中断}//发送unsigned int 数据函数//先传输MSB字节void uart_sendUint(uint num){uchar *p;p = #uart_sendUchar(*p);p++;uart_sendUchar(*p);}//发送int数据函数void uart_sendInt(int num){uchar *p;p = # //指向MSB字节uart_sendUchar(*p);p++; //指向下一个字节uart_sendUchar(*p);}//发送float数据函数, MSB Byte firstvoid uart_sendFloat(float num){uchar *p;uchar i;p = #for(i=0; i<4;i++){uart_sendUchar(*(p++));}}//发送字符串函数, 字符串以''结尾void uart_sendString(uchar* pStr){while(*pStr != ''){uart_sendUchar(*pStr);pStr++; //指向下一个字符}}/**************************重写stdio.h中的putchar函数,实现调用printf函数打印字符串到串口必须包含stdio.h头文件**************************/char putchar(char c){//初始重新定向到串口uart_sendUchar(c);//返回字符到调用者printfreturn c;}
主程序源码
//uart_firstdemo.c//#include"reg51.h"sbit beeper_en = P2^0;sbit key_s1 = P1^0;char msg[] = "Welcome back. ";unsigned char uart_rx_buffer[2];unsigned int count = 0;//函数定义void delayMS(unsigned int nms);void keyScan();void delayMS(unsigned int nms){unsigned int i,j;for(i=0;ifor(j=0;j<130;j++);}void main(){float temperature = 21.0/13;uart_init();while(1){keyScan(); //按键扫描printf("Hello world! ");printf("Temperature: %.3f count: %d. ", temperature, count);printf("printf demo. 2022-9-1 Guilin,China. ");delayMS(1000);count++;}}void keyScan(){if(key_s1 == 0){delayMS(10); //消抖if(key_s1 == 0){printf("S1按下!!");}}}//串口中断函数void isr_uart() interrupt 4{static unsigned char rx_byte_count = 0;//接收字节计数if(RI) //收到数据{uart_rx_buffer[rx_byte_count] = SBUF; //存储收到的数据rx_byte_count++;RI = 0;if(rx_byte_count == 2) //已完成2个字节数据的接收{rx_byte_count = 0;//下面是命令解析及执行~魔幻的if elseif(uart_rx_buffer[0] == 0x01 && uart_rx_buffer[1] == 0x00){beeper_en = 1; //beeper offprintf("执行命令:关闭蜂鸣器!");}else if (uart_rx_buffer[0] == 0x01 && uart_rx_buffer[1] == 0x01){beeper_en = 0; //beeper onprintf("执行命令:开启蜂鸣器!");}else if (uart_rx_buffer[0] == 0x02 && uart_rx_buffer[1] == 0x00){count = 0;printf("执行命令:清零count!");}else if (uart_rx_buffer[0] == 0xF0 && uart_rx_buffer[1] == 0x0F){printf("将关闭串口,再见!");TR1 = 0;}}}}
-
如何用printf打印到终端?2019-09-30 0
-
求一种用printf打印到串口的解决方案2021-11-30 0
-
如何用printf打印到串口?2021-12-01 0
-
如何使printf打印到单片机的外设中?2021-12-01 0
-
怎样将printf打印到单片机的外设中去呢2021-12-02 0
-
怎样去实现RFID-RC522的ID读取并打印到串口呢2021-12-14 0
-
单片机是如何实现printf打印到串口的2022-02-16 0
-
怎样使用printf函数将字符串打印到串口呢2022-02-24 0
-
STM8S串口打印调试信息(不使用printf)2016-07-25 1244
-
Keil C51重定向printf到串口的程序免费下载2019-07-19 770
-
STM32中使用printf打印串口数据的实现原理及方法2021-07-22 14343
-
单片机实现 printf 打印输出,和电脑端一样用2021-12-17 671
-
STM32串行通讯时打印到多个USART串口2021-12-29 601
-
如何使用printf函数将字符串打印到串口2022-01-12 436
-
stm32使用printf实现串口打印原理2022-01-13 736
全部0条评论

快来发表一下你的评论吧 !
