

【DFRobot Beetle ESP32-C3开发板试用体验】WEBSOKET—PWM—LED
描述
本文来源电子发烧友社区,作者:华仔stm32, 帖子地址:https://bbs.elecfans.com/jishu_2284182_1_1.html
【目的】展示ESP32作为web服务器的,用ESP32C3写一个websocket服务器,用网页来实现控制板载LED灯亮度的例子。
【实现思路】1、ESP32建立webserver。2、书写一个ajax的网页。3、配置LED灯的pwm。
1、打开uPyCraft 软件,建立一个esp32c3.html:
复制代码

2、新建esp32webpwmCtrl.py
复制代码
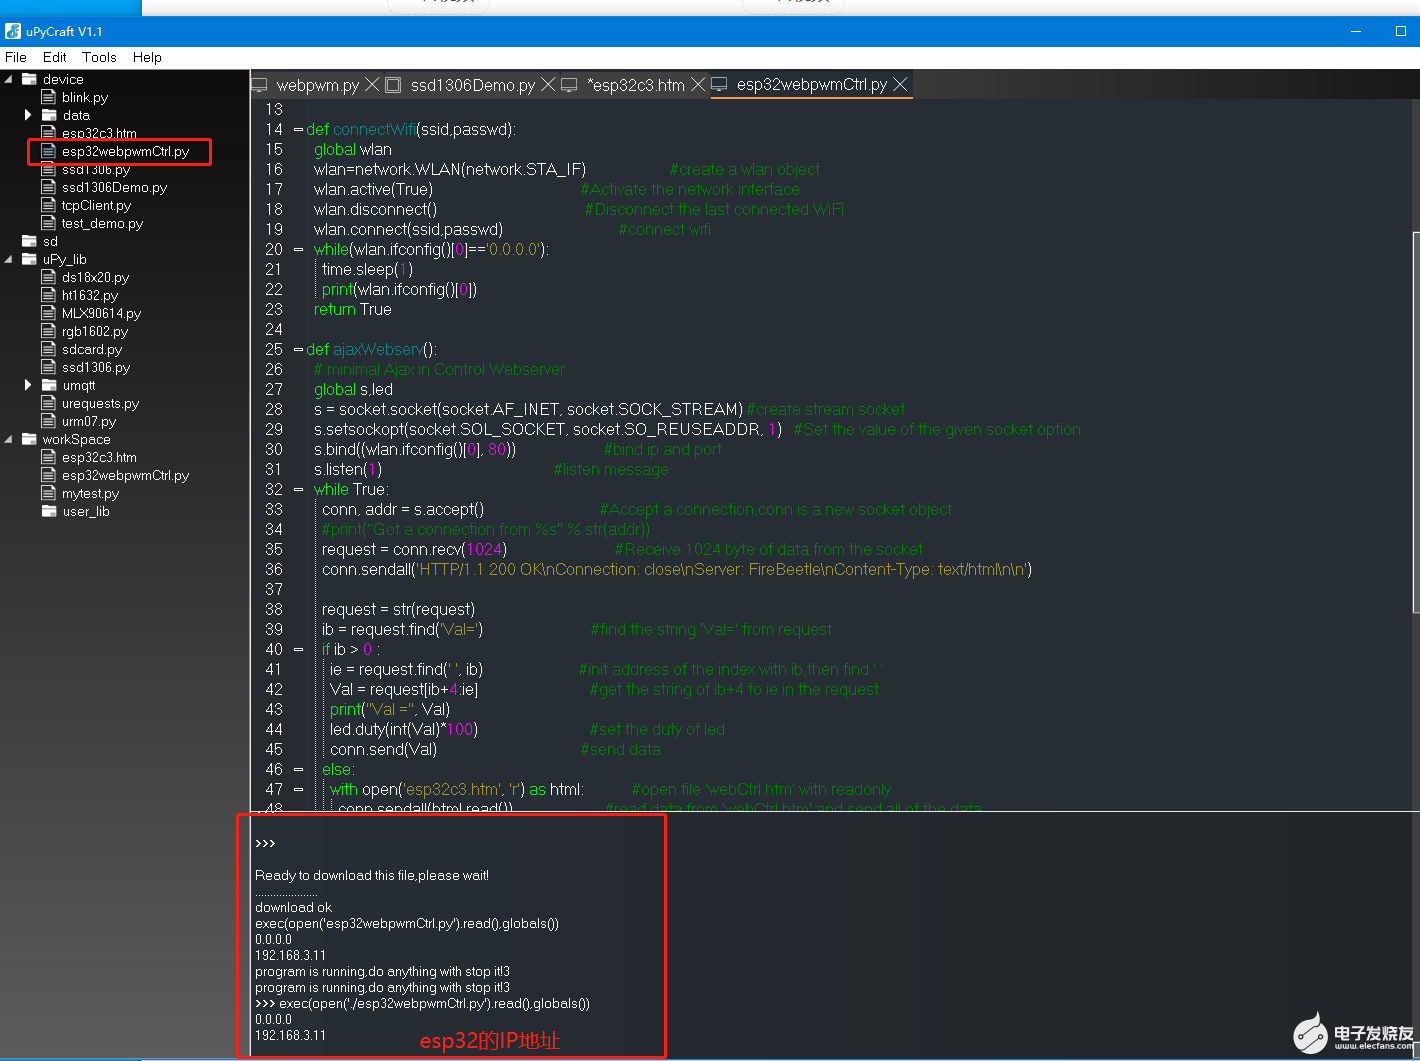
3、然后把两个文件上传到ESP32C3,运行esp32c3webpwmCtrl.py:
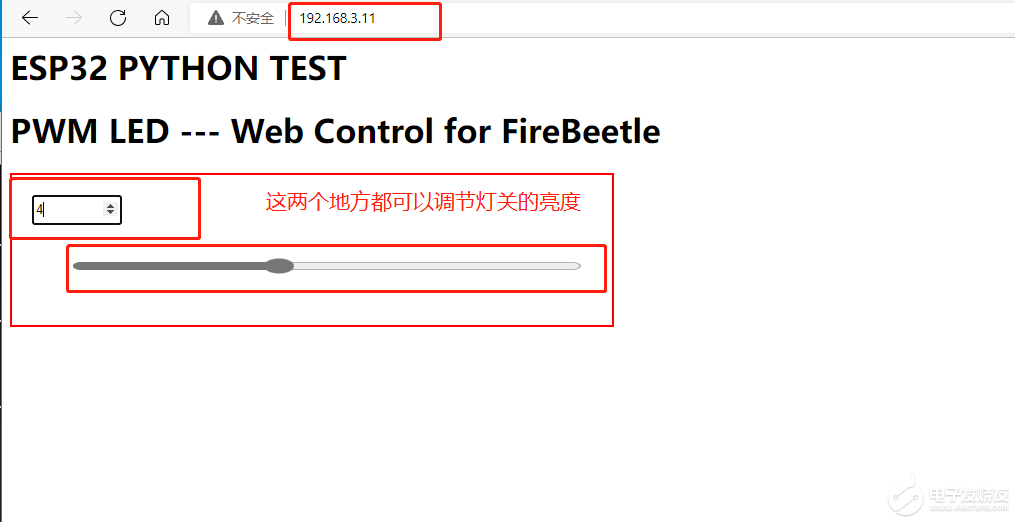
4、根据获取的的IP地址,打开浏览器输入ip地址:
【总结】python做为开发,就是快捷,快速。注(这些都是基于示例webserver创建的)
打开APP阅读更多精彩内容
【目的】展示ESP32作为web服务器的,用ESP32C3写一个websocket服务器,用网页来实现控制板载LED灯亮度的例子。
【实现思路】1、ESP32建立webserver。2、书写一个ajax的网页。3、配置LED灯的pwm。
1、打开uPyCraft 软件,建立一个esp32c3.html:
复制代码
2、新建esp32webpwmCtrl.py
- from machine import Pin,PWM
- import network
- import os
- import time
- import socket
- import gc
- SSID="HUAWEI-H10R9U"
- PASSWORD="18977381885@"
- wlan=None
- s=None
- led=None
- def connectWifi(ssid,passwd):
- global wlan
- wlan=network.WLAN(network.STA_IF) #create a wlan object
- wlan.active(True) #Activate the network interface
- wlan.disconnect() #Disconnect the last connected WiFi
- wlan.connect(ssid,passwd) #connect wifi
- while(wlan.ifconfig()[0]=='0.0.0.0'):
- time.sleep(1)
- print(wlan.ifconfig()[0])
- return True
- def ajaxWebserv():
- # minimal Ajax in Control Webserver
- global s,led
- s = socket.socket(socket.AF_INET, socket.SOCK_STREAM) #create stream socket
- s.setsockopt(socket.SOL_SOCKET, socket.SO_REUSEADDR, 1) #Set the value of the given socket option
- s.bind((wlan.ifconfig()[0], 80)) #bind ip and port
- s.listen(1) #listen message
- while True:
- conn, addr = s.accept() #Accept a connection,conn is a new socket object
- #print("Got a connection from %s" % str(addr))
- request = conn.recv(1024) #Receive 1024 byte of data from the socket
- conn.sendall('HTTP/1.1 200 OKnConnection: closenServer: FireBeetlenContent-Type: text/htmlnn')
- request = str(request)
- ib = request.find('Val=') #find the string 'Val=' from request
- if ib > 0 :
- ie = request.find(' ', ib) #init address of the index with ib,then find ' '
- Val = request[ib+4:ie] #get the string of ib+4 to ie in the request
- print("Val =", Val)
- led.duty(int(Val)*100) #set the duty of led
- conn.send(Val) #send data
- else:
- with open('esp32c3.htm', 'r') as html: #open file 'webCtrl.htm' with readonly
- conn.sendall(html.read()) #read data from 'webCtrl.htm',and send all of the data
- conn.sendall('rn')
- conn.close() #close file
- #print("Connection wth %s closed" % str(addr))
- #Catch exceptions,stop program if interrupted accidentally in the 'try'
- try:
- led=PWM(Pin(10),freq=100) #create led object
- led.init()
- led.duty(0)
- connectWifi(SSID, PASSWORD)
- ajaxWebserv()
- except:
- if (s):
- s.close()
- led.deinit()
- wlan.disconnect()
- wlan.active(False)
3、然后把两个文件上传到ESP32C3,运行esp32c3webpwmCtrl.py:
4、根据获取的的IP地址,打开浏览器输入ip地址:
【总结】python做为开发,就是快捷,快速。注(这些都是基于示例webserver创建的)
webpwm(开发板体验视频,详见作者原文链接内容)
声明:本文内容及配图由入驻作者撰写或者入驻合作网站授权转载。文章观点仅代表作者本人,不代表电子发烧友网立场。文章及其配图仅供工程师学习之用,如有内容侵权或者其他违规问题,请联系本站处理。
举报投诉
-
【RISC-V专题】DFRobot Beetle ESP32-C3开发板试用2022-04-26 0
-
【DFRobot Beetle ESP32-C3开发板试用体验】开箱分享及Arduino安装疑难问题解决2022-05-31 0
-
【DFRobot Beetle ESP32-C3开发板试用体验】WEBSOKET—PWM—LED2022-06-01 0
-
【DFRobot Beetle ESP32-C3开发板试用体验】开箱和1602A显示2022-06-10 0
-
【DFRobot Beetle ESP32-C3开发板试用体验】刷写micropython固件2022-06-15 0
-
【DFRobot Beetle ESP32-C3开发板试用体验】开箱&踩坑&点灯2022-06-20 0
-
【DFRobot Beetle ESP32-C3开发板试用体验】开箱 & 体验2022-06-23 0
-
【DFRobot Beetle ESP32-C3开发板试用体验】与GNSS模块串口通信2022-07-04 0
-
【DFRobot Beetle ESP32-C3开发板试用体验】心心念念的开箱来啦!2022-07-05 0
-
【DFRobot Beetle ESP32-C3开发板试用体验】I 开箱,点亮小蓝灯2022-07-15 0
-
【DFRobot Beetle ESP32-C3开发板试用体验】基于DFRobot Beetle ESP32-C3的天气界面2022-07-17 0
-
【DFRobot Beetle ESP32-C3开发板试用体验】车载导航天气挂件?2022-11-28 916
-
DFRobot Beetle ESP32-C3 DIY运动按钮 让你随时随地动起来2022-12-15 276
全部0条评论

快来发表一下你的评论吧 !
