

STM32的串口通信
描述
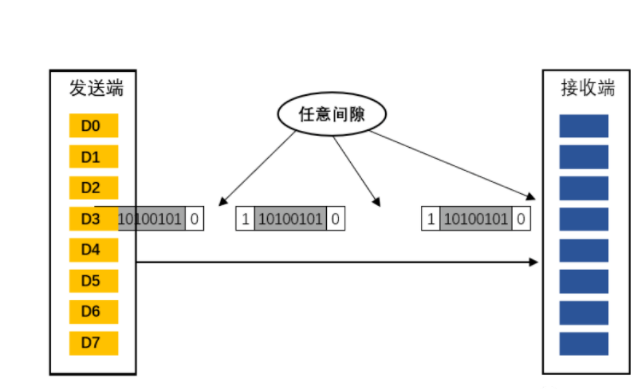
串口通信的接口标准有很多,有 RS-232C、RS-232、RS-422A、RS-485 等。常用的就是 RS-232 和 RS-485。RS-232 其实是 RS-232C 的改进,原理是一样的。我们所使用的串口(USART)又称为通用同步异步收发器,我们所使用的是异步串行通信,异步串行通信示意图如下所示:
2、串口软件配置
#include "stm32f10x.h"

void LED_Init(void)
{
  GPIO_InitTypeDef GPIO_InitStructure;        //定义结构体变量

  RCC_APB2PeriphClockCmd(RCC_APB2Periph_GPIOC,ENABLE);//开启时钟

  GPIO_InitStructure.GPIO_Pin=GPIO_Pin_0;        //选择你要设置的IO口
  GPIO_InitStructure.GPIO_Mode=GPIO_Mode_Out_PP;     //设置推挽输出模式
  GPIO_InitStructure.GPIO_Speed=GPIO_Speed_50MHz;      //设置传输速率
  GPIO_Init(GPIOC,&GPIO_InitStructure);            //初始化GPIO

  GPIO_SetBits(GPIOC,GPIO_Pin_0);             //将LED端口拉高,熄灭所有LED
}


// USART1初始化函数
void USART1_Init(u32 bound)
{
   //GPIO端口设置
  GPIO_InitTypeDef GPIO_InitStructure;
  USART_InitTypeDef USART_InitStructure;
  NVIC_InitTypeDef NVIC_InitStructure;

  RCC_APB2PeriphClockCmd(RCC_APB2Periph_GPIOA,ENABLE);
  RCC_APB2PeriphClockCmd(RCC_APB2Periph_USART1,ENABLE);

  /*  配置GPIO的模式和IO口 */
  GPIO_InitStructure.GPIO_Pin=GPIO_Pin_9;//TX         //串口输出PA9
  GPIO_InitStructure.GPIO_Speed=GPIO_Speed_50MHz;
  GPIO_InitStructure.GPIO_Mode=GPIO_Mode_AF_PP;      //复用推挽输出
  GPIO_Init(GPIOA,&GPIO_InitStructure);  /* 初始化串口输入IO */
  GPIO_InitStructure.GPIO_Pin=GPIO_Pin_10;//RX       //串口输入PA10
  GPIO_InitStructure.GPIO_Mode=GPIO_Mode_IN_FLOATING;      //模拟输入
  GPIO_Init(GPIOA,&GPIO_InitStructure); /* 初始化GPIO */

   //USART1 初始化设置
  USART_InitStructure.USART_BaudRate = bound;//波特率设置
  USART_InitStructure.USART_WordLength = USART_WordLength_8b;//字长为8位数据格式
  USART_InitStructure.USART_StopBits = USART_StopBits_1;//一个停止位
  USART_InitStructure.USART_Parity = USART_Parity_No;//无奇偶校验位
  USART_InitStructure.USART_HardwareFlowControl = USART_HardwareFlowControl_None;//无硬件数据流控制
  USART_InitStructure.USART_Mode = USART_Mode_Rx | USART_Mode_Tx;  //收发模式
  USART_Init(USART1, &USART_InitStructure); //初始化串口1

  USART_Cmd(USART1, ENABLE);  //使能串口1

  USART_ClearFlag(USART1, USART_FLAG_TC);

  USART_ITConfig(USART1, USART_IT_RXNE, ENABLE);//开启相关中断

  //Usart1 NVIC 配置
  NVIC_InitStructure.NVIC_IRQChannel = USART1_IRQn;//串口1中断通道
  NVIC_InitStructure.NVIC_IRQChannelPreemptionPriority=3;//抢占优先级3
  NVIC_InitStructure.NVIC_IRQChannelSubPriority =3;    //子优先级3
  NVIC_InitStructure.NVIC_IRQChannelCmd = ENABLE;      //IRQ通道使能
  NVIC_Init(&NVIC_InitStructure);  //根据指定的参数初始化VIC寄存器、
}
// USART1中断函数
void USART1_IRQHandler(void)                  //串口1中断服务程序
{
  u8 r;
  if(USART_GetITStatus(USART1, USART_IT_RXNE) != RESET)  //接收中断
  {
    r =USART_ReceiveData(USART1);//(USART1->DR);  //读取接收到的数据
    USART_SendData(USART1,r);
    while(USART_GetFlagStatus(USART1,USART_FLAG_TC) != SET);
  }
  USART_ClearFlag(USART1,USART_FLAG_TC);
}

int main( void )
{
  LED_Init();
  USART1_Init(115200);
  while(1)
  {
    GPIO_ResetBits(GPIOC,GPIO_Pin_0);
  }
}
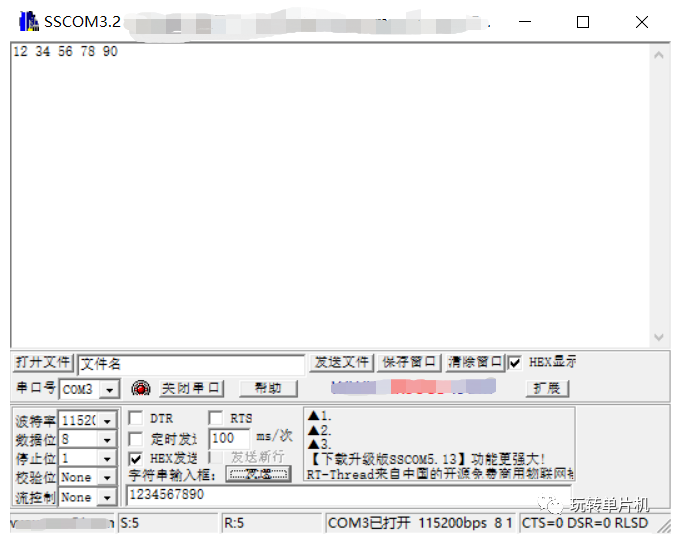
3、验证程序是否通过测试,下图可以看出程序可以正常使用
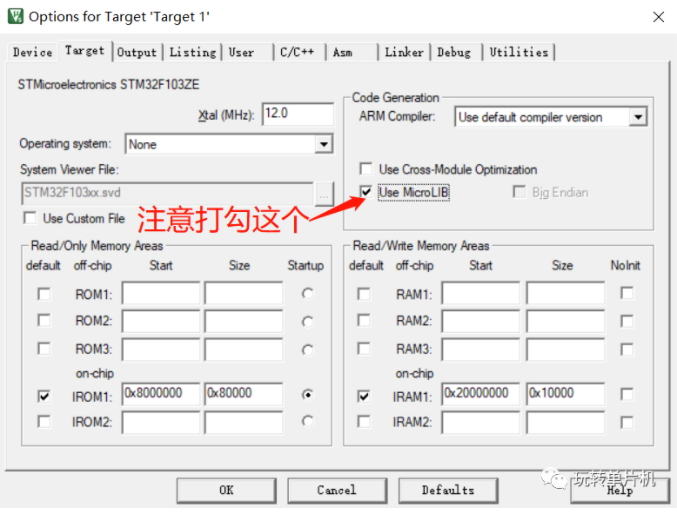
4、重定向配置
#include "stm32f10x.h"
#include "stdio.h"

void LED_Init(void)
{
  GPIO_InitTypeDef GPIO_InitStructure;        //定义结构体变量

  RCC_APB2PeriphClockCmd(RCC_APB2Periph_GPIOC,ENABLE);//开启时钟

  GPIO_InitStructure.GPIO_Pin=GPIO_Pin_0;        //选择你要设置的IO口
  GPIO_InitStructure.GPIO_Mode=GPIO_Mode_Out_PP;     //设置推挽输出模式
  GPIO_InitStructure.GPIO_Speed=GPIO_Speed_50MHz;      //设置传输速率
  GPIO_Init(GPIOC,&GPIO_InitStructure);            //初始化GPIO

  GPIO_SetBits(GPIOC,GPIO_Pin_0);             //将LED端口拉高,熄灭所有LED
}

void USART_init(uint32_t bound)
{
  GPIO_InitTypeDef GPIO_InitStruct;   //定义GPIO结构体变量
  USART_InitTypeDef USART_InitStruct;   //定义串口结构体变量

  RCC_APB2PeriphClockCmd(RCC_APB2Periph_GPIOA|RCC_APB2Periph_USART1,ENABLE);   //使能GPIOC的时钟

  GPIO_InitStruct.GPIO_Pin=GPIO_Pin_9;   //配置TX引脚
  GPIO_InitStruct.GPIO_Mode=GPIO_Mode_AF_PP;   //配置PA9为复用推挽输出
  GPIO_InitStruct.GPIO_Speed=GPIO_Speed_50MHz;   //配置PA9速率
  GPIO_Init(GPIOA,&GPIO_InitStruct);   //GPIO初始化函数

  GPIO_InitStruct.GPIO_Pin=GPIO_Pin_10;   //配置RX引脚
  GPIO_InitStruct.GPIO_Mode=GPIO_Mode_IN_FLOATING;   //配置PA10为浮空输入
  GPIO_InitStruct.GPIO_Speed=GPIO_Speed_50MHz;   //配置PA10速率
  GPIO_Init(GPIOA,&GPIO_InitStruct);   //GPIO初始化函数


  USART_InitStruct.USART_Mode=USART_Mode_Tx|USART_Mode_Rx;   //发送接收模式
  USART_InitStruct.USART_Parity=USART_Parity_No;   //无奇偶校验
  USART_InitStruct.USART_BaudRate=bound;   //波特率
  USART_InitStruct.USART_StopBits=USART_StopBits_1;   //停止位1位
  USART_InitStruct.USART_WordLength=USART_WordLength_8b;   //字长8位
  USART_InitStruct.USART_HardwareFlowControl=USART_HardwareFlowControl_None;   //无硬件数据流控制
  USART_Init(USART1,&USART_InitStruct);   //串口初始化函数

  USART_Cmd(USART1,ENABLE);   //使能USART1
}

int fputc(int ch,FILE *f)   //printf重定向函数
{
  USART_SendData(USART1,(uint8_t)ch);   //发送一字节数据
  while(USART_GetFlagStatus(USART1,USART_FLAG_TXE) == RESET);   //等待发送完成
  return ch;
}

int main( void )
{
  uint32_t i;
  LED_Init();
  USART_init(115200);
  while(1)
  {
    GPIO_ResetBits(GPIOC,GPIO_Pin_0);
    for(i=0;i<655350;i++);
    printf("printf testrn");
  }
}
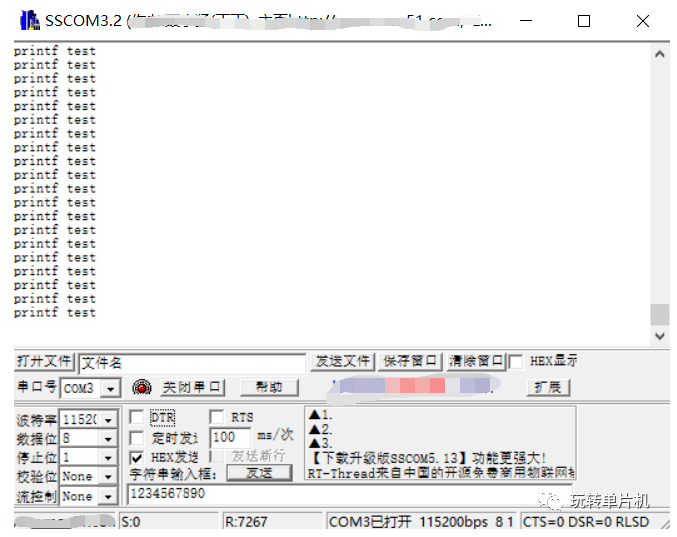
5、验证程序,下图可以看出程序正常
--END--
声明:本文内容及配图由入驻作者撰写或者入驻合作网站授权转载。文章观点仅代表作者本人,不代表电子发烧友网立场。文章及其配图仅供工程师学习之用,如有内容侵权或者其他违规问题,请联系本站处理。
举报投诉
-
串口通信简介和STM32的串口通信2021-08-04 0
-
求大佬分享ROS与STM32的串口通信的程序2021-12-06 0
-
如何实现jetsonnano和stm32的串口通信?2021-12-07 0
-
如何利用Arduino IDE去完成stm32的串口通信呢2021-12-07 0
-
如何用Arduino去完成stm32的串口通信呢2021-12-07 0
-
如何使用usart完成stm32的串口通信?2021-12-08 0
-
如何对STM32的串口通信进行配置呢2021-12-08 0
-
如何在Ardunio下完成STM32的串口通信?2021-12-09 0
-
怎样去设计一种STM32的串口通信接口呢2021-12-13 0
-
STM32的串口通信接口有哪几种2022-02-14 0
-
基于是stm32的串口通信2021-12-16 337
-
在Arduino完成STM32的串口通信2021-12-24 783
-
Arduino下的STM32的串口通信2021-12-24 704
-
2021-07-29 Openmv与stm32 的串口通信(HAL库)2021-12-24 529
-
基于stm32的串口通信代码2022-06-15 497
全部0条评论

快来发表一下你的评论吧 !
