

SpringBoot的核心注解2
电子说
描述
他会调用 ((AbstractApplicationContext) applicationContext).refresh();方法,我们点进来看
public void refresh() throws BeansException, IllegalStateException {
   synchronized (this.startupShutdownMonitor) {
      // Prepare this context for refreshing.
      prepareRefresh();

      // Tell the subclass to refresh the internal bean factory.
      ConfigurableListableBeanFactory beanFactory = obtainFreshBeanFactory();

      // Prepare the bean factory for use in this context.
      prepareBeanFactory(beanFactory);

      try {
         // Allows post-processing of the bean factory in context subclasses.
         postProcessBeanFactory(beanFactory);

         // Invoke factory processors registered as beans in the context.
         invokeBeanFactoryPostProcessors(beanFactory);

         // Register bean processors that intercept bean creation.
         registerBeanPostProcessors(beanFactory);

         // Initialize message source for this context.
         initMessageSource();

         // Initialize event multicaster for this context.
         initApplicationEventMulticaster();

         // Initialize other special beans in specific context subclasses.
         onRefresh();

         // Check for listener beans and register them.
         registerListeners();

         // Instantiate all remaining (non-lazy-init) singletons.
         finishBeanFactoryInitialization(beanFactory);

         // Last step: publish corresponding event.
         finishRefresh();
      }

      catch (BeansException ex) {
         if (logger.isWarnEnabled()) {
            logger.warn("Exception encountered during context initialization - " +
                  "cancelling refresh attempt: " + ex);
         }

         // Destroy already created singletons to avoid dangling resources.
         destroyBeans();

         // Reset 'active' flag.
         cancelRefresh(ex);

         // Propagate exception to caller.
         throw ex;
      }

      finally {
         // Reset common introspection caches in Spring's core, since we
         // might not ever need metadata for singleton beans anymore...
         resetCommonCaches();
      }
   }
}
这点代码似曾相识啊 没错,就是一个spring的bean的加载过程我在,解析springIOC加载过程的时候介绍过这里面的方法,如果你看过Spring源码的话 ,应该知道这些方法都是做什么的。现在我们不关心其他的,我们来看一个方法叫做 onRefresh();方法
protected void onRefresh() throws BeansException {
   // For subclasses: do nothing by default.
}
他在这里并没有实现,但是我们找他的其他实现,我们来找

我们既然要找Tomcat那就肯定跟web有关,我们可以看到有个ServletWebServerApplicationContext
@Override
protected void onRefresh() {
   super.onRefresh();
   try {
      createWebServer();
   }
   catch (Throwable ex) {
      throw new ApplicationContextException("Unable to start web server", ex);
   }
}
我们可以看到有一个createWebServer();方法他是创建web容器的,而Tomcat不就是web容器,那他是怎么创建的呢,我们继续看
private void createWebServer() {
   WebServer webServer = this.webServer;
   ServletContext servletContext = getServletContext();
   if (webServer == null && servletContext == null) {
      ServletWebServerFactory factory = getWebServerFactory();
      this.webServer = factory.getWebServer(getSelfInitializer());
   }
   else if (servletContext != null) {
      try {
         getSelfInitializer().onStartup(servletContext);
      }
      catch (ServletException ex) {
         throw new ApplicationContextException("Cannot initialize servlet context",
               ex);
      }
   }
   initPropertySources();
}
factory.getWebServer(getSelfInitializer());他是通过工厂的方式创建的
public interface ServletWebServerFactory {

   WebServer getWebServer(ServletContextInitializer... initializers);

}
可以看到 它是一个接口,为什么会是接口。因为我们不止是Tomcat一种web容器。

我们看到还有Jetty,那我们来看TomcatServletWebServerFactory
@Override
public WebServer getWebServer(ServletContextInitializer... initializers) {
   Tomcat tomcat = new Tomcat();
   File baseDir = (this.baseDirectory != null) ? this.baseDirectory
         : createTempDir("tomcat");
   tomcat.setBaseDir(baseDir.getAbsolutePath());
   Connector connector = new Connector(this.protocol);
   tomcat.getService().addConnector(connector);
   customizeConnector(connector);
   tomcat.setConnector(connector);
   tomcat.getHost().setAutoDeploy(false);
   configureEngine(tomcat.getEngine());
   for (Connector additionalConnector : this.additionalTomcatConnectors) {
      tomcat.getService().addConnector(additionalConnector);
   }
   prepareContext(tomcat.getHost(), initializers);
   return getTomcatWebServer(tomcat);
}
那这块代码,就是我们要寻找的内置Tomcat,在这个过程当中,我们可以看到创建Tomcat的一个流程。因为run方法里面加载的东西很多,所以今天就浅谈到这里。如果不明白的话, 我们在用另一种方式来理解下,
大家要应该都知道stater举点例子
<dependency>
    <groupId>org.springframework.boot<span class="hljs-name"groupId>
    <artifactId>spring-boot-starter-data-redis<span class="hljs-name"artifactId>
<span class="hljs-name"dependency>
<dependency>
    <groupId>org.springframework.boot<span class="hljs-name"groupId>
    <artifactId>spring-boot-starter-freemarker<span class="hljs-name"artifactId>
<span class="hljs-name"dependency>
所以我们不防不定义一个stater来理解下,我们做一个需求,就是定制化不同的人跟大家说你们好,我们来看
<parent>
    <groupId>org.springframework.boot<span class="hljs-name"groupId>
    <artifactId>spring-boot-starter-parent<span class="hljs-name"artifactId>
    <version>2.1.4.RELEASE<span class="hljs-name"version>
    <relativePath/>
<span class="hljs-name"parent>
<groupId>com.zgw<span class="hljs-name"groupId>
<artifactId>gw-spring-boot-srater<span class="hljs-name"artifactId>
<version>1.0-SNAPSHOT<span class="hljs-name"version>

<dependencies>
    <dependency>
        <groupId>org.springframework.boot<span class="hljs-name"groupId>
        <artifactId>spring-boot-autoconfigure<span class="hljs-name"artifactId>
    <span class="hljs-name"dependency>
<span class="hljs-name"dependencies>
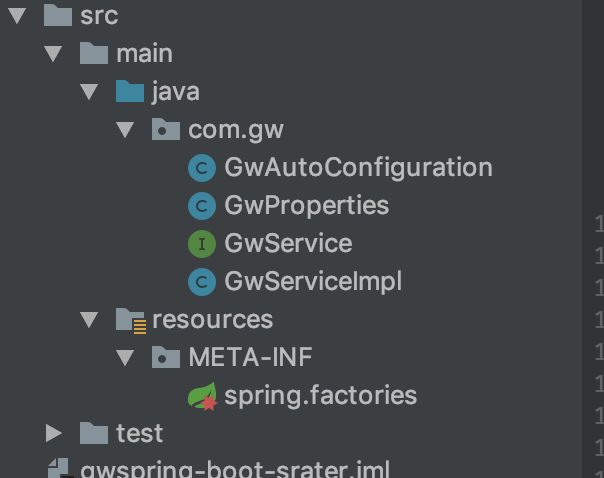
我们先来看maven配置写入版本号,如果自定义一个stater的话必须依赖spring-boot-autoconfigure这个包,我们先看下项目目录
public class GwServiceImpl  implements GwService{
    @Autowired
    GwProperties properties;

    @Override
    public void Hello()
    {
        String name=properties.getName();
        System.out.println(name+"说:你们好啊");
    }
}
我们做的就是通过配置文件来定制name这个是具体实现
@Component
@ConfigurationProperties(prefix = "spring.gwname")
public class GwProperties {

    String name="zgw";

    public String getName() {
        return name;
    }

    public void setName(String name) {
        this.name = name;
    }
}
这个类可以通过@ConfigurationProperties读取配置文件
@Configuration
@ConditionalOnClass(GwService.class)  //扫描类
@EnableConfigurationProperties(GwProperties.class) //让配置类生效
public class GwAutoConfiguration {

    /**
    * 功能描述 托管给spring
    * @author zgw
    * @return
    */
    @Bean
    @ConditionalOnMissingBean
    public GwService gwService()
    {
        return new GwServiceImpl();
    }
}
这个为配置类,为什么这么写因为,spring-boot的stater都是这么写的,我们可以参照他仿写stater,以达到自动配置的目的,然后我们在通过spring.factories也来进行配置
org.springframework.boot.autoconfigure.EnableAutoConfiguration=com.gw.GwAutoConfiguration
然后这样一个简单的stater就完成了,然后可以进行maven的打包,在其他项目引入就可以使用,在这里列出代码地址
-
SpringBoot配置Mybatis的2个错误和修正2019-04-19 0
-
一文解析SpringBoot2整合SSM框架2020-06-09 0
-
怎样去使用springboot呢2021-10-25 0
-
Spring Boot常用注解与使用方式2022-07-08 1112
-
求一种SpringBoot定时任务动态管理通用解决方案2023-02-03 574
-
一个无需注解的SpringBoot API文档生成神器2023-03-13 619
-
什么是 SpringBoot?2023-04-07 1064
-
SpringBoot常用注解及使用方法12023-04-07 461
-
SpringBoot常用注解及使用方法22023-04-07 426
-
Springboot常用注解合集2023-04-07 536
-
SpringBoot常用注解及原理2023-04-07 427
-
SpringBoot的核心注解12023-04-07 507
-
springboot核心注解2023-11-23 313
-
一个注解搞定SpringBoot接口防刷2023-11-28 257
-
SpringBoot核心注解由几个注解组成2023-12-03 368
全部0条评论

快来发表一下你的评论吧 !
