

如何使用cpp编写用于小型系统的app
描述
本文将介绍如何使用 cpp 编写用于小型系统的 app。
Ability 相关介绍
Ability 是应用所具备能力的抽象,也是应用程序的重要组成部分。Ability 是系统调度应用的最小单元,是能够完成一个独立功能的组件。
一个应用可以包含一个或多个 Ability。其中 Ability 又分为 Page 类型的和 Service 类型的,前者是为用户提供人机交互能力的,后者是提供后台任务机制的。
简单来讲就是 Page 带界面,Service 不带界面。这里将重点介绍 Page 类型的 Ability。
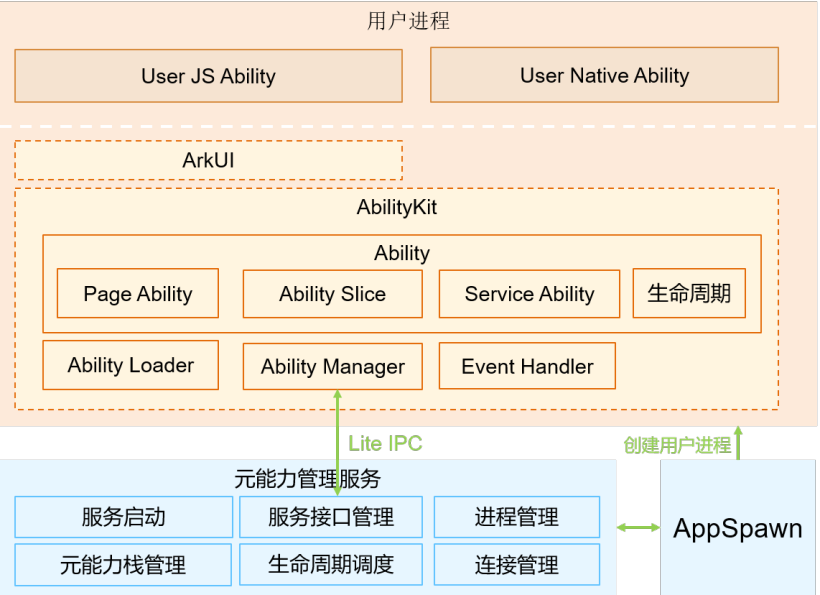
使用到的子系统有 Ability 子系统、包管理子系统和图形 UI 子系统。
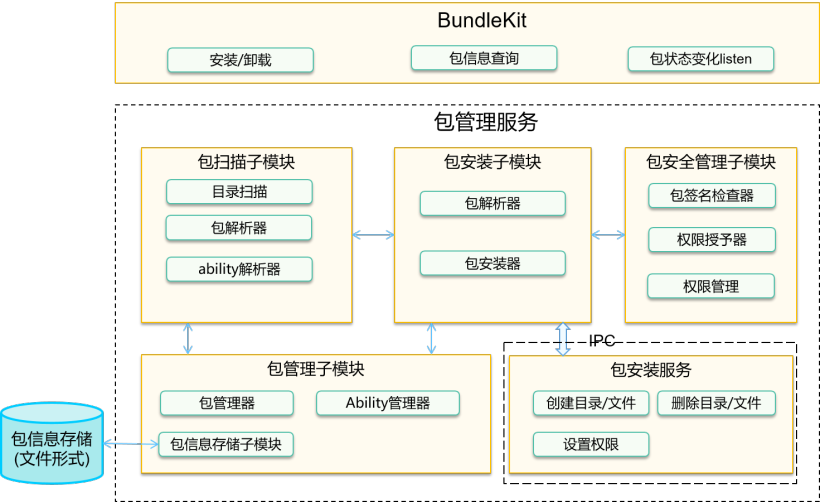
Ability 子系统是管理 OpenHarmony 应用运行状态的开发框架;包管理子系统是 OpenHarmony 为开发者提供的安装包管理框架;图形 UI 子系统提供基础 UI 组件和容器类组件。
简单实现
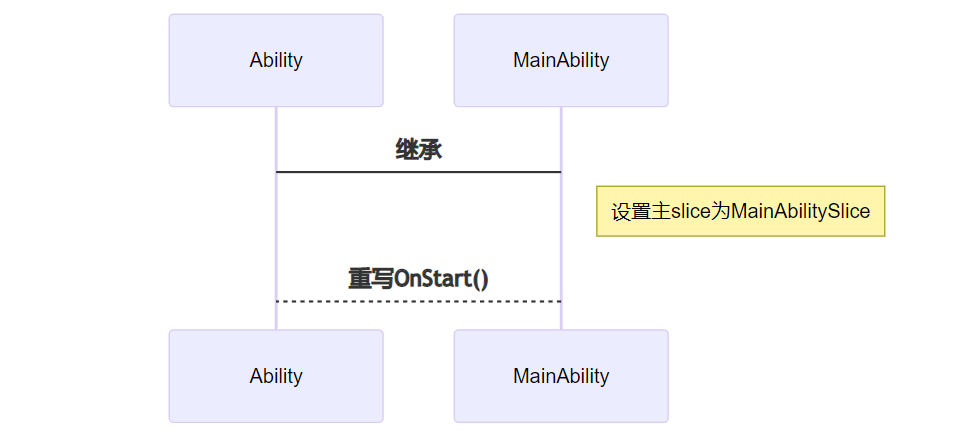
①ability 和 abilityslice
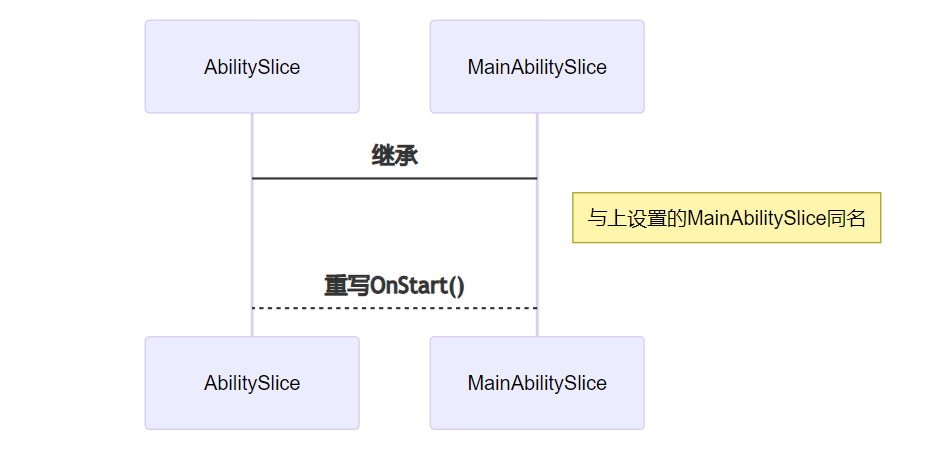
abilityslice 是单个页面及其控制逻辑的总和,是 Page 类型 Ability 特有的组件。
一个 Page 类型的 Ability 可以包含多个 AbilitySlice,此时,这些页面提供的业务能力应当是高度相关的。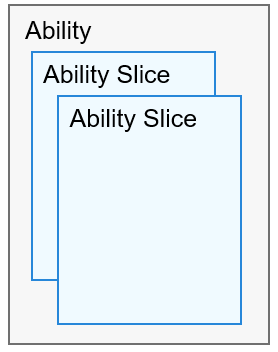
②生命周期
整体流程下来大致有 OnStart()、OnAvtive()、OnInactive()、OnBackground() 和 OnStop() 五阶段。
abilityslice 生命周期与 ability 相似,但是仍要区分。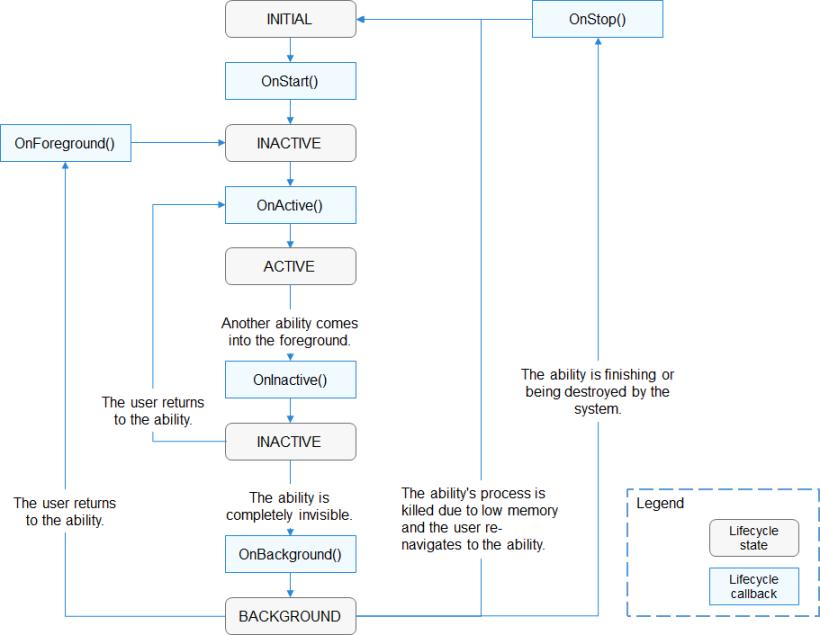
③hello world
./helloworld/
├── config.json                         //配置文件
├── resource                            //资源
└── src                                 //主要文件
    ├── include
    │   ├── main_ability.h
    │   └── main_ability_slice.h
    └── main
        ├── main_ability.cpp
        └── main_ability_slice.cpp
首先定义并注册 ability:
// main_ability.h
#ifndef HELLO_MAIN_ABILITY_H
#define HELLO_MAIN_ABILITY_H

#include "ability_loader.h"

namespace OHOS {
class MainAbility : public Ability {
protected:
    void OnStart(const Want &want) override; //Want结构体,ability的相关信息
    /*
     * 由于在这里我们只要简单的展示helloworld标签,其它函数不需要重载。
     */
    // void OnInactive() override;
    // void OnActive(const Want &want) override;
    // void OnBackground() override;
    // void OnStop() override;
};
}

#endif
//main_ability.cpp
#include "main_ability.h"

namespace OHOS {
REGISTER_AA(MainAbility) //使用REGISTER_AA注册ability

void MainAbility::OnStart(const Want &want)
{
    printf("This is MainAbility OnStart status!
");
    SetMainRoute("MainAbilitySlice"); //设置主页面为MainAbilitySlice,这要与后续的slice名字匹配

    Ability::OnStart(want);
}
}
//main_ability_slice.h
#ifndef HELLO_ABILITY_SLICE_H
#define HELLO_ABILITY_SLICE_H

#include "ability_loader.h"
#include "ability_manager.h"
#include "bundle_manager.h"
#include "components/ui_label.h"

namespace OHOS {
class MainAbilitySlice : public AbilitySlice { //创建AbilitySlice类 与上面同名
public:
    MainAbilitySlice() = default;
    virtual ~MainAbilitySlice();

protected:
    void OnStart(const Want &want) override;
    /*
     * 同理
     */
    // void OnInactive() override;
    // void OnActive(const Want &want) override;
    // void OnBackground() override;
    // void OnStop() override;
};
}
#endif
//main_ability_slice.cpp
#include "main_ability_slice.h"
const int screen_width = 720;
const int screen_height = 1280;

namespace OHOS {
REGISTER_AS(MainAbilitySlice)

MainAbilitySlice::~MainAbilitySlice()
{
    printf("This is ~MainAbilitySlice!rn");
}

void MainAbilitySlice::OnStart(const Want& want)
{
    AbilitySlice::OnStart(want);
    RootView* rootView_ = RootView::GetWindowRootView(); //创建底层界面
    rootView_->SetPosition(0, 0, screen_width, screen_height);
    rootView_->SetStyle(STYLE_BACKGROUND_COLOR, Color::Black()));
    rootView_->SetFocusable(true);
    rootView_->SetInterceptFocus(false);

    UILabel* label = new UILabel(); //创建label写入Hello World
    label->SetPosition(0, 0, 720, 64);
    label->SetText("Hello World!");
    label->SetFont("SourceHanSansSC-Regular.otf", 64);
    label->SetStyle(STYLE_TEXT_COLOR, Color::White()));

    rootView_->Add(label); //将label放入rootView

    SetUIContent(rootView_); //设置显示RootView UI
}
}
#endif
④config.json 的编写
//config.json
{
    "app": {
        "bundleName": "com.sample.hello",
        "vendor": "sample",
        "version": {
            "code": 1,
            "name": "1.0"
        },
        "apiVersion": {
            "compatible": 3,
            "target": 4
        }
    },
    "deviceConfig": {
        "default": {
        }
    },
    "module": {
        "package": "com.sample.hello",
        "name": ".MyHarmonyAbilityPackage",
        "deviceType": [
            "phone",
            "tv",
            "tablet",
            "pc",
            "car",
            "smartWatch",
            "sportsWatch",
            "smartVision"
        ],
        "distro": {
            "deliveryWithInstall": true,
            "moduleName": "hello",
            "moduleType": "entry"
        },
        "abilities": [ //ability配置声明
            {
                "name": "MainAbility",
                "label": "hello world app",
                "launchType": "standard",
                "type": "page",
                "visible": true
            }
        ]
    }
}
hap 编译
①通过 BUILD.gn 与系统一并编译使用到编译链中的 hap_pack,添加配置:
import(“/ildte/config/hap_pack.gni”)
import("//build/lite/config/hap_pack.gni")

shared_library("hello") {
  sources = [
    "src/main/main_ability.cpp",
    "src/main/main_ability_slice.cpp"
  ] #将主要文件编译出库

  deps = [
    "${aafwk_lite_path}/frameworks/ability_lite:aafwk_abilitykit_lite",
    "${appexecfwk_lite_path}/frameworks/bundle_lite:bundle",
    "//foundation/graphic/ui:lite_ui",
    "//foundation/graphic/utils:lite_graphic_utils",
    "//foundation/systemabilitymgr/samgr_lite/samgr:samgr",
  ]

  include_dirs = [
    "src/include",
    "${aafwk_lite_path}/interfaces/kits/ability_lite",
    "${aafwk_lite_path}/interfaces/kits/want_lite",
    "${appexecfwk_lite_path}/interfaces/kits/bundle_lite",
  ]

  ldflags = [ "-shared" ]
  ldflags += [ "-lstdc++" ]
  ldflags += [ "-L$ohos_root_path/sysroot/usr/lib" ]
  ldflags += [ "-Wl,-rpath-link=$ohos_root_path/sysroot/usr/lib" ]
  ldflags += [
    "-lui",
    "-lability",
  ] #添加依赖

  defines = [
    "ENABLE_WINDOW=1",
    "ABILITY_WINDOW_SUPPORT",
    "OHOS_APPEXECFWK_BMS_BUNDLEMANAGER",
  ] #配置定义
}

hap_pack("hello_hap") { #打包成hap
  deps = [ ":hello" ]
  mode = "hap"
  json_path = "config.json"
  ability_so_path = "$root_out_dir/libhello.so" #编译后的库文件
  force = "true"
  cert_profile = "com.huawei.launcher_AppProvision_release.p7b" #由于不清楚获取证书方法 先用源码案例自带的证书代替
  resources_path = "resources"
  hap_name = "hello"
}
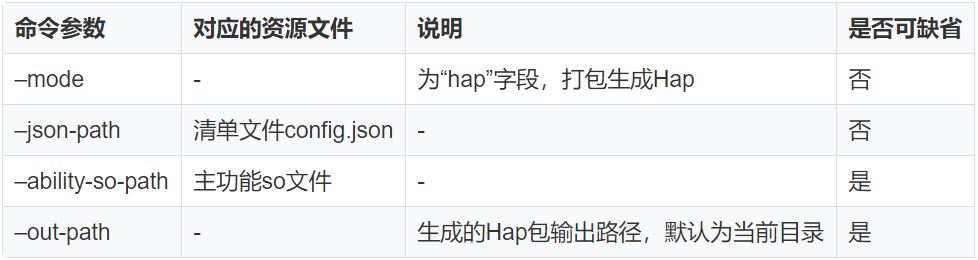
②通过 app_packing_tool 单独编译
该打包工具在源码目录 developtools/packing_tool/jar 下。
主要参数如下:
./out/
├── config.json
└── libhello.so
最后使用 java -jar app_packing_tool.jar 进行打包,如下:
java -jar app_packing_tool.jar |
--mode hap |
--json-path ./config.json |
--ability-out-path ./libhello.so |
--out-path ./hello.hap
hap 安装
①安装命令 bm
由于小型系统不支持使用 HDC 工具,我们需要使用到 bm 命令进行安装程序。
bm set -s disable //取消签名安装。
bm install -p system/internal/hello.hap //使用BUILD.gn一起编译的hap默认会在这个路径,如果使用工具打包的,视情况填写路径。
②相关参数
# bm
Usage: install hap-path [options]
Description:
        --help|-h                   help menu
        --happath|-p           location of the hap to install
Usage: uninstall bundle-name [options]
Description:
        --help|-h                   help menu
        --bundlename|-n           name of the bundle to uninstall
Usage: dump [options]
Option Description:
        --help|-h                   help menu
        --list|-l                   app list
        --bundlename|-n           dump installed hap's info
        --metadatakey|-m           dump bundleNames match metaData key
Usage: set [options]
Option Description:
        --externalmode|-e status    enable externalmode
        --debugmode|-d  status      enable debugmode
        --signmode|-s  status      enable signmode
小型系统的 bm 指令是标准系统的阉割版。
安装成功后就可以打开该 app,部分小型系统的设备屏幕没有触摸功能和鼠标驱动,我们可以使用 aa 命令来启动 app。
aa start -p com.sample.hello -n MainAbility //包名和ability名都在config.json中定义
# aa
Usage:
aa start -p bundlename -n ability_name
aa stopability -p bundlename -n ability_name
aa terminate -p bundlename
aa dump -p bundlename -n ability_name -e extra_option
aa dump -a

Options:
 -h (--help)                Show the help information.             [eg: aa -h]
 -p (--bundlename)          Appoint the bundlename name.           [eg: -p com.huawei]
 -n (--abilityname)         Appoint the ability name.              [eg: -n MyAbility]
 -a (--all)                 [Unnecessary]dump all ability info.    [eg: -a]
 -e (--extra)               [Unnecessary]extra info when dump.     [eg: -e]

Commands:
aa start                    Start the target ability.
aa stopability              Stop the target service ability.
aa terminate                Terminate the target app.
aa dump                     Dump ability
总结
使用 cpp 编写用户应用程序,我们可以更方便有效的调用南向接口,这将会在开发和调试的过程中给我们带来极大的便利。
审核编辑 :李倩
- 相关推荐
- APP
- 应用程序
- OpenHarmony
-
请问keil编写的BootLoader可以跳转到GCC编写的APP里吗?2024-04-18 0
-
小型测距系统2014-01-04 0
-
小型智慧家居,基于Arduino uno r3,带APP2017-11-03 0
-
CPP和C共存的诀窍是什么?2019-01-22 0
-
【信盈达】鸿蒙系统驱动程序--2、编写APP2020-09-14 0
-
Stm32的bootloader和App的编写注意事项有哪些?2021-10-29 0
-
如何利用App inventor编写安卓app控制ESP8266?2022-02-11 0
-
OpenHarmony轻量与小型系统入门概述2022-05-06 0
-
idf4.4在cmakelists.txt中设置了main.cpp依然找不到app_main是为什么?2023-02-14 0
-
嵌入式小型TCPIP协议栈2011-10-08 515
-
一个专为嵌入式系统编写的小型TCP IP协议栈2017-02-08 929
-
ICA亚投链app系统开发2018-08-20 334
-
Dev-Cpp 5.11TDM-GCC 4.9.2 Setup C语言开发工具软件免费下载2018-09-27 7162
-
小型仿人机器人系统的设计资料详细说明2020-06-10 765
-
(远程控制)App inventor 编写安卓app控制 ESP82662021-12-08 1135
全部0条评论

快来发表一下你的评论吧 !
