

启明云端分享|ESP32-S3 Smartconfig一键配网教程
描述
物联网时代技术开始规模化服务于民众,方便快捷显得尤为重要,smartconfig一键配网便是一个典型案例。智能家居/家电现阶段还处于普及阶段,由于家庭wifi网络的普及,目前普遍采用wifi与路由器完成连接,与手机/云端进行数据交互智能硬件,如智能插座,智能空调,智能空气净化器,智能灯泡,智能门锁由于不具备人机交互界面,不能像电脑一样的搜索/选择指定路由器,输入连接SSID和密码的界面,所以必须先解决正确连接路由问题。
1.开发环境:
esp-idf版本 :master
esp-idf环境:ESP-IDF开发环境搭建
https://docs.espressif.com/projects/esp-idf/zh_CN/latest/esp32c3/get-started/index.html
注:官方暂时没有s3的安装教程,可以参照32系列其他方式选择master分支即可。
配网例程:esp-idf\examples\wifi\smart_config
2.硬件需求
Esp32-s3 开发板一块
Usb数据线一条
3.一键配网(SmartConfig)连接过程:
1)ESP32 设备进入初始化状态,开启混监听所有网络数据包。
2)手机连上 WiFi,开启 APP 软件,输入手机所在 WiFi 密码,请求配网,发送UDP广播包。
3)ESP32 通过 UDP 包(长度)获取配置信息捕捉到路由 SSID 和 PASSWD,连接路由器。
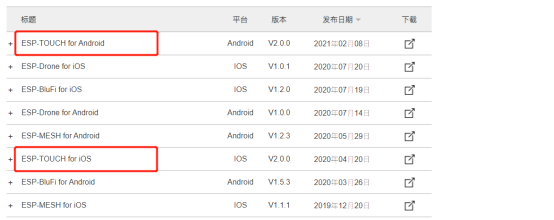
4. 配网APP
乐鑫官方:配网APP
https://www.espressif.com/zh-hans/support/download/apps
根据自己的手机系统选择相应的APP
例程分析:
// 在 event_handler 中,通过获取不同的时间执行相对应的操作。
static void event_handler(void* arg, esp_event_base_t event_base,
int32_t event_id, void* event_data)
{
if (event_base == WIFI_EVENT && event_id == WIFI_EVENT_STA_START) {
xTaskCreate(smartconfig_example_task, "smartconfig_example_task", 4096, NULL, 3, NULL);
} else if (event_base == WIFI_EVENT && event_id == WIFI_EVENT_STA_DISCONNECTED) {
esp_wifi_connect(); // 开始连接WiFi
xEventGroupClearBits(s_wifi_event_group, CONNECTED_BIT);
} else if (event_base == IP_EVENT && event_id == IP_EVENT_STA_GOT_IP) {
xEventGroupSetBits(s_wifi_event_group, CONNECTED_BIT);
} else if (event_base == SC_EVENT && event_id == SC_EVENT_SCAN_DONE) {
ESP_LOGI(TAG, "Scan done");
} else if (event_base == SC_EVENT && event_id == SC_EVENT_FOUND_CHANNEL) {
ESP_LOGI(TAG, "Found channel");
} else if (event_base == SC_EVENT && event_id == SC_EVENT_GOT_SSID_PSWD) {
ESP_LOGI(TAG, "Got SSID and password");
smartconfig_event_got_ssid_pswd_t *evt = (smartconfig_event_got_ssid_pswd_t *)event_data;
wifi_config_t wifi_config;
uint8_t ssid[33] = { 0 };
uint8_t password[65] = { 0 };
uint8_t rvd_data[33] = { 0 };
bzero(&wifi_config, sizeof(wifi_config_t));
memcpy(wifi_config.sta.ssid, evt->ssid, sizeof(wifi_config.sta.ssid));
memcpy(wifi_config.sta.password, evt->password, sizeof(wifi_config.sta.password));
wifi_config.sta.bssid_set = evt->bssid_set;
if (wifi_config.sta.bssid_set == true) {
memcpy(wifi_config.sta.bssid, evt->bssid, sizeof(wifi_config.sta.bssid));
}
memcpy(ssid, evt->ssid, sizeof(evt->ssid));
memcpy(password, evt->password, sizeof(evt->password));
ESP_LOGI(TAG, "SSID:%s", ssid);
ESP_LOGI(TAG, "PASSWORD:%s", password);
if (evt->type == SC_TYPE_ESPTOUCH_V2) {
ESP_ERROR_CHECK( esp_smartconfig_get_rvd_data(rvd_data, sizeof(rvd_data)) );
ESP_LOGI(TAG, "RVD_DATA:");
for (int i=0; i<33; i++) {
printf("%02x ", rvd_data[i]);
}
printf("\n");
}
ESP_ERROR_CHECK( esp_wifi_disconnect() );
ESP_ERROR_CHECK( esp_wifi_set_config(WIFI_IF_STA, &wifi_config) );
esp_wifi_connect();
} else if (event_base == SC_EVENT && event_id == SC_EVENT_SEND_ACK_DONE) {
xEventGroupSetBits(s_wifi_event_group, ESPTOUCH_DONE_BIT);
}
}
static void initialise_wifi(void)
{
ESP_ERROR_CHECK(esp_netif_init()); // 初始化底层TCP/IP堆栈
s_wifi_event_group = xEventGroupCreate(); // 创建事件组
ESP_ERROR_CHECK(esp_event_loop_create_default()); // 创建默认事件循环
esp_netif_t *sta_netif = esp_netif_create_default_wifi_sta(); // 创建默认WIFI STA 在初始化错误的情况下,这个APl中止
assert(sta_netif);
wifi_init_config_t cfg = WIFI_INIT_CONFIG_DEFAULT();
ESP_ERROR_CHECK( esp_wifi_init(&cfg) ); // 初始化WiFi
//首先调用esp_event_loop_create_default() 创建默认事件循环。
//之后使用esp_event_handler_register() 将事件处理程序注册到系统事件循环。
ESP_ERROR_CHECK( esp_event_handler_register(WIFI_EVENT, ESP_EVENT_ANY_ID, &event_handler, NULL) );
ESP_ERROR_CHECK( esp_event_handler_register(IP_EVENT, IP_EVENT_STA_GOT_IP, &event_handler, NULL) );
ESP_ERROR_CHECK( esp_event_handler_register(SC_EVENT, ESP_EVENT_ANY_ID, &event_handler, NULL) );
ESP_ERROR_CHECK( esp_wifi_set_mode(WIFI_MODE_STA) ); // 将ESP32 wifi设置为sta模式
ESP_ERROR_CHECK( esp_wifi_start() ); // 根据配置启动WiFi为sta
}
// 创建事件组 s_wifi_event_group = xEventGroupCreate();,触发相关事件则置标志位,在任务中循环检测标志位处理相应事件。
// smartconfig_example_task 任务中,获取 CONNECTED_BIT 和 ESPTOUCH_DONE_BIT 表示连接上 AP 和 SmartConfig 配置完成。
static void smartconfig_example_task(void * parm)
{
EventBits_t uxBits;
ESP_ERROR_CHECK( esp_smartconfig_set_type(SC_TYPE_ESPTOUCH) ); // 设置 SmartConfig 的协议类型
smartconfig_start_config_t cfg = SMARTCONFIG_START_CONFIG_DEFAULT();
ESP_ERROR_CHECK( esp_smartconfig_start(&cfg) ); //开始 smartconfig 一键配网
while (1) {
uxBits = xEventGroupWaitBits(s_wifi_event_group, CONNECTED_BIT | ESPTOUCH_DONE_BIT, true, false, portMAX_DELAY);
if(uxBits & CONNECTED_BIT) {
ESP_LOGI(TAG, "WiFi Connected to ap");
}
if(uxBits & ESPTOUCH_DONE_BIT) {
ESP_LOGI(TAG, "smartconfig over");
esp_smartconfig_stop(); // 配网结束,释放 esp_smartconfig_start 占用的缓冲区。
vTaskDelete(NULL);
}
}
}
void app_main(void)
{
ESP_ERROR_CHECK( nvs_flash_init() ); // 初始化NVS分区
initialise_wifi(); // 初始化WiFi为sta模式,等待APP进行配网
}
配网操作流程:
1.搭建esp-idf环境
2.编译smart_config例程
1) 设置target为S3 idf.py set-target esp32s3
2) 编译工程 idf.py build
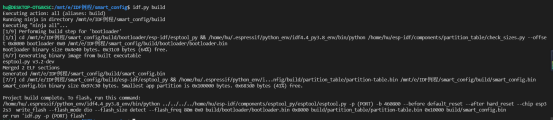
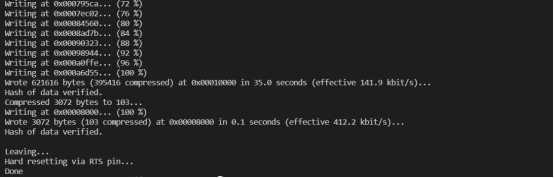
3.烧录到开发板
idf.py flash
多个设备需添加串口号(idf.py -p PORT [-b BAUD] flash)
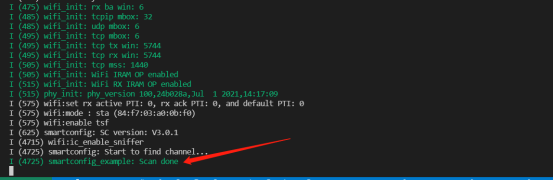
4.开启监视窗口
idf.py monitor (idf.py -p PORT monitor)
出现下面的打印就可以用APP进行配网
5.打开EspTouch APP (配网APP)
1)手机连接到WiFi (目前ESP32系列只支持2.4G频段)
2)输入WiFi密码
3)点击确认,配网成功会显示开发板的IP
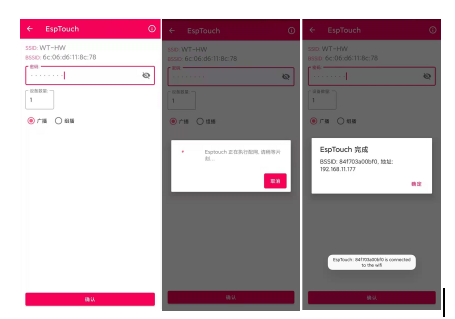
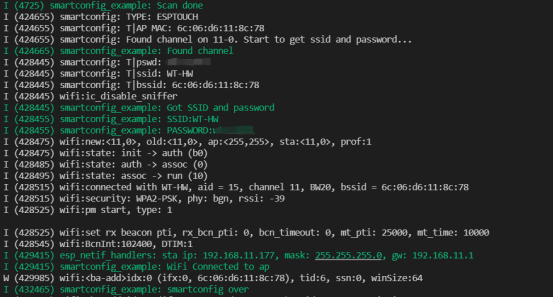
6.一键配网成功
日志输出如下,成功获取到WiFi的账号密码
并连接到此WiFi,smartconfig停止
- 相关推荐
-
ESP32、ESP32-S3是否有类似ARM的位带操作?2023-02-14 0
-
使用VScode编辑和编译esp32-s3,目标设备选择esp32-s3时报错如何解决?2023-02-16 0
-
ESP32-S3有DAC吗?2023-02-17 0
-
ESP32 C3用smartconfig配网不成功怎么解决?2023-02-17 0
-
ESP32-S2使用smartconfig在IOS中配网问题如何处理?2023-02-20 0
-
ESP32-S3(ESP32-S2,ESP32)在商用触摸按键面板上使用安全吗?2023-04-12 0
-
ESP32-S3技术参考手册2023-09-18 0
-
ESP32-S3硬件设计指南2023-09-18 0
-
合宙ESP32-S3开发板特性解读2023-01-11 8609
-
启明云端分享| 盘ESP32-C3与ESP32-C2有哪些区别2021-12-28 1661
-
启明云端分享| ESP32方案的86盒如何烧录2021-09-07 1922
-
启明云端测试分享|ESP32-C3连接阿里云2021-09-13 2153
-
启明云端ESP32-S3模组正式发布| 用AI唤醒你的智慧生活2022-05-26 1178
-
新品上市 | 合宙ESP32-S3开发板2023-01-13 1858
-
乐鑫首款WiFi 6芯片—ESP32-C6现已开售2023-04-13 1710
全部0条评论

快来发表一下你的评论吧 !
