

地平线旭日X3派试用体验 | 运行轻量级人脸检测模型
描述
一、下载代码
Linzaer的代码仓中,提供了PyTorch和ONNX格式的预训练模型,同时还提供了常用框架的Python和C++推理代码实现,以及测试图片、脚本和说明文档,直接使用即可:
# 当然,首先需要联网 # 如果没有git先安装一下: # sudo apt install git # 下载大佬的代码仓: git clone https://github.com/Linzaer/Ultra-Light-Fast-Generic-Face-Detector-1MB.git
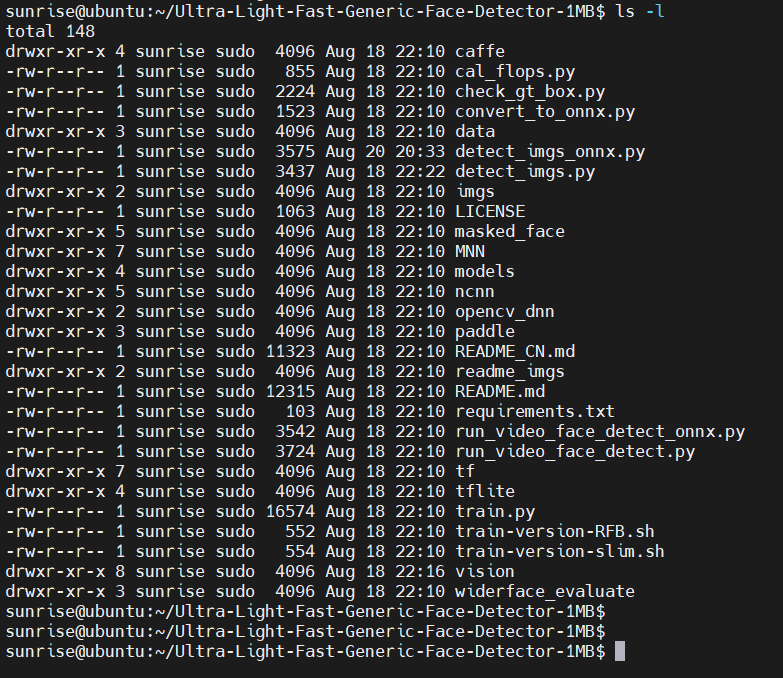
下载完成后,可以通过 ls -al 命令查顶层看有哪些文件和目录(当然,GitHub网页上也能看):
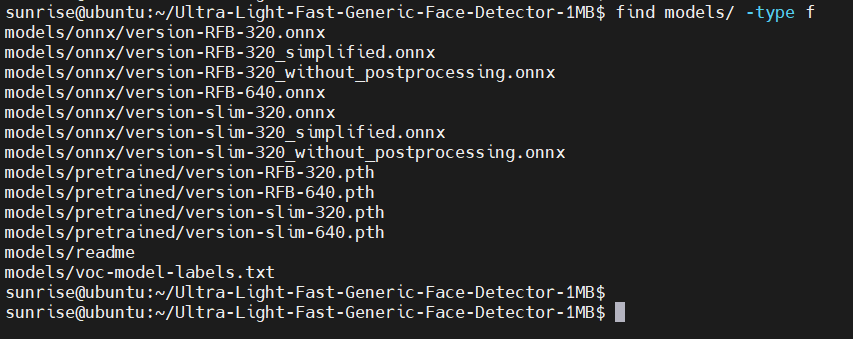
预训练的模型位于 models 子目录,使用 find models/ -type f 命令,可以查看有哪些文件:
二、安装依赖
地平线发布的旭日X3派系统镜像已经自带了python3和pip3命令,不用再安装了。树莓派上,如果没有python3和pip3命令,需要先安装:
sudo apt install python3 python3-pip
2.1 更新pip源
由于pip install 默认会从pypi.org(国外主机)下载软件包,国内网络环境一般下载速度较慢。因此,建议修改pip源配置:
pip3 config set global.index-url http://mirrors.aliyun.com/pypi/simple/ pip3 config set global.trusted-host mirrors.aliyun.com pip3 config set global.timeout 120
2.2 按装pip包
大佬的代码仓中提供了requirements.txt,里面记录执行仓中python代码所需的Python软件包。使用pip命令安装即可:
pip3 install -r requirements.txt
稍等一段时间,下载完成,如下图:
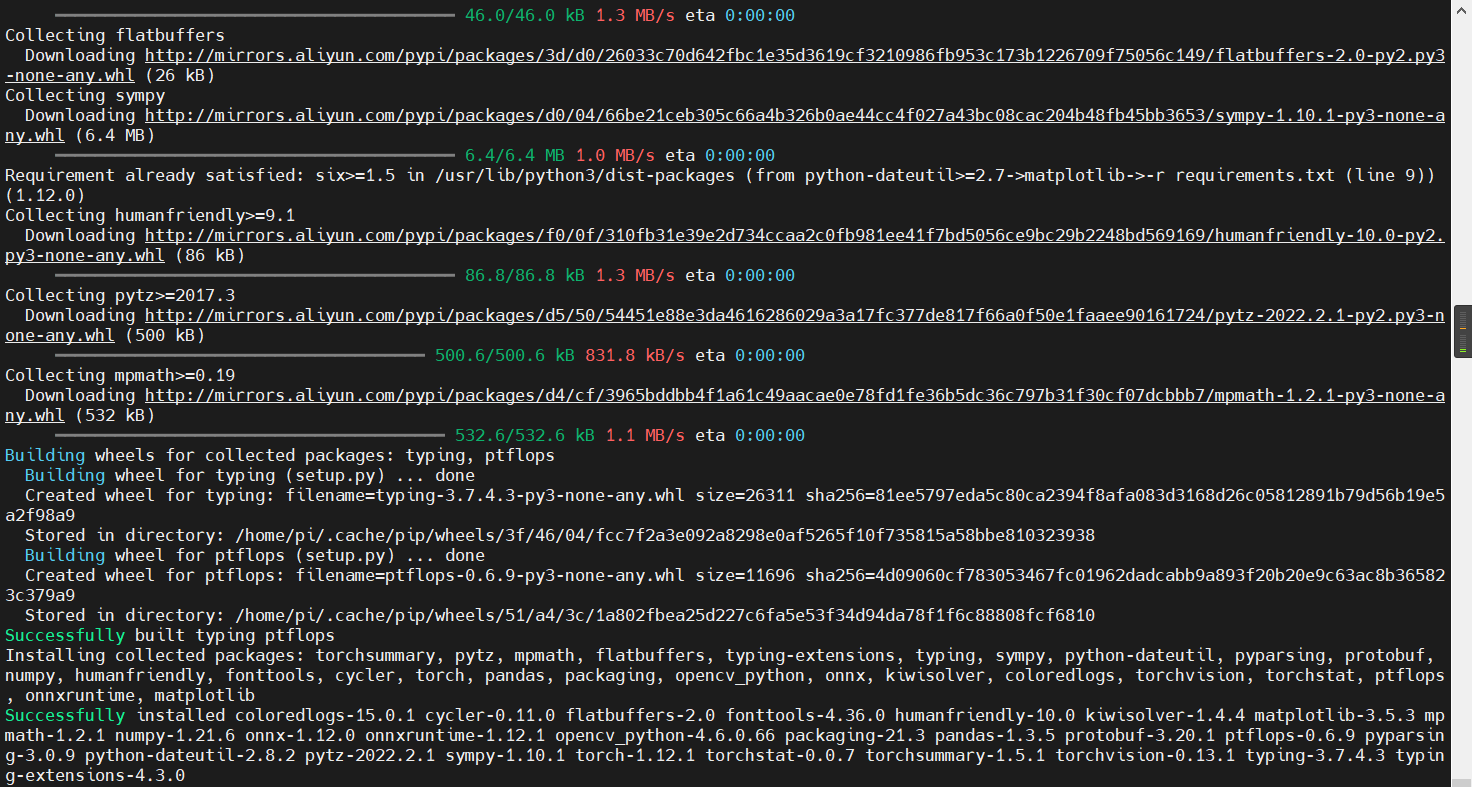
可以看到下载链接已经变成 aliyun 的了。
三、运行模型
代码仓顶层的 detect_imgs.py 和 detect_imgs_onnx.py 两个脚本文件,可以直接使用 models 下的预训练模型进行推理。
其中,detect_imgs.py 脚本的内容如下:
""" This code is used to batch detect images in a folder. """ import argparse import os import sys import cv2 from vision.ssd.config.fd_config import define_img_size parser = argparse.ArgumentParser( description='detect_imgs') parser.add_argument('--net_type', default="RFB", type=str, help='The network architecture ,optional: RFB (higher precision) or slim (faster)') parser.add_argument('--input_size', default=640, type=int, help='define network input size,default optional value 128/160/320/480/640/1280') parser.add_argument('--threshold', default=0.6, type=float, help='score threshold') parser.add_argument('--candidate_size', default=1500, type=int, help='nms candidate size') parser.add_argument('--path', default="imgs", type=str, help='imgs dir') parser.add_argument('--test_device', default="cuda:0", type=str, help='cuda:0 or cpu') args = parser.parse_args() define_img_size(args.input_size) # must put define_img_size() before 'import create_mb_tiny_fd, create_mb_tiny_fd_predictor' from vision.ssd.mb_tiny_fd import create_mb_tiny_fd, create_mb_tiny_fd_predictor from vision.ssd.mb_tiny_RFB_fd import create_Mb_Tiny_RFB_fd, create_Mb_Tiny_RFB_fd_predictor result_path = "./detect_imgs_results" label_path = "./models/voc-model-labels.txt" test_device = args.test_device class_names = [name.strip() for name in open(label_path).readlines()] if args.net_type == 'slim': model_path = "models/pretrained/version-slim-320.pth" # model_path = "models/pretrained/version-slim-640.pth" net = create_mb_tiny_fd(len(class_names), is_test=True, device=test_device) predictor = create_mb_tiny_fd_predictor(net, candidate_size=args.candidate_size, device=test_device) elif args.net_type == 'RFB': model_path = "models/pretrained/version-RFB-320.pth" # model_path = "models/pretrained/version-RFB-640.pth" net = create_Mb_Tiny_RFB_fd(len(class_names), is_test=True, device=test_device) predictor = create_Mb_Tiny_RFB_fd_predictor(net, candidate_size=args.candidate_size, device=test_device) else: print("The net type is wrong!") sys.exit(1) net.load(model_path) if not os.path.exists(result_path): os.makedirs(result_path) listdir = os.listdir(args.path) sum = 0 for file_path in listdir: img_path = os.path.join(args.path, file_path) orig_image = cv2.imread(img_path) image = cv2.cvtColor(orig_image, cv2.COLOR_BGR2RGB) boxes, labels, probs = predictor.predict(image, args.candidate_size / 2, args.threshold) sum += boxes.size(0) for i in range(boxes.size(0)): box = boxes[i, :] cv2.rectangle(orig_image, (box[0], box[1]), (box[2], box[3]), (0, 0, 255), 2) # label = f"""{voc_dataset.class_names[labels[i]]}: {probs[i]:.2f}""" label = f"{probs[i]:.2f}" # cv2.putText(orig_image, label, (box[0], box[1] - 10), cv2.FONT_HERSHEY_SIMPLEX, 0.7, (0, 0, 255), 2) cv2.putText(orig_image, str(boxes.size(0)), (30, 30), cv2.FONT_HERSHEY_SIMPLEX, 0.7, (0, 0, 255), 2) cv2.imwrite(os.path.join(result_path, file_path), orig_image) print(f"Found {len(probs)} faces. The output image is {result_path}") print(sum)
可以看到,该脚本中:
- 使用 --path 选项执行输入图片所在目录,默认为 imgs;
- 将后处理后的输出图片保存到detect_imgs_results目录;
- 默认使用models/pretrained/version-RFB-320.pth 模型。
3.1 跑torch模型
好了,准备直接跑 detect_imgs.py :
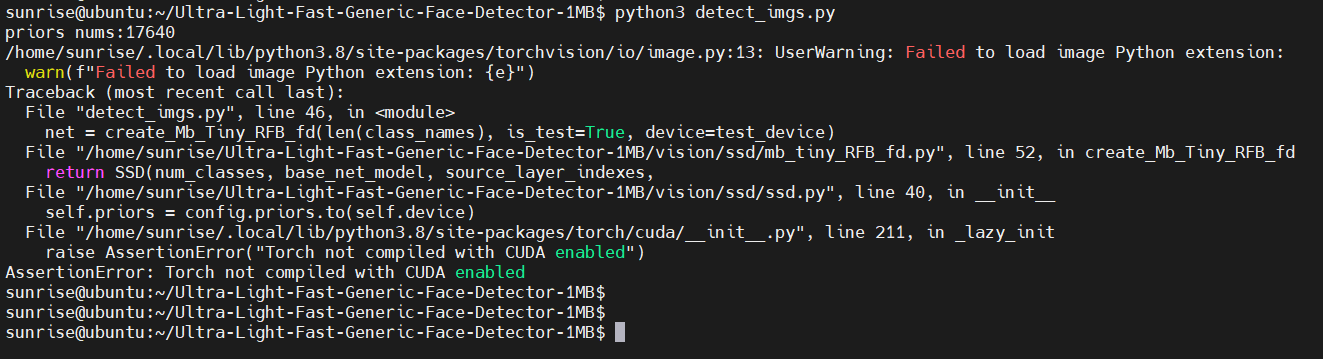
失败了,说PyTorch不是使能CUDA编译的。
从代码中,我们看到可以通过 test_device 选项指定设备,默认是 cuda:0 。
我们手动指定 test_device 为 CPU,继续尝试运行:
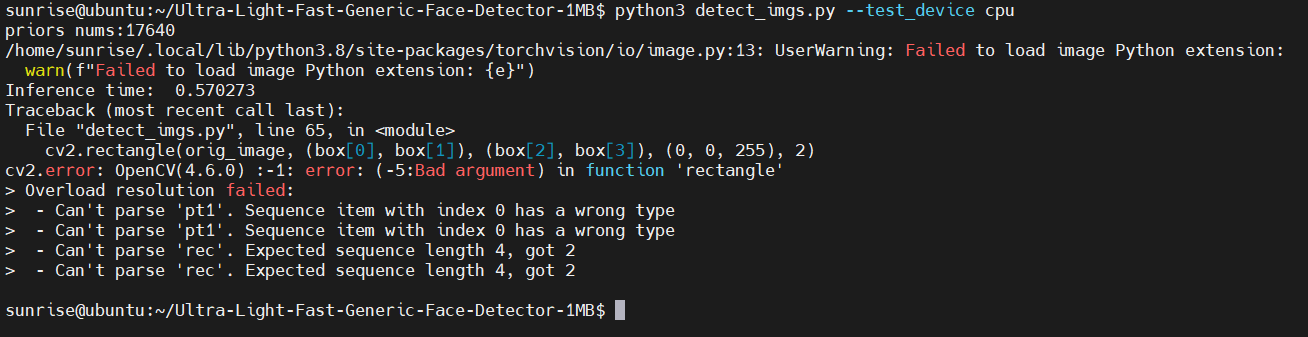
又失败了,这次是OpenCV报错,说是 cv2.rectangle 的参数类型不对。
将box坐标转为int,具体修改:
diff --git a/detect_imgs.py b/detect_imgs.py index 570f6a4..73b7d38 100644 --- a/detect_imgs.py +++ b/detect_imgs.py @@ -62,7 +62,9 @@ for file_path in listdir: sum += boxes.size(0) for i in range(boxes.size(0)): box = boxes[i, :] - cv2.rectangle(orig_image, (box[0], box[1]), (box[2], box[3]), (0, 0, 255), 2) + x1, y1 = int(box[0]), int(box[1]) + x2, y2 = int(box[2]), int(box[3]) + cv2.rectangle(orig_image, (x1, y1), (x2, y2), (0, 0, 255), 2) # label = f"""{voc_dataset.class_names[labels[i]]}: {probs[i]:.2f}""" label = f"{probs[i]:.2f}" # cv2.putText(orig_image, label, (box[0], box[1] - 10), cv2.FONT_HERSHEY_SIMPLEX, 0.7, (0, 0, 255), 2)
再次执行:
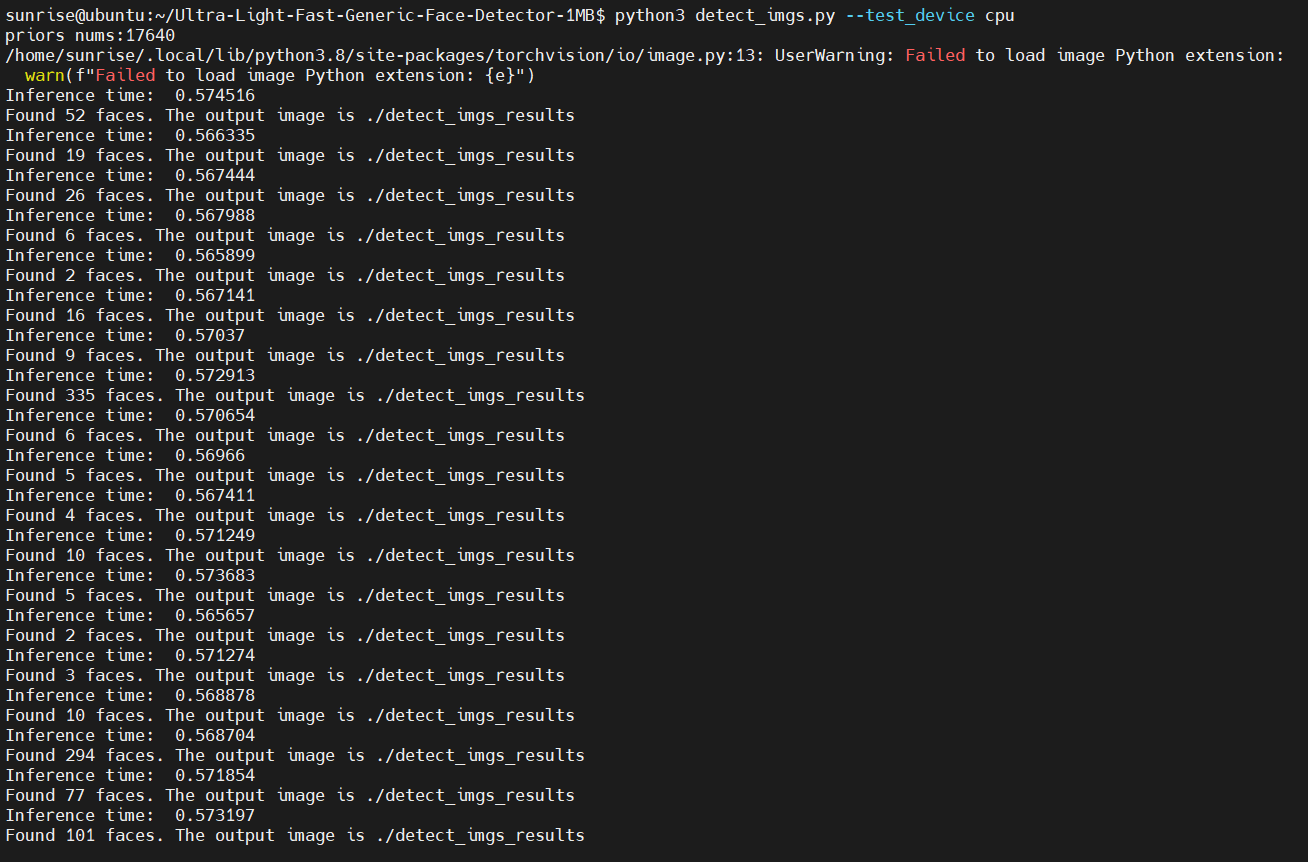
已经可以正常识别到人脸了。
3.2 跑onnx模型
类似的,尝试运行 detect_imgs_onnx.py 脚本,使用onnx模型进行推理:
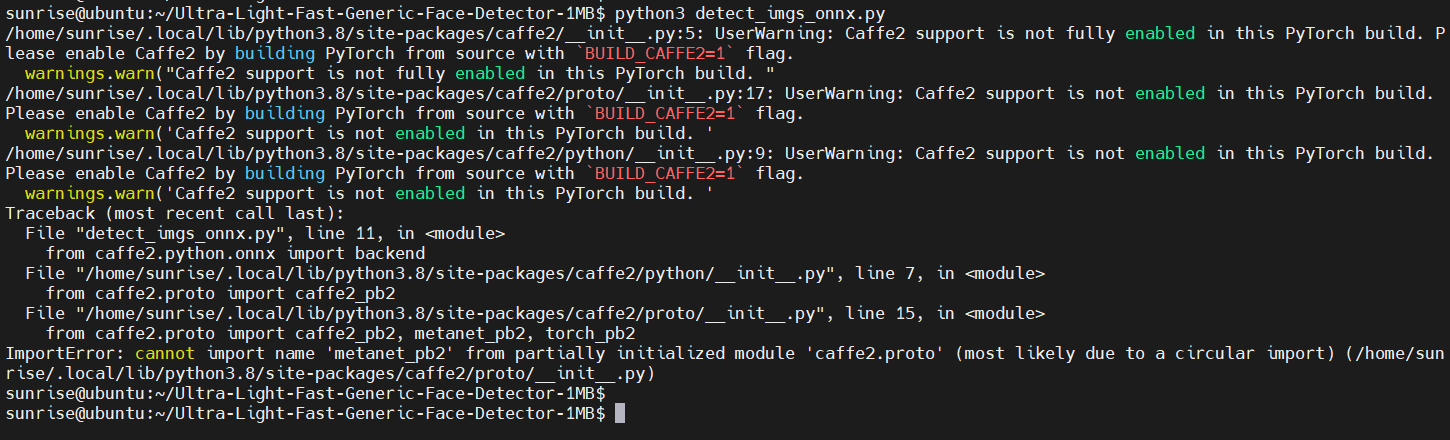
这里也报错了。
这个报错,我们不需要去解决它,只需要将脚本中多余的代码删除即可,修改内容为:
diff --git a/detect_imgs_onnx.py b/detect_imgs_onnx.py index 2594085..9644449 100644 --- a/detect_imgs_onnx.py +++ b/detect_imgs_onnx.py @@ -8,7 +8,6 @@ import cv2 import numpy as np import onnx import vision.utils.box_utils_numpy as box_utils -from caffe2.python.onnx import backend # onnx runtime import onnxruntime as ort @@ -48,11 +47,6 @@ label_path = "models/voc-model-labels.txt" onnx_path = "models/onnx/version-RFB-320.onnx" class_names = [name.strip() for name in open(label_path).readlines()] -predictor = onnx.load(onnx_path) -onnx.checker.check_model(predictor) -onnx.helper.printable_graph(predictor.graph) -predictor = backend.prepare(predictor, device="CPU") # default CPU - ort_session = ort.InferenceSession(onnx_path) input_name = ort_session.get_inputs()[0].name result_path = "./detect_imgs_results_onnx"
四、查看结果
由于WiFi天线的问题,连接ssh,速度反应很慢,scp拷贝文件也非常慢,一度卡住。
所以这里使用nginx Web服务器,通过HTTP协议和PC的浏览器查看推理输出的结果图片。首先安装 nginx ,使用如下命令:
sudo apt install nginx
安装成功后,可以通过ps命令查看nginx进程是否正常启动:

可以看到 nginx 进程正常启动了。
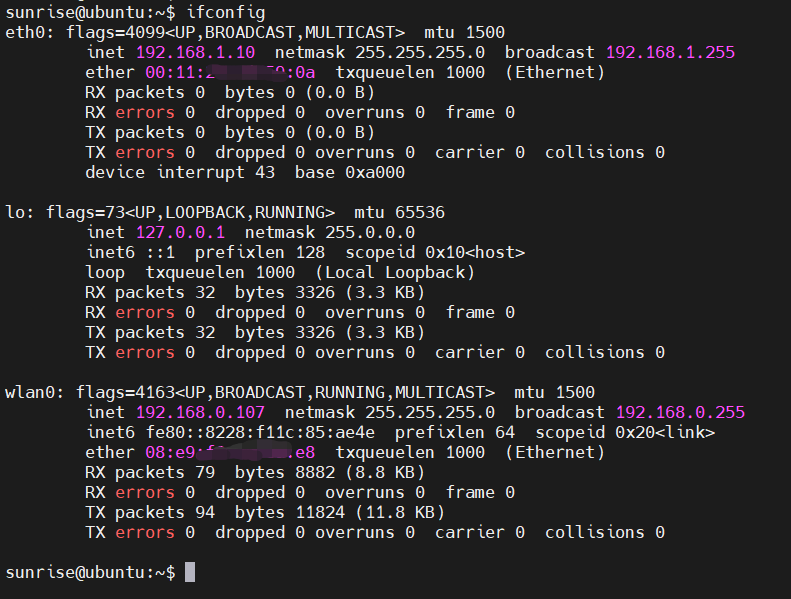
查看IP地址:
将推理输出的结果图片拷贝到/var/www/html目录:

我的PC此时和开发板连在同一个热点上,因此,可以通过浏览器输入http://192.168.0.107/9.jpg
onnx模型推理的输出结果图片,也可以通过同样方法查看。
五、结果对比
本节对旭日X3派和树莓派3B+上运行“轻量级人脸检测模型”的结果进行对比。
为了方便对比,上述两个脚本需要重新修改,最终修改为:
diff --git a/detect_imgs.py b/detect_imgs.py index 570f6a4..0886677 100644 --- a/detect_imgs.py +++ b/detect_imgs.py @@ -54,7 +54,7 @@ if not os.path.exists(result_path): os.makedirs(result_path) listdir = os.listdir(args.path) sum = 0 -for file_path in listdir: +for file_path in sorted(listdir): img_path = os.path.join(args.path, file_path) orig_image = cv2.imread(img_path) image = cv2.cvtColor(orig_image, cv2.COLOR_BGR2RGB) @@ -62,11 +62,13 @@ for file_path in listdir: sum += boxes.size(0) for i in range(boxes.size(0)): box = boxes[i, :] - cv2.rectangle(orig_image, (box[0], box[1]), (box[2], box[3]), (0, 0, 255), 2) + x1, y1 = int(box[0]), int(box[1]) + x2, y2 = int(box[2]), int(box[3]) + cv2.rectangle(orig_image, (x1, y1), (x2, y2), (0, 0, 255), 2) # label = f"""{voc_dataset.class_names[labels[i]]}: {probs[i]:.2f}""" label = f"{probs[i]:.2f}" # cv2.putText(orig_image, label, (box[0], box[1] - 10), cv2.FONT_HERSHEY_SIMPLEX, 0.7, (0, 0, 255), 2) cv2.putText(orig_image, str(boxes.size(0)), (30, 30), cv2.FONT_HERSHEY_SIMPLEX, 0.7, (0, 0, 255), 2) cv2.imwrite(os.path.join(result_path, file_path), orig_image) - print(f"Found {len(probs)} faces. The output image is {result_path}") + print(f"Found {len(probs)} faces. The output image is {result_path}/{file_path}") print(sum) diff --git a/detect_imgs_onnx.py b/detect_imgs_onnx.py index 2594085..19ae9fb 100644 --- a/detect_imgs_onnx.py +++ b/detect_imgs_onnx.py @@ -8,7 +8,6 @@ import cv2 import numpy as np import onnx import vision.utils.box_utils_numpy as box_utils -from caffe2.python.onnx import backend # onnx runtime import onnxruntime as ort @@ -48,11 +47,6 @@ label_path = "models/voc-model-labels.txt" onnx_path = "models/onnx/version-RFB-320.onnx" class_names = [name.strip() for name in open(label_path).readlines()] -predictor = onnx.load(onnx_path) -onnx.checker.check_model(predictor) -onnx.helper.printable_graph(predictor.graph) -predictor = backend.prepare(predictor, device="CPU") # default CPU - ort_session = ort.InferenceSession(onnx_path) input_name = ort_session.get_inputs()[0].name result_path = "./detect_imgs_results_onnx" @@ -64,7 +58,7 @@ if not os.path.exists(result_path): os.makedirs(result_path) listdir = os.listdir(path) sum = 0 -for file_path in listdir: +for file_path in sorted(listdir): img_path = os.path.join(path, file_path) orig_image = cv2.imread(img_path) image = cv2.cvtColor(orig_image, cv2.COLOR_BGR2RGB) @@ -76,10 +70,11 @@ for file_path in listdir: image = np.expand_dims(image, axis=0) image = image.astype(np.float32) # confidences, boxes = predictor.run(image) - time_time = time.time() + start_time = time.time() confidences, boxes = ort_session.run(None, {input_name: image}) - print("cost time:{}".format(time.time() - time_time)) + stop_time = time.time() boxes, labels, probs = predict(orig_image.shape[1], orig_image.shape[0], confidences, boxes, threshold) + print(f"{file_path}, faces: {boxes.shape[0]}, time: {stop_time - start_time:.9f}") for i in range(boxes.shape[0]): box = boxes[i, :] label = f"{class_names[labels[i]]}: {probs[i]:.2f}"
添加了文件名排序、文件名输出、推理时间输出,方便在两个平台上运行是进行对比。
使用如下命令,进行 torch模型数据统计:
# 记录运行输出 python3 detect_imgs.py --test_device cpu | tee torch.txt # 提取人脸数 grep faces torch.txt | cut -d' ' -f2 # 提取消耗时间 grep time: torch.txt | awk '{print $3}'
经上述命令统计,torch模型在旭日X3派和树莓派3B+的运行结果如下:

可以看到,旭日X3派上torch模型平均耗时要比树莓派短58%,而这仅仅只是CPU计算性能差异。
类似的,两个开发板运行onnx模型的结果如下:
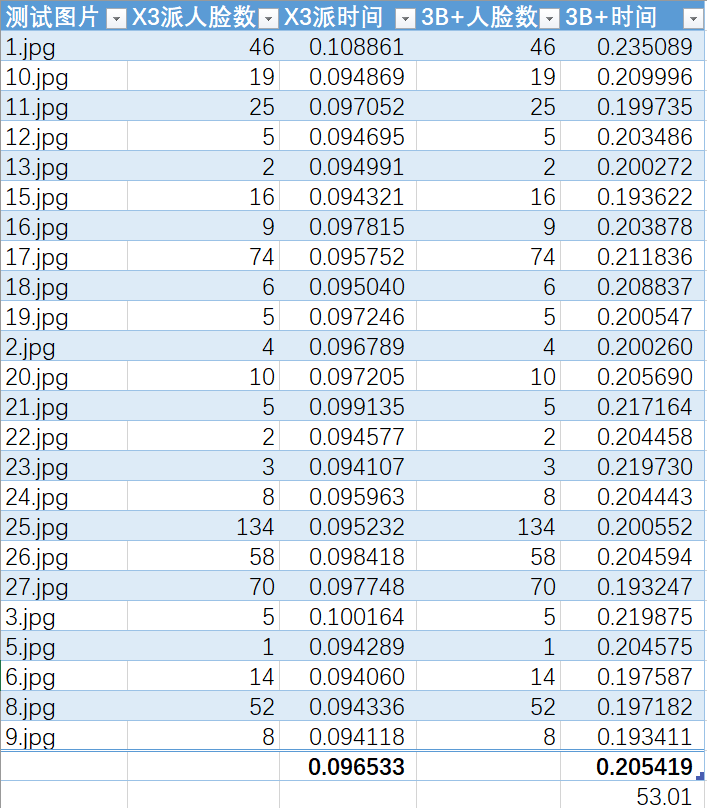
可以看到,旭日X3派上onnx模型平均耗时要比树莓派短53%,而这仅仅只是CPU计算性能差异。
原作者:xusiwei1236
原链接:详见地平线开发者社区
-
【地平线旭日X3派试用体验】开箱与板载资源介绍视频2022-07-10 0
-
【地平线旭日X3派试用体验】烧录镜像与UBUNTU桌面环境初体验视频2022-07-10 0
-
【 地平线旭日X3派试用体验】#旭日X3派首百尝鲜#资料下载及环境搭建初试2022-07-12 0
-
【地平线旭日X3派试用体验】开箱+快速上手体验2022-07-17 0
-
【 地平线旭日X3派试用体验】#首百尝鲜# 第二篇 旭日X3派基础实验操作演示2022-07-19 0
-
【地平线旭日X3派试用体验】开箱篇硬件介绍2022-07-26 0
-
【 地平线旭日X3派试用体验】 HHP环境搭建及简单demo演示2022-07-31 0
-
【 地平线旭日X3派试用体验】01. X3派开箱及上手2022-08-09 0
-
#旭日X3派首百尝鲜# 用solidworks画了一个旭日X3派的模型2022-08-31 0
-
[经验] 【 地平线旭日X3派试用体验】X3派开箱及开发环境搭建2022-09-01 0
-
【 地平线旭日X3派试用体验】地平线旭日X3派AGV智能车设计2022-09-12 0
-
旭日X3派首百尝鲜#地平线旭日X3派 MIPI摄像头GC4663人体跟随调试2022-10-03 0
-
【地平线旭日X3派试用体验】01.X3派开箱及上手2022-10-21 1058
-
地平线旭日X3派试用-玩转串口通信2022-07-22 893
-
旭日,从地平线升起——地平线旭日X3派开箱试用2022-11-08 1170
全部0条评论

快来发表一下你的评论吧 !
