

ESP32学习笔记:NVS分区永久保存数据
描述
今天我们来说说ESP32 for Arduino NVS分区永久保存数据。
ESP32 for Arduino NVS分区
上一节我们讲了整个ESP32的存储分布,其中有一个NVS分区,这个分区专门用来存储数据的,系统在复位或断电后数据仍然存在,我们可以使用Preferences库保存网络SSID,密码,一些阈值或者IO的最后状态等。
在保存数据的时候,我们推荐使用Preferences库,不推荐使用EEPROM库。
使用Preferences库保存的数据结构如下,也叫键值对:
namespace {
  key:value
}
一个命名空间中也可以有不同的键:
namespace {
  key1: value1
  key2: value2
}
实际使用中,我们可以用来保存网络凭证:
credentials {
  ssid: "your_ssid"
  pass: "your_pass"
}
也可以有多个具有相同键的命名空间(但每个键都有其值):
namespace1{
  key:value1
}
namespace2{
  key:value2
}
使用Preferences库时,应该定义要保存的数据类型。如果想读取该数据,则必须知道保存的数据类型,也就是说,写入和读取的数据类型应该相同。
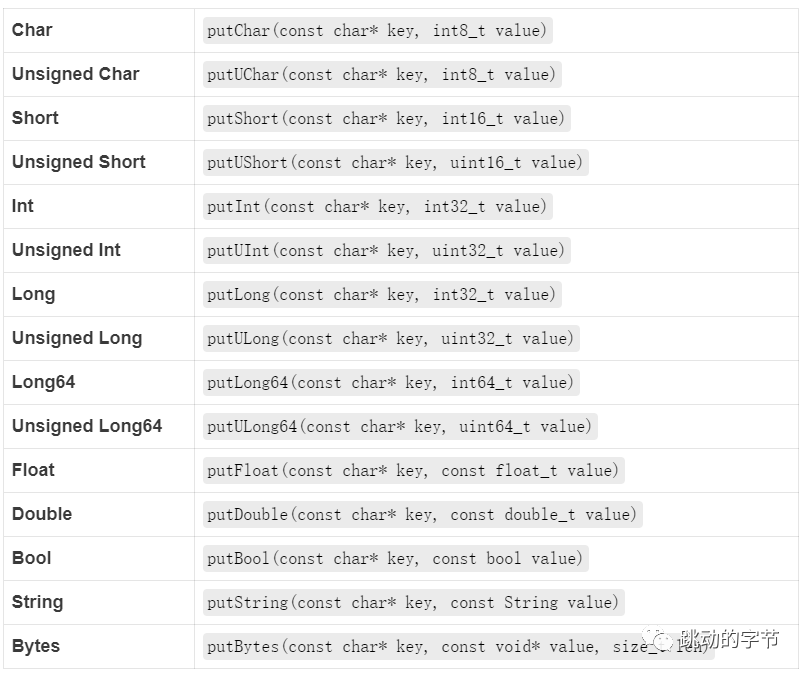
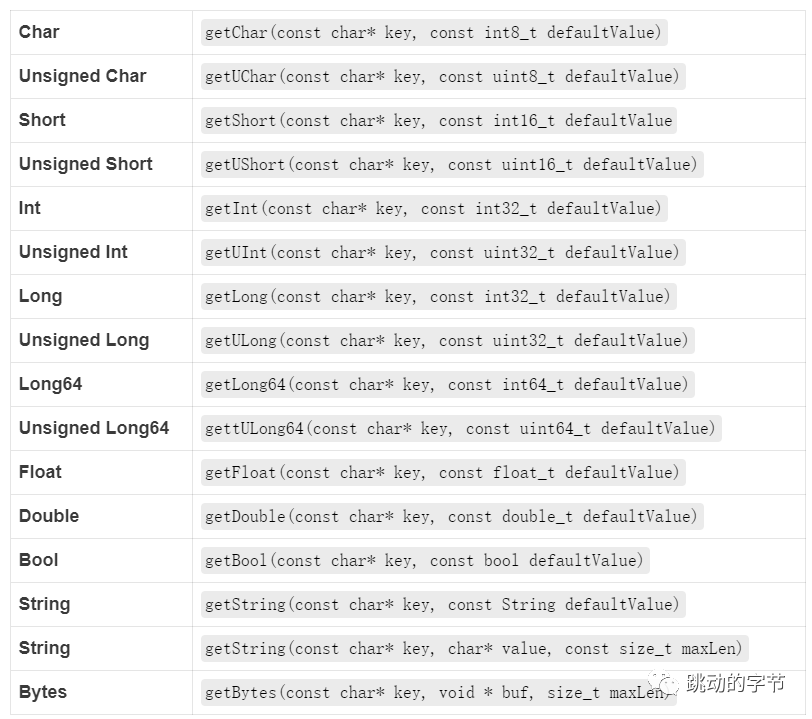
支持以下数据类型的保存:char、char、short、Ushort、int、Uint、long、Ulong、long64、Ulong64、float、double、bool、字符串和字节。
Preferences库函数说明
首先包含头文件
Preferences 库
然后定义一个实例
Preferences preferences;
打开一个命名空间
begin方法打开一个带有定义命名空间的“储存空间”,参数为false代表我们在读/写模式下使用,为true代表以只读的方式打开或创建命令空间,命名空间名称最多为15个字符。
preferences.begin("my-app", false);
清除preferences
从打开的命名空间中删除一个键。
preferences.remove(key);
关闭preferences
使用end方法在打开的命名空间下关闭preferences
preferences.end();
放置一个k-v
获取一个k-v
删除命名空间
在Preferences 库中,并没有完全删除命令空间的方法,我们存储很多数据之后,nvs分区可能就满了,所以我们想要完全擦除nvs分区,可以使用以下程序运行一次:
#include < nvs_flash.h >

void setup() {
  nvs_flash_erase(); // 擦除NVS分区
  nvs_flash_init();  // 初始化NVS分区
  while(true);
}

void loop() {

}
程序示例
我们直接打开Example中的例子,StartCounter
/*
 ESP32 startup counter example with Preferences library.

 This simple example demonstrates using the Preferences library to store how many times the ESP32 module has booted.
 The Preferences library is a wrapper around the Non-volatile storage on ESP32 processor.

 created for arduino-esp32 09 Feb 2017 by Martin Sloup (Arcao)

 Complete project details at https://RandomNerdTutorials.com/esp32-save-data-permanently-preferences/
*/

#include < Preferences.h >

Preferences preferences;

void setup() {
  Serial.begin(115200);
  Serial.println();

  // Open Preferences with my-app namespace. Each application module, library, etc
  // has to use a namespace name to prevent key name collisions. We will open storage in
  // RW-mode (second parameter has to be false).
  // Note: Namespace name is limited to 15 chars.
  preferences.begin("my-app", false);

  // Remove all preferences under the opened namespace
  //preferences.clear();

  // Or remove the counter key only
  //preferences.remove("counter");

  // Get the counter value, if the key does not exist, return a default value of 0
  // Note: Key name is limited to 15 chars.
  unsigned int counter = preferences.getUInt("counter", 0);

  // Increase counter by 1
  counter++;

  // Print the counter to Serial Monitor
  Serial.printf("Current counter value: %un", counter);

  // Store the counter to the Preferences
  preferences.putUInt("counter", counter);

  // Close the Preferences
  preferences.end();

  // Wait 10 seconds
  Serial.println("Restarting in 10 seconds...");
  delay(10000);

  // Restart ESP
  ESP.restart();
}

void loop() {

}
这个例子增加了一个counter键,每次运行都加一,我们在按下复位键之后,可以看到下面你的现象,数据保存起来了。
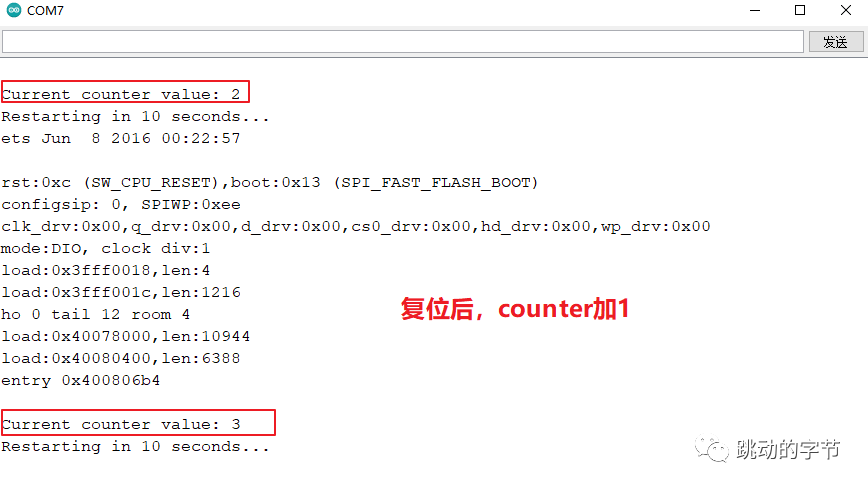
Preferences库很方便保存键:值对。即使在重置 ESP32 或断电后,闪存中保存的数据仍然存在。
感谢大家,关于ESP32的学习,希望大家Enjoy!
-
基于PlatfromIO-Arduino的ESP32-Flash分区2022-01-26 0
-
ESP32之ESP-IDF学习笔记2022-02-22 0
-
使用ESP32-S3无法使用NVS分区是为什么?2023-02-15 0
-
ESP32-S3-DevKitC-1 v1.1开发板的nvs分区可以写入,但是无法正常读取出来是怎么回事?2023-03-06 0
-
如何将ESP-IDF引导加载程序与用于NVS的ESP32-Arduino代码一起使用?2023-04-13 0
-
ESP32驱动AD77052021-11-23 577
-
ESP32-Flash分区,基于PlatfromIO-Arduino2021-12-02 694
-
[ESP8266学习笔记]components_nvs 非易失性存储 Non-Volatile Storage(NVS),保存数据到flash2021-12-02 991
-
[ESP32]学习笔记022021-12-03 695
-
[ESP32]学习笔记042021-12-22 670
-
SPI主线协议——ESP32学习笔记2021-12-22 599
-
ESP32 之 ESP-IDF 教学(六)——I2C数据总线(I²C)2021-12-28 1072
-
ESP32 单片机学习笔记 - 04 - ADC和定时器2022-01-17 537
-
ESP32学习笔记:双核2023-07-15 3169
-
ESP32学习笔记:WiFi2023-07-15 2454
全部0条评论

快来发表一下你的评论吧 !
