

ch347连接mpu6050模块的方法
描述
在上一篇文章 详解 I2C的末尾,有这样一张波形图:

实例2
这个对应的就是常见的从设备寄存器读数据的波形,只是在写数据时多了一个字节。
通用的从 I2C 设备读寄存器数据的模式应该是这样的:
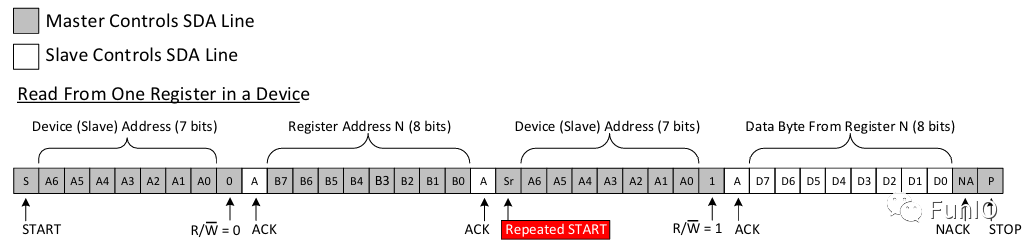
从从设备寄存器读数据示例
在mpu6050 数据表 中的9.3 I2C Communications Protocol章节说明了 mpu6050 的 i2c 接口协议,符合通用模式。
mpu6050 单字节写和加速写序列如下:
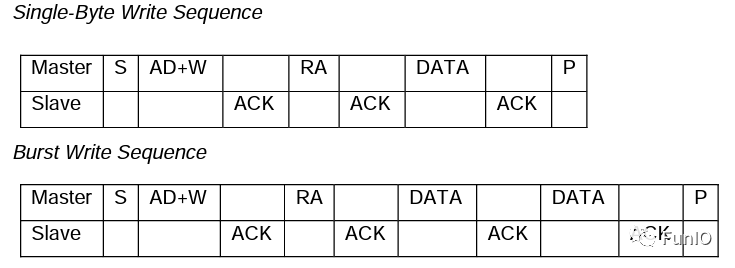
mpu6050单字节写和加速写
mpu6050 单字节读和加速读序列如下:
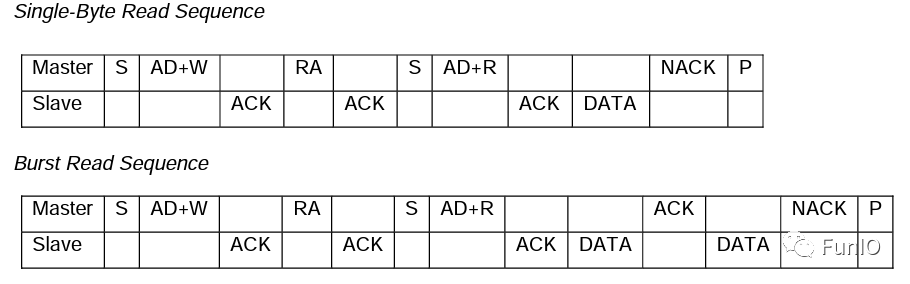
mpu6050单字节读和加速读
上面的加速写和加速读都是以 2 个数据字节为例的。
从实例 2 的波形图可以看出,启动传输后,写了0x12``0x13``0x143 个字节,这 3 个字节后都是NACK,然后是重复起始信号,跟着刚才地址字节0x12+1即0x13,I2C 从写转换到读,然后开始读数据字节。
对应代码为:
result = ch347_driver.i2c_set(device_index, 1)
if result:
    print("Success to set I2C speed.")
else:
    print("Failed to set I2C speed.")

result = ch347_driver.i2c_set_delay_ms(device_index, 1)
if result:
    print("Success to set I2C delay.")
else:
    print("Failed to set I2C delay.")


result = ch347_driver.stream_i2c(device_index, b'x12x13x14', 8)
if result:
    print("Success!")
else:
    print("Failed!")
将上面这段代码稍加修改:
result = ch347_driver.i2c_set(device_index, 1)
if result:
    print("Success to set I2C speed.")
else:
    print("Failed to set I2C speed.")

result = ch347_driver.i2c_set_delay_ms(device_index, 1)
if result:
    print("Success to set I2C delay.")
else:
    print("Failed to set I2C delay.")


result = ch347_driver.stream_i2c(device_index, b'xd0x75', 1)
if result:
    print("Success! result:", result.hex())
else:
    print("Failed!")
mpu6050 模块的地址是0b1101000(AD0 = 0),左移 1 位得到设备写地址0xd0,读数据时的读地址 ch347 会自动产生,波形如下:

读寄存器0x75
还没有连接 mpu6050 模块,所以没有数据返回。现在把 mpu6050 模块 i2c 接口连接到 ch347 模块上,运行程序,结果为:
❯  python test.py
Successfully opened device index: 0
Device Information:
iIndex: 0
DevicePath: ?USB#VID_1A86&PID_55DB&MI_02#7&2887B016&0&0002#{5446F048-98B4-4EF0-96E8-27994BAC0D00}
UsbClass: 0
FuncType: 1
DeviceID: USBVID_1A86&PID_55DB&MI_02#7&2887B016&0&0002#
ChipMode: 1
DevHandle: 912
BulkOutEndpMaxSize: 512
BulkInEndpMaxSize: 512
UsbSpeedType: 1
CH347IfNum: 0
DataUpEndp: 6
DataDnEndp: 6
ProductString:
ManufacturerString:
WriteTimeout: 500
ReadTimeout: 500
FuncDescStr: USB2.0 To SPI&IIC
FirewareVer: 64
<  ch347.mDeviceInforS object at 0x000002465A1E63C0  >
Version Information:
Driver Version: 35
DLL Version: 34
Device Version: 64
Chip Type: 1
Success to set I2C speed.
Success to set I2C delay.
Success! result: 68
Successfully closed device index: 0
可以看到返回了数据0x68,0x75是'WHO_AM_I'寄存器,默认值为0x68。
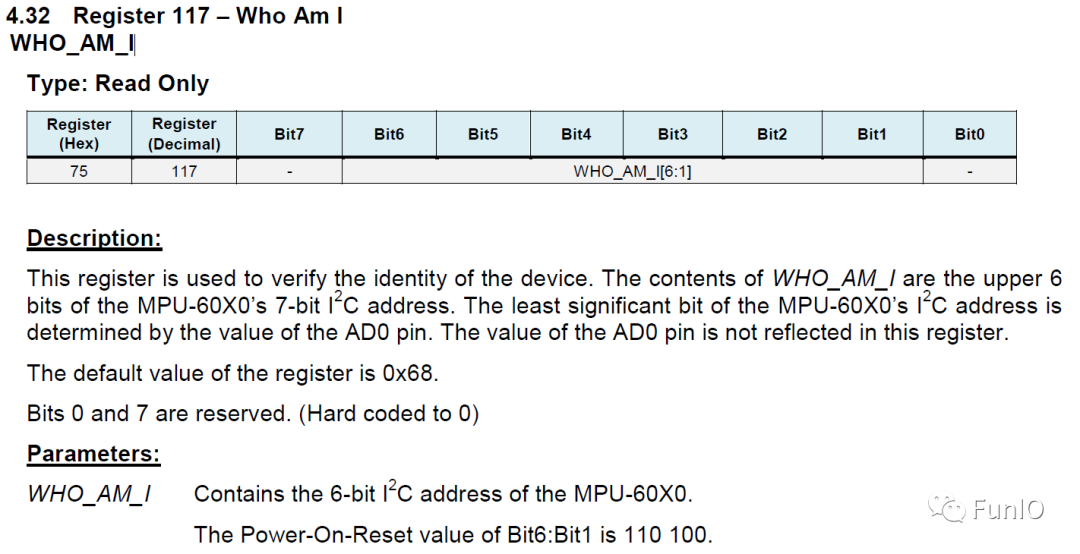
'WHO_AM_I'寄存器
完整代码:
import ch347

dll_path = "ch347dlla64.dll"  # Replace with the actual path to the DLL
device_index = 0  # Set the device index according to your requirements

ch347_driver = ch347.CH347Driver(dll_path)

result = ch347_driver.open_device(device_index)
if result:
    print(f"Successfully opened device index: {device_index}")
else:
    print(f"Failed to close device index: {device_index}")

result, device_info = ch347_driver.get_device_info(device_index)
if result:
    print("Device Information:")
    print(f"iIndex: {device_info.iIndex}")
    print(f"DevicePath: {device_info.DevicePath.decode()}")
    print(f"UsbClass: {device_info.UsbClass}")
    print(f"FuncType: {device_info.FuncType}")
    print(f"DeviceID: {device_info.DeviceID.decode()}")
    print(f"ChipMode: {device_info.ChipMode}")
    print(f"DevHandle: {device_info.DevHandle}")
    print(f"BulkOutEndpMaxSize: {device_info.BulkOutEndpMaxSize}")
    print(f"BulkInEndpMaxSize: {device_info.BulkInEndpMaxSize}")
    print(f"UsbSpeedType: {device_info.UsbSpeedType}")
    print(f"CH347IfNum: {device_info.CH347IfNum}")
    print(f"DataUpEndp: {device_info.DataUpEndp}")
    print(f"DataDnEndp: {device_info.DataDnEndp}")
    print(f"ProductString: {device_info.ProductString.decode()}")
    print(f"ManufacturerString: {device_info.ManufacturerString.decode()}")
    print(f"WriteTimeout: {device_info.WriteTimeout}")
    print(f"ReadTimeout: {device_info.ReadTimeout}")
    print(f"FuncDescStr: {device_info.FuncDescStr.decode()}")
    print(f"FirewareVer: {device_info.FirewareVer}")
    print(repr(device_info))
else:
    print("Failed to get device information.")

result, driver_ver, dll_ver, device_ver, chip_type = ch347_driver.get_version(device_index)
if result:
    print("Version Information:")
    print(f"Driver Version: {driver_ver}")
    print(f"DLL Version: {dll_ver}")
    print(f"Device Version: {device_ver}")
    print(f"Chip Type: {chip_type}")
else:
    print("Failed to get version information.")

result = ch347_driver.i2c_set(device_index, 1)
if result:
    print("Success to set I2C speed.")
else:
    print("Failed to set I2C speed.")

result = ch347_driver.i2c_set_delay_ms(device_index, 1)
if result:
    print("Success to set I2C delay.")
else:
    print("Failed to set I2C delay.")


result = ch347_driver.stream_i2c(device_index, b'xd0x75', 1)
if result:
    print("Success! result:", result.hex())
else:
    print("Failed!")


# Example usage of CH347CloseDevice
result = ch347_driver.close_device(device_index)
if result:
    print(f"Successfully closed device index: {device_index}")
else:
    print(f"Failed to close device index: {device_index}")
接下来就可以对 mpu6050 各种功能进行封装,然后在电脑上直接获取传感器数据了。
声明:本文内容及配图由入驻作者撰写或者入驻合作网站授权转载。文章观点仅代表作者本人,不代表电子发烧友网立场。文章及其配图仅供工程师学习之用,如有内容侵权或者其他违规问题,请联系本站处理。
举报投诉
评论(0)
发评论
-
 wuyingpeng
2023-08-05
0 回复 举报这个ch347的python库在哪下 收起回复
wuyingpeng
2023-08-05
0 回复 举报这个ch347的python库在哪下 收起回复
-
MPU6050连接失败错误2018-10-24 0
-
HAL库 MPU6050的使用 精选资料分享2021-07-20 0
-
用示波器测试mpu6050和stm32连接后的scl2021-08-06 0
-
MPU6050模块2021-08-09 0
-
使用esp32连接mpu6050读取角度数据2022-02-10 0
-
MPU6050原理图2016-03-24 2024
-
MPU6050(硬件IIC)2017-04-02 2631
-
Arduino与MPU6050的通信2017-11-07 7032
-
一文看懂mpu9150和mpu6050区别2018-03-08 41256
-
mpu6050怎么与单片机连接2018-03-09 25898
-
mpu6050姿态解算原理_mpu6050姿态解算程序2018-03-09 42160
-
MPU6050专用稳压模块的原理图设计2021-11-07 1207
-
MPU6050简介2021-12-06 1561
-
MPU6050( )2021-12-06 630
-
高速USB转接芯片 CH3472023-04-28 1942
全部0条评论

快来发表一下你的评论吧 !
