

HarmonyOS应用开发之Java UI框架
电子说
描述
TableLayout使用表格的方式划分子组件。
TableLayout的共有XML属性继承自:Component。
TableLayout的自有XML属性见下表:
| 属性名称 | 中文描述 | 取值 | 取值说明 | 使用案例 |
|---|---|---|---|---|
| alignment_type | 对齐方式 | align_edges | 表示TableLayout内的组件按边界对齐。 | ohos:alignment_type="align_edges" |
| align_contents | 表示TableLayout内的组件按边距对齐。 | ohos:alignment_type="align_contents" | ||
| column_count | 列数 | integer类型 | 可以直接设置整型数值,也可以引用integer资源。 |
ohos:column_count="3" ohos:column_count="$integer:count" |
| row_count | 行数 | integer类型 | 可以直接设置整型数值,也可以引用integer资源。 |
ohos:row_count="2" ohos:row_count="$integer:count" |
| orientation | 排列方向 | horizontal | 表示水平方向布局。 | ohos:orientation="horizontal" |
| vertical | 表示垂直方向布局。 | ohos:orientation="vertical" |
在XML中创建TableLayout,示例代码如下:
在graphic文件夹下创建Text的背景table_text_bg_element.xml,示例代码如下:
ohos:radius="5vp"/>
在TableLayout布局中添加子组件。
xmlns:ohos="http://schemas.huawei.com/res/ohos"
    ohos:height="match_parent"
    ohos:width="match_parent"
    ohos:background_element="#87CEEB"
    ohos:padding="8vp">
    ohos:height="60vp"
        ohos:width="60vp"
        ohos:background_element="$graphic:table_text_bg_element"
        ohos:margin="8vp"
        ohos:text="1"
        ohos:text_alignment="center"
        ohos:text_size="20fp"/>
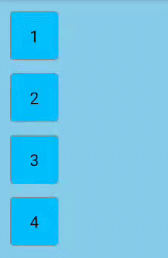
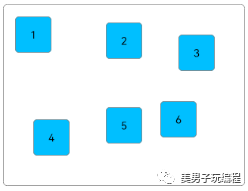
TableLayout默认一列多行。
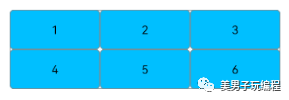
设置行列数:
...
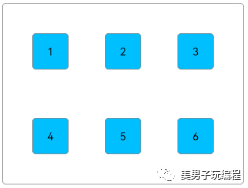
ohos:row_count="2"
ohos:column_count="2">
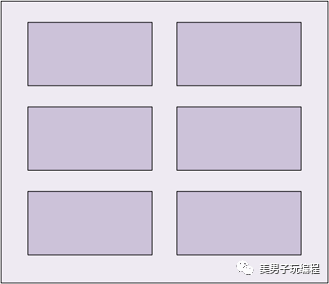
设置TableLayout的行为2,列为2效果。
在XML中设置布局排列方向,以“vertical”为例:
...
    ohos:orientation="vertical">
    ...
设置布局排列方向为“vertical”的效果。
TableLayout提供两种对齐方式,边距对齐“align_contents”、边界对齐“align_edges”,默认为边距对齐“align_contents”。代码如下:
xmlns:ohos="http://schemas.huawei.com/res/ohos"
    ohos:height="match_content"
    ohos:width="match_content"
    ohos:alignment_type="align_contents"
    ohos:background_element="$graphic:layout_borderline"
    ohos:column_count="3"
    ohos:padding="8vp">


    ohos:height="48vp"
        ohos:width="48vp"
        ohos:background_element="$graphic:table_text_bg_element"
        ohos:margin="8vp"
        ohos:padding="8vp"
        ohos:text="1"
        ohos:text_alignment="center"
        ohos:text_size="14fp"/>
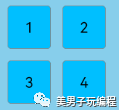
边距对齐效果:
将TableLayout的对齐方式修改为边界对齐。
...
    ohos:alignment_type="align_edges">
    ...
边界对齐效果:
引用graphic文件夹下的背景资源文件为layout_borderline.xml,示例代码如下:
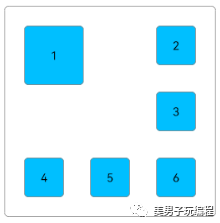
TableLayout合并单元格的效果可以通过设置子组件的行列属性来实现。
设置子组件的行列属性均为2的效果展示:
在XML中创建TableLayout,并添加子组件,代码如下:
xmlns:ohos="http://schemas.huawei.com/res/ohos"
    ohos:height="match_content"
    ohos:width="match_content"
    ohos:alignment_type="align_edges"
    ohos:background_element="$graphic:layout_borderline"
    ohos:column_count="3"
    ohos:padding="8vp"
    ohos:row_count="3">


    ohos:id="$+id:text_one"
        ohos:height="48vp"
        ohos:width="48vp"
        ohos:background_element="$graphic:table_text_bg_element"
        ohos:margin="16vp"
        ohos:padding="8vp"
        ohos:text="1"
        ohos:text_alignment="center"
        ohos:text_size="14fp"/>
在Java代码中设置子组件的行列属性,代码如下:
@Override
    protected void onStart(Intent intent) {
        ...
        Component component = findComponentById(ResourceTable.Id_text_one);
        TableLayout.LayoutConfig tlc = new TableLayout.LayoutConfig(vp2px(72), vp2px(72));
        tlc.columnSpec = TableLayout.specification(TableLayout.DEFAULT, 2);
        tlc.rowSpec = TableLayout.specification(TableLayout.DEFAULT, 2);
        component.setLayoutConfig(tlc);
    }


    private int vp2px(float vp) {
        return AttrHelper.vp2px(vp, getContext());
    }
在设置子组件的行列属性时,TableLayout剩余的行数和列数必须大于等于该子组件所设置的行数和列数。
目前仅支持Java代码设置TableLayout子组件的行列属性。
在创建子组件的行列属性时,还可设置子组件的对齐方式,修改上述Java代码如下:
@Override
    protected void onStart(Intent intent) {
        ...
        tlc.columnSpec = TableLayout.specification(TableLayout.DEFAULT, 2, TableLayout.Alignment.ALIGNMENT_FILL);
        tlc.rowSpec = TableLayout.specification(TableLayout.DEFAULT, 2, TableLayout.Alignment.ALIGNMENT_FILL);
        ...
    }
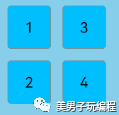
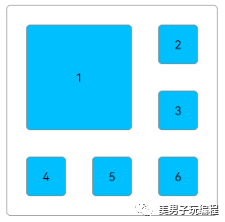
子组件的对齐方式设置为ALIGNMENT_FILL的效果:
设置子组件的权重,代码如下:
@Override
    protected void onStart(Intent intent) {
        ...
        TableLayout.LayoutConfig tlc = new TableLayout.LayoutConfig(0, vp2px(48));
        tlc.columnSpec = TableLayout.specification(TableLayout.DEFAULT, 1, 1.0f);
        tlc.rowSpec = TableLayout.specification(TableLayout.DEFAULT, 1);


        findComponentById(ResourceTable.Id_text_one).setLayoutConfig(tlc);
        findComponentById(ResourceTable.Id_text_two).setLayoutConfig(tlc);
        findComponentById(ResourceTable.Id_text_three).setLayoutConfig(tlc);
        findComponentById(ResourceTable.Id_text_four).setLayoutConfig(tlc);
        findComponentById(ResourceTable.Id_text_five).setLayoutConfig(tlc);
        findComponentById(ResourceTable.Id_text_six).setLayoutConfig(tlc);
    }
上述代码将子组件的宽度权重设置为1.0,每行子组件会均分TableLayout的宽度,所以需要设置TableLayout为固定宽度或match_parent。
ohos:width="match_parent"
    ...>


    ohos:id="$+id:text_one"
        .../>
将子组件的宽度权重设置为1.0的效果展示:
审核编辑:汤梓红
-
【HarmonyOS】应用开发文档2020-10-14 0
-
【HarmonyOS HiSpark AI Camera试用连载 】鸿蒙JS UI介绍2021-01-11 0
-
请教鸿蒙应用开发JAVA UI 框架ProgressBar或者RoundProgressBar怎么实现滑动调节2021-01-12 0
-
基于HarmonyOS Java UI使用元数据绑定框架实现UI和数据源的绑定2021-08-18 0
-
基于HarmonyOS Java UI,使用元数据绑定框架,实现UI和数据源的绑定2021-09-01 0
-
鸿蒙应用开发的JS UI框架如何实现高德地图的访问?2022-04-28 0
-
DevEco Studio里的java UI框架有没有必要做拖拽式编程呢?2022-05-18 0
-
HarmonyOS自动化测试框架—Hypium2022-08-10 0
-
4天带你上手HarmonyOS ArkUI开发——《HarmonyOS ArkUI入门训练营之健康生活实战》2023-01-05 0
-
在HarmonyOS版本下如何基于JS UI框架来开发?2021-07-13 1914
-
华为开发者HarmonyOS零基础入门:HarmonyOS UI编程框架快速上手2021-10-23 1664
-
零基础入门HarmonyOS-UI编程框架2021-10-23 1560
-
HarmonyOS测试技术与实战-分布式UI测试框架2021-10-23 1201
-
全面解读HarmonyOS新一代UI框架2021-10-29 2312
-
方舟开发框架(Ark UI)概述及开发实战2021-12-17 7402
全部0条评论

快来发表一下你的评论吧 !
