

使用GUI Guider工具开发嵌入式GUI应用(3)
电子说
描述
引言
本节讲述在GUI Guider中,应用各种UI的基本元素,并顺利部署到MCU的过程。在GUI Guider中使用各LVGL的组件时,将会涉及到GUI Guider的操作,以及将某些组件额外生成的源码添加到Keil工程中。至于具体产品中的UI应用,可以是这些基本UI元素的组合使用,以实现更加丰富的显示效果。
在本文中,将说明使用通过GUI Guider创建并使用LVGL的label组件显示字符信息。
在GUI Guider工程中创建label组件
在新建GUI Guider工程搭建MCU运行时的框架工程时,曾使用了label组件实现在屏幕上显示一个“Hello World”字符串的演示效果。Label是GUI Guider中最简单的组件,可用于显示字符。
当需要为某个页面添加一个显示字符串的对象时,可在编辑区域左边的工具栏中选择label按钮,此时,在组件窗口中就可以看到,当前的页面screen下出现了一个label_1的对象。如图x所示。
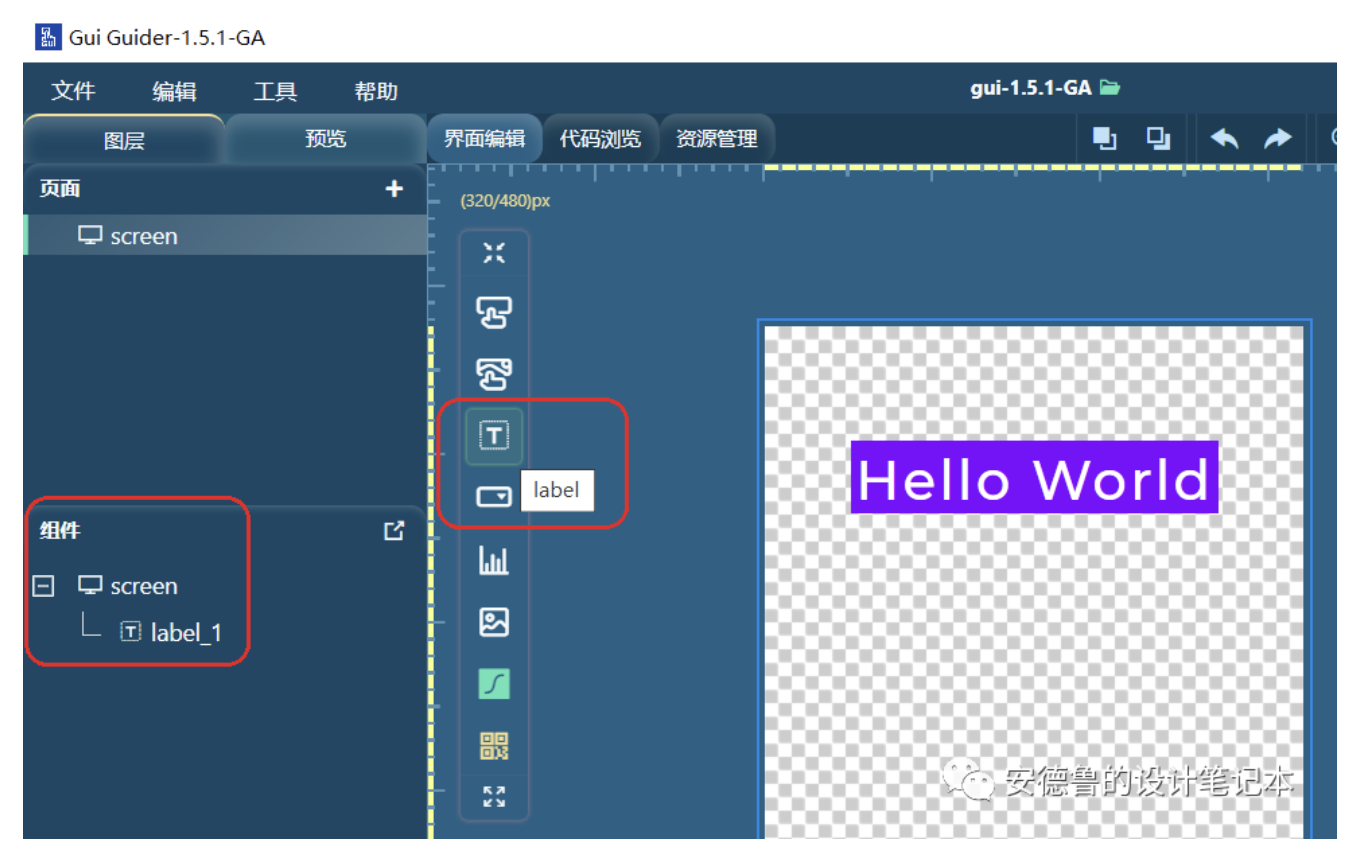
figure-gui-using-label-1
图x 新增label对象
双击在当前页面上出现的label对象,可以在编辑区域的右侧激活该对象的属性设置对话框,如图x所示。在其中,可以执行该对象的名字、位置、文本内容、字体、颜色等属性。当然,既然是在图形编辑界面,对象的位置也可以通过在图形编辑区拖拽对象来调整。
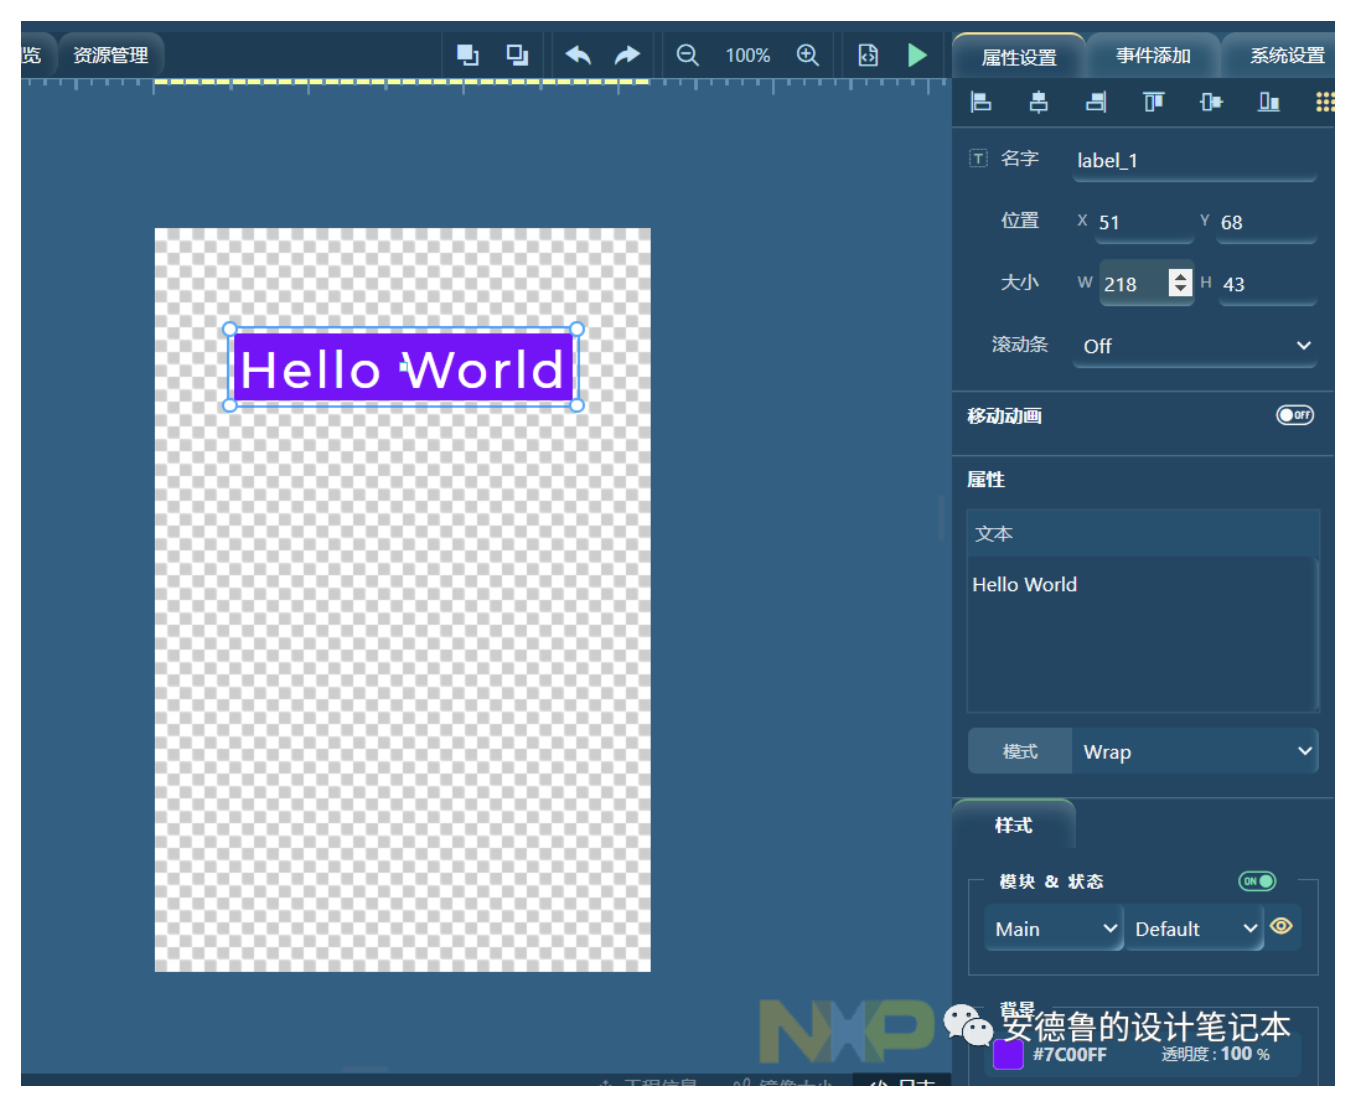
figure-gui-using-label-2
图x 编辑label对象属性
然后,重新生成代码。在运行时的Keil工程已经包含了静态页面的源文件,因此不用额外再执行添加文件的操作。但实际上,这里新生成的源码位于./gui/generated/setup_scr_screen.c文件中。有源码如下:
/*
 * Copyright 2023 NXP
 * SPDX-License-Identifier: MIT
 * The auto-generated can only be used on NXP devices
 */

#include "lvgl.h"
#include < stdio.h >
#include "gui_guider.h"
#include "events_init.h"
#include "custom.h"


void setup_scr_screen(lv_ui *ui){

 //Write codes screen
 ui- >screen = lv_obj_create(NULL);
 lv_obj_set_scrollbar_mode(ui- >screen, LV_SCROLLBAR_MODE_OFF);

 //Set style for screen. Part: LV_PART_MAIN, State: LV_STATE_DEFAULT
 lv_obj_set_style_bg_color(ui- >screen, lv_color_make(0xff, 0xff, 0xff), LV_PART_MAIN|LV_STATE_DEFAULT);
 lv_obj_set_style_bg_grad_color(ui- >screen, lv_color_make(0x21, 0x95, 0xf6), LV_PART_MAIN|LV_STATE_DEFAULT);
 lv_obj_set_style_bg_grad_dir(ui- >screen, LV_GRAD_DIR_NONE, LV_PART_MAIN|LV_STATE_DEFAULT);
 lv_obj_set_style_bg_opa(ui- >screen, 0, LV_PART_MAIN|LV_STATE_DEFAULT);

 //Write codes screen_label_1
 ui- >screen_label_1 = lv_label_create(ui- >screen);
 lv_obj_set_pos(ui- >screen_label_1, 51, 68);
 lv_obj_set_size(ui- >screen_label_1, 218, 43);
 lv_obj_set_scrollbar_mode(ui- >screen_label_1, LV_SCROLLBAR_MODE_OFF);
 lv_label_set_text(ui- >screen_label_1, "Hello World");
 lv_label_set_long_mode(ui- >screen_label_1, LV_LABEL_LONG_WRAP);

 //Set style for screen_label_1. Part: LV_PART_MAIN, State: LV_STATE_DEFAULT
 lv_obj_set_style_radius(ui- >screen_label_1, 0, LV_PART_MAIN|LV_STATE_DEFAULT);
 lv_obj_set_style_bg_color(ui- >screen_label_1, lv_color_make(0x7c, 0x00, 0xff), LV_PART_MAIN|LV_STATE_DEFAULT);
 lv_obj_set_style_bg_grad_color(ui- >screen_label_1, lv_color_make(0x21, 0x95, 0xf6), LV_PART_MAIN|LV_STATE_DEFAULT);
 lv_obj_set_style_bg_grad_dir(ui- >screen_label_1, LV_GRAD_DIR_NONE, LV_PART_MAIN|LV_STATE_DEFAULT);
 lv_obj_set_style_bg_opa(ui- >screen_label_1, 255, LV_PART_MAIN|LV_STATE_DEFAULT);
 lv_obj_set_style_shadow_width(ui- >screen_label_1, 0, LV_PART_MAIN|LV_STATE_DEFAULT);
 lv_obj_set_style_shadow_color(ui- >screen_label_1, lv_color_make(0x21, 0x95, 0xf6), LV_PART_MAIN|LV_STATE_DEFAULT);
 lv_obj_set_style_shadow_opa(ui- >screen_label_1, 255, LV_PART_MAIN|LV_STATE_DEFAULT);
 lv_obj_set_style_shadow_spread(ui- >screen_label_1, 0, LV_PART_MAIN|LV_STATE_DEFAULT);
 lv_obj_set_style_shadow_ofs_x(ui- >screen_label_1, 0, LV_PART_MAIN|LV_STATE_DEFAULT);
 lv_obj_set_style_shadow_ofs_y(ui- >screen_label_1, 0, LV_PART_MAIN|LV_STATE_DEFAULT);
 lv_obj_set_style_text_color(ui- >screen_label_1, lv_color_make(0xff, 0xff, 0xff), LV_PART_MAIN|LV_STATE_DEFAULT);
 lv_obj_set_style_text_font(ui- >screen_label_1, &lv_font_montserratMedium_32, LV_PART_MAIN|LV_STATE_DEFAULT);
 lv_obj_set_style_text_letter_space(ui- >screen_label_1, 2, LV_PART_MAIN|LV_STATE_DEFAULT);
 lv_obj_set_style_text_line_space(ui- >screen_label_1, 0, LV_PART_MAIN|LV_STATE_DEFAULT);
 lv_obj_set_style_text_align(ui- >screen_label_1, LV_TEXT_ALIGN_CENTER, LV_PART_MAIN|LV_STATE_DEFAULT);
 lv_obj_set_style_pad_left(ui- >screen_label_1, 0, LV_PART_MAIN|LV_STATE_DEFAULT);
 lv_obj_set_style_pad_right(ui- >screen_label_1, 0, LV_PART_MAIN|LV_STATE_DEFAULT);
 lv_obj_set_style_pad_top(ui- >screen_label_1, 8, LV_PART_MAIN|LV_STATE_DEFAULT);
 lv_obj_set_style_pad_bottom(ui- >screen_label_1, 0, LV_PART_MAIN|LV_STATE_DEFAULT);
}
此时,可以通过预览页面,看到本页面的静态显示效果。还可以通过运行模拟器,在GUI Guider中模拟UI程序运行时的动态效果(如果有动态效果)。如图x所示。
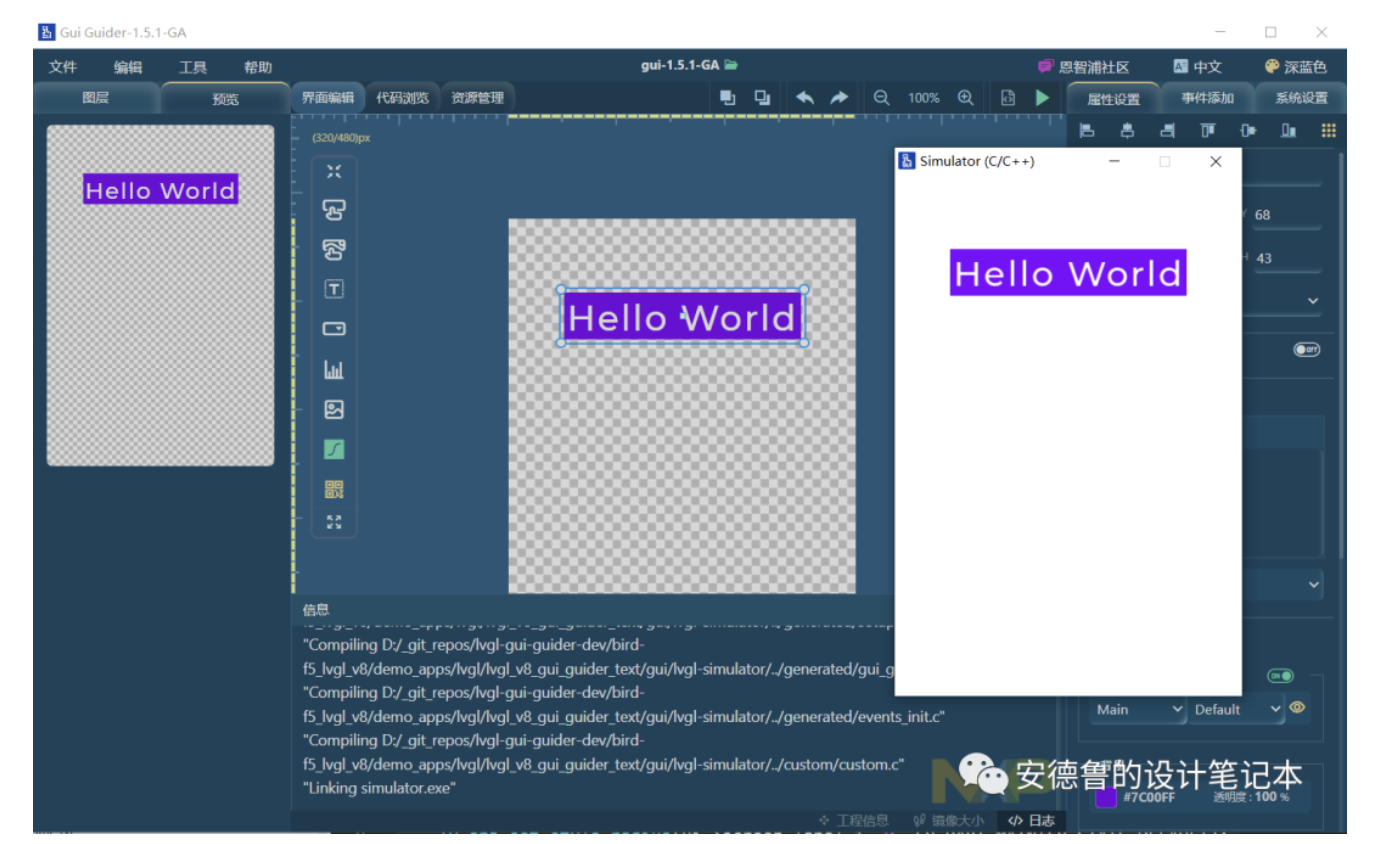
figure-gui-using-label-3
图x 预览编辑label对象的效果
编译MCU工程并下载到开发板
编译对应的Keil工程,启动针对代码量的优化,看下对存储空间的占用。
Build started: Project: project
*** Using Compiler 'V6.18', folder: 'C:Keil_v5ARMARMCLANGBin'
Build target 'Target 1'
compiling clock_init.c...
compiling board_init.c...
compiling hal_crc.c...
compiling lcd_port.c...
compiling pin_init.c...
compiling lcd.c...
...
compiling events_init.c...
compiling gui_guider.c...
compiling lv_font_montserratMedium_16.c...
compiling lv_table.c...
compiling setup_scr_screen.c...
compiling lv_font_montserratMedium_32.c...
compiling lv_textarea.c...
linking...
Program Size: Code=154616 RO-data=64380 RW-data=148 ZI-data=29100
".Objectsproject.axf" - 0 Error(s), 0 Warning(s).
Build Time Elapsed:  00:00:14
下载程序到MCU并运行,可以看到,开发板上的显示屏上也成功显示了“同款”图像。如图x所示。
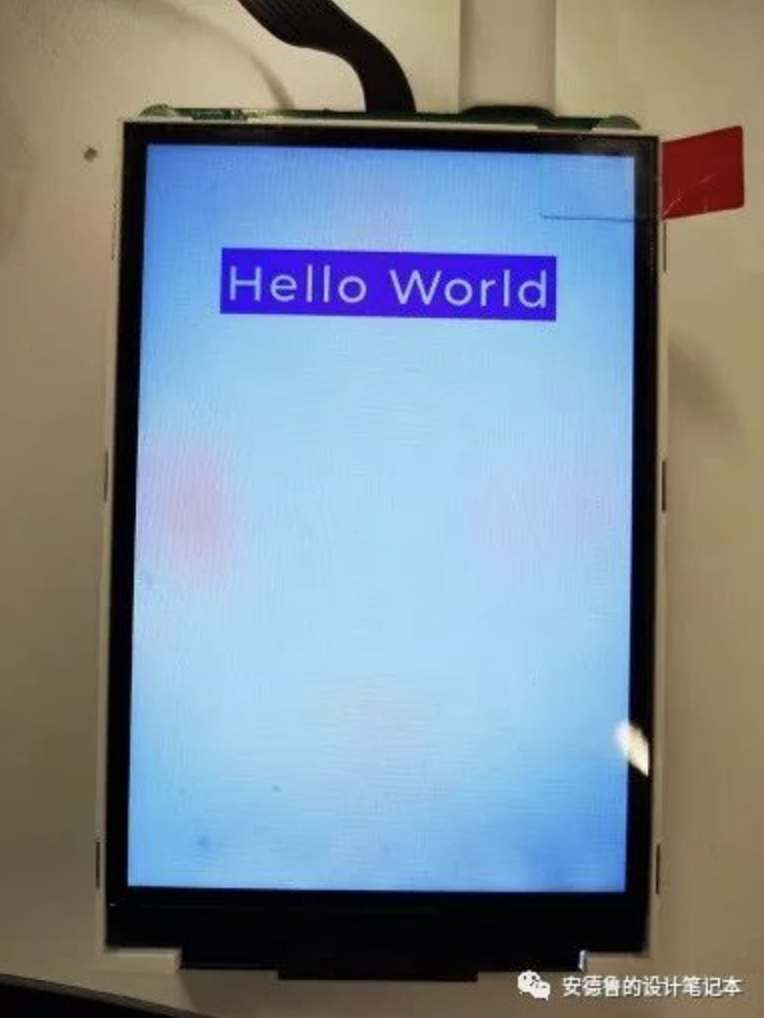
figure-gui-using-label-4-mini
图x 在开发板上运行UI显示label对象
-
基于Linux的嵌入式GUI设计研究2009-08-12 560
-
GUI-Guider生成工程移植MCU2023-02-22 439
-
GUI Guider v1.5.0正式发布!它为嵌入式图形开发又带来哪些新功能,一起来探索吧~2023-02-24 2622
-
如何选择嵌入式系统的GUI库?2019-07-04 0
-
嵌入式系统开发之ucos在各种硬件上的GUI实现2010-03-15 667
-
Linux GUI嵌入式开发有什么新的研究方向2019-11-06 994
-
免费的GUI Guider又出新版本!看看它为嵌入式图形开发,带来哪些新玩法~2022-11-25 5902
-
GUI Guider v1.6.0正式发布:更多嵌入式HMI开发新功能,等你来探索!2023-08-04 1211
-
使用GUI Guider工具在MCU上开发嵌入式GUI应用 (1)2023-08-16 1552
-
使用GUI Guider工具开发嵌入式GUI应用(2)2023-08-16 2161
-
免费又简单!新版本GUI Guider发布,速来体验不一样的嵌入式HMI开发2023-10-13 1623
-
『嵌入式GUI特训营』开营啦!是学霸就有奖拿,快来挑战一下!2023-12-01 205
-
“嵌入式GUI开发特训营”开营啦!是学霸就有奖拿,快来挑战一下!2023-12-07 722
-
图形界面开发工具GUI Guider的使用教程2023-12-20 4939
-
GUI Guider新版本发布,嵌入式GUI开发体验升级2024-03-29 365
全部0条评论

快来发表一下你的评论吧 !
