

基于OpenHarmony编写GPIO平台驱动和应用程序
描述
1、案例简介
该程序是基于OpenHarmony标准系统编写的基础外设类:GPIO驱动。
目前已在凌蒙派-RK3568开发板跑通。详细资料请参考官网
详细资料请参考OpenHarmony官网:
GPIO平台驱动开发
GPIO应用程序开发
2、基础知识
2.1、GPIO简介
GPIO(General-purpose input/output)即通用型输入输出。通常,GPIO控制器通过分组的方式管理所有GPIO管脚,每组GPIO有一个或多个寄存器与之关联,通过读写寄存器完成对GPIO管脚的操作。
2.2、GPIO平台驱动
GPIO(General-purpose input/output)即通用型输入输出。通常,GPIO控制器通过分组的方式管理所有GPIO管脚,每组GPIO有一个或多个寄存器与之关联,通过读写寄存器完成对GPIO管脚的操作。
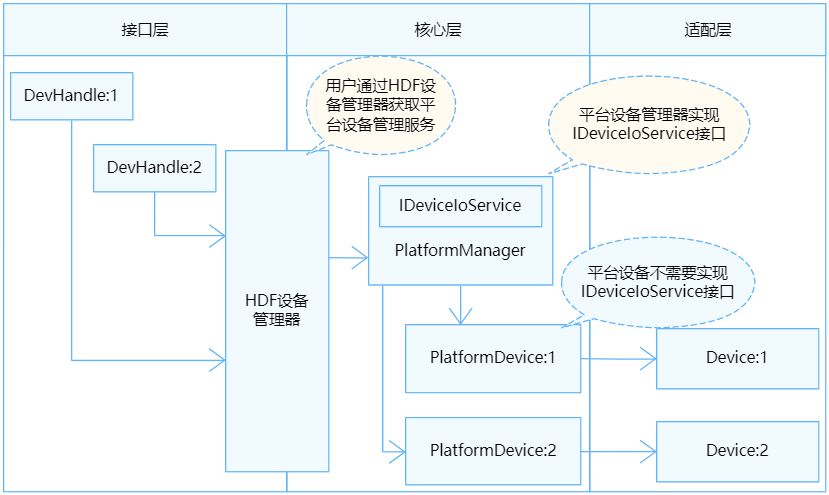
GPIO模块各分层作用:
接口层提供操作GPIO管脚的标准方法。
核心层主要提供GPIO管脚资源匹配,GPIO管脚控制器的添加、移除以及管理的能力,通过钩子函数与适配层交互,供芯片厂家快速接入HDF框架。
适配层主要是将钩子函数的功能实例化,实现具体的功能。
GPIO统一服务模式结构图:
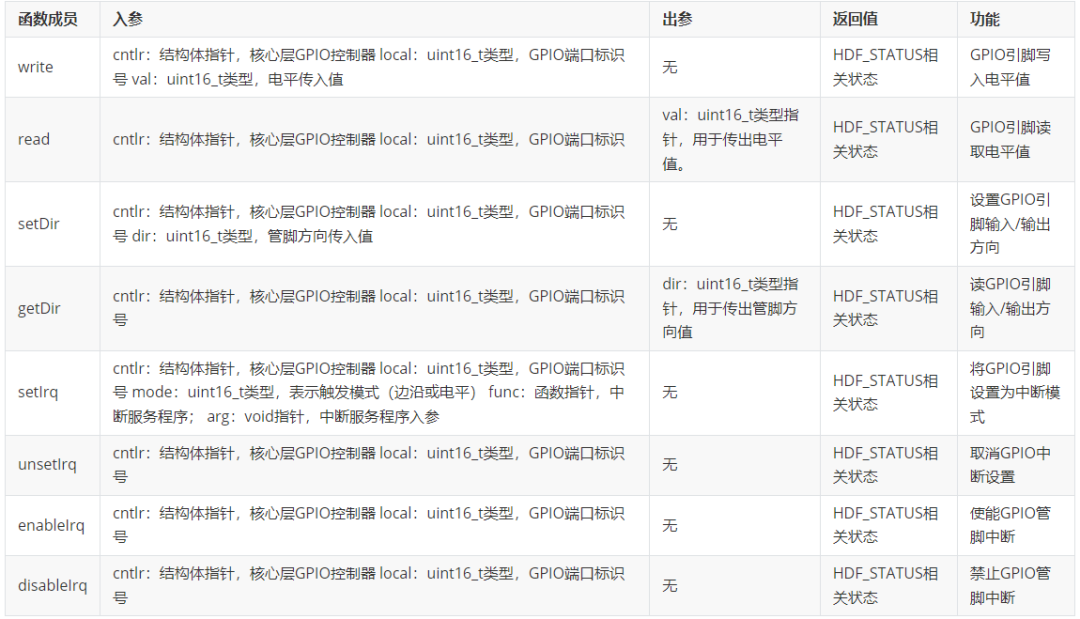
为了保证上层在调用GPIO接口时能够正确的操作GPIO管脚,核心层在//drivers/hdf_core/framework/support/platform/include/gpio/gpio_core.h中定义了以下钩子函数,驱动适配者需要在适配层实现这些函数的具体功能,并与钩子函数挂接,从而完成适配层与核心层的交互。
GpioMethod定义:
    struct GpioMethod {
        int32_t (*request)(struct GpioCntlr *cntlr, uint16_t local);                 // 【预留】
        int32_t (*release)(struct GpioCntlr *cntlr, uint16_t local);                 // 【预留】
        int32_t (*write)(struct GpioCntlr *cntlr, uint16_t local, uint16_t val);
        int32_t (*read)(struct GpioCntlr *cntlr, uint16_t local, uint16_t *val);
        int32_t (*setDir)(struct GpioCntlr *cntlr, uint16_t local, uint16_t dir);
        int32_t (*getDir)(struct GpioCntlr *cntlr, uint16_t local, uint16_t *dir);
        int32_t (*toIrq)(struct GpioCntlr *cntlr, uint16_t local, uint16_t *irq);    // 【预留】
        int32_t (*setirq)(struct GpioCntlr *cntlr, uint16_t local, uint16_t mode, GpioIrqFunc func, void *arg);
        int32_t (*unsetIrq)(struct GpioCntlr *cntlr, uint16_t local);
        int32_t (*enableIrq)(struct GpioCntlr *cntlr, uint16_t local);
        int32_t (*disableIrq)(struct GpioCntlr *cntlr, uint16_t local);
    }
(左右移动查看全部内容)
GpioMethod结构体成员的钩子函数功能说明:
2.3、GPIO应用程序
GPIO驱动API接口功能:
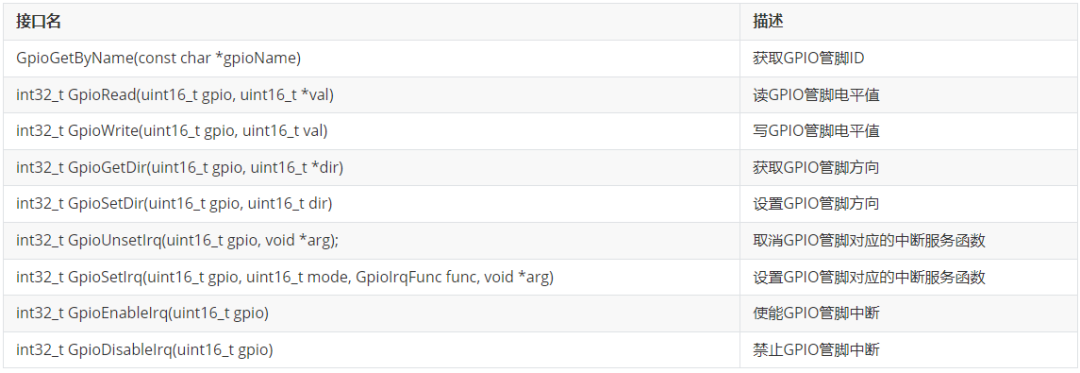
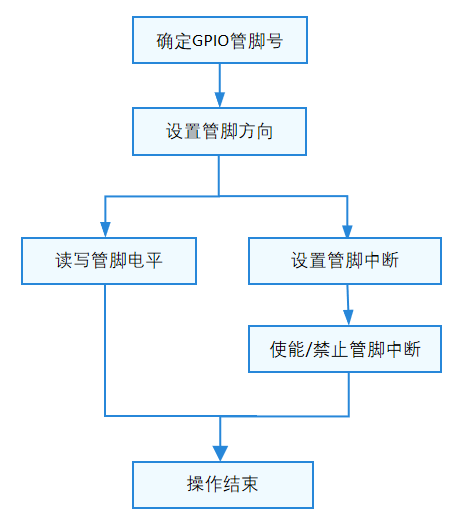
GPIO标准API通过GPIO管脚号来操作指定管脚,使用GPIO的一般流程如下图所示:
3、代码解析
3.1、准备工作
查看《凌蒙派-RK3568开发板_排针说明表_》(即Git仓库的//docs/board/凌蒙派-RK3568开发板_排针说明表_v1.0.xlsx),选中0_B5(即GPIO0_B5)。
3.2、配置文件
3.2.1、device_info.hcs
创建config/device_info.hcs,用于GPIO驱动设备描述,具体内容如下:
root {
    device_info {
        platform :: host {
            device_gpio :: device {
                device0 :: deviceNode {                         // GPIO控制器信息描述
                    policy = 2;                                 // 对外发布服务,必须为2,用于定义GPIO管理器的服务
                    priority = 50;
                    permission = 0644;
                    moduleName = "HDF_PLATFORM_GPIO_MANAGER";   // 这与drivers/hdf_core/framework/support/platform/src/gpio/gpio_service.c的g_gpioServiceEntry.moduleName对应,它主要负责GPIO引脚的管理
                    serviceName = "HDF_PLATFORM_GPIO_MANAGER";
                }
                device1 :: deviceNode {
                    policy = 0;                                 // 等于0,不需要发布服务
                    priority = 55;                              // 驱动驱动优先级
                    permission = 0644;                          // 驱动创建设备节点权限
                    moduleName = "linux_gpio_adapter";          // 用于指定驱动名称,必须是linux_adc_adapter,与drivers/hdf_core/adapter/khdf/linux/platform/gpio/gpio_adapter.c对应
                    deviceMatchAttr = "";                       // 用于配置控制器私有数据,不定义
                }
            }
        }
    }
}
(左右移动查看全部内容)
注意:
device_gpio:为配置树对gpio的设备类结点。
device0:是用于启用HDF_PLATFORM_GPIO_MANAGER驱动的,它负责对GPIO进行对外接口管理。
device1:是用于启用linux_gpio_adapter驱动的,它负责对Linux GPIO的读写(即对Linux Gpio子系统进行操作)。
3.2.3、参与配置树编译
编辑//vendor/lockzhiner/rk3568/hdf_config/khdf/hdf.hcs,将device_info.hcs添加配置树中。具体内容如下所示:
#include "../../samples/b03_platform_device_gpio/config/device_info.hcs"
(左右移动查看全部内容)
3.3、HDF驱动//drivers/hdf_core/adapter/khdf/linux/platform/gpio/gpio_adapter.c已对Linux Gpio子系统进行规范化操作。因此,我们不需要额外的GPIO寄存器操作。
3.4、应用程序
3.4.1、gpio_test.c
gpio_test.c主要分为两个部分:
对gpio引脚进行读操作。
对gpio引脚进行写操作。
(1)对gpio引脚进行读操作
    // GPIO设置为输出
    ret = GpioSetDir(m_gpio_id, GPIO_DIR_OUT);
    if (ret != 0) {
        PRINT_ERROR("GpioSetDir failed and ret = %d
", ret);
        return -1;
    }
    // GPIO输出电平
    ret = GpioWrite(m_gpio_id, m_gpio_value);
    if (ret != 0) {
        PRINT_ERROR("GpioWrite failed and ret = %d
", ret);
        return -1;
    }
(左右移动查看全部内容)
(2)对gpio引脚进行写操作
    // GPIO设置为输出
    ret = GpioSetDir(m_gpio_id, GPIO_DIR_IN);
    if (ret != 0) {
        PRINT_ERROR("GpioSetDir failed and ret = %d
", ret);
        return -1;
    }
    // 读取GPIO引脚的电平
    ret = GpioRead(m_gpio_id, &m_gpio_value);
    if (ret != 0) {
        PRINT_ERROR("GpioRead failed and ret = %d
", ret);
        return -1;
    }
    printf("GPIO Read Successful and GPIO = %d, value = %d
", m_gpio_id, m_gpio_value);
(左右移动查看全部内容)
3.4.2、BUILD.gn
    import("//build/ohos.gni")
    import("//drivers/hdf_core/adapter/uhdf2/uhdf.gni")
    ohos_executable("rk3568_gpio_test") {
      sources = [ "gpio_test.c" ]
      include_dirs = [
        "$hdf_framework_path/include",
        "$hdf_framework_path/include/core",
        "$hdf_framework_path/include/osal",
        "$hdf_framework_path/include/platform",
        "$hdf_framework_path/include/utils",
        "$hdf_uhdf_path/osal/include",
        "$hdf_uhdf_path/ipc/include",
        "//base/hiviewdfx/hilog/interfaces/native/kits/include",
        "//third_party/bounds_checking_function/include",
      ]
      deps = [
        "$hdf_uhdf_path/platform:libhdf_platform",
        "$hdf_uhdf_path/utils:libhdf_utils",
        "//base/hiviewdfx/hilog/interfaces/native/innerkits:libhilog",
      ]
      cflags = [
        "-Wall",
        "-Wextra",
        "-Werror",
        "-Wno-format",
        "-Wno-format-extra-args",
      ]
      part_name = "product_rk3568"
      install_enable = true
    }
(左右移动查看全部内容)
3.4.3、参与应用程序编译
编辑//vendor/lockzhiner/rk3568/samples/BUILD.gn,开启sample编译。具体如下:
"b03_platform_device_gpio/app:rk3568_gpio_test",
(左右移动查看全部内容)
4、编译说明
建议使用docker编译方法,运行如下:
    hb set -root .
    hb set
    #选择lockzhiner下的rk3568编译分支。
    hb build -f
(左右移动查看全部内容)
5、运行结果
该程序运行结果如下所示:
    # rk3568_gpio_test -g 13 -i
    gpio id: 13
    gpio dir: in
    gpio value: 0
    GPIO Read Successful and GPIO = 13, value = 1
    #
    #
    # rk3568_gpio_test -g 13 -o
    gpio id: 13
    gpio dir: out
    gpio value: 0
    #
(左右移动查看全部内容)
可将GPIO引脚接入排针中的GND或3V3引脚,查看GPIO输出结果。
审核编辑:汤梓红
-
想通过应用程序控制GPIO驱动2019-03-22 0
-
OpenHarmony:全流程讲解如何编写ADC平台驱动以及应用程序2023-09-04 0
-
OpenHarmony:全流程讲解如何编写GPIO平台驱动以及应用程序2023-09-05 0
-
OpenHarmony:全流程讲解如何编写RTC平台驱动以及应用程序2023-09-18 0
-
OpenHarmony应用程序包整体说明2023-09-20 0
-
Windows CE下GPIO驱动程序的设计与应用2010-01-06 564
-
OpenHarmony HDF平台驱动框架及驱动适配介绍2021-09-24 5925
-
OpenHarmony应用程序集成AGC云存储2023-02-27 1034
-
OpenHarmony:如何使用HDF平台驱动控制I2C2023-09-13 670
-
OpenHarmony:如何使用HDF平台驱动控制PWM2023-09-14 473
-
OpenHarmony:全流程讲解如何编写Watchdog平台驱动以及应用程序2023-09-19 618
-
如何从单片机平台编写GPIO口程序2023-09-28 881
全部0条评论

快来发表一下你的评论吧 !
