

KW45使用SPSDK进行代码更新和debug authentication指南
描述
1. 问题背景
KW45是继KW38的下一代BLE芯片,符合 BLE5.3标准,最多可同时支持24个安全连接。在KW系列中KW45首次采用三核架构:一个96MHz的CM33应用核、一个处理Radio相关任务的CM3内核和一个专门处理加密安全称为EdgeLock(类似HSM)M0+核。其中CM3内核用于处理BLE controller相关的任务, CM33内核可以更专注于处理BLE Host层,GATT层和应用相关的任务,除此之外CM3内核还拥有独立的Flash和SRAM资源,不占用芯片本身内置的1M Flash和128K RAM,从而可以将CM33主核上的内存资源和处理资源释放给用户应用空间。EdgeLock类似HSM的功能,提供常见AES/ECC/RSA等对称非对称加解密的硬件加速、密钥存储操作和安全生命周期管理,最大限度地减少了主核工作量。
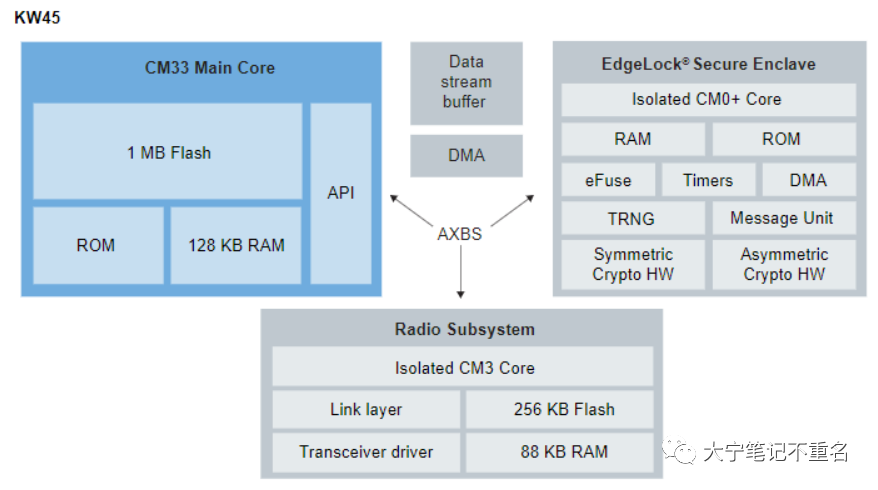
尽管架构更复杂,但因为后两者的软件是由芯片厂商提供,无需用户开发,所以并没有额外增加多少工作量,其和以前KW3X系列一个最大不同是,CM3的软件也称为NBU需要用户自行烧录(这也就是为何常有客户反馈自己做的板子运行无线相关的例子运行时总是卡在一个地方的原因),之所以这块没有固化在芯片内内部有两方面考虑,一方面方便用户更新支持到更新的BLE feature,例如说channel sounding,而一方面方便用户可以对官方提供的NBU Image 进行个性化的签名,防止未认证的恶意代码启动,从而增加系统安全等级。所以这里就需要工具完成密钥的生成,image的加密,加密image的烧录过程,为方便用户,原厂提供了一套开源的SPSDK脚本方便用户使用,但牵涉到环境搭建,尤其有很多Key的生成,对新手来说有些挑战,本文第4章节会给出一个step by step的教程,方便开发者更系统的去看每一个步骤在做什么,需要修改什么,先解决怎么做的问题,至于为什么这么做,每个Key的作用需要用户结合RM手册去查看。同时随着信息安全越来越受到重视,很多产品量产后会考虑临时禁止调试口,在需要时通过特定的方式再去使能,对应到KW45就是debug authentication,RM文档更多从原理性介绍,给出的是JTAG操作伪指令,至于如何在SPSDK中实现未有提及,本文会在第5章节重点介绍相关实操。
2. SPSDK概览
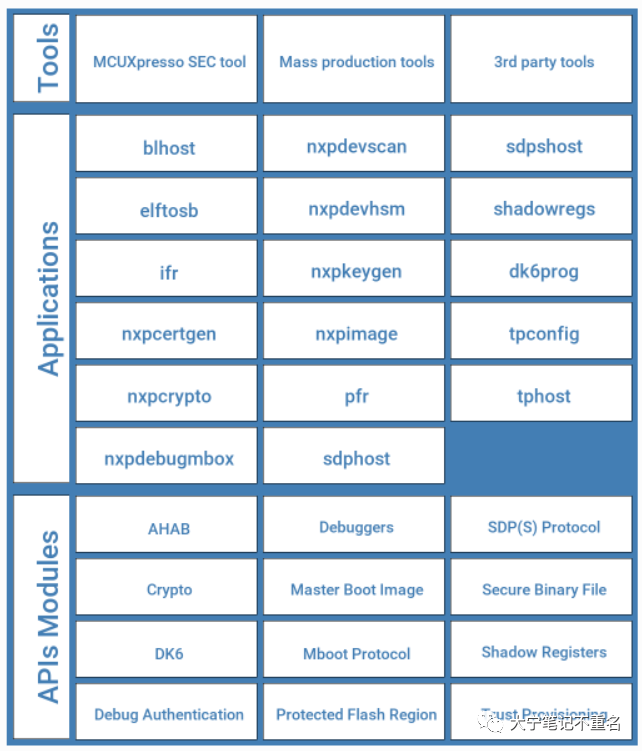
SPSDK的全称是Secure Provisioning SDK,它是一个统一、可靠且易于使用的Python SDK 库,适用于NXP MCU 产品组合,客户帮助客户快速完成从原型设计到生产部署的整个过程。该库允许用户与设备连接和通信、配置设备、准备、下载和上传数据(包括安全操作)。
在SPSDK包中,提供了以下两种方式供用户使用:
应用程序:用户可以使用 Python虚拟环境命令行或者Jupyter Notebook(推荐方式)调用各个应用程序;
API接口:以Python 库的形式提供,方便用户或者工具厂商增加自定义功能和自定义安全部署;
3. 准备工作:
安装Python3.7,建议使用3.7-3.11版本,不支持Python2.x;
安装SPSDK,可以直接在cmd中完成;
安装jupyter
d:
cd D:YU_IOTKW45_3SPSDK
D:YU_IOTKW45_3SPSDK> python -m venv spsdk_pyenv
D:YU_IOTKW45_3SPSDK> spsdk_pyenvScriptsactivate
D:YU_IOTKW45_3SPSDK> python -m pip install --upgrade pip
D:YU_IOTKW45_3SPSDK> pip install spsdk
D:YU_IOTKW45_3SPSDK> spsdk --help
D:YU_IOTKW45_3SPSDK> pip3 install jupyter
# 以上spsdk和jupyter的安装需在Python虚拟环境启动后进行,否则安装无效;
下载spsdk源文件或者AN13883的附件,两者大同小异,此笔记以后者为示例。
spsdk源文件:https://spsdk.readthedocs.io/en/latest/spsdk.html
AN13883源文件:
4. 在ISP下载KW45 Radio firmware过程
OEM公私钥和证书文件的生成
SB3文件的生成
image烧录过程
D:YU_IOTKW45_3SPSDK> spsdk_pyenvScriptsactivate
(spsdk_pyenv)D:YU_IOTKW45_3SPSDK>cd D:YU_IOTKW45_3SPSDKAN13883SWAN_SPSDK
(spsdk_pyenv)D:YU_IOTKW45_3SPSDKAN13883SWAN_SPSDK> jupyter-lab
此后,会有一个Jupyter的网页交互产生,如下图,然后就是傻瓜式的step by step执行脚本。
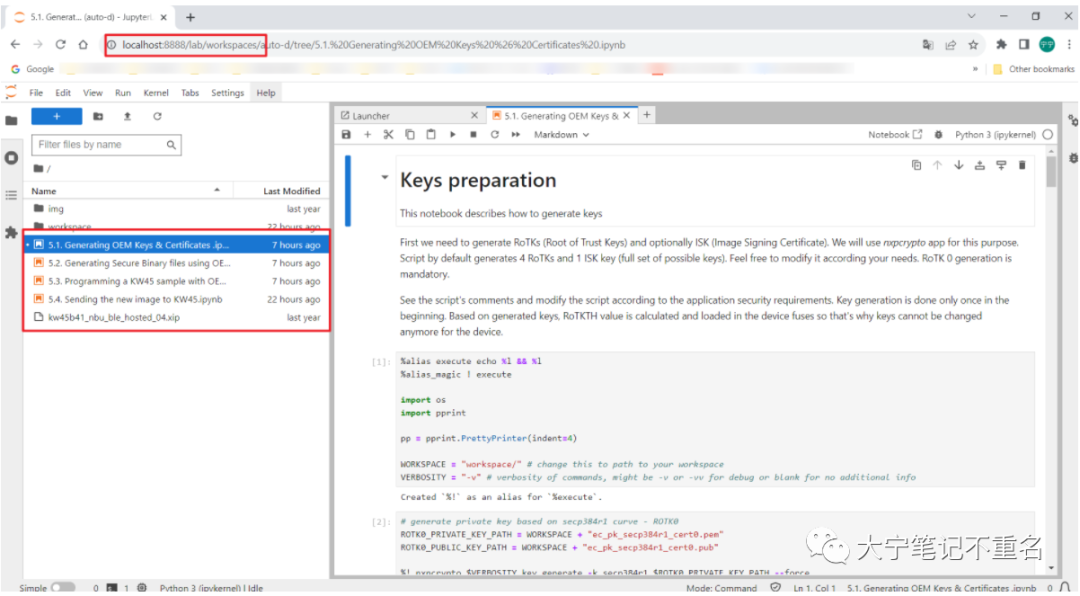
详细步骤如下:
4.1. RoTKs 和ISK的生成
此过程会生成4对RoTKs (Root of Trust Keys) 和1对ISK (Image Signing Certificate), ISK是可选的,会在生成SB3文件时选择是否使用。
# generate private key based on secp384r1 curve - ROTK0
ROTK0_PRIVATE_KEY_PATH = WORKSPACE + "ec_pk_secp384r1_cert0.pem"
ROTK0_PUBLIC_KEY_PATH = WORKSPACE + "ec_pk_secp384r1_cert0.pub"

%! nxpcrypto $VERBOSITY key generate -k secp384r1 $ROTK0_PRIVATE_KEY_PATH --force
assert _exit_code == 0

# verify that keys were generated
assert os.path.exists(ROTK0_PRIVATE_KEY_PATH)
assert os.path.exists(ROTK0_PUBLIC_KEY_PATH)
.....
4.2. X509证书生成的yml模板生成
# obtain a template for root cert ROTK0
ROOT0_CERT_CONFIG_PATH = WORKSPACE + "cert0_template.yml"
%! nxpcrypto $VERBOSITY cert get-cfg-template $ROOT0_CERT_CONFIG_PATH --force

assert _exit_code == 0
证书模板如下,包括issue,subject,证书序列号、有效期、签发使用的私钥,对应公钥等信息,更多证书格式信息可以参考https://github.com/pyca/cryptography,cryptography/src/cryptography/x509/oid.py
issuer:
  COMMON_NAME: NXP
  COUNTRY_NAME: CZ
  LOCALITY_NAME: Roznov pod Radhostem
  STATE_OR_PROVINCE_NAME: Morava
  STREET_ADDRESS: 1.maje 1009
  ORGANIZATION_NAME: SPSDK Team

# ==============================================
# Subject identification fields
# ==============================================
# All available option can be found within class NameOID in
# cryptography/src/cryptography/x509/oid.py at https://github.com/pyca/cryptography
subject:
  COMMON_NAME: NXP - SPSDK
  COUNTRY_NAME: CZ
  LOCALITY_NAME: Roznov pod Radhostem
  STATE_OR_PROVINCE_NAME: Morava
  STREET_ADDRESS: 1.maje 1009
  ORGANIZATION_NAME: SPSDK Team
  POSTAL_CODE: 756 61

# ==============================================
# The certificate settings
# ==============================================

# Path, where issuer private key is stored
issuer_private_key: issuer_key.pem
# Path, where subject public key is stored
subject_public_key: subject_key.pub
# Serial number of certificate
serial_number: 12346578
# Validity duration in days
duration: 3650

# ==============================================
# Certificate basic extensions
# ==============================================
extensions:
  BASIC_CONSTRAINTS:
    # Delegate certificate as a signing authority to create an intermediate certificates.
    ca: false  # Valid values true|false
    # Integer length of the path of certificate signature from a given certificate, back to the root certificate
    path_length: 0
4.3. 正式证书生成
# Generate root certificates 0
%! nxpcrypto $VERBOSITY cert generate -c $ROOT0_CERT_CONFIG_PATH -o $ROOT_0_CERT_PATH --force
assert _exit_code == 0
# Generate root certificates 1
%! nxpcrypto $VERBOSITY cert generate -c $ROOT1_CERT_CONFIG_PATH -o $ROOT_1_CERT_PATH --force
assert _exit_code == 0
# Generate root certificates 2
%! nxpcrypto $VERBOSITY cert generate -c $ROOT2_CERT_CONFIG_PATH -o $ROOT_2_CERT_PATH --force
assert _exit_code == 0
# Generate root certificates 3
%! nxpcrypto $VERBOSITY cert generate -c $ROOT3_CERT_CONFIG_PATH -o $ROOT_3_CERT_PATH --force
assert _exit_code == 0


# Generate ISK certificate
%! nxpcrypto $VERBOSITY cert generate -c $ISK_CERT_CONFIG_PATH -o $ISK_CERT_PATH --force
assert _exit_code == 0
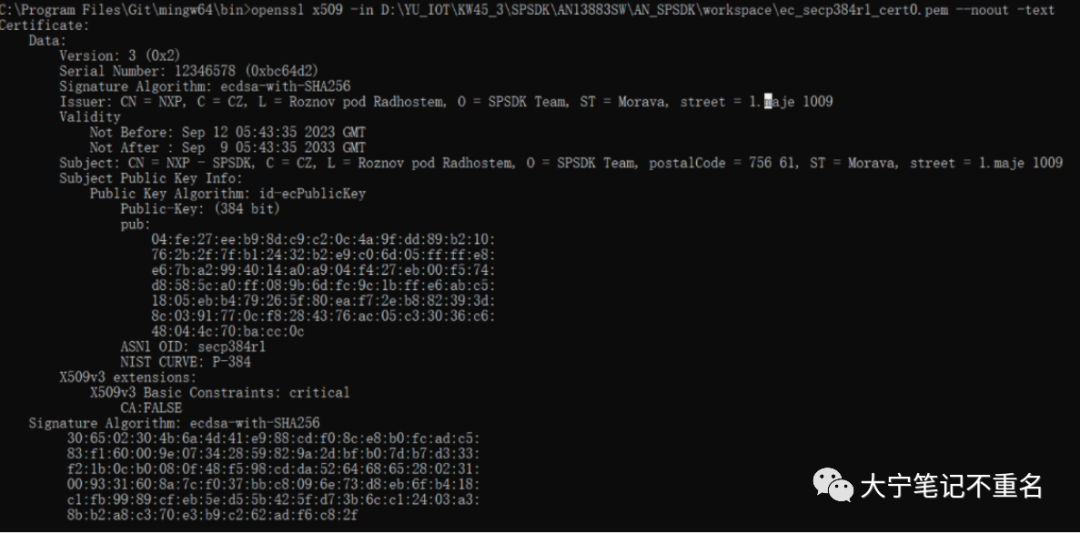
如下是cert0的内容,但是因为其是base64编码,不方便查看,如果有兴趣可以通过Openssl去读取证书的信息和yml文件对照。

openssl x509 -in cacert.pem -noout -text
#openssl在Git安装后可以直接使用
4.4 对称密钥SB3KDK生成
该Key用于加密SB3 key block,会被program到fuse,后续无法再次修改,该生成步骤也可以放在前面去执行。
import os, binascii

SB3KDK_KEY_PATH = WORKSPACE + "sb3kdk.txt"
with open(SB3KDK_KEY_PATH, "wb") as f:
    f.write(binascii.b2a_hex(os.urandom(32)))

assert os.path.exists(SB3KDK_KEY_PATH)
4.5. SB3配置文件生成
该步骤会使用到SPSDK的npximage.exe应用程序
WORKSPACE = "workspace/" # change this to path to your workspace
VERBOSITY = "-v" # verbosity of commands, might be -v or -vv for debug or blank for no additional info

SB31_TEMPLATE_PATH = WORKSPACE + "sb31_config.yml"
%! nxpimage $VERBOSITY sb31 get-template -f kw45xx -o $SB31_TEMPLATE_PATH
assert _exit_code == 0
assert os.path.exists(SB31_TEMPLATE_PATH)
需要注意的是:
需要手动注释掉binaryCertificateBlock: my_isk_cert.bin,否则会后面SB3正式生成时会报错。
useIsk: false意味着没有使用ISK,需要修改配置文件
#binaryCertificateBlock: my_isk_cert.bin
commands:
- erase:
    address: '0x48800000 '
    size: '0x30000'
- load:
    address: '0x48800000 '
    file: kw45b41_nbu_ble_hosted_04.xip
containerConfigurationWord: 0
containerKeyBlobEncryptionKey: workspace/sb3kdk.txt
containerOutputFile: sb3.sb3
description: 384_none_nbu_only
family: kw45xx
firmwareVersion: 0
isNxpContainer: false
iskSignProvider: type=file;file_path=my_isk_prv_key.pem
kdkAccessRights: 3
mainRootCertId: 0
mainRootCertPrivateKeyFile: workspace/ec_pk_secp384r1_cert0.pem
rootCertificate0File: workspace/ec_secp384r1_cert0.pem
rootCertificate1File: workspace/ec_secp384r1_cert1.pem
rootCertificate2File: workspace/ec_secp384r1_cert2.pem
rootCertificate3File: workspace/ec_secp384r1_cert3.pem
rootCertificateEllipticCurve: secp384r1
signingCertificateConstraint: 0
useIsk: false
4.6 SB3文件的生成
上面已经生成了证书和key,按照sb31_config.yml 的配置生成
%! nxpimage $VERBOSITY sb31 export $SB31_TEMPLATE_PATH
assert _exit_code == 0
assert os.path.exists(WORKSPACE+SB31_FILE_PATH)

INFOSB3KDK: 9e1432fc4869435ee6f396dccba9595933c8d1d2ad40385927f3a8b9f58162d7
INFORoTKTH: 5e03e6649294d19fa31b19e17895184dc16149e5c2748bc394db46249a6ef29ca1f14dcd67169d7744c5c1a9025b981a
4.7 SB3KDK和ROTKH的烧录(研发阶段可跳到此步骤)
在NXP demo板芯片内已经预烧录了SB3KDK和ROTKTH,所以可以直接跳到这个步骤。
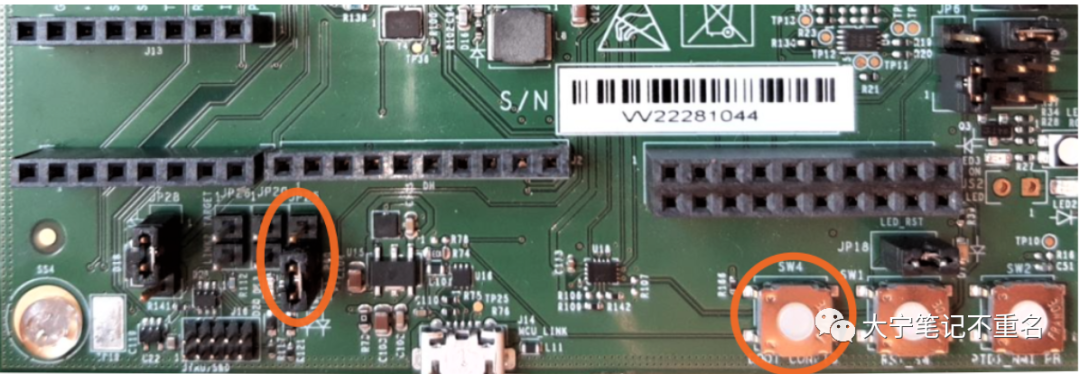
把J25连到2-3,按住SW4,重新上电
修改串口号,尝试连接
# choose com port
UART_CONNECTION = "-p com14"

%! blhost $UART_CONNECTION get-property current-version
assert _exit_code == 0
fuses with keys/RoTKTH
此过程是不可逆的,强烈建议在研发阶段使用NXP提供的默认SB3KDK和ROTKTH;
# Increase voltage for fuse burning
%! blhost $UART_CONNECTION set-property 0x16 1

# program SB3KDK (CUST_PROD_OEMFW_ENC_SK)
# put value SB3KDK generated by nxpimage
#%! blhost $UART_CONNECTION fuse-program 0x20 [["Substitute this comment by the SB3KDK generated key output in section SB3.1 generation. Example below."]]
# example line : %! blhost $UART_CONNECTION fuse-program 0x20 [[7aa7ef9813b3561257b8837dab26225301df3511217f2733c71dadcd447722d1]]
%! blhost $UART_CONNECTION fuse-program 0x20 [[7aa7ef9813b3561257b8837dab26225301df3511217f2733c71dadcd447722d1]]

# program RoTKTH (CUST_PROD_OEMFW_AUTH_PUK)
# put value RoTKTH generated by nxpimage
#%! blhost $UART_CONNECTION fuse-program 0x1F [["Substitute this comment by the RoTKTH generated key output in section SB3.1 generation. Example below."]]
# example line : %! blhost $UART_CONNECTION fuse-program 0x1F [[650d8097079ff27a3e8a2da14781b922fd8295b6c00bfa067f00e87f1a16b8b304bf710d45cbd591e2e24be83183922c]]
%! blhost $UART_CONNECTION fuse-program 0x1F [[650d8097079ff27a3e8a2da14781b922fd8295b6c00bfa067f00e87f1a16b8b304bf710d45cbd591e2e24be83183922c]]
# Program TZM_EN fuse, this fuse was missed during manufacturing of first KW45 samples. Without TZM_EN fuse set, the S3MUA semaphore is not working properly and after getting of ownership, the write access to TR register causing BUS Fault. If S3MUA semaphore is not used during communication with S3MUA (e.g. only one thread is communicating with S3MUA (EdgeLock)), then TZM_EN fuse can remain 0.
%! blhost $UART_CONNECTION fuse-program 0xD [[01]]

# Set voltage to normal value
%! blhost $UART_CONNECTION set-property 0x16 0
4.8 SB3文件烧录
此步骤需要在ISP模式下执行,即把J25连到2-3,按住SW4,重新上电
# uploads SB3.1
SB31_FILE_FINAL = WORKSPACE+SB31_FILE_PATH
assert os.path.exists(SB31_FILE_FINAL)

%! blhost $UART_CONNECTION receive-sb-file $SB31_FILE_FINAL
assert _exit_code == 0
至此,生成加密签名文件的工作结束。
5. Debug authentication实现步骤
在做Debug authentication之前,需要大概了解下KW45启动的过程,如下图,在启动后,会先去检查用户是否使能dual image启动,如果是就去运行最新版本,如果不是就会先去Boot image base address处去查看是否有有效的PC和SP,对于KW45来说如果未使能dual image这个地址就是0x00。如果PC和SP有效就会先去对用户应用程序验签,如果失败,就会回到ISP模式,如果用户应用程序验签通过,ROM就会继续对NBU进行验签,如果验签通过才会真正进入到客户正常应用程序。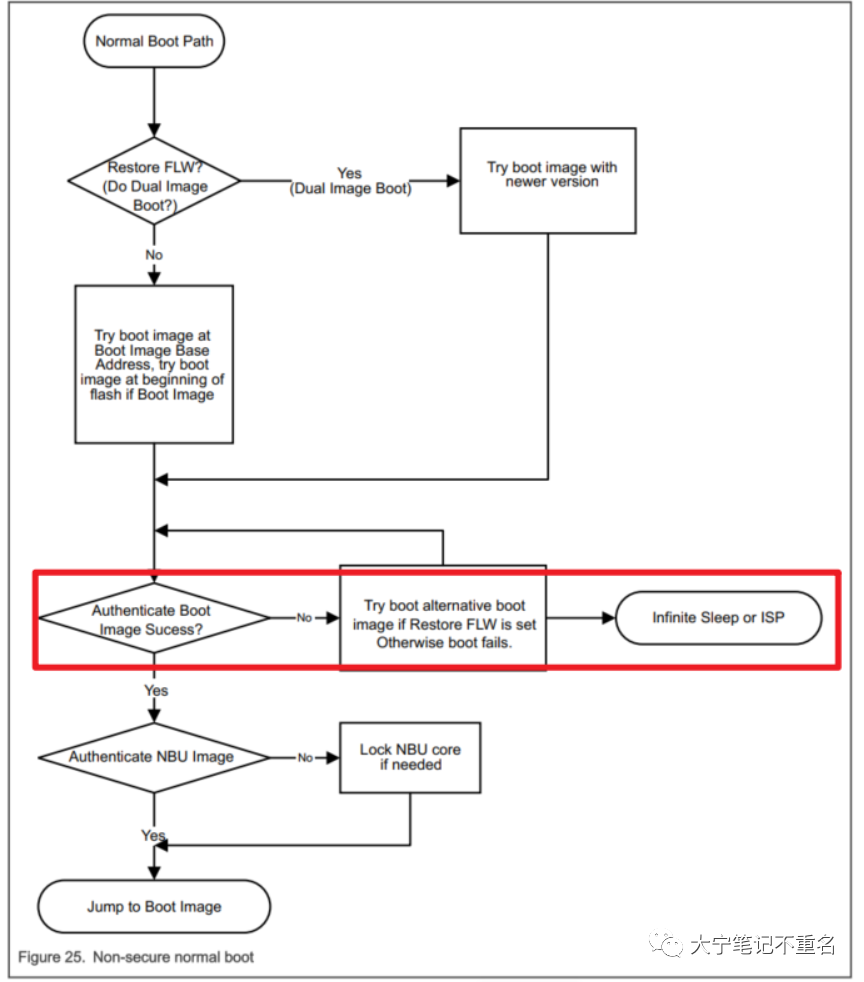 而Debug authentication是贯穿在上面整个过程中的,需要在每一个步骤都能进行debug。前文提到,Debug authentication的目的是在量产禁止JTAG仿真器接口后,通过证书认证方式再去打开Debug口的访问权限,所以如果想去使能这个功能就需要做些额外的操作,譬如说将lifecycle推进到OEM secure world,生成debug authentication的证书,输入命令等,如下分别讲述。
5.1 关闭JTAG调试功能,
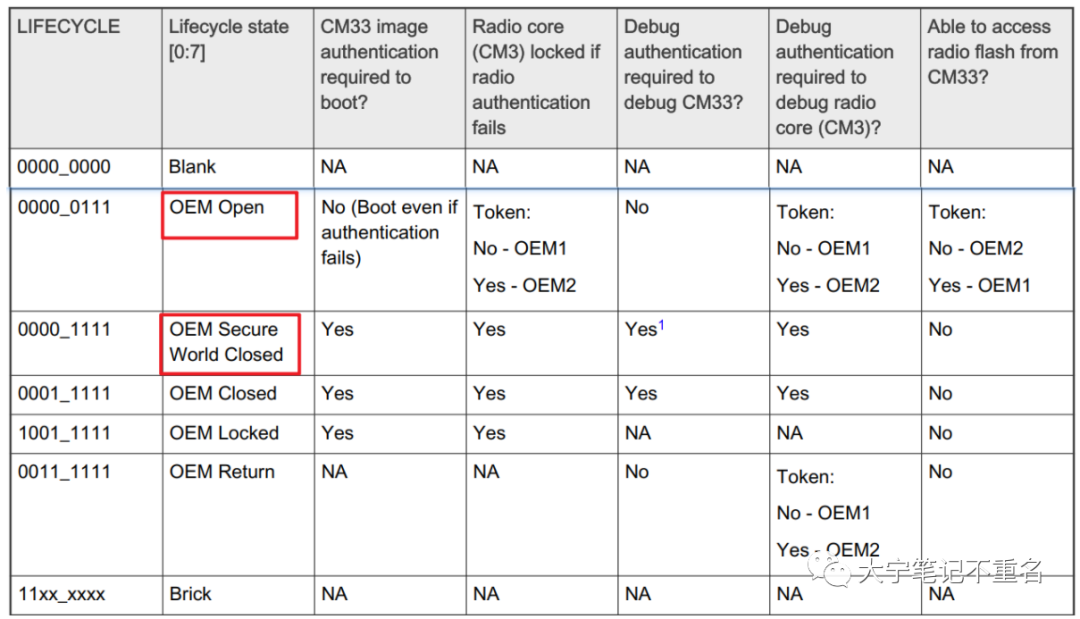
OEM Open->OEM Secure World Close模式
实现方式有两种:第一种借助于单独的blhost程序,第二种使用SPSDK中的app实现
:: Increase voltage for fuse burning
..inlhost.exe -p COM14 set-property 0x16 1
:: program SB3KDK (CUST_PROD_OEMFW_ENC_SK)
..inlhost.exe -p COM14 -- fuse-program 0x20 "{{7aa7ef9813b3561257b8837dab26225301df3511217f2733c71dadcd447722d1}}"
:: program RoTKTH (CUST_PROD_OEMFW_AUTH_PUK)
..inlhost.exe -p COM14 -- fuse-program 0x1F "{{650d8097079ff27a3e8a2da14781b922fd8295b6c00bfa067f00e87f1a16b8b304bf710d45cbd591e2e24be83183922c}}"
::Program TZM_EN fuse, this fuse was missed during manufacturing of first KW45 samples. Without TZM_EN fuse set, the S3MUA semaphore is not working properly and after getting of ownership, the write access to TR register causing BUS Fault. If S3MUA semaphore is not used during communication with S3MUA (e.g. only one thread is communicating with S3MUA (EdgeLock)), then TZM_EN fuse can remain 0.
..inlhost.exe -p COM14 -- fuse-program 0xD "{{1}}"
:: Set voltage to normal value
..inlhost.exe -p COM14 set-property 0x16 0
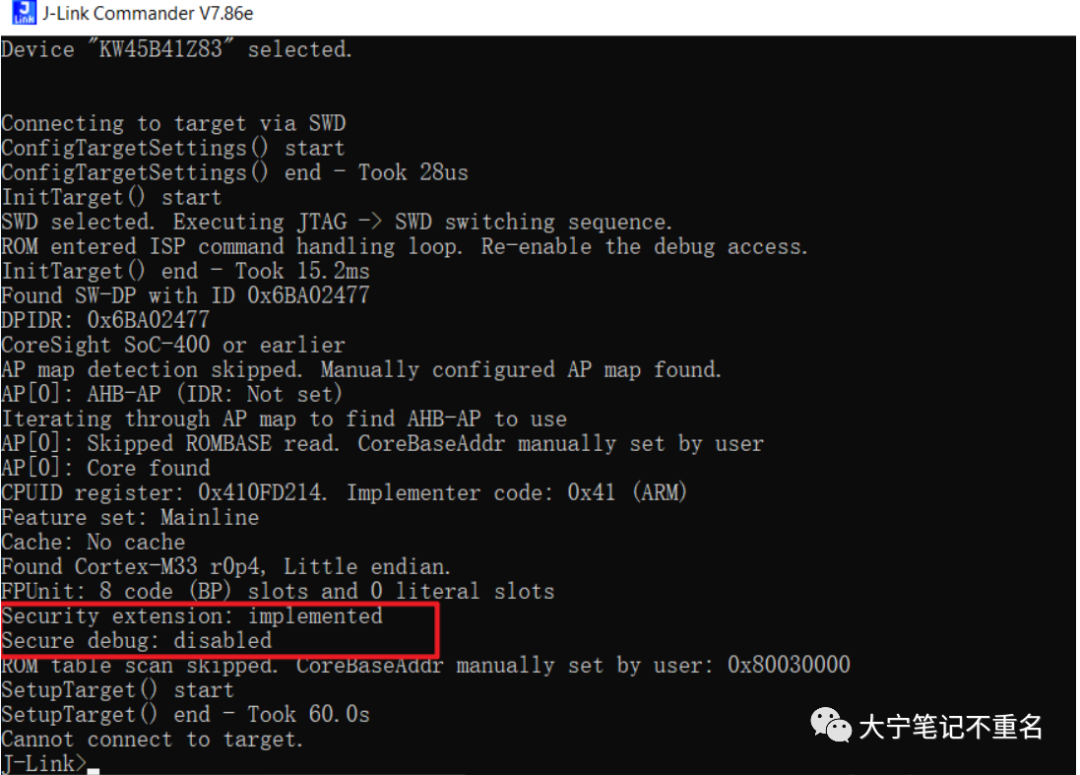
成功后可以回读0x0A fuse地址,查看当前lifecycle状态,成功后如果使用Jlink去连接显示如下Secure debug disabled:
5.2 生成DC使用的公私钥对
# generate private key based on secp384r1 curve - Debug
ROTK0_Debug_PRIVATE_KEY_PATH = WORKSPACE + "ec_pk_secp384r1_cert0_debug.pem"
ROTK0_Debug_PUBLIC_KEY_PATH = WORKSPACE + "ec_pk_secp384r1_cert0_debug.pub"

%! nxpcrypto $VERBOSITY key generate -k secp384r1 $ROTK0_Debug_PRIVATE_KEY_PATH --force
assert _exit_code == 0

# verify that keys were generated
assert os.path.exists(ROTK0_Debug_PRIVATE_KEY_PATH)
assert os.path.exists(ROTK0_Debug_PUBLIC_KEY_PATH)
5.3 DC证书模板生成
# obtain a template for debug cert
DC_CONFIG_PATH = WORKSPACE + "DC.yml"
%! nxpdebugmbox get-template -f $DC_CONFIG_PATH
assert _exit_code == 0
# Copyright 2023 NXP
#
# SPDX-License-Identifier: BSD-3-Clause

#             DC Block structure
# ============================================
# ============================================
# ============================================
# ===              Version                 ===
# ============================================
# ===             Soc Class                ===
# ============================================
# ===                UUID                  ===
# ============================================
# ===    RoT Meta SHA256 of following:     ===
# ===          RoT Key0 SHA256             ===
# ===          RoT Key1 SHA256             ===
# ===          RoT Key2 SHA256             ===
# ===          RoT Key3 SHA256             ===
# ============================================
# ===        Debugger Key DCK (Pub):       ===
# ===           Mod: 2048 Exp: 32          ===
# ============================================
# ===              CC SOCU                 ===
# ============================================
# ===               CC VU                  ===
# ============================================
# ===                 CB                   ===
# ============================================
# ===            RoT Key (pub)             ===
# ===           Mod: 2048 Exp: 32          ===
# ============================================
# ============================================
# ===       Signature of all block         ===
# ===  SHA256 of whole block => RSA(RoTK)  ===
# ============================================
# ============================================
# ============================================

# ============ SoC Class ============
# A unique identifier for a set of SoCs that require no SoC-specific differentiation in
# their debug authentication. The main usage is to allow a different set of debug
# domains and options to be negotiated between the device configuration and
# credentials. A class can contain just a single revision of a single SoC model, if the
# granularity of debug control warrants it.
# Examples list of possible settings:
# 0x0000:       i.MXRT595, i.MXRT685,
# 0x0001:       LPC550x, LPC55s0x, LPC551x, LPC55s1x, LPC552x, LPC55s2x, LPC55s6x
# 0x0004:       LPC55s3x, RW61x
# 0x0005:       KW45xx/K32W1xx
# 0x0006:       MCXN9xx (A0)
# 0x0007:       MCXN9xx (A1)
# 0x000A:       RW61x (A2)
# 0x5254049C:   i.MXRT118x

socc: 0x0005

# ============ Device UUID ============
# 128-bit IETF RFC4122 compliant non-sequential Universally Unique Identifier (UUID)
uuid: "00000000000000000000000000000000"

# ============ SoC Usage ============
# A CC (constraint) value that is a bit mask, and whose bits are used in an
# SoCC-specific manner. These bits are typically used for controlling which debug
# domains are accessed via the authentication protocol, but device-specific debug
# options can be managed in this way also.
cc_socu: 0xFFFF


# ============ Vendor Usage ============
# A CC (constraint) value that is opaque to the debug authentication protocol itself but
# which can be leveraged by vendors in product-specific ways.
cc_vu: 0

# ============ Credential Beacon & Authentication beacon ============
# A value that is passed through the authentication protocol, which is not interpreted
# by the protocol but is instead made visible to the application being debugged. A
# credential beacon is associated with a DC and is therefore vendor/RoT-signed. An
# authentication beacon is provided and signed by the debugger during the
# authentication process.
cc_beacon: 0

# ============ RoT meta-data ============
# The RoT meta-data required by the device to corroborate; the ROTID sent in the
# DAC, the field in this DC, and any additional RoT state that is not stored within the
# device. This allows different RoT identification, management and revocation
# solutions to be handled.
rot_meta:
  - ../kw45_debug_auth/secp384r1_private_key0.pub
  - ../kw45_debug_auth/secp384r1_private_key1.pub
  - ../kw45_debug_auth/secp384r1_private_key2.pub
  - ../kw45_debug_auth/secp384r1_private_key3.pub

# ============ RoT Identifier ============
# RoTID allows the debugger to infer which RoT public key(s) are acceptable to the
# device. If the debugger cannot or does not provide such a credential, the
# authentication process will fail.
rot_id: 0

# ============ Debug Credential Key ============
# A user-owned key pair. The public part of the key is associated with a DC, the
# private part is held by the user and used to produce signatures during
# authentication.
dck: ../kw45_debug_auth/secp384r1_private_dck.pub

# ==================================================================================================
#               Signature configuration area
# ==================================================================================================
# There are two ways how sign the final DC data blob.
#
# 1. In case that you is available private pair for rot_meta with index rot_id just use first simple style
#    to use it by rotk key. As a second way to do same is use sign_provider (or signProvider - both are accepted) option with 'type=file'.
#
# 2. For case that Debug Credential files are generated in untrusted environment (without access to RoT private keys),
#    there is option to use plugin (example how to create own plugin is in: ./SPSDK/examples/dat/hsm/). The plugin
#    has simple interface that allows handle DC data blob into plugin with index of RoT meta public key to get back signed
#    DC image.
#
#    Those options are exclusive, so only one option could be used to sign the DC.

# ============ Signature Provider ============
# To use signing provider examples
#
# sign_provider: 'type=file;file_path=./hsm/k0_cert0_2048.pem'
# sign_provider: : 'type=sasp;key_number=0'

# ============ RoT signature private key ============
# Private key for for the RoT meta chosen by rot_id to sign the image.
rotk: ../kw45_debug_auth/secp384r1_private_key0.pem
此处的公钥是NXP生成的默认值,这个是客户拿不到的
5.4 DC证书生成
%! nxpdebugmbox -p 2.1 gendc -c D:YU_IOTKW45_3SPSDKdebug_authenworkspacecert0_template_debug.yml D:YU_IOTKW45_3SPSDKdebug_authenworkspacedebug_authen.cert1

%! nxpdebugmbox -p 2.1 gendc -c D:YU_IOTKW45_3SPSDKdebug_authenkw45_debug_auth	est.yml D:YU_IOTKW45_3SPSDKdebug_authenkw45_debug_auth	est.cert
5.5 Debug认证过程
nxpdebugmbox start

nxpdebugmbox -v -p 2.1 -i jlink auth -b 0x0 –c D:YU_IOTKW45_3SPSDKdebug_authenworkspacedebug_authen.cert –k D:YU_IOTKW45_3SPSDKdebug_authenkw45_debug_authsecp384r1_private_dck.pem

nxpdebugmbox -v -p 2.1 -i jlink auth -b 0x0 –c D:YU_IOTKW45_3SPSDKdebug_authenkw45_debug_auth	est.cert –k D:YU_IOTKW45_3SPSDKdebug_authenkw45_debug_authsecp384r1_private_dck.pem
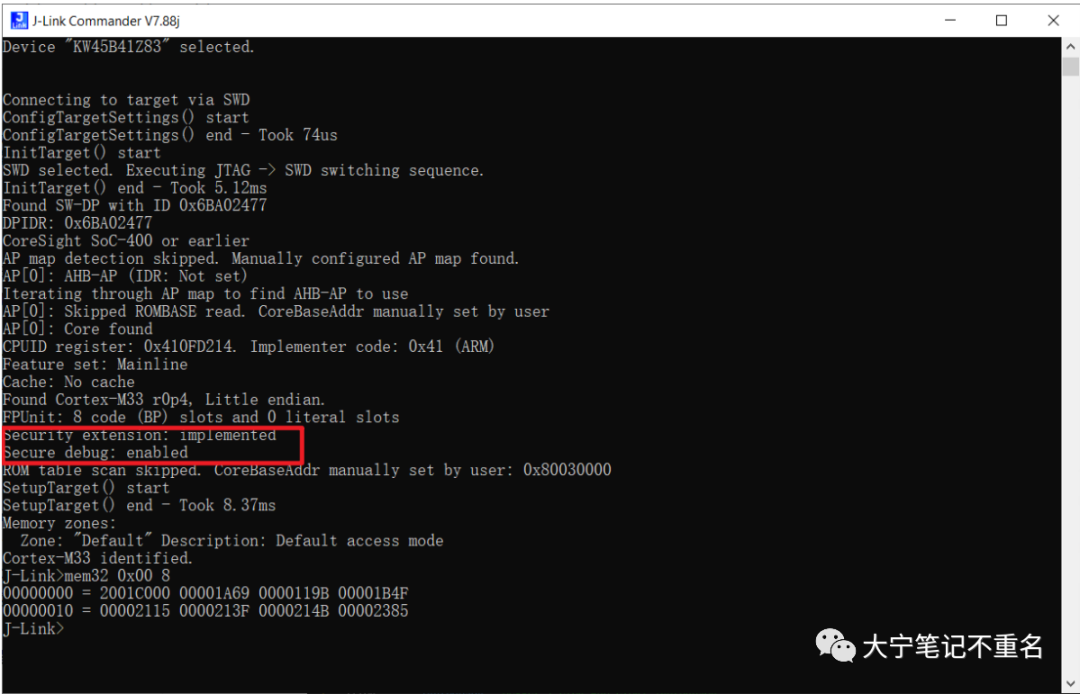
执行debug authen的命令和步骤如下,可以看到在debug authen成功后会显示successful。
此时再去用Jlink尝试连接KW45,会显示secure debug enabled.
6. 总结
至此,完成了对在ISP下KW45 Radio firmware下载过程和Debug authentication实现步骤的讲解。以上步骤确实比较多,笔者也摸索了好久,但熟悉其原理和每一步的执行目的后,可以简化成几个自定义的脚本,在开发阶段建议使用NXP默认的Key和证书,在量产阶段再根据自定义的key和证书做自定义。
审核编辑:汤梓红
-
如何将Kw45 is值转换为dBm结果?2023-04-10 0
-
首次使用KW45(汽车门禁)或K32W1(物联网/工业)构建PCB的最佳方式是什么?2023-04-07 0
-
用于VDD_RF的KW45内部VPA源,以确保我们可以偏置10dBm目标,如何实现?2023-04-10 0
-
KW45板CAN收发器静默模式下未接收到CAN Rx中断是怎么回事?2023-04-14 0
-
在哪里可以获得KW45的SDK?2023-04-17 0
-
想在kw45中用Felxio做spi,是不是所有的Felxio都支持I/O?2023-04-17 0
-
如何使用SPSDK对i.MX RT685EVK进行编程?2023-05-08 0
-
求助,关于KW45芯片半双倍模式的SPI配置问题2023-11-13 0
-
通过一个小Demo进行Debug库文件C/C++代码2017-12-06 1785
-
使用DRaaS测试操作系统更新和新代码版本2018-01-12 5074
-
创建KW45B41Z/K32W148固件更新图像使用的编程工具2023-08-17 151
-
使用SPSDK通过ISP更新KW45无线电固件2023-08-16 176
-
KW45通过32MHz晶振电容调节时钟频率2023-12-14 1218
-
如何在KW45-EVK上使用RTC2024-01-03 83
全部0条评论

快来发表一下你的评论吧 !
