

RZ/G2L开发板使用指南(下)
描述
前篇您可点击上方的文章合集或文末的“上一篇 · RZ/G2L开发板使用指南(上)”查看相关文章。
首先恭喜你参考‘使用指南-上’方法,已经成功烧写flash_writer到G2L的片上RAM。接下来将介绍如何将bootloader和U-boot烧写到QSPI或EMMC,以及如何制作SD卡镜像并启动系统。
G2L开发板提供了64MB的QSPI NOR FALSH 和64GB的EMMC Memory资源,可以选择其中其一设为启动空间。
接下来从上篇这里继续我们的操作
方式1. 下载到QSPI NOR FLASH
Flash_writer 已经提供“XLS2”指令,支持把二进制文件烧写到FLASH ROM.
步骤1
烧写 bl2_bp-smarc-rzg2l_pmic.srec
串口输入‘XLS2’根据提示,输入对应地址:
左右滑动查看更多
>XLS2
===== Qspi writing of RZ/G2 Board Command =============
Load Program to Spiflash
Writes to any of SPI address.
Micron : MT25QU512
Program Top Address & Qspi Save Address
===== Please Input Program Top Address ============
Please Input : H'11E00
===== Please Input Qspi Save Address ===
Please Input : H'00000
Work RAM(H'50000000-H'53FFFFFF) Clear....
please send ! ('.' & CR stop load)
选择"bl2_bp-smarc-rzg2l_pmic.srec"文件,出现如下信息提供,输入’y’
左右滑动查看更多
SPI Data Clear(H'FF) Check : H'00000000-0000FFFF,Clear OK?(y/n)
出现以下信息,表示烧写成功
左右滑动查看更多
SPI Data Clear(H'FF) Check :H'00000000-0000FFFF Erasing..Erase Completed
SAVE SPI-FLASH.......
======= Qspi Save Information =================
SpiFlashMemory Stat Address : H'00000000
SpiFlashMemory End Address  : H'0000CB28
===========================================================
步骤2
烧写fip-smarc-rzg2l_pmic.srec
左右滑动查看更多
>XLS2
===== Qspi writing of RZ/G2 Board Command =============
Load Program to Spiflash
Writes to any of SPI address.
Micron : MT25QU512
Program Top Address & Qspi Save Address
===== Please Input Program Top Address ============
Please Input : H'00000
===== Please Input Qspi Save Address ===
Please Input : H'1D200
Work RAM(H'50000000-H'53FFFFFF) Clear....
please send ! ('.' & CR stop load)
选择 fip-smarc-rzg2l_pmic.srec文件,输入y
左右滑动查看更多
SPI Data Clear(H'FF) Check : H'00000000-0000FFFF,Clear OK?(y/n)
出现以下信息,表示烧写成功。
左右滑动查看更多
SPI Data Clear(H'FF) Check :H'00000000-0000FFFF Erasing..Erase Completed
SAVE SPI-FLASH.......
======= Qspi Save Information =================
SpiFlashMemory Stat Address : H'00000000
SpiFlashMemory End Address  : H'0000CB28
===========================================================
至此,bootloader和U-boot已成功烧写到QSPI FLASH。
方式2. 下载到EMMC MEMORY
Flash_writer 已经提供“EXT_CSD、 EM_W”指令,支持把二进制文件烧写到EMMC.
步骤1
烧写 bl2_bp-smarc-rzg2l_pmic.srec
左右滑动查看更多
>EM_SECSD
Please Input EXT_CSD Index(H'00 - H'1FF) :b1
EXT_CSD[B1] = 0x00
Please Input Value(H'00 - H'FF) :2
EXT_CSD[B1] = 0x02
>EM_SECSD
Please Input EXT_CSD Index(H'00 - H'1FF) :b3
EXT_CSD[B3] = 0x00
Please Input Value(H'00 - H'FF) :8
EXT_CSD[B3] = 0x08
左右滑动查看更多
>EM_W
EM_W Start --------------
---------------------------------------------------------
Please select,eMMC Partition Area.
0:User Partition Area : 62160896 KBytes
eMMC Sector Cnt : H'0 - H'0768FFFF
1:Boot Partition 1 : 32256 KBytes
eMMC Sector Cnt : H'0 - H'0000FBFF
2:Boot Partition 2 : 32256 KBytes
eMMC Sector Cnt : H'0 - H'0000FBFF
---------------------------------------------------------
Select area(0-2)>1
-- Boot Partition 1 Program -----------------------------
Please Input Start Address in sector :1
Please Input Program Start Address : 11e00
Work RAM(H'50000000-H'50FFFFFF) Clear....
please send ! ('.' & CR stop load)
选择 bl2_bp-smarc-rzv2l_pmic.srec
出现以下信息,表示烧写成功
左右滑动查看更多
SAVE -FLASH.......
EM_W Complete!
步骤2
烧写fip-smarc-rzg2l_pmic.srec
左右滑动查看更多
> EM_W
EM_W Start --------------
---------------------------------------------------------
Please select,eMMC Partition Area.
0:User Partition Area : 62160896 KBytes
eMMC Sector Cnt : H'0 - H'0768FFFF
1:Boot Partition 1 : 32256 KBytes
eMMC Sector Cnt : H'0 - H'0000FBFF
2:Boot Partition 2 : 32256 KBytes
eMMC Sector Cnt : H'0 - H'0000FBFF
---------------------------------------------------------
Select area(0-2)>1
-- Boot Partition 1 Program -----------------------------
Please Input Start Address in sector :100
Please Input Program Start Address : 0
Work RAM(H'50000000-H'50FFFFFF) Clear....
please send ! ('.' & CR stop load)
选择 fip-smarc-rzg2l_pmic.srec文件
出现以下信息,表示烧写成功。
左右滑动查看更多
SAVE -FLASH.......
EM_W Complete!
至此,bootloader和U-boot已成功烧写到EMMC。长按SW9 按键关机。
制作SD文件系统
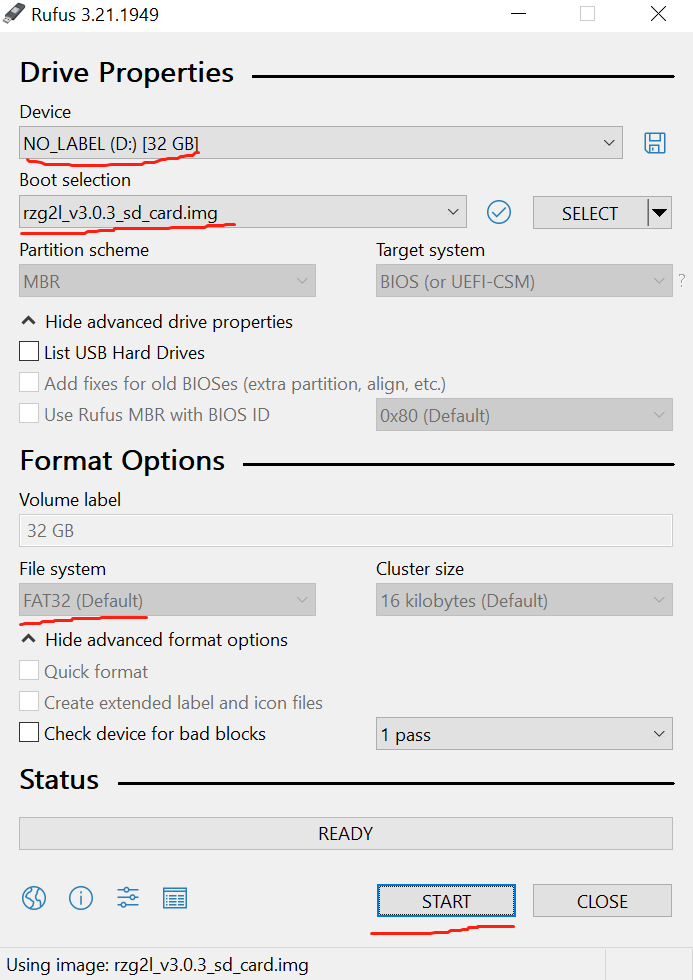
可以在windows电脑上通过工具制作,如https://rufus.ie/en/
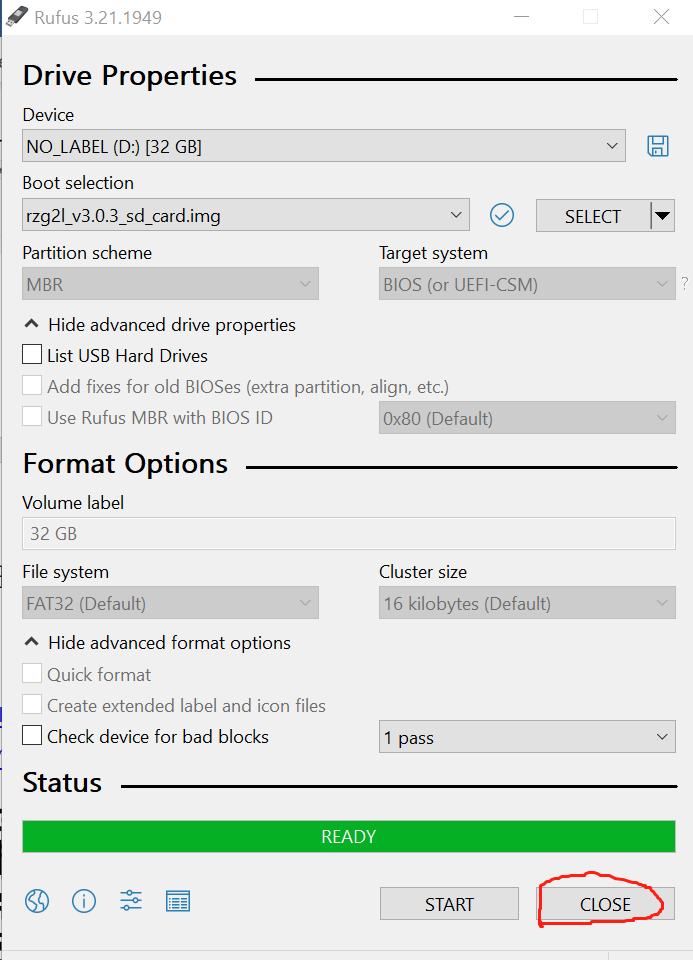
如下选择对应的SD卡和镜像文件,开始制作,等一段时间制作完成。
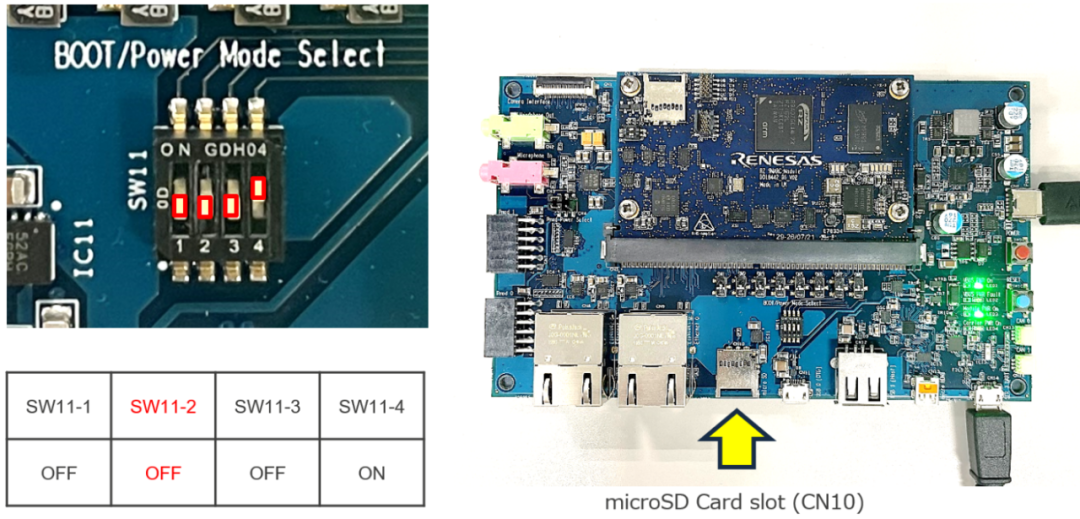
最后如下安装SD卡到开发板,SW11选择QSPI引导模式
长按SW9开机,3秒事件内按下电脑任意按键,进入如下界面:
左右滑动查看更多
U-Boot 2021.10 (Mar 31 2022 - 03:57:20 +0000)
CPU: Renesas Electronics K rev 14.15
Model: smarc-rzg2l
DRAM: 1.9 GiB
MMC: sd@11c00000: 0, sd@11c10000: 1
Loading Environment from MMC... OK
In: serial@1004b800
Out: serial@1004b800
Err: serial@1004b800
Net: eth0: ethernet@11c20000
Hit any key to stop autoboot: 0
=>
设置环境变量:
=> env default -a
## Resetting to default environment
=> setenv bootargs 'root=/dev/mmcblk1p2 rootwait'
=> setenv bootcmd 'mmc dev 1;fatload mmc 1:1 0x48080000 Image-smarc-rzg2l.bin; fatload mmc 1:1 0x48000000 Image-r9a07g044l2-smarc.dtb; booti 0x48080000 - 0x48000000'
=> saveenv
Saving Environment to MMC... Writing to MMC(0)….OK
输入boot启动系统
=> boot
到下面界面,输入Root账户登录,至此,系统已成功启动,开启G2L的世界之旅吧!
左右滑动查看更多
Version: 3.0.3
smarc-rzg2l login: root
Last login: Sun Sep 20 10:44:03 UTC 2020
root@smarc-rzg2l:~#
root@smarc-rzg2l:~# uname -r
5.10.158-cip22-yocto-standard
后续文章会介绍EMMC文件系统制作、开发环境创建、如何编译相关镜像和文件系统。
审核编辑:汤梓红
-
飞凌嵌入式之瑞萨G2L核心板及开发板开箱体验2022-06-08 0
-
G2L系列 核心板 -RZ/G2L 处理器简介|框架图|功耗|原理图及硬件设计指南2022-06-21 0
-
【飞凌RZ/G2L开发板试用体验】开箱帖子,飞凌质量YYDS2022-08-15 0
-
【飞凌RZ/G2L开发板试用体验】+01.开箱(zmj)2022-08-28 0
-
【飞凌RZ/G2L开发板试用体验】+04.RZ/V2L开发板的温度测试(zmj)2022-08-28 0
-
【飞凌RZ/G2L开发板】飞凌RZ/G2L开发板试用测评报告2022-08-29 0
-
【飞凌RZ/G2L开发板试用体验】+07.RZ/V2L开发板的Camera测试(zmj)2022-09-06 0
-
【飞凌RZ/G2L开发板试用体验】+08.RZ/V2L开发板的QT测试(zmj)2022-09-06 0
-
【米尔瑞萨RZ/G2L开发板-试用体验】开箱2023-05-14 0
-
【米尔瑞萨RZ/G2L开发板-试用体验】开箱 + 开机2023-05-18 0
-
【米尔瑞萨RZ/G2L开发板-试用体验】米尔瑞萨RZ/G2L开发板开箱视频2023-05-22 0
-
150套开发板免费送!还有5G手机拿?米尔RZ/G2L开发板创意秀2023-05-24 0
-
【米尔瑞萨RZ/G2L开发板-试用体验】米尔瑞萨RZ/G2L开发板使用SSH登录2023-06-11 0
-
【米尔瑞萨RZ/G2L开发板-试用体验】认识一下米尔瑞萨RZ/G2L开发板的核心板2023-07-29 0
-
RZ/G2L开发板使用指南(上)2023-11-03 490
全部0条评论

快来发表一下你的评论吧 !
