

HarmonyOS开发实例:【图片编辑应用】
电子说
1.2w人已加入
描述
介绍
通过动态设置元素样式的方式,实现几种常见的图片操作,包括裁剪、旋转、缩放和镜像。效果如图所示:

相关概念
- [image组件]:图片组件,用来渲染展示图片。
- [div组件]:基础容器组件,用作页面结构的根节点或将内容进行分组。
- [text组件]:文本组件,用于呈现一段信息。
- [setstyle]:动态设置组件样式的方法。
环境搭建
软件要求
- [DevEco Studio]版本:DevEco Studio 3.1 Release及以上版本。
- OpenHarmony SDK版本:API version 9及以上版本。
硬件要求
- 开发板类型:[润和RK3568开发板]。
- OpenHarmony系统:3.2 Release及以上版本。
环境搭建
完成本篇Codelab我们首先要完成开发环境的搭建,本示例以RK3568开发板为例,参照以下步骤进行:
- [获取OpenHarmony系统版本]:标准系统解决方案(二进制)。以3.2 Release版本为例:

- 搭建烧录环境。
- [完成DevEco Device Tool的安装]
- [完成RK3568开发板的烧录]
- 搭建开发环境。
- 开始前请参考[工具准备],完成DevEco Studio的安装和开发环境配置。
- 开发环境配置完成后,请参考[使用工程向导]创建工程(模板选择“Empty Ability”)。
- 工程创建完成后,选择使用[真机进行调测]。
- 鸿蒙开发指导文档:[
gitee.com/li-shizhen-skin/harmony-os/blob/master/README.md]

代码结构解读
本篇Codelab只对核心代码进行讲解,对于完整代码,我们会在gitee中提供。
HarmonyOS与OpenHarmony鸿蒙文档籽料:mau123789是v直接拿
├──entry/src/main/js	              // 代码区
│  └──MainAbility
│     ├──common
│     │  ├──constants
│     │  │  └──commonConstants.js     // 公共数据常量
│     │  └──images
│     ├──i18n		                  // 中英文
│     │  ├──en-US.json
│     │  └──zh-CN.json
│     └──pages
│        └──index
│           ├──index.css              // 首页样式文件
│           ├──index.hml              // 首页布局文件
│           └──index.js               // 首页脚本文件
└──entry/src/main/resources           // 应用资源目录
构建界面
本示例主界面由上至下分为三部分:顶部标题栏、中间图片区域、底部操作栏。
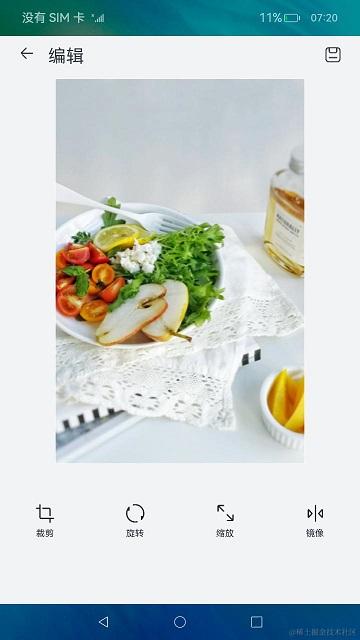
标题栏中的元素呈水平分布,包含“返回”图标、“编辑”标题和“保存”图标。div容器内元素默认为水平分布,开发者将对应元素置于div容器组件中即可。“返回”图标和“编辑”标题置于同一个子div容器中,组成一个新元素,与“保存”图标分别置于父div容器的水平两侧。
< !-- index.hml -- >
< !-- 顶部标题栏 -- >
< div class="title-container" >
    < div >
        < image src="/common/images/ic_back.png" class="image-back" >< /image >
        < text class="title-text" >{{ $t('strings.edit') }}< /text >
    < /div >
    < image src="/common/images/ic_save.png" class="image-save" >< /image >
< /div >
/* index.css */
.title-container {
    justify-content: space-between;
    width: 100%;
    padding-top: 13vp;
    padding-left: 26vp;
    padding-bottom: 15vp;
    padding-right: 24vp;
}
图片区域用于展示被编辑的图片,使用div容器组件限定区域范围。再通过设置样式,使范围内的图片居中展示。图片组件image设置object-fit属性为contain,确保图片保持宽高比缩放,并在区域内完整展示。
< !-- index.hml -- >
< !-- 图片区域 -- >
< div class="image-container" >
    < image id="picture" src="/common/images/ic_meals.png" class="picture" >< /image >
< /div >
/* index.css */
.image-container {
    justify-content: center;
    width: 100%;
    height: 68%;
    flex-direction: column;
    align-items: center;
}

.picture {
    object-fit: contain;
}
操作栏包含裁剪、旋转、缩放和镜像四种常见操作按钮。他们的布局和数据结构相同,可采用for循环的方式进行渲染。每个按钮的图标和文字都是垂直分布,也是通过设置对应样式达到效果。
< !-- index.hml -- >
< !-- 操作栏 -- >
< div >
    < div class="button-container" for="item in buttonList" on:click="pictureManipulation({{ item.buttonType }})" >
        < image src="{{ item.src }}" class="button-icon" >
        < /image >
        < text class="operation-text" >{{ item.description }}< /text >
    < /div >
< /div >
/* index.css */
.button-icon {
    width: 27vp;
    height: 27vp;
    margin-left: 24vp;
    margin-right: 24vp;
    margin-top: 52vp;
    margin-bottom: 6vp;
}

.operation-text {
    font-size: 12fp;
    color: #182431;
}

.button-container {
    justify-content: center;
    flex-direction: column;
    align-items: center;
    width: 100%;
}
编辑图片
使用指定元素的setStyle(name: string, value: string)方法,可以动态设置该元素样式。当前示例正是基于此方式,实现了对图片裁剪、旋转、缩放以及镜像操作。
- 裁剪操作:使用clip-path样式,设置组件的裁剪区域,只显示区域内的部分,实现对图片的裁剪操作。
- 旋转操作:使用transform动画样式,设置组件的旋转动画属性,实现对图片的旋转操作。
- 缩放操作:动态等比例设置组件宽、高属性,实现对图片的缩放操作。
- 镜像操作:使用transform动画样式,设置组件的Y轴方向旋转动画属性,实现对图片的旋转操作。
// index.js
pictureManipulation(buttonType) {
  if (this.isCropped || this.isRotated || this.isZoomed || this.isMirror) {
    this.$element('picture').setStyle('clipPath', 'inset(0, 0, 0, 0');
    this.$element('picture').setStyle('transform', 'rotate(0)');
    this.$element('picture').setStyle('height', this.imageHeight);
    this.$element('picture').setStyle('width', this.imageWidth);
    this.$element('picture').setStyle('transform', 'rotateY(0)');
    this.degrees = 0;
    this.rotateY = 0;
    this.isCropped = false;
    this.isRotated = false;
    this.isZoomed = false;
    this.isMirror = false;
  } else {
    switch (buttonType) {
      case CommonConstants.OperationType.CROP:
        this.$element('picture')
          .setStyle('clipPath', 'inset(0, 0, ' + (this.imageHeight / CommonConstants.SPLIT_IN_HALF) + ', 0');
        this.isCropped = true;
        break;
      case CommonConstants.OperationType.ROTATE:
        this.degrees = this.degrees + CommonConstants.ROTATE_DEGREE;
        this.$element('picture').setStyle('transform', 'rotate(' + this.degrees + ')');
        this.isRotated = true;
        break;
      case CommonConstants.OperationType.ZOOM:
        this.$element('picture').setStyle('height', this.imageHeight / CommonConstants.SPLIT_IN_HALF);
        this.$element('picture').setStyle('width', this.imageWidth / CommonConstants.SPLIT_IN_HALF);
        this.isZoomed = true;
        break;
      case CommonConstants.OperationType.MIRROR:
        this.rotateY = this.rotateY + CommonConstants.ROTATE_Y;
        this.$element('picture').setStyle('transform', 'rotateY(' + this.rotateY + ')');
        this.isMirror = true;
        break;
      default:
        hilog.info(0x0000, 'ImageOperation', '%{public}s', 'Operation type is wrong!');
        break;
    }
  }
}
审核编辑 黄宇
声明:本文内容及配图由入驻作者撰写或者入驻合作网站授权转载。文章观点仅代表作者本人,不代表电子发烧友网立场。文章及其配图仅供工程师学习之用,如有内容侵权或者其他违规问题,请联系本站处理。
举报投诉
-
HarmonyOS开发必备知识2020-09-10 0
-
HarmonyOS WLAN开发指南2020-09-10 0
-
HarmonyOS应用开发-代码编辑2020-09-18 0
-
【HarmonyOS】应用开发文档2020-10-14 0
-
绝对干货!HarmonyOS开发者日资料全公开,鸿蒙开发者都在看2021-08-04 0
-
HarmonyOS教程—基于图片处理能力,实现一个图片编辑模板2021-08-31 0
-
华为开发者HarmonyOS零基础入门:Word图片资源支持预览效果2021-10-23 1212
-
华为开发者HarmonyOS零基础入门:UI组件设计开发实践2021-10-23 1449
-
HarmonyOS Connect的智能硬件开发2021-10-23 1960
-
华为开发者大会2021 HarmonyOS设计人因研究框架2021-10-23 1318
-
华为开发者分论坛HarmonyOS学生公开课-HarmonyOS的无限可能2021-10-24 1245
-
HarmonyOS云开发:舒尔特方格游戏2023-06-19 510
-
OpenHarmony上实现图片编辑功能2023-06-25 800
-
HarmonyOS开发案例:【图片编辑】2024-04-22 416
全部0条评论

快来发表一下你的评论吧 !
