

snmp及编程实现
网络/协议
描述
一、snmp编程详解
SNMP是一构建在TCP/UDP上的远程监控应用。它能监控网络中主机的各种信息,如内存使用率,CPU占用率,磁盘占用率等。它主要分为2个部分,安装在待监控主机上的SNMP服务端,用于收集主机的信息,并按树形进行组织;安装在监控端的SNMP客户端,实时发出查询命令,获得被监控主机的运行信息。
SNMP服务端:将主机信息按树形进行组织,有点类似windows的注册表,但是简单得多。树形结构如下图所示。
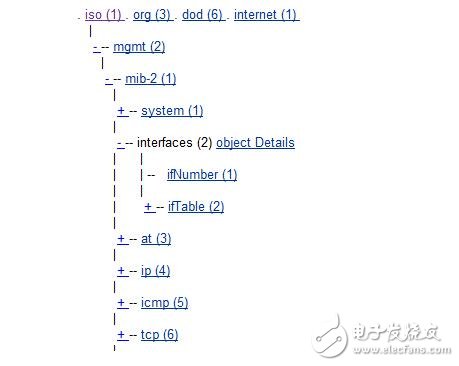
其中根为空,每个子节点分配一个编号,用点号(。)连接根节点到叶节点经过
的路径上的编号就可以定位到查询的信息。如图中.1.3.6.1.2.1.2就可以访问。 iso 。 org 。 dod 。 internet 。 mgmt 。 mib-2 。 interfaces的信息。
SNMP客户端:向SNMP服务端发出查询请求,主要有2种请求。GET请求可以获取指定信息;GETNEXT获取下一条信息。
另一种情况:SNMP服务端在监控到异常事件时主动向SNMP监控端发送TRAP报文,这时SNMP客户端充当服务器,对异常信息进行处理。
二、SNMP安装
一般linux自带。可用whereis snmpd查询检查是否安装。没有的话下载net-snmp安装。(自己搜)
安装:1)源码安装:。/configure;make;make install
2)包管理器安装:centos:yum install net-snmp
yum install net-snmp-devel(开发环境需要)
yum install net-snmp-utils(测试环境需要)
三、SNMP配置
SNMP服务端配置:源码里有个EXAMPLE.conf,将其拷贝到自己选定的一个配置文件目录中(假设为/usr/local/etc/snmp/),并重命名为snmpd.conf.
修改里面的配置参数:
1)找到view systemonly included .1.3.6.1.2.1.1,在上面插入一行view systemonly included .1
表示能查看根下面的所有信息
2)将agentAddress udp:127.0.0.1:161中的127.0.0.1改为该机器的外网IP地址,这样就可以远程访问。
四、测试及问题
1)用包管理器安装的运行service snmpd start;源码安装的运行 [snmpd的绝对路径] -c /usr/local/etc/snmp/snmpd.conf
2)在被监控的机器上运行snmpwalk -v 1 localhost -c public .1看是否有输出。
3)在监控主机上运行snmpwalk -v 1 [被监控机器的IP地址] -c public .1看是否有输出
如果无法远程访问,则关闭被监控主机的防火墙:service iptables stop
改变selinux模式:set enforce 0
五、SNMP C编程
NET-SNMP提供了灵活的接口。在被监控主机的snmpd.conf文件中可以添加外部程序,当监控主机发出查询命令时,该程序就执行一次。这样就可以灵活地开发各种监控程序。
如在snmpd.conf添加一行
extend .1.3.6.1.4.1.2021.50 monitor /bin/sh /tmp/monitor.sh
就可以监控主机在每次查询被监控主机的 .1.3.6.1.4.1.2021.50值时执行monitor.sh脚本。
monitor.sh中可以这样写:
#!/bin/bash
echo “my snmp test”
在监控主机端,需要对查询到的结果进行处理。用C语言编程如下:
#include 《net-snmp/net-snmp-config.h》
#include 《net-snmp/net-snmp-includes.h》
#include 《string.h》
int find_last_oid (netsnmp_session * ss,oid *base,int base_length){
netsnmp_pdu *response;
netsnmp_pdu *pdu;
int running = 1;
int status;
int length=0;
pdu = snmp_pdu_create (SNMP_MSG_GETNEXT);
snmp_add_null_var (pdu, base, base_length);
while (running){
status = snmp_synch_response (ss, pdu, &response);
if (status != STAT_SUCCESS || !response){
snmp_sess_perror (“snmp_synch_response”, ss);
exit (1);
}
if (response-》errstat != SNMP_ERR_NOERROR){
fprintf (stderr, “snmp: Error in packet: %s\n”,snmp_errstring (response-》errstat));
exit (1);
}
if (response &&snmp_oid_compare (response-》variables-》name,SNMP_MIN (base_length,response-》variables-》name_length),base, base_length) != 0)
running = 0;
else{
memcpy(base,response-》variables-》name,response-》variables-》name_length*sizeof(oid));
length=response-》variables-》name_length;
pdu = snmp_pdu_create (SNMP_MSG_GETNEXT);
snmp_add_null_var (pdu, response-》variables-》name, response-》variables-》name_length);
}
snmp_free_pdu (response);
}
return length;
}
int main(){
netsnmp_session session, *ss;
netsnmp_pdu *pdu;
netsnmp_pdu *response;
struct variable_list *vars;
oid base[128]={1,3,6,1,4,1,2021,50};
size_t base_length=8;
int status;
init_snmp (“APC Check”);
snmp_sess_init (&session);
session.version = SNMP_VERSION_1;
session.community = (u_char*)“public”;
session.community_len = strlen ((const char*)session.community);
session.peername = “10.0.1.3”;//被监控主机的IP地址
ss = snmp_open (&session);
if (ss == NULL){
snmp_sess_perror (“snmp_open”, &session);
exit (1);
}
int new_length=find_last_oid (ss, base, base_length);
pdu = snmp_pdu_create (SNMP_MSG_GET);
snmp_add_null_var (pdu, base, new_length);
status = snmp_synch_response (ss, pdu, &response);
if (status != STAT_SUCCESS || !response){
snmp_sess_perror (“snmp_synch_response”, ss);
exit (1);
}
for(vars = response-》variables; vars; vars = vars-》next_variable){
int i;
for(i=0;i《vars-》name_length;i++){
printf(“%d ”,vars-》name[i]);
}
print_value(vars-》name, vars-》name_length, vars);
}
snmp_free_pdu (response);
snmp_close (ss);
return 0;
}
- 相关推荐
- SNMP
-
基于SNMP的网络拓扑结构自动发现研究2009-09-19 0
-
【无线电版】基于W5500的嵌入式SNMP代理端实现2015-04-09 0
-
MQX4.2的SNMP编程问题2016-06-06 0
-
AN_基于FreeRTOS+LwIP的SNMP实现方案2022-11-02 0
-
多协议转换网关支持OPC UA及SNMP协议2023-10-09 0
-
基于ARM的嵌入式系统及SNMP的设计与实现2006-03-25 637
-
OBS网络中基于SNMP的嵌入式代理的实现2009-03-04 619
-
SNMP委托代理在嵌入式系统中的实现2009-06-16 415
-
SNMP管理框架及其在思科路由器的实现2009-12-30 874
-
什么是路由器SNMP?2010-01-08 1368
-
SNMP代理和Web网管系统的设计与实现2012-02-16 766
-
SNMP五种协议数据单元以及SNMP框架组成2021-08-19 5381
-
N32G457系列基于FreeRTOS+LwIP的SNMP实现方案2022-11-10 335
-
基于FreeRTOS+LwIP的SNMP实现方案V02022-10-18 316
-
什么是SNMP?SNMP是如何工作的?2023-12-27 851
全部0条评论

快来发表一下你的评论吧 !
