

构建简单数据管道,为什么tf.data要比feed_dict更好?
电子说
描述
在大多数面向初学者的TensorFlow教程里,作者通常会建议读者在会话中用feed_dict为模型导入数据——feed_dict是一个字典,能为占位符馈送数据。但是,其实TF提供了另一种更好的、更简单的方法:只需使用tf.dataAPI,你就能用几行代码搞定高性能数据管道。
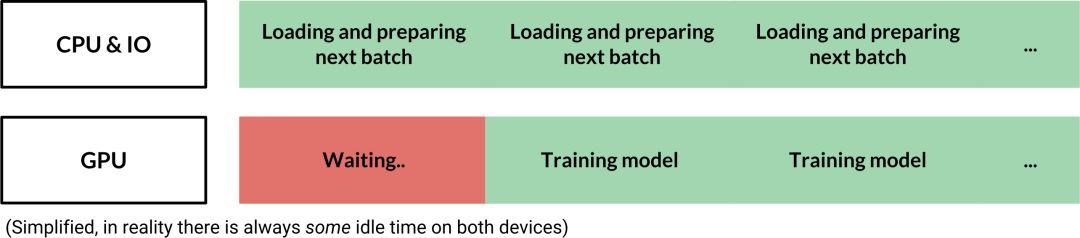
那么tf.data的优势具体在哪里呢?如下图所示,虽然feed_dict的灵活性大家有目共睹,但每当我们需要等待CPU把数据馈送进来时,GPU就一直处于闲置状态,也就是程序运行效率太低。
而tf.data管道没有这个问题,它能提前抓取下个batch的数据,降低总体闲置时间。在这个基础上,如果我们采用并行数据导入,或者事先进行数据预处理,整个过程就更快了。
在5分钟内实现小型图像管道
要构建一个简单数据管道,首先我们需要两个对象:一个用于存储数据集的tf.data.Dataset,以及一个允许我们逐个从数据集中提取样本的tf.data.Iterator。
对于tf.data.Dataset,它在图像管道中是这样的:
[
[Tensor(image), Tensor(label)],
[Tensor(image), Tensor(label)],
...
]
之后我们就可以用tf.data.Iterator逐个检索图像标签对。在实践中,多个图像标签对通常会组成元素序列,方便迭代器进行提取。
至于数据集,Dataset API有两种创建数据集的方法,其一是从源(如Python中的文件名列表)创建数据集,其二是可以直接在现有数据集上应用转换,下面是一些示例:
Dataset(list of image files) → Dataset(actual images)
Dataset(6400 images) → Dataset(64 batches with 100 images each)
Dataset(list of audio files) → Dataset(shuffled list of audio files)
定义计算图
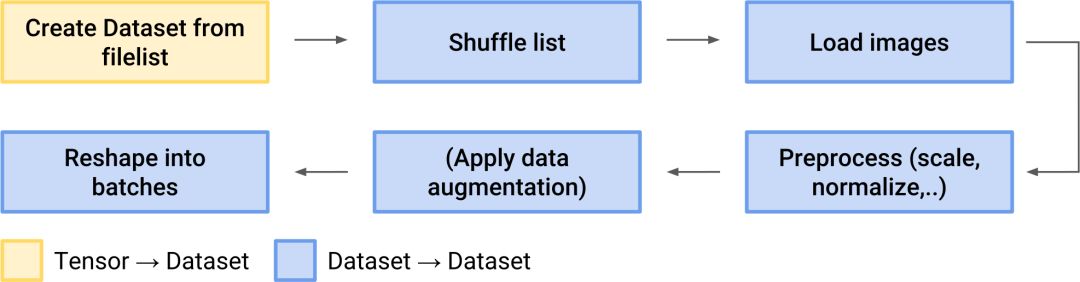
小型图像管道的大致情况如下图所示:

所有代码都和模型、损失、优化器等一起放在我们的计算图定义中。首先,我们要从文件列表中创建一个张量。
# define list of files
files = ['a.png', 'b.png', 'c.png', 'd.png']
# create a dataset from filenames
dataset = tf.data.Dataset.from_tensor_slices(files)
之后是定义一个函数来从其路径加载图像(作为张量),并调用tf.data.Dataset.map()把函数用于数据集中的所有元素(文件路径)。如果想并行调用函数,你也可以设置num_parallel_calls=n里的map()参数。
# Source
def load_image(path):
image_string = tf.read_file(path)
# Don't use tf.image.decode_image, or the output shape will be undefined
image = tf.image.decode_jpeg(image_string, channels=3)
# This will convert to float values in [0, 1]
image = tf.image.convert_image_dtype(image, tf.float32)
image = tf.image.resize_images(image, [image_size, image_size])
return image
# Apply the function load_image to each filename in the dataset
dataset = dataset.map(load_image, num_parallel_calls=8)
然后是用tf.data.Dataset.batch()创建batch:
# Create batches of 64 images each
dataset = dataset.batch(64)
如果想减少GPU闲置时间,我们可以在管道末尾添加tf.data.Dataset.prefetch(buffer_size),其中buffer_size这个参数表示预抓取的batch数,我们一般设buffer_size=1,但在某些情况下,尤其是处理每个batch耗时不同时,我们也可以适当扩大一点。
dataset = dataset.prefetch(buffer_size=1)
最后,我们再创建一个迭代器遍历数据集。虽然迭代器的选择有很多,但对于大多数任务,我们还是建议选择可以初始化的迭代器。
iterator = dataset.make_initializable_iterator()
调用tf.data.Iterator.get_next()创建占位符张量,每次评估时,TensorFlow都会填充下一batch的图像。
batch_of_images = iterator.get_next()
如果写到这里,你突然想换回feed_dict的方法,你可以用batch_of_images把之前的占位符全都替换掉。
运行会话
现在,我们就可以向往常一样运行模型了。但在每个epoch前,记得先评估iterator.initializer的op和tf.errors.OutOfRangeError有没有抛出异常。
with tf.Session() as session:
for i in range(epochs):
session.run(iterator.initializer)
try:
# Go through the entire dataset
whileTrue:
image_batch = session.run(batch_of_images)
except tf.errors.OutOfRangeError:
print('End of Epoch.')
nvidia-smi这个命令可以帮我们监控GPU利用率,找到数据管道中的瓶颈。正常情况下,GPU的平均利用率应该高于70%-80%。
更完整的数据管道
Shuffle
在Dataset里,tf.data.Dataset.shuffle()是一个比较常用的方法,它可以用来打乱数据集中的数据顺序。它的参数buffer_size指定的是一次打乱的元素数量,一般情况下,我们建议把这个参数值设大一点,最好一次性就能把整个数据集洗牌,因为如果参数过小,它可能会造成意料之外的偏差。
dataset = tf.data.Dataset.from_tensor_slices(files)
dataset = dataset.shuffle(len(files))
数据增强
数据增强是扩大数据集的一种常用方式,这方面常用的函数有tf.image.random_flip_left_right()、tf.image.random_brightness()和tf.image.random_saturation():
# Source
def train_preprocess(image):
image = tf.image.random_flip_left_right(image)
image = tf.image.random_brightness(image, max_delta=32.0 / 255.0)
image = tf.image.random_saturation(image, lower=0.5, upper=1.5)
# Make sure the image is still in [0, 1]
image = tf.clip_by_value(image, 0.0, 1.0)
return image
标签
要想在图像上加载标签(或其他元数据),我们只需在创建初始数据集时就把它们包含在内:
# files is a python list of image filenames
# labels is a numpy array with label data for each image
dataset = tf.data.Dataset.from_tensor_slices((files, labels))
确保应用于数据集的所有.map()函数都允许标签数据通过:
def load_image(path, label):
# load image
return image, label
dataset = dataset.map(load_image)
-
带校时功能的简单数字钟2013-02-01 0
-
简单数据采集系统怎样清除上次采集的数据2015-03-07 0
-
TF:TF定义两个变量相乘之placeholder先hold类似变量+feed_dict最后外界传入值2018-12-21 0
-
内建属性__dict__的简单概述2019-07-24 0
-
最简单数字钟电路图2008-01-08 1300
-
使用tensorflow构建一个简单神经网络2018-10-16 2127
-
tf.data API的功能和最佳实践操作2019-01-11 12552
-
TensorFlow 2.0将专注于简单性和易用性2019-01-18 2428
-
python教程之变量和简单数据类型2020-04-26 471
-
C语言简单数据解析2022-01-13 442
-
使用tf.data进行数据集处理2022-11-29 874
全部0条评论

快来发表一下你的评论吧 !
