

如何使用Ethers.js在以太坊上构建出完整的DApps
区块链
描述
你在以太坊上构建DApps时,你很可能最常使用Web3.js来构建javascript前端。Ethers.js是一个轻量级的JavaScript库,可以用来替代Web3.js来构建javascript前端并与以太坊区块链进行交互。这篇文章/教程中,我将展示如何使用Ethers.js构建一个简单的DApp。我希望这有助于您评估并开始使用Ethers.js进行下一个项目。
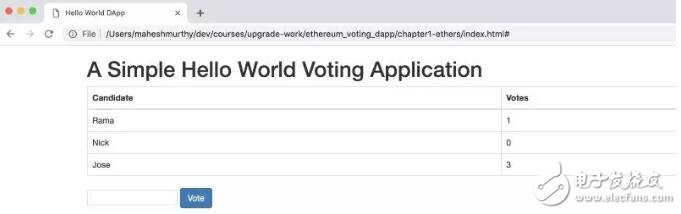
在本教程中,我们将创建一个简单的Voting dapp。Solidity合同将是相同的,但我们将使用Ethers.js而不是Web3.js作为前端。申请非常简单,只需初始化一组候选人,让任何人投票给那些候选人并显示每位候选人收到的总票数。
本教程的目标是:
1.设置开发环境。
2.学习编写合同、编译合同和在开发环境中部署合同的过程。
3.通过nodejs控制台使用ethers.js与合同交互。
4.在简单的网页中使用ethers.js与合同互动,以显示投票计数并通过页面对候选人进行投票。
这就是我们将要构建的应用程序的流程图。

搭建开发环境
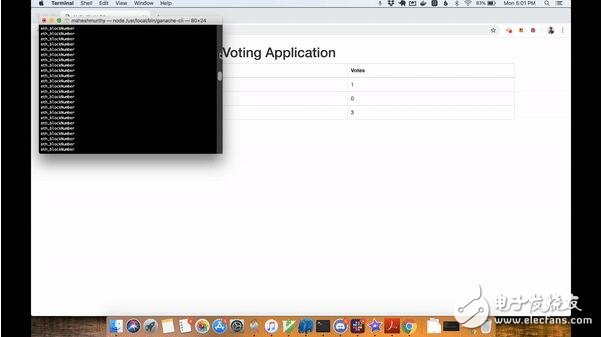
我们将使用名为ganache的内存区块链(将其视为区块链模拟器),而不是针对实时区块链开发应用程序。 下面是在MacOS上安装Ganache、EthersJS、Solc(编译我们的合同)和启动测试区块链的步骤。同样的指令也适用于Linux。
zastrin@macbook$ brew update
zastrin@macbook$ brew install nodejs
zastrin@macbook$ mkdir -p ethereum_voting_dapp/chapter1-ethersjs
zastrin@macbook$ cd ethereum_voting_dapp/chapter1-ethersjs
zastrin@macbook$ npm install ganache-cli ethers solc@0.5.3
zastrin@macbook$ node_modules/.bin/ganache-cli
Ganache CLI v6.0.3 (ganache-core: 2.0.2)
Available Accounts
==================
(0) 0x5c252a0c0475f9711b56ab160a1999729eccce97
(1) 0x353d310bed379b2d1df3b727645e200997016ba3
(2) 0xa3ddc09b5e49d654a43e161cae3f865261cabd23
(3) 0xa8a188c6d97ec8cf905cc1dd1cd318e887249ec5
(4) 0xc0aa5f8b79db71335dacc7cd116f357d7ecd2798
(5) 0xda695959ff85f0581ca924e549567390a0034058
(6) 0xd4ee63452555a87048dcfe2a039208d113323790
(7) 0xc60c8a7b752d38e35e0359e25a2e0f6692b10d14
(8) 0xba7ec95286334e8634e89760fab8d2ec1226bf42
(9) 0x208e02303fe29be3698732e92ca32b88d80a2d36
Private Keys
==================
(0) a6de9563d3db157ed9926a993559dc177be74a23fd88ff5776ff0505d21fed2b
(1) 17f71d31360fbafbc90cad906723430e9694daed3c24e1e9e186b4e3ccf4d603
(2) ad2b90ce116945c11eaf081f60976d5d1d52f721e659887fcebce5c81ee6ce99
(3) 68e2288df55cbc3a13a2953508c8e0457e1e71cd8ae62f0c78c3a5c929f35430
(4) 9753b05bd606e2ffc65a190420524f2efc8b16edb8489e734a607f589f0b67a8
(5) 6e8e8c468cf75fd4de0406a1a32819036b9fa64163e8be5bb6f7914ac71251cc
(6) c287c82e2040d271b9a4e071190715d40c0b861eb248d5a671874f3ca6d978a9
(7) cec41ef9ccf6cb3007c759bf3fce8ca485239af1092065aa52b703fd04803c9d
(8) c890580206f0bbea67542246d09ab4bef7eeaa22c3448dcb7253ac2414a5362a
(9) eb8841a5ae34ff3f4248586e73fcb274a7f5dd2dc07b352d2c4b71132b3c73f
HD Wallet
==================
Mnemonic: cancel better shock lady capable main crunch alcohol derive alarm duck umbrella
Base HD Path: m/44‘/60’/0‘/0/{account_index}
Listening on localhost:8545
请注意,GANACHE CLI创建了10个要自动使用的测试帐户。这些帐户预装了100(测试)以太。
简单投票合同
我们将使用可靠性编程语言来编写我们的合同。如果您熟悉面向对象编程,那么学习编写可靠性合同应该是轻而易举的。我们将使用一个构造函数编写一个智能合约(将合同视为您最喜欢的OOP语言中的类),该构造函数初始化一组候选项。我们将编写2个方法,一个用于返回候选人收到的总票数,另一个用于增加候选人的投票数。
注意:在将合同部署到区块链时,只调用一次构造函数。与Web代码中每次部署代码都覆盖旧代码的情况不同,区块链中部署的代码是不可变的。即如果您更新合同并再次部署,旧合同仍将保留区块链以及存储在其中的所有数据,新部署将创建合同的新实例。
下面是带内联注释解释的投票合同代码:
pragma solidity 》=0.4.0 《0.6.0;
// We have to specify what version of compiler this code will compile with
contract Voting {
/* mapping field below is equivalent to an associative array or hash.
The key of the mapping is candidate name stored as type bytes32 and value is
an unsigned integer to store the vote count
*/
mapping (bytes32 =》 uint256) public votesReceived;
/* Solidity doesn’t let you pass in an array of strings in the constructor (yet)。
We will use an array of bytes32 instead to store the list of candidates
*/
bytes32[] public candidateList;
/* This is the constructor which will be called once when you
deploy the contract to the blockchain. When we deploy the contract,
we will pass an array of candidates who will be contesting in the election
*/
constructor(bytes32[] memory candidateNames) public {
candidateList = candidateNames;
}
// This function returns the total votes a candidate has received so far
function totalVotesFor(bytes32 candidate) view public returns (uint256) {
require(validCandidate(candidate));
return votesReceived[candidate];
}
// This function increments the vote count for the specified candidate. This
// is equivalent to casting a vote
function voteForCandidate(bytes32 candidate) public {
require(validCandidate(candidate));
votesReceived[candidate] += 1;
}
function validCandidate(bytes32 candidate) view public returns (bool) {
for(uint i = 0; i 《 candidateList.length; i++) {
if (candidateList[i] == candidate) {
return true;
}
}
return false;
}
}
将以上代码复制到ethereum_voting_dapp / chapter1-ethersjs目录中名为Voting.sol的文件中。 现在让我们编译代码并将其部署到ganache区块链。 按照以下命令编译合同。
zastrin@macbook$ node_modules/.bin/solcjs — bin — abi Voting.sol
zastrin@macbook$ ls
Voting.sol Voting_sol_Voting.abi Voting_sol_Voting.bin
当您使用上述命令成功编译代码时,编译器输出2个文件,这些文件对于理解:
1. Voting_sol_Voting.bin:这是编译Voting.sol中的源代码时得到的字节码。 这是将部署到区块链的代码。
2. Voting_sol_Voting.abi:这是合同的接口或模板(称为abi),它告诉合同用户合同中有哪些方法可用。 每当您将来必须与合同进行交互时,您将需要此abi定义。
我们现在将使用ethersjs库来部署我们的应用程序并与之交互。
首先,在终端中运行‘node’命令以进入节点控制台并初始化ethers对象。 下面的所有代码片段都需要在节点控制台中输入。 要编译合同,请将字节码和abi从文件系统加载到如下所示的字符串中
zastrin@macbook$ node
》 ethers = require(‘ethers’)
》 bytecode = fs.readFileSync(‘Voting_sol_Voting.bin’).toString()
》 abi = JSON.parse(fs.readFileSync(‘Voting_sol_Voting.abi’).toString())
接下来是初始化程序,它是连接到区块链的通用接口。 由于我们在本地运行区块链,我们将使用JsonRPCProvider连接到它。 如果您想连接到生产的区块链上,您还有许多其他提供选项。 连接后,您可以通过查询ganache并列出所有帐户来测试连接。 在nodejs控制台中运行以下命令应该列出10个帐户。
》 provider = new ethers.providers.JsonRpcProvider()
》 provider.listAccounts().then(result =》 console.log(result))
下一步是初始化用于签署事务的签名者。 我们可以通过将索引传递给getSigner来选择我们想要使用的帐户(我们在设置中有10个帐户ganache),如下所示。 钱包初始化后,创建合同库并按所示部署合同。 deploy函数接受一组传递给合同构造函数的参数。 在我们的案例中,我们传递候选人的姓名。 我们必须显式地将字符串转换为bytes32,因为我们的智能合约将bytes32作为参数。
》 signer = provider.getSigner(0)
》 factory = new ethers.ContractFactory(abi, bytecode, signer)
》 contract = null
》 factory.deploy([ethers.utils.formatBytes32String(‘Rama’), ethers.utils.formatBytes32String(‘Nick’), ethers.utils.formatBytes32String(‘Jose’)]).then(© =》 { contract = c})
如果您成功部署了合同,则您的合同对象应具有已部署合同的所有详细信息。 区块链上部署了数十万份合同。 那么,你如何识别区块链中的合同? 答案:contract.address。 当您必须与合同进行交互时,您需要我们之前谈到的这个部署地址和abi定义。
在nodejs控制台中与合同交互
》 contract.totalVotesFor(ethers.utils.formatBytes32String(‘Rama’))。
then((f) =》 console.log(f.toNumber()))
》 contract.voteForCandidate(ethers.utils.formatBytes32String(‘Rama’))。
then((f) =》 console.log(f))
》 contract.totalVotesFor(ethers.utils.formatBytes32String(‘Rama’))。
then((f) =》 console.log(f.toNumber()))
在节点控制台中尝试上述命令,您应该看到投票计数增量。 每次投票给候选人时,都会得到一个交易ID:例如:
‘0xdedc7ae544c3dde74ab5a0b07422c5a51b5240603d31074f5b75c0ebc786bf53’。 此事务ID是此事务发生的证据,您可以在将来的任何时间再参考此事务。 此事务是不可变的。
连接到区块链的投票网页
现在大部分工作已经完成,我们现在要做的就是创建一个带有候选名称的简单html文件,并在js文件中调用投票命令(我们已在nodejs控制台中尝试和测试过)。 您可以在下面找到html代码和js文件。 将它们都放在ethereum_voting_dapp / chapter1-ethersjs目录中,然后在浏览器中打开index.html。
《!DOCTYPE html》
《html》
《head》
《title》Hello World DApp《/title》
《link href=‘https://fonts.googleapis.com/css?family=Open Sans:400,700’ rel=‘stylesheet’ type=‘text/css’》
《link href=‘https://maxcdn.bootstrapcdn.com/bootstrap/3.3.7/css/bootstrap.min.css’ rel=‘stylesheet’ type=‘text/css’》
《/head》
《body class=“container”》
《h1》A Simple Hello World Voting Application《/h1》
《div class=“table-responsive”》
《table class=“table table-bordered”》
《thead》
《tr》
《th》Candidate《/th》
《th》Votes《/th》
《/tr》
《/thead》
《tbody》
《tr》
《td》Rama《/td》
《td id=“candidate-1”》《/td》
《/tr》
《tr》
《td》Nick《/td》
《td id=“candidate-2”》《/td》
《/tr》
《tr》
《td》Jose《/td》
《td id=“candidate-3”》《/td》
《/tr》
《/tbody》
《/table》
《/div》
《input type=“text” id=“candidate” /》
《a href=“#” onclick=“voteForCandidate()” class=“btn btn-primary”》Vote《/a》
《/body》
《script charset=“utf-8”
src=“https://cdn.ethers.io/scripts/ethers-v4.min.js”
type=“text/javascript”》《/script》
《script src=“https://code.jquery.com/jquery-3.1.1.slim.min.js”》《/script》
《script src=“。/index.js”》《/script》
《/html》
index.html
abi = JSON.parse(‘[{“constant”:true,“inputs”:[{“name”:“candidate”,“type”:“bytes32”}],“name”:“totalVotesFor”,“outputs”:[{“name”:“”,“type”:“uint8”}],“payable”:false,“stateMutability”:“view”,“type”:“function”},{“constant”:true,“inputs”:[{“name”:“candidate”,“type”:“bytes32”}],“name”:“validCandidate”,“outputs”:[{“name”:“”,“type”:“bool”}],“payable”:false,“stateMutability”:“view”,“type”:“function”},{“constant”:true,“inputs”:[{“name”:“”,“type”:“bytes32”}],“name”:“votesReceived”,“outputs”:[{“name”:“”,“type”:“uint8”}],“payable”:false,“stateMutability”:“view”,“type”:“function”},{“constant”:true,“inputs”:[{“name”:“”,“type”:“uint256”}],“name”:“candidateList”,“outputs”:[{“name”:“”,“type”:“bytes32”}],“payable”:false,“stateMutability”:“view”,“type”:“function”},{“constant”:false,“inputs”:[{“name”:“candidate”,“type”:“bytes32”}],“name”:“voteForCandidate”,“outputs”:[],“payable”:false,“stateMutability”:“nonpayable”,“type”:“function”},{“inputs”:[{“name”:“candidateNames”,“type”:“bytes32[]”}],“payable”:false,“stateMutability”:“nonpayable”,“type”:“constructor”}]’)
provider = new ethers.providers.JsonRpcProvider()
signer = provider.getSigner(0);
contract = new ethers.Contract(‘0x5735731eEbDA5BE1eEe9f0b119B9374a63b0f507’, abi, signer)
candidates = {“Rama”: “candidate-1”, “Nick”: “candidate-2”, “Jose”: “candidate-3”}
function voteForCandidate(candidate) {
candidateName = $(“#candidate”).val();
console.log(candidateName);
contract.voteForCandidate(ethers.utils.formatBytes32String(candidateName)).then((f) =》 {
let div_id = candidates[candidateName];
contract.totalVotesFor(ethers.utils.formatBytes32String(candidateName)).then((f) =》 {
$(“#” + div_id).html(f);
})
});
}
$(document).ready(function() {
candidateNames = Object.keys(candidates);
for(var i=0; i《candidateNames.length; i++) {
let name = candidateNames[i];
contract.totalVotesFor(ethers.utils.formatBytes32String(name)).then((f) =》 {
$(“#” + candidates[name]).html(f);
})
}
});
index.js
您现在应该看到投票计数,您还应该能够投票给候选人。
如果您使用Metamask之类的钱包,则需要使用Web3提供程序而不是之前使用的JsonRPCProvider。 要做到这一点,只需将index.js中的提供程序更改为:
provider = new ethers.providers.Web3Provider(web3.currentProvider);
如果您想通过Metamask进行交互,则不能再打开index.html并在浏览器中进行交互。 您必须通过服务器来服务该文件。 所以安装一个简单的网络服务器,然后如下所示
zastrin@macbook$ npm install http-server
zastrin@macbook$ http-server
您现在可以转到localhost:8080并与您的应用程序进行交互。 下面是一个快速演示,其中包括将测试以太网帐户加载到元掩码中。
我希望你能够顺利搭建应用程序并正常运行,好,教程就到此结束。
-
#硬声创作季 #区块链 区块链开发-008 以太坊理论_初识以太坊1账户和钱包-1水管工 2022-10-09
-
#硬声创作季 #区块链 区块链开发-008 以太坊理论_初识以太坊1账户和钱包-2水管工 2022-10-09
-
#硬声创作季 #区块链 区块链开发-011 以太坊理论_初识以太坊4初识以太坊合约-1水管工 2022-10-09
-
#硬声创作季 #区块链 区块链开发-011 以太坊理论_初识以太坊4初识以太坊合约-2水管工 2022-10-09
-
#硬声创作季 #区块链 区块链开发-011 以太坊理论_初识以太坊4初识以太坊合约-3水管工 2022-10-09
-
#硬声创作季 #区块链 区块链开发-015 以太坊理论_以太坊客户端简介-2水管工 2022-10-09
-
#硬声创作季 #区块链 区块链开发-023 以太坊理论_以太坊账户2-1水管工 2022-10-09
-
#硬声创作季 #区块链 区块链开发-023 以太坊理论_以太坊账户2-2水管工 2022-10-09
-
#硬声创作季 #区块链 区块链开发-026 以太坊理论_以太坊交易3构造交易-1水管工 2022-10-09
-
#硬声创作季 #区块链 区块链开发-026 以太坊理论_以太坊交易3构造交易-3水管工 2022-10-09
-
#硬声创作季 #区块链 区块链开发-051 以太坊理论_web3js5-2水管工 2022-10-09
-
#硬声创作季 #区块链 区块链开发-052 以太坊理论_web3js6-1水管工 2022-10-09
-
【江逸老师】:以太坊为何分叉?分叉后的ETH与ETC有何区别?2019-02-23 0
-
有谁来解释一下以太坊升级为什么会延期?2021-06-16 0
-
利用env构建工程,输入“scons”回车发现构建出错怎么解决?2022-03-17 0
全部0条评论

快来发表一下你的评论吧 !
