

怎样用机器学习和openFrameworks控制伺服电机
电子说
描述
电路图
在伺服电机和Arduino之间建立以下连接:
黄色线是信号线。将其连接到Arduino上的数字引脚2。
棕色线是地线。将它连接到Arduino上的GND 。
红色线是电源线。将其连接到Arduino上的 5V 引脚。
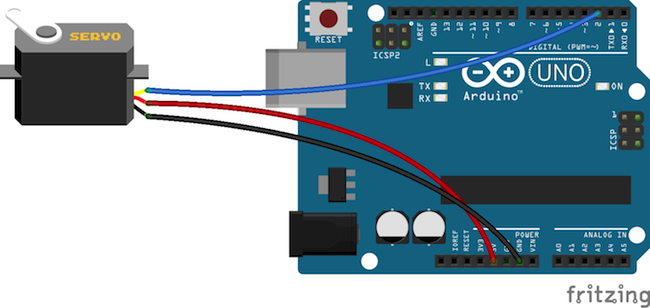
根据上面的电路图在伺服电机和Arduino UNO之间建立连接。
编程Arduino
在Arduino代码中,我们首先包含了伺服库并为伺服初始化了一些变量。
然后在设置函数中,我们将伺服连接到Arduino的引脚2并开始串行通信。
在循环功能中,我们查找了输入数据,如果有任何数据可用,我们将读取它并根据此值伺服电机将移动。
// Code to control servo motor from openframeworks using wekinator
#include //including the servo library
Servo sg90; //including a variable for servo named sg90
int servo_pin = 2;
void setup() {
sg90.attach(servo_pin); //Giving the command to arduino to control pin 2 for servo
// Start the serial communication
Serial.begin(9600);
}
void loop() {
if (Serial.available()) { // If there is any data available
int inByte = Serial.read(); // Get the incoming data
sg90.write(inByte);
}
}
编程openFrameworks
在openFrameworks方面,我们有三个用于发送和的文件从Wekinator接收数据,也将帮助我们将数据发送到Arduino。
Main.cpp
Main .cpp运行应用程序并打开输出窗口。
以下代码适用于Main.cpp:
#include “ofMain.h”
#include “ofApp.h”
//========================================================================
int main( ){
ofSetupOpenGL(600, 480, OF_WINDOW); // 《-------- setup the GL context
// this kicks off the running of my app
// can be OF_WINDOW or OF_FULLSCREEN
// pass in width and height too:
ofRunApp(new ofApp());
}
OfApp.cpp
OfApp.cpp代码是Arduino和openFrameworks之间存在串行通信的地方。它也是openFrameworks和Wekinator之间的OSC通信。
#include “ofApp.h”
#include “ofxOsc.h”
//--------------------------------------------------------------
void ofApp::setup(){
sender.setup(HOST, SENDPORT);
receiver.setup(RECEIVEPORT);
ofSetFrameRate(60);
serial.listDevices();
vector deviceList = serial.getDeviceList();
// this should be set to whatever com port your serial device is connected to.
// (ie, COM4 on a pc, /dev/tty.。.. on linux, /dev/tty.。. on a mac)
// arduino users check in arduino app.。..
int baud = 9600;
serial.setup(0, baud);
//open the first device
// windows example
//serial.setup(“COM10”, baud);
// mac osx example
//serial.setup(“/dev/tty.usbserial-A4001JEC”, baud);
//linux example
//serial.setup(“/dev/ttyUSB0”, baud);
}
//--------------------------------------------------------------
void ofApp::update(){
// Sending data to the wekinator
ofxOscMessage m;
m.setAddress(string(SENDMESSAGE));
m.addFloatArg((float)mouseX);
m.addFloatArg((float)mouseY);
sender.sendMessage(m, false);
// looking for incoming messages from wekinator
while (receiver.hasWaitingMessages()) {
ofxOscMessage msg;
receiver.getNextMessage(&msg); // Get Message
if (msg.getAddress() == RECEIVEMESSAGE) {
outputData = msg.getArgAsFloat(0); // Stored it
}
}
serial.writeByte(outputData); // sending the data to arduino
}
//--------------------------------------------------------------
void ofApp::draw(){
ofSetColor(255, 0, 0);
string buf = “Sending message ” + string(SENDMESSAGE) + “ to ” + string(HOST) + “ on port ” + ofToString(SENDPORT);
ofDrawBitmapString(buf, 10, 20);
buf = “X=” + ofToString(mouseX) + “, Y=” + ofToString(mouseY);
ofDrawBitmapString(buf, 10, 50);
ofSetColor(0, 255, 0);
ofDrawRectangle(mouseX, mouseY, boxSize, boxSize);
}
//--------------------------------------------------------------
void ofApp::mouseDragged(int x, int y, int button){
mouseX = x;
mouseY = y;
}
在设置功能中,我们首先设置发送器和接收器,然后查找串口。一旦找到,它将自动连接。
在更新功能中,我们首先将滑块的X和Y值发送到Wekinator。然后,我们从接收器中查找传入的消息。当任何数据可用时,它将存储它并将其发送到Arduino。
在绘图功能中,我们制作了一个滑块,当我们拖动它时它会移动。
OfApp.h
OfApp.h文件是头文件。
#pragma once
#include “ofMain.h”
#include “ofxOsc.h”
//Defaults for OSC:
#define HOST “127.0.0.1”
#define SENDPORT 6448
#define RECEIVEPORT 12000
#define SENDMESSAGE “/wek/inputs”
#define RECEIVEMESSAGE “/wek/outputs”
class ofApp : public ofBaseApp{
public:
void setup();
void update();
void draw();
void mouseDragged(int x, int y, int button);
ofxOscSender sender;
ofxOscReceiver receiver;
ofSerial serial;
int mouseX = 0;
int mouseY = 0;
int boxSize = 30;
char outputData;
};
如何运行openFrameworks草图
使用openFrameworks中的项目生成器创建一个新项目。此项目需要‘Ofxosc’插件。
将上一节中给出的代码复制到相应的文件中并构建项目。构建项目后,您将看到如下所示的输出窗口。
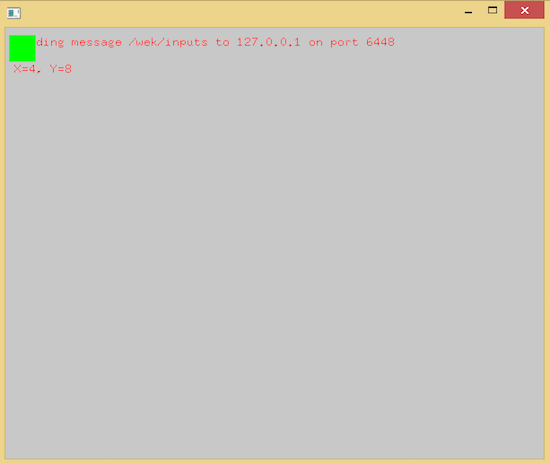
openFrameworks中的输出窗口。
在Wekinator中设置项目
设置openFrameworks后,打开Wekinator并调整设置以匹配下图所示的设置。
将输入设置为2,输出设置为1.选择输出类型为“custom”,然后单击“configure”。
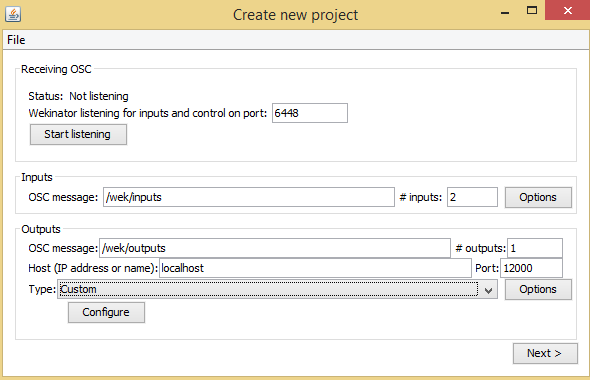
在Wekinator中设置输入,输出和类型字段以匹配上面显示的字段。
接下来,将最小值设置为0,将最大值设置为180,然后单击“完成”。
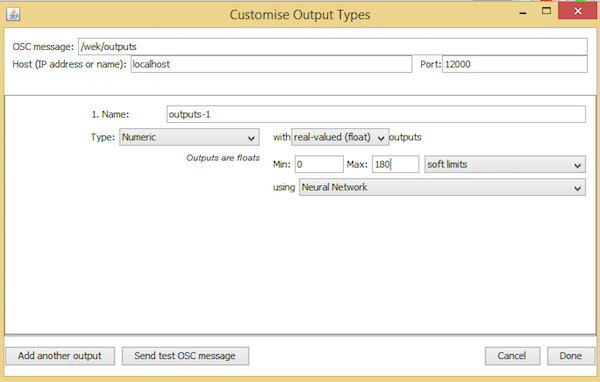
自定义输出类型至少为0和a最多180个。
点击“下一步”,将出现“新建项目”窗口。
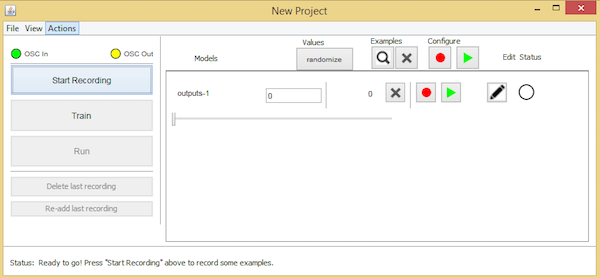
按照上面列出的步骤并单击下一步后,您将进入Wekinator的New Project窗口。
将处理窗口中的绿色框拖动到屏幕左侧的中心,然后单击“随机化” ”。开始录制一秒钟,让Wekinator记录一些样本。
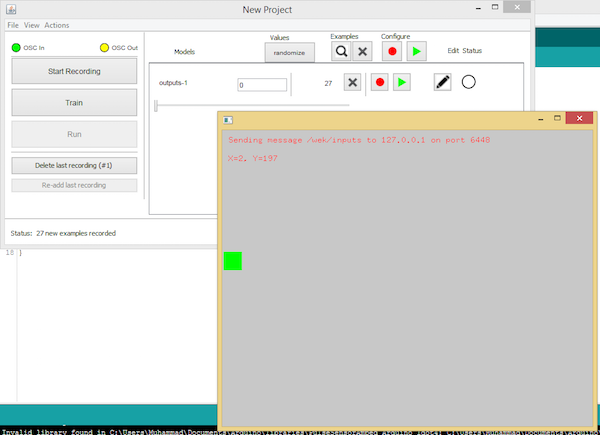
将绿色框拖到屏幕左侧以记录您的第一个输出。
现在将处理窗口中的绿框拖到窗口中心,然后单击“随机化”。开始录制半秒。
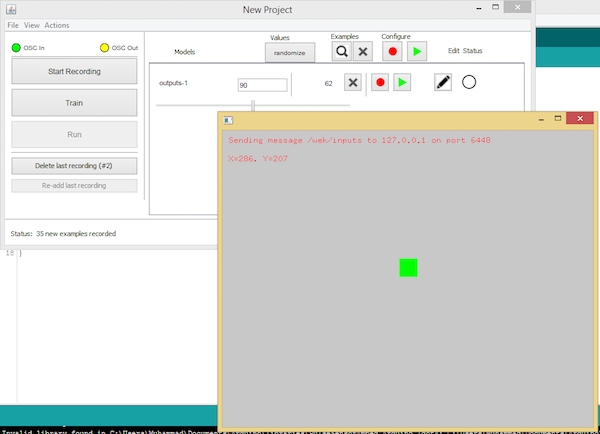
将绿色框移动到中心以允许Wekinator记录更多样本。
最后,将处理窗口中的绿色框拖动到右侧中心,然后单击随机化。开始录制半秒。
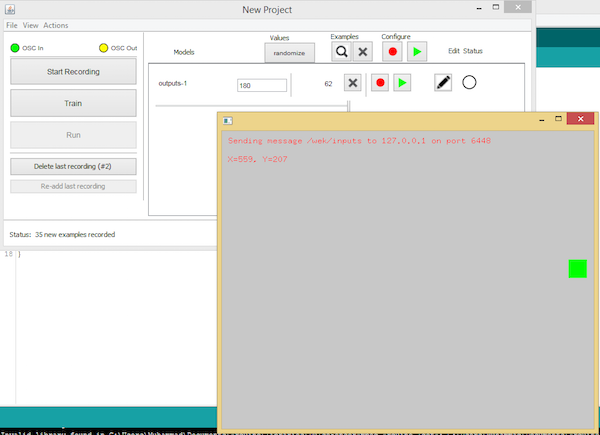
将绿色框移动到窗口的右侧,以允许Wekinator制作第三组样本。
为Wekinator制作了三组样本后,点击“ train”,然后点击“运行”。
现在,当您在openFrameworks窗口中拖动滑块时,它将控制并移动连接到Arduino的伺服。
-
已用时间函数怎样用2012-10-08 3774
-
怎样用FPGA控制舵机2013-10-20 3975
-
怎样用51单片机控制电源2015-07-29 5297
-
labview中怎样用开关控制频率2019-10-17 1873
-
怎样用STM32F407VET6单片机去控制无刷电机呢2021-09-18 2646
-
怎样用串口通信去控制伺服速度呢2021-10-11 1732
-
怎样用倒顺开关去控制单相电机的正反转呢2021-10-18 6827
-
请问怎样用一个脉冲使伺服电机旋转呢?2023-03-30 4696
-
PLC控制伺服电机学习资料pdf下载2018-04-02 2124
-
怎样用ArduinoUNO和Wekinator控制伺服电机2019-08-03 2920
-
怎样用Wekinator控制与树莓派连接的伺服电机2019-07-26 7982
-
怎样用ESP8266的Web控制伺服2019-07-30 7633
-
怎样用Arduino蓝牙控制伺服电机2019-07-29 8198
-
一文详解伺服电机与伺服控制器2020-09-24 15755
-
怎样用好手中的六位半万用表?2023-03-07 4249
全部0条评论

快来发表一下你的评论吧 !
