

如何使用Arduino Processing和Wekinator按钮更改声音播放器的音高
电子说
描述
设置Arduino Board
这个项目使用连接到Arduino Uno的五个按钮。使用Arduino为按钮建立连接,如下图所示。
项目草图
在输入端,我们将有一个Arduino草图和一个Processing草图。 Arduino草图将读取五个按钮的状态,并通过串行通信将其转发到Processing。 Processing sketch将接收此数据,并通过OSC(开放式声音控制)协议将其转发给Wekinator。
Arduino Sketch
#define buttonPin1 6
#define buttonPin2 5
#define buttonPin3 4
#define buttonPin4 3
#define buttonPin5 2
int inByte = 0; // incoming serial byte
// the setup function runs once when you press reset or power the board
void setup() {
Serial.begin(115200);
pinMode(buttonPin1, INPUT);
pinMode(buttonPin2, INPUT);
pinMode(buttonPin3, INPUT);
pinMode(buttonPin4, INPUT);
pinMode(buttonPin5, INPUT);
establishContact(); // send a byte to establish contact until receiver
// responds
}
// the loop function runs over and over again forever
void loop() {
// if we get a valid byte, read button pins:
if (Serial.available() 》 0) {
// get incoming byte:
inByte = Serial.read();
// read the state of the pushbuttons:
int buttonState1 = digitalRead(buttonPin1);
int buttonState2 = digitalRead(buttonPin2);
int buttonState3 = digitalRead(buttonPin3);
int buttonState4 = digitalRead(buttonPin4);
int buttonState5 = digitalRead(buttonPin5);
Serial.write(buttonState1);
Serial.write(buttonState2);
Serial.write(buttonState3);
Serial.write(buttonState4);
Serial.write(buttonState5);
}
}
void establishContact() {
while (Serial.available() 《= 0) {
Serial.print(‘A’); // send a capital A
delay(300);
}
}
处理草图
import processing.serial.*;
import oscP5.*;
import netP5.*;
OscP5 oscP5;
NetAddress dest;
Serial myPort; // The serial port
int[] serialInArray = new int[5]; // Where we‘ll put what we receive
int serialCount = 0; // A count of how many bytes we receive
int button1, button2, button3, button4, button5;
boolean firstContact = false; // Whether we’ve heard from the microcontroller
void setup() {
size(256, 256); // Stage size
noStroke(); // No border on the next thing drawn
// Print a list of the serial ports, for debugging purposes:
println(Serial.list());
// I know that the first port in the serial list on my mac
// is always my FTDI adaptor, so I open Serial.list()[0]。
// On Windows machines, this generally opens COM1.
// Open whatever port is the one you‘re using.
String portName = Serial.list()[0];
myPort = new Serial(this, portName, 115200);
/* start oscP5, sending messages at port 9000 */
oscP5 = new OscP5(this,9000);
dest = new NetAddress(“127.0.0.1”,6448);
}
void draw() {
//Send the OSC message
sendOsc();
}
void serialEvent(Serial myPort) {
// read a byte from the serial port:
int inByte = myPort.read();
// if this is the first byte received, and it’s an A,
// clear the serial buffer and note that you‘ve
// had first contact from the microcontroller.
// Otherwise, add the incoming byte to the array:
if (firstContact == false) {
if (inByte == ’A‘) {
myPort.clear(); // clear the serial port buffer
firstContact = true; // you’ve had first contact from the microcontroller
myPort.write(‘A’); // ask for more
}
}
else {
// Add the latest byte from the serial port to array:
serialInArray[serialCount] = inByte;
serialCount++;
// If we have 3 bytes:
if (serialCount 》 4 ) {
button1 = serialInArray[0];
button2 = serialInArray[1];
button3 = serialInArray[2];
button4 = serialInArray[3];
button5 = serialInArray[4];
// print the values (for debugging purposes only):
println(button1 + “&” + button2 + “&” + button3 + “&” + button4 + “&” + button5);
// Send a capital A to request new sensor readings:
myPort.write(‘A’);
// Reset serialCount:
serialCount = 0;
}
}
}
void sendOsc() {
OscMessage msg = new OscMessage(“/wek/inputs”);
msg.add((float)button1);
msg.add((float)button2);
msg.add((float)button3);
msg.add((float)button4);
msg.add((float)button5);
oscP5.send(msg, dest);
}
设置ChucK
在输出端,我们可以使用ChucK从Wekinator接收五个连续输出,并根据这些输出发出声音。
下载您正在使用的操作系统的FM Synthesis示例。
现在打开终端并转到您放置它的目录并输入以下行:
chuck FMSynth_5ContinousOutputs.ck
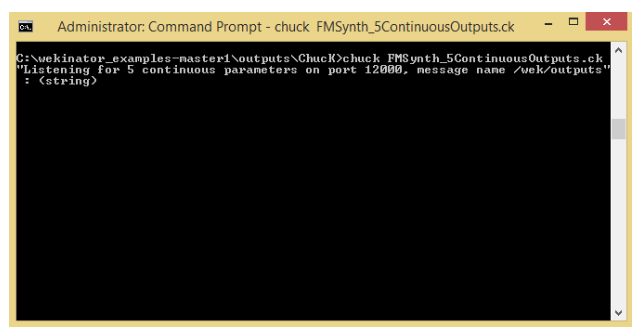
Chuck将开始收听Wekinator的输出并接收输出,它将改变声音的音高。
设置Wekinator
现在打开Wekinator并对设置进行以下调整:
将输入设置为5并输出为5
选择输出键入到所有连续
Wekinator将从Processing接收五个输入,并在训练后将向Chuck发送五个不同的输出。从那里,ChucK将根据Wekinator输出产生不同的声音。
点击 下一步 按钮,您将看到此窗口:
按第一个按钮,然后单击 随机化 。开始录制一秒钟,它将记录一些样本。
按第二个按钮,然后单击 随机化 的。然后记录一秒。
同样,记录其他三个按钮的样本。
记录五个样本后,单击在 火车 上训练Wekinator。然后单击 运行 。现在当您按下按钮时,程序将根据您提供的输入发出声音。
相关项目
如何构建Arduino演讲者几分钟播放音乐
- 相关推荐
- 热点推荐
- Processing
- Arduino
-
基于Arduino的简易WAV播放器2014-10-09 23871
-
labview做的视频播放器,按钮不起作用2019-07-25 3094
-
【项目分享】教你用Arduino、Micro SD制作一个简单的音乐播放器2019-09-27 14388
-
RT-Thread实现蜂鸣器播放器设计资料分享(一)2022-04-12 9646
-
CSF文件播放器2007-06-10 5666
-
如何使用Arduino和MicroSD读卡器/模块制作简易音乐播放器2019-07-29 17708
-
使用Arduino和DFPlayer迷你MP3播放器模块制作带有LCD的MP3播放器2020-12-07 10046
-
基于Arduino的音乐播放器设计2022-03-25 7508
-
如何利用Arduino UNO和SD卡制作音乐播放器2022-04-13 11052
-
Arduino WAV播放器开源2022-11-08 1395
-
Arduino歌曲播放器2022-11-11 1238
-
Arduino UNO构建音乐播放器2023-01-03 1591
-
Arduino之基于网络的MP3播放器2023-02-01 1594
-
Arduino网络广播播放器2023-02-08 1151
-
带显示屏和按钮的NodeMCU MP3播放器2023-02-10 900
全部0条评论

快来发表一下你的评论吧 !
