
如何设置LED灯或5V继电器并使用亚马逊AlexaEcho和ESP8266控制它
电子说
描述
软件要求
对于此项目,您将需要以下程序:
Arduino IDE(在此处下载最新版本)
NodeMCU
除ESP8266板支持(NodeMCU)外,还应安装以下Arduino库(在库管理器中搜索或手动将文件夹放在Arduino/库中):
fauxmoESP
ESPAsyncTCP
ESPAsyncWebServer
连接和原理图
ESP8266
D1→LED/继电器
D2→按钮
编程Arduino
此项目的Arduino代码使用fauxmoESP库的示例草图,该库模拟Belkin WeMo设备。因此,配置家庭自动化开关遵循与商业设备完全相同的过程,这在Alexa应用程序中是轻而易举的。为了发现这个设备,我将我的设备命名为“光”。
请注意高电压:在确定继电器接线之前拔下所有电源插头。为了控制电路的交流部分,我使用的是5V继电器 - 只需中断220V电线,然后将剥开的端子插入常开和常开螺丝端子。 *请记住,如果您没有太多使用高压的经验,请找一个监督的人。
Arduino IDE配置
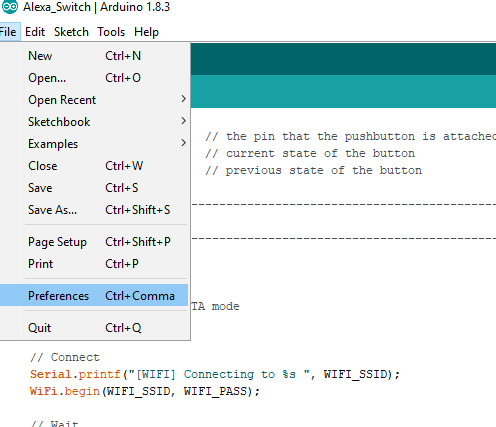
单击文件 - 》首选项

添加这个链接到附加URL板:
http://arduino.esp8266.com/stable/package_esp8266com_index.json

接下来,安装电路板文件并按照提及步骤进行操作。
工具→电路板→电路板管理器

搜索ESP8266和安装模块包。

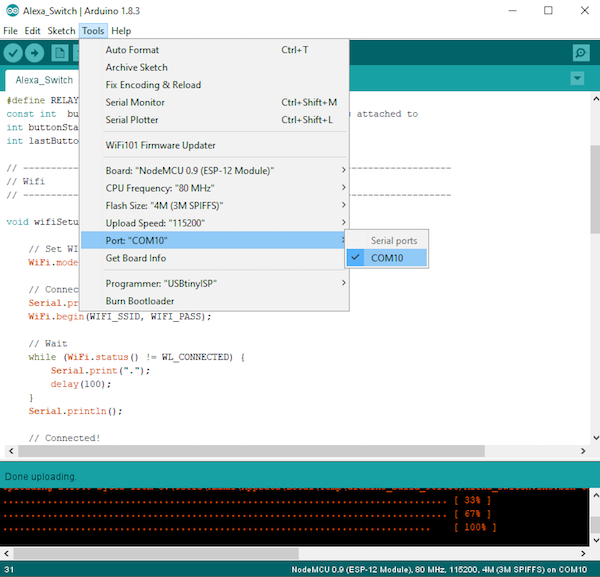
选择您的电路板,如下图所示。
《二v》

然后,选择电路板端口。

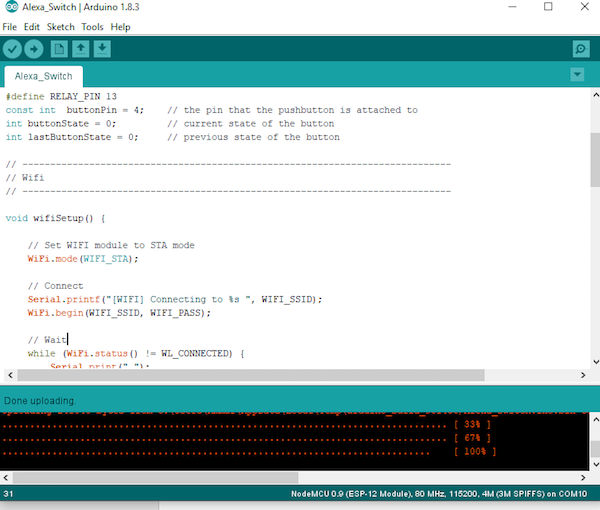
选择端口后,编辑源代码并更改Wi-Fi名称和密码,如图所示:

Arduino代码
#include
#include
#include “fauxmoESP.h”
#include “ESPAsyncWebServer.h”
#include
#include
#define WIFI_SSID “” // Please Enter you Wifi name here
#define WIFI_PASS “” // Enter password here
#define SERIAL_BAUDRATE 115200
fauxmoESP fauxmo;
#define RELAY_PIN 5
const int buttonPin = 4; // the pin that the pushbutton is attached to
int buttonState = 0; // current state of the button
int lastButtonState = 0; // previous state of the button
// -----------------------------------------------------------------------------
// Wifi
// -----------------------------------------------------------------------------
void wifiSetup() {
// Set WIFI module to STA mode
WiFi.mode(WIFI_STA);
// Connect
Serial.printf(“[WIFI] Connecting to %s ”, WIFI_SSID);
WiFi.begin(WIFI_SSID, WIFI_PASS);
// Wait
while (WiFi.status() != WL_CONNECTED) {
Serial.print(“。”);
delay(100);
}
Serial.println();
// Connected!
Serial.printf(“[WIFI] STATION Mode, SSID: %s, IP address: %s ”, WiFi.SSID().c_str(), WiFi.localIP().toString().c_str());
}
void callback(uint8_t device_id, const char * device_name, bool state) {
Serial.print(“Device ”); Serial.print(device_name);
Serial.print(“ state: ”);
if (state) {
Serial.println(“ON”);
digitalWrite(RELAY_PIN, HIGH);
} else {
Serial.println(“OFF”);
digitalWrite(RELAY_PIN, LOW);
}
}
void setup() {
pinMode(RELAY_PIN, OUTPUT);
pinMode(buttonPin, INPUT_PULLUP);
digitalWrite(RELAY_PIN, LOW);
// Init serial port and clean garbage
Serial.begin(SERIAL_BAUDRATE);
Serial.println(“FauxMo demo sketch”);
Serial.println(“After connection, ask Alexa/Echo to ‘turn on’ or ‘off’”);
// Wifi
wifiSetup();
// Fauxmo
fauxmo.addDevice(“the light”);
fauxmo.onMessage(callback);
}
void loop() {
fauxmo.handle();
// read the pushbutton input pin:
buttonState = digitalRead(buttonPin);
// compare the buttonState to its previous state
if (buttonState != lastButtonState) {
// if the state has changed, increment the counter
if (buttonState == LOW) {
Serial.println(“on”);
digitalWrite(RELAY_PIN, HIGH);
}
else {
// if the current state is LOW then the button
// went from on to off:
Serial.println(“off”);
digitalWrite(RELAY_PIN, LOW);
}
// Delay a little bit to avoid bouncing
delay(50);
}
// save the current state as the last state,
//for next time through the loop
lastButtonState = buttonState;
}

现在是时候玩了!
上传代码后让您的Alexa发现新设备,它会检测到您的智能家居设备,即ESP8266。通过说“Alexa打开/关闭灯”来控制它。在这种情况下,Alexa可以是您的计算机或Amazon Echo。
-
带有Blynk和IR的Arduino ESP8266控制继电器2023-06-30 1547
-
如何使用ESP8266来控制12V LED灯带?2023-05-30 1169
-
基于arduino用esp8266和继电器实现小爱同学开关灯2023-05-04 823
-
esp8266-01s控制继电器开关2023-04-27 764
-
esp8266三路继电器2023-04-21 665
-
如何开始esp8266 +esp8266 wifi继电器5v之间的连接?2023-02-24 701
-
基于ESP8266的继电器WiFi relay模块2022-08-02 1027
-
ESP8266+DHT11温湿度传感器+小爱同学语音智能LED灯(状态可视化)2021-12-17 1314
-
HC05-ESP8266实现控制LED的闪烁2021-11-23 1375
-
如何使用ESP8266和Android控制继电器2019-07-30 28358
-
esp8266控制led灯51单片机底层程序资料下载2018-02-27 1669
全部0条评论

快来发表一下你的评论吧 !

