

怎样用Arduino连接HC-SR04超声波传感器来构建电子卷尺
电子说
描述
您是否见过一个机器人项目,其设备看起来像一对大卡通眼睛,想知道那部分是做什么的?有可能你正在看超声波传感器。在本教程中,您将了解HC-SR04超声波传感器,包括如何使用Arduino连接它来构建电子卷尺。
超声波如何传感器工作?
超声波传感器是一种利用超声波测量物体距离的装置。超声波换能器 - 麦克风和扬声器串联 - 发送和接收超高频声波以获得物体的距离或接近度。超高频声波从物体表面反射,形成独特的回声模式。

图1 。 HC-SR04超声波传感器。
图2显示了超声波传感器的超高频声音波从物体表面反射。
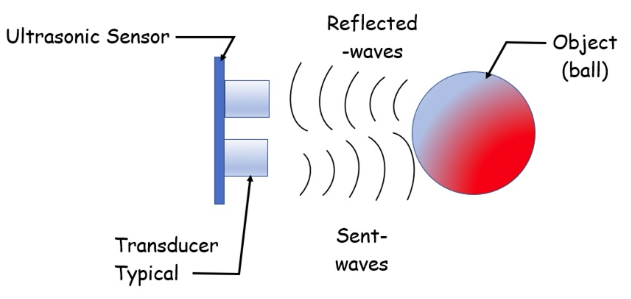
图2. 发送和反射波:超声波传感器基本操作。
使用TinkerCad电路将超声波传感器连接到Arduino
基本了解超声波传感器的工作原理,现在就可以了将设备连接到Arduino。要探索超声波传感器的操作,您可以使用TinkerCad电路构建虚拟功能电路。
TinkerCad Circuits是一款免费的在线电路仿真器,可以在将它们连接到真正的面包板上之前模拟各种电气和电子电路。您甚至可以使用TinkerCad Circuits测试Arduino项目(包括代码)。在承诺构建物理电路之前,您可以通过实验获得宝贵的电子知识。
图3显示了使用TinkerCad Circuits构建的功能超声波传感器Arduino项目。
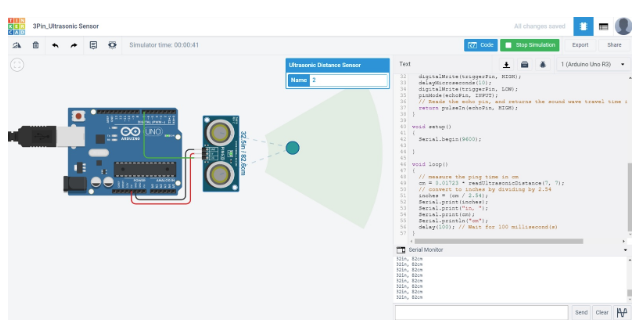
图3. 在线超声波传感器和Arduino TinkerCard电路。
如果您有试验超声波传感器的面包板,请使用图4作为参考。
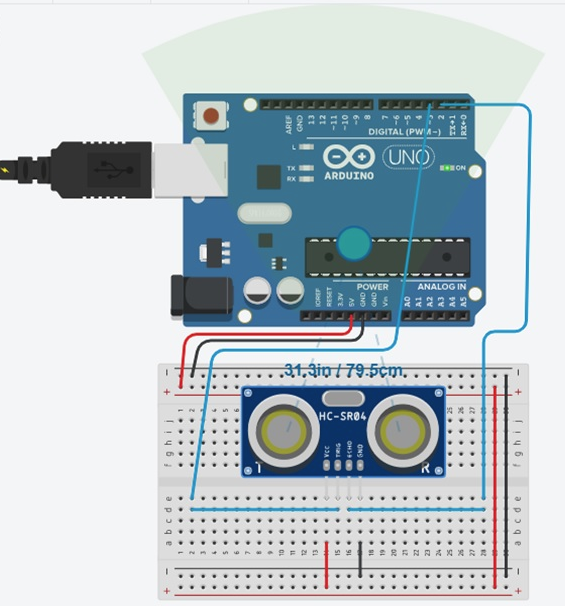
图4. TinkerCad Circuits内置的面包板布线版本。
在面包板上用Arduino连接超声波传感器
您可以使用TinkerCad Circuits内置的超声波传感器Arduino电路或图5所示的电气接线图来构建您的传感设备。
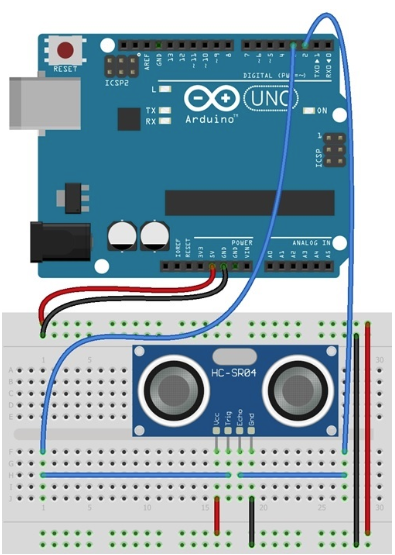
图5。实际超声波传感器的电气接线图到Arduino。
如果您使用的是4针超声波传感器,则常闭引脚(NC)接地。您可以如图所示放置面包板上的超声波传感器,并使用跳线完成Arduino的接线。
这是我使用4线跳线将超声波传感器连接到Arduino的电路。
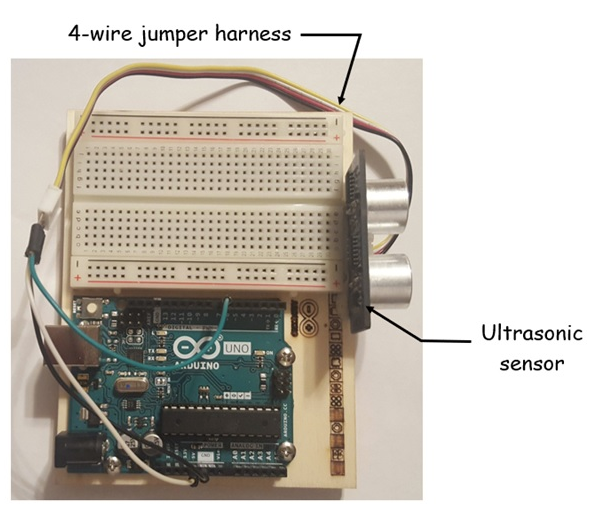
图6。作者的实际电路。
4线跳线线束采用彩色编码。图7显示了Arduino和超声波传感器之间的接线连接。
图7. 4线彩色编码跳线接线连接。
您现在已成功将超声波传感器连接到Arduino!您现在可以将超声波传感器代码安装(上传)到Arduino。
超声波传感器代码
该项目的最后一部分是将超声波传感器代码上传到Arduino。使用USB线将Arduino连接到台式PC或笔记本电脑。在Arduino IDE中,输入如下所示的代码。您也可以将代码下载到台式PC或笔记本电脑的硬盘上。在IDE中,您可以通过单击水平箭头上传代码。
此草图读取 PING)))超声波测距仪,并返回距离范围内最近的对象的距离。为此,它向传感器发送脉冲以启动读数,然后监听要返回的脉冲。返回脉冲的长度与物体距传感器的距离成正比。
电路:
+ P连接+)+)连接到+ 5V
PING的GND连接)))接地
PING的SIG连接)))连接到数字引脚7
完整项目代码
/* Ping))) Sensor
*/
// this constant won‘t change. It’s the pin number
// of the sensor‘s output:
const int pingPin = 7;
void setup() {
// initialize serial communication:
Serial.begin(9600);
}
void loop()
{
// establish variables for duration of the ping,
// and the distance result in inches and centimeters:
long duration, inches, cm;
// The PING))) is triggered by a HIGH pulse of 2 or more microseconds.
// Give a short LOW pulse beforehand to ensure a clean HIGH pulse:
pinMode(pingPin, OUTPUT);
digitalWrite(pingPin, LOW);
delayMicroseconds(2);
digitalWrite(pingPin, HIGH);
delayMicroseconds(2);
digitalWrite(pingPin, LOW);
// The same pin is used to read the signal from the PING))): a HIGH
// pulse whose duration is the time (in microseconds) from the sending
// of the ping to the reception of its echo off of an object.
pinMode(pingPin, INPUT);
duration = pulseIn(pingPin, HIGH);
// convert the time into a distance
inches = microsecondsToInches(duration);
inches = inches +2;// Ultrasonic Calibration factor
cm = microsecondsToCentimeters(duration);
cm = cm +2; // Ultrasonic Calibration factor
// Display measured values on the Serial Monitor
Serial.print(inches);
Serial.print(“in, ”);
Serial.print(cm);
Serial.print(“cm”);
Serial.println();
delay(1000);
}
long microsecondsToInches(long microseconds)
{
// According to Parallax’s datasheet for the PING))), there are
// 73.746 microseconds per inch (i.e. sound travels at 1130 feet per
// second)。 This gives the distance travelled by the ping, outbound
// and return, so we divide by 2 to get the distance of the obstacle.
// See: http://www.parallax.com/dl/docs/prod/acc/28015-PING-v1.3.pdf
return microseconds / 74 / 2;
}
// microsecondsToCentimeters function
long microsecondsToCentimeters(long microseconds)
{
// The speed of sound is 340 m/s or 29 microseconds per centimeter.
// The ping travels out and back, so to find the distance of the
// object we take half of the distance travelled.
return microseconds / 29 / 2;
}
您应该立即在IDE中看到距离数据向下滚动。图8显示了示例距离测量会话的数据。
图8. 带电子卷尺的示例距离测量会话。
在超声波传感器和测量距离的物体之间放置一个小刻度尺或标尺。您的读数与实际测量距离相比有多准确?
测量值应该非常接近相同,这意味着您已经成功构建了电子卷尺。您可以使用电子卷尺观察各种物体及其测量距离。快乐测量!
注意
此项目代码最初由David A Mellis创建,由Tom Igoe修改,后来由Don Wilcher修改。此示例代码位于公共域中。
-
超声波传感器HC-SR04(Arduino项目)2023-07-04 1555
-
Zephyr RTOS和HC-SR04超声波传感器开源2023-06-20 897
-
HC-SR04超声波传感器开源分享2023-06-12 1291
-
带有HC-SR04的超声波传感器阵列2022-12-30 936
-
使用超声波传感器HC SR04和Arduino Uno制作超声波距离传感器2022-10-31 1483
-
基于Arduino Nano和HC-SR04超声波传感器制作社交距离项目2022-08-09 1581
-
HC-SR04超声波测距模块原理2021-12-06 3202
-
HC-SR04超声波传感器实验记录2021-11-09 2927
-
怎样去编写HC-SR04超声波传感器的程序呢2021-10-18 1809
-
超声波传感器HC-SR04测距实例软件2021-07-30 1751
-
hc-sr04超声波传感器的原理和应用2020-04-23 34229
-
HC-SR04超声波模块的Arduino代码2017-03-20 1666
-
HC-SR04超声波测距资料2016-05-10 964
-
HC-SR04超声波测距模块及程序2015-12-08 2860
全部0条评论

快来发表一下你的评论吧 !
