

怎样用ESP32创建一个Web服务器 并将其连接到Wi-Fi获取IP地址
电子说
描述
入门
客户端与客户端之间的连接webserver是使用HTTP协议建立的。 HTTP协议如下所示:HTTP/1.1 200 OK r nContent-Type:text/html r n r n“。
”HTTP/1.1 200 OK“表示服务器已接受请求并已回复“200 OK”,这是状态代码,后跟“ r n”,这是HTTP协议的约束。
“Content-Type:text/html r n“表示响应内容类型为HTML格式,后跟” r n“
在HTTP协议结束时,网络服务器将返回显示”Hello world“的网页。
代码
#include
const char* wifi_name = “Tenda_31BC98”; //Your Wifi name
const char* wifi_pass = “barcelona”; //Your Wifi password
WiFiServer server(80); //Port 80
void setup()
{
Serial.begin(115200);
// Let‘s connect to wifi network
Serial.print(“Connecting to ”);
Serial.print(wifi_name);
WiFi.begin(wifi_name, wifi_pass); //Connecting to wifi network
while (WiFi.status() != WL_CONNECTED) { //Waiting for the responce of wifi network
delay(500);
Serial.print(“。”);
}
Serial.println(“”);
Serial.println(“Connection Successful”);
Serial.print(“IP address: ”);
Serial.println(WiFi.localIP()); //Getting the IP address at which our webserver will be created
Serial.println(“Put the above IP address into a browser search bar”);
server.begin(); //Starting the server
}
void loop()
{
WiFiClient client = server.available(); //Checking for incoming clients
if (client)
{
Serial.println(“new client”);
String currentLine = “”; //Storing the incoming data in the string
while (client.connected())
{
if (client.available()) //if there is some client data available
{
char c = client.read(); //read a byte
Serial.print(c);
if (c == ’ ‘) //check for newline character,
{
if (currentLine.length() == 0) //if line is blank it means its the end of the client HTTP request
{
client.print(“”);
client.print(“
Hello World
”);
break; //Going out of the while loop
}
else
{
currentLine = “”; //if you got a newline, then clear currentLine
}
}
else if (c != ’ ‘)
{
currentLine += c; //if you got anything else but a carriage return character,
}
}
}
}
delay(2000);
}
代码说明
首先,我们加入了Wi-Fi库,它将帮助我们创建网络服务器。然后我们存储了Wi-Fi名称和密码,以便我们可以连接到这个Wi-Fi网络。之后,我们定义了我们要将数据发送到的端口。
const char* wifi_name = “Tenda_31BC98”; //Your Wifi name
const char* wifi_pass = “barcelona”; //Your Wifi password
WiFiServer server(80); //Port 80
在setu中p功能,我们使用上面提供的Wi-Fi信息将ESP32连接到我们的Wi-Fi网络。如果与Wi-Fi网络的连接成功,则“连接成功”将显示在串行监视器上。否则,它将继续尝试,直到它将连接到Wi-Fi网络。
Serial.print(“Connecting to ”);
Serial.print(wifi_name);
WiFi.begin(wifi_name, wifi_pass); //Connecting to wifi network
while (WiFi.status() != WL_CONNECTED) { //Waiting for the responce of wifi network
delay(500);
Serial.print(“。”);
}
Serial.println(“”);
Serial.println(“Connection Successful”);
以下命令将获取IP地址,我们将在串行监视器上显示它。
Serial.println(WiFi.localIP());
然后我们启动了服务器,以便我们可以获取数据并将数据发送到浏览器。
server.begin( );
在循环函数中,我们检查了是否有客户端发送了http请求。如果有任何客户端请求可用,它将存储在字符中并显示在串行监视器上。在请求结束时,我们将发送HTML命令,它将在网页上打印“Hello world”。
WiFiClient client = server.available(); //Checking for incoming clients
if (client)
{
Serial.println(“new client”);
String currentLine = “”; //Storing the incoming data in the string
while (client.connected())
{
if (client.available()) //if there is some client data available
{
char c = client.read(); //read a byte
Serial.print(c);
if (c == ’ ‘) //check for newline character,
{
if (currentLine.length() == 0) //if line is blank it means it’s the end of the client HTTP request
{
client.print(“
”);
client.print(“
Hello World
”);
break; //Going out of the while loop
}
如何运行代码
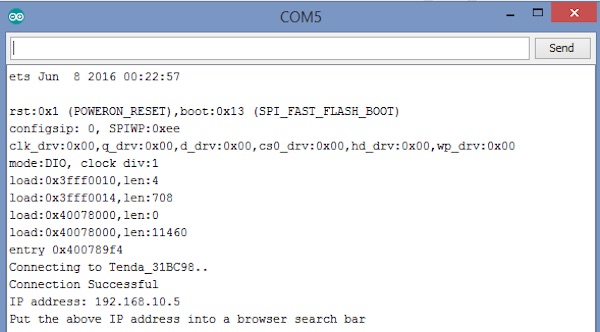
使用您的Wi-Fi名称和密码更改代码中的Wi-Fi名称和密码。然后上传代码并打开串行监视器。串行监视器将显示IP地址,如下图所示。在浏览器中输入此IP地址。
输入IP地址后,网页将如下所示。
-
CY8CPROTO-062S2-43439无法连接到ThingSpeak服务器怎么解决?2025-06-05 5265
-
Wi-Fi 定位服务2025-04-17 499
-
乐鑫ESP32调试Wi-Fi常用调试API2025-02-07 4071
-
原来ESP32竟可《一“芯”两用》既做人体检测传感器也做Wi-Fi数据传输2024-12-18 5445
-
【AI技术支持】ESP32无线Wi-Fi常用调试API2024-10-26 2724
-
ESP无法连接到路由器上的Wi-Fi要怎么处理?2023-06-06 847
-
如何将ESP-12F仅作为Wi-Fi模块进行无线传输?2023-06-01 656
-
httpd服务器如何处理Wi-Fi堆栈崩溃?2023-04-13 524
-
如何创建客户端将连接到服务器的网状网络?2023-03-02 637
-
如何使用Arduino和Wi-Fi的Web浏览器控制伺服电机?2023-03-01 1415
-
在处于STA模式的esp8266中,尝试将其更改回STA模式时无法连接到Wi-Fi的原因?2023-02-22 470
-
基于ESP32的简易web服务器设计2023-01-05 5137
-
带Wi-Fi管理器的ESP32 Neopixel状态指示器2022-12-28 511
-
AP和网络运行方式低功耗Wi-Fi2018-09-03 3144
全部0条评论

快来发表一下你的评论吧 !
