
RFID卡识别器的制作
电子说
描述
第1步:所需组件
arduino uno x1
100uF电容器x1
按钮x 2
1k欧姆电阻器x 2
RFID读取器模块x1
LED x1
16x2 LCD x1
软件:arduino ide
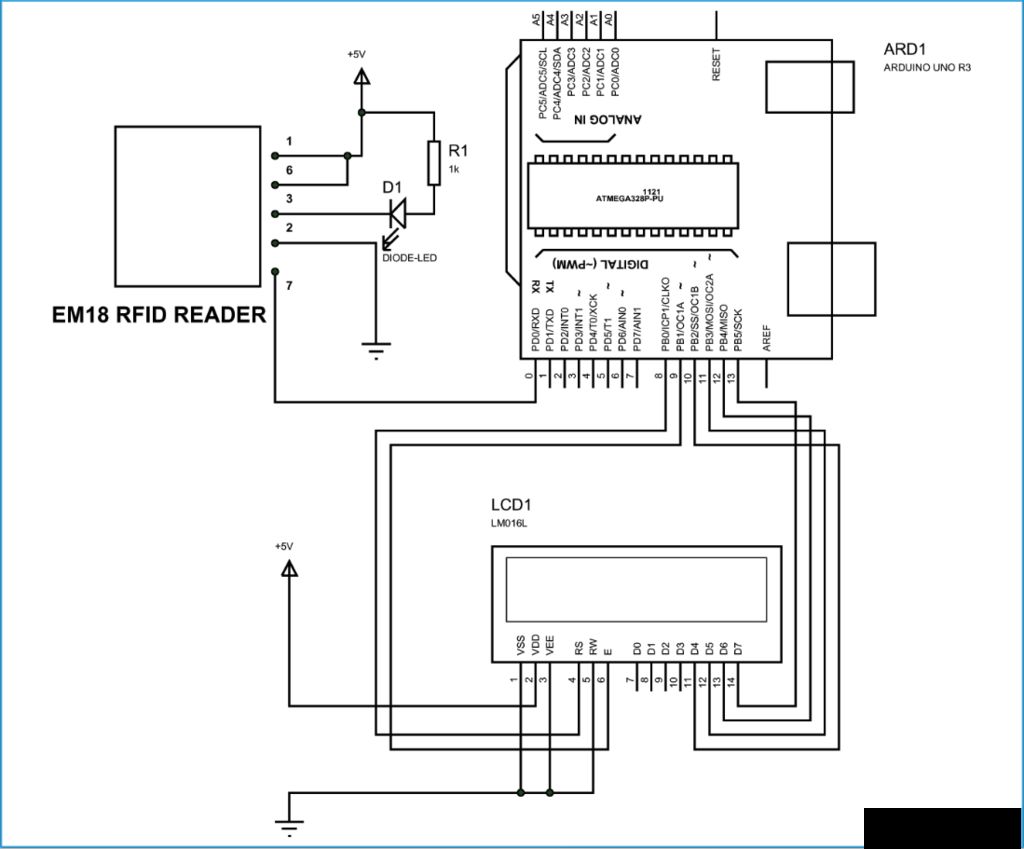
步骤2:LCD连接
arduino和lcd
》 PIN1或VSS接地
》 PIN2或VDD或VCC至+ 5v电源
》 PIN3或VEE接地(给出最佳对比度最适合初学者)
》 PIN4或RS(寄存器选择)到ARDUINO UNO的PIN8
》 PIN5或RW(读/写)接地(将LCD置于读取状态)模式简化了用户的通信)
》 PIN6或E(启用)到ARDUINO UNO的PIN9
》 PIN11或ARDUINO UNO的D4到PIN10
》 ARDUINO UNO的PIN12或D5至PIN11
》 ARDUINO UNO的PIN13或D6至PIN12
》 ARDUINO UN的PIN14或D7至PIN13 O
步骤3:RFID模块
步骤4:CIRCUIT

步骤5:
#include
//使用接口引脚的编号初始化库
LiquidCrystal lcd(8,9,10,11,12,13)//RS,EN,D4,D5,D6,D7
int count = 0;//用于存储ID字符的整数
void setup()
{
//设置LCD的列数和行数:
lcd.begin(16,2);
Serial.begin(9600);//通过9600波特率启用串行通信
pinMode(0,INPUT);//receive pin设置所有输出
lcd.print(“RFID”);//写出你想要的任何名字
lcd.setCursor(0,1);//将光标移动到第二行使用按钮
}
void loop()
{
while(Serial.available()&& count 《12)//读取12个字符并将它们存储在输入数组中
{
input [count] = Serial.read();//逐个存储12个字符
count ++;
lcd.print(input [count]);//逐个在LCD上存储12个字符
if(count == 12)
{
lcd.print(“”);
count = 0;//一旦使用了12个字符就可以开始并等待第二个ID
lcd.setCursor(0,1);//移动光标开始
}
}
}
-
射频识别RFID2024-02-28 1153
-
RFID射频识别中的高频HF2024-05-08 1365
-
令人期待的射频识别技术RFID2009-11-13 6779
-
RFID技术原理及全向的RFID天线设计介绍2019-06-11 4852
-
详解RFID无线射频识别技术2019-07-01 2121
-
RFID技术的原理和射频天线设计2019-07-09 2315
-
RFID读卡器与RFID智能卡的密码数据动态变换怎么实现?2019-08-23 2405
-
非接触式IC卡RFID的原理和制作实验资料推荐2021-04-27 1459
-
什么是射频识别技术?RFID读写卡的原理是什么?2021-05-19 2482
-
如何制作一个带联网功能的RFID宿舍门禁卡?2022-01-24 2456
-
使用M480 SPI与MFRC 522模块通信读取RFID卡的独特识别2023-08-29 395
-
射频识别(RFID)技术原理2006-04-16 2016
-
rfid技术可以制作出药品识别箱吗2020-01-02 1331
-
RFID射频识别技术基本组成及原理2023-03-21 12387
-
RFID纸质芯片卡的应用2025-04-18 731
全部0条评论

快来发表一下你的评论吧 !

