

植物自动浇水系统的制作
电子说
描述
步骤1:耗材
1米2mm内径/2.6mm外径硅管(这个尺寸很重要且无法更换)
1米厚的硅管,例如5mm内径/1mm外径(实际上不是
环氧胶(防水密封)
3瓶盖,底部可轻松粘在一起
Superglue
Arduino Micro或任何其他类似系统
3种彩色LED选择(可选)
力敏电阻(可选)
Towerpro 9g伺服(或(等))
土壤湿度传感器(我使用水深传感器结束可能不太理想)
大量接线
3.3k电阻器
可以做0.2毫米层的3D长丝打印机
PLA长丝
微小的松紧带
1扑克牌(或同等产品)
第2步:苍鹭的水泵
H eron是亚历山大的杰出数学家和工程师。而这个泵是他的一个设计的变种。它的工作方式是重力迫使水通过硅管从顶部瓶子流到底部瓶子。这导致底部瓶子中的水位上升,迫使空气从底部瓶子到中间瓶子,这又增加了压力。然后通过将水从中间底部推到需要的地方来减轻这种压力。这样做的另一个好处是,由于管道尺寸和高度差异存在显着差异,您实际上可以将水泵送到高于泵顶部水位的水位。使用简单的重力泵无法做到的事情。
为了使这个漂亮的设备工作,你需要钻一些孔,如图所示安装管道并确保一切都是防水的同样重要的气密。为此,您需要使用正确的胶水。
注意:顶部的盖子有一个小孔,以防止水从顶部瓶子移动到底部瓶子时产生真空。
为了启动水流,您需要用水填充中间瓶。然后简单地将水加到顶瓶中。
步骤3:带有附加水传感器的3d打印伺服控制阀(Mikey77)
对于这一步,我将引导您进入mikey77的另一个3D打印伺服控制阀的指导。
它的设计很整洁,但我做了必须做一些简单的调整才能使它与水一起工作。
需要一些松紧带将mikey77的阀门中的活动部件拉回到位。我结束了从扑克牌上切下一条小条带,并将其挤在系统中的硅管旁边,以便能够完全阻止水流。只是为了额外的挤压。最初我无法完全停止水流。
之后,水传感器只是超级粘在阀门控制器上,如图所示。并插入植物的土壤中。
步骤4:接线
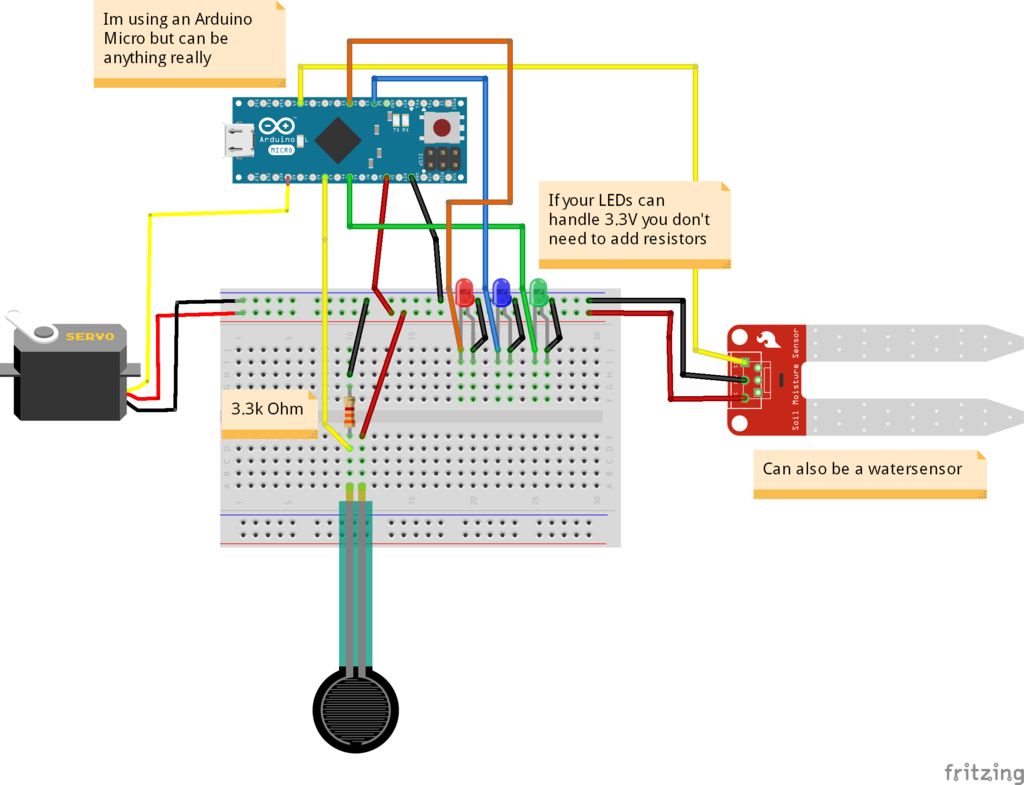
其中一些组件是可选的,只是那就是花哨。
第5步:代码
const int waterSens = 9; //define water sensor
const int led2 = 2; //define blue led to pin 2
const int led4 = 4; //define red led to pin 4
const int ledA5 = A5; //define green led to pin A5
int fsr = A2; //define fsr read to pin A2
int waterVal; //define the water sensor value
int fsrRead; //the analog reading from the FSR resistor divider
int value = 375; //starting value for servo
#include //load servo from library
Servo servo1; //name the servo used for reference void setup() {
pinMode(led4, OUTPUT); //set led as an output
pinMode(led2, OUTPUT); // set led as an output
pinMode(ledA5, OUTPUT); // set led as an output
pinMode(waterSens, INPUT); //set water sensor as an input
Serial.begin(9600); //start the serial port at 9600 bauds
pinMode(9, INPUT); // attach watersensor sensor output as an input
pinMode(A2, INPUT); // attach fsr output as an input
} void loop() {
waterVal = analogRead(waterSens); //read the water sensor
fsrRead = analogRead(fsr); // read the force sensor value
Serial.print(“FSR reading = ”); // for serial monitoring
Serial.println(fsrRead); //print the value of the FSR resistor to the serial monitor
Serial.print(“WaterSensor reading = ”); // for serial monitoring
Serial.println(waterVal); //print the value of the water sensor to the serial monitor // this if statement is for when the resevoir needs a refill
if (fsrRead 》= 900) { //force sensor value should be adjusted to your own needs
servo1.attach(A0); //attach servo to A0
digitalWrite(ledA5, LOW); // if the water sensor senses water turn the green led off
digitalWrite(led2, LOW); // if the water sensor senses water turn the blue led off
digitalWrite(led4, HIGH); // if the water sensor senses water turn the red led on
int value = 837; // set a value for the servo position (this is similar to analog outputs
int servoPos = map(value, 0, 1023, 0, 170); // map that value to the positions of the servo
servo1.write(servoPos); // make the servo go in position
delay (250); // give the servo time to go into position
servo1.detach(); // detach servo to avoid buzz noises at low voltages
delay (10000); // delay of 10 seconds
} else{ // this else statement is for when the resevoir has sufficient water
- 相关推荐
- 热点推荐
- Arduino
-
分享一个简单的自动植物浇水系统电路2024-02-25 3835
-
基于STM32的植物浇水系统开发2024-01-18 5220
-
使用Arduino构建植物浇水系统2023-06-28 1083
-
智能植物浇水系统项目2022-11-21 705
-
自动植物浇水系统开源分享2022-11-08 955
-
智能植物浇水系统开源案例2022-11-07 663
-
室内植物浇水系统开源分享2022-11-03 688
-
智能植物浇水系统开源2022-11-02 646
-
智能植物浇水系统开源项目2022-10-27 694
-
使用Arduino Uno的自动植物浇水系统2022-10-26 1681
-
基于Arduino的自动植物浇水系统2022-09-14 3878
-
Arduino自动植物浇水系统2022-08-19 978
-
使用树莓派2实现的植物浇水系统的资料合集2021-03-17 1522
全部0条评论

快来发表一下你的评论吧 !
