

RGBLED键盘模块钢琴的制作
电子说
描述
步骤1:需要的材料
材料清单
Piezo Buzzer 1x
4x4键盘模块1x
Arduino Uno 1x
USB 2.0电缆类型A/B 1x
声音传感器模块1x
RGB LED 1x
330欧姆电阻3x
公对母跳线8x
男性跳线4x
3 pin公对母跳线1x
材料清单与上面的图片有序。
第2步:建立时间!
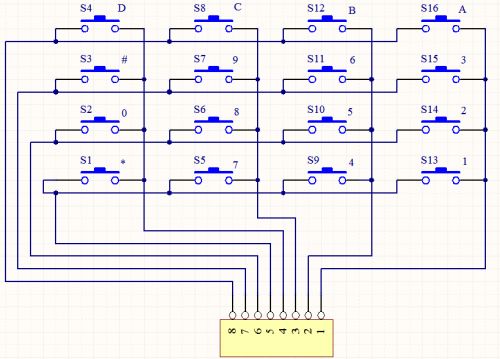
4x4键盘模块& Piezo Buzzer
理论
由于4x4键盘模块和压电蜂鸣器包含许多单独的引脚输入,我决定将所用的组件分成两部分对。专注于键盘,通常用作输入。 SunFounder 4 * 4矩阵键盘模块是一个矩阵非编码键盘,由16个并行键组成,每行和每列的键通过外部引脚连接 - 引脚Y1-Y4,如同标记旁边控制行,当X1- X4,列。
目的
这些组件对整个项目的目的是允许用户按下设置为a的按钮压电蜂鸣器通过赫兹频率产生的特定声音。
矩阵模块引脚 - Arduino引脚
4 - 2
3 - 3
2 - 4
1 - 5
5 - 6
6 - 7
7 - 8
8 - 13
Piezo Buzzer - Arduino Pin
黑色 - GND
红色 - 电源
我在这个版本中最困难的任务是弄清楚每根电线插入的位置。上面我提供了快速简便的线路位置,只要按照从上到下的方式,尖端需要花费时间并确保每个引脚都正确插入正确的插槽。
*提示是遵循每根导线从一端到另一端的位置。
特定元件导线的所有Tinkercad草图都是正确的颜色编码,因此请仔细阅读。
第3步:声音传感器模块和RGB LED
声音传感器模块和RGB LED
理论
声音传感器模块允许您检测声音何时超过您选择的设定点。通过麦克风检测声音并将其馈入LM393运算放大器。一旦声级超过设定值,模块上的LED将亮起并输出。
目的
这些组件对整个项目的目的是获得声音传感器模块的声音/音量读数,通过读取RGB LED将激活与声音有关的正确颜色。
声音传感器模块 - Arduino引脚(使用3针跳线)
输出 - A0模拟引脚
GND - 任何开路GND引脚插槽
VCC - 3V
RGB共阳极(+)LED - Arduino引脚
红色 - 9
电源 - 5V
绿色 - 10
蓝色 - 11
请记住电线,每根电线穿过330欧姆电阻。使用上面的图片作为参考。
我在这个版本中最困难的任务是弄清楚每根电线插入的位置。上面我提供了快速简便的线路位置,只要按照从上到下的方式,提示就是花时间确保每个引脚都正确插入到正确的插槽中以防止将来调试。
*提示是遵循每条线插入的方式。
特定组件线的所有Tinkercad草图都是正确的颜色编码,因此请遵循。
步骤4:代码
代码
此代码允许使用新定义的所有组件一起工作功能包含所有许多控件一个组件,它有许多可变变量,这些组件是RGB led,并使用rgb颜色改变打开时的颜色和压电蜂鸣器以及根据按钮按下它会产生的声音。
此代码中必须包含键盘库
下载后,将新库添加到ardu中ino,然后插入激活它所需的单行代码。
我在代码中遇到的困难是将新定义的函数放在何处通过反复试验我发现它必须在设置中而不是循环。
代码
#include // Keypad Library
int greenPin = 11; //RGB Green Pin connected to digital pin 9
int redPin= 10; //RGB Red Pin connected to digital pin 9
int bluePin = 9; //RGB Blue Pin connected to digital pin 9
int speakerPin = 12; // speaker connected to digital pin 12
const byte ROWS = 4; // four rows
const byte COLS = 4; // four coloums
const int soundPin = A0; //sound sensor attach to A0
char keys[ROWS][COLS] = {
{‘a’,‘b’,‘c’,‘d’},
{‘e’,‘f’,‘g’,‘h’},
{‘i’,‘j’,‘k’,‘l’},
{‘m’,‘n’,‘o’,‘p’}
}; // Visualization of keypad module
byte rowPins[ROWS] = {2, 3, 4, 5}; // connect to the row pinouts of the keypad
byte colPins[COLS] = {6, 7, 8, 13}; // connect to the colum pinouts of the keypad
Keypad keypad = Keypad ( makeKeymap(keys), rowPins, colPins, ROWS, COLS ); // Creates keys
void setup(){
pinMode(speakerPin, OUTPUT); // sets the speakerPin to be an output
pinMode(redPin, OUTPUT); // sets the red pin to be an output
pinMode(greenPin, OUTPUT); // sets the green pin to be an output
pinMode(bluePin, OUTPUT); // sets the blue pin to be an output
Serial.begin (9600);
}
void setColor(int red, int green, int blue) // New defined function to allow RGB to display colour through RGB code
{
#ifdef COMMON_ANODE
red = 255 - red;
green = 255 - green;
blue = 255 - blue;
#endif
analogWrite(redPin, red);
analogWrite(greenPin, green);
analogWrite(bluePin, blue);
}
void beep (unsigned char speakerPin, int frequencyInHertz, long timeInMilliseconds){ // the sound producing functions
int x;
long delayAmount = (long)(1000000/frequencyInHertz);
long loopTime = (long)((timeInMilliseconds*1000)/(delayAmount*2));
for (x=0;x
void loop (){
char key = keypad.getKey();
int value = analogRead(soundPin);//read the value of A0
Serial.println(value);//print the value
if (key != NO_KEY) {
Serial.println(key);
}
if (key==‘a’){
beep(speakerPin,2093,100);
setColor(218, 112, 214);
}
if (key==‘b’){
beep(speakerPin,2349,100);
setColor(218, 112, 214);
}
if (key==‘c’){
beep(speakerPin,2637,100);
setColor(218, 112, 214);
}
if (key==‘d’){
beep(speakerPin,2793,100);
setColor(218, 112, 214);
}
if (key==‘e’){
beep(speakerPin,3136,100);
setColor(218, 112, 214);
}
if (key==‘f’){
beep(speakerPin,3520,100);
setColor(218, 112, 214);
}
if (key==‘g’){
beep(speakerPin,3951,100);
setColor(218, 112, 214);
}
if (key==‘h’){
beep(speakerPin,4186,100);
setColor(218, 112, 214);
}
if (key==‘i’){
beep(speakerPin,2093,100);
setColor(230, 230,0 );
}
if (key==‘j’){
beep(speakerPin,2349,100);
setColor(180,255,130);
}
if (key==‘k’){
beep(speakerPin,2637,100);
setColor(130,255,130);
}
if (key==‘l’){
beep(speakerPin,2739,100);
setColor(130,220,130);
}
if (key==‘m’){
beep(speakerPin,3136,100);
setColor(0,255,255);
}
if (key==‘n’){
beep(speakerPin,3520,100);
setColor(0,220,255);
}
if (key==‘o’){
beep(speakerPin,3951,100);
setColor(0,69,255);
}
if (key==‘p’){
beep(speakerPin,4186,100);
setColor(255, 0,255 );
}
}
-
钢琴老师:Arduino+LEDs+MIDI键盘+MuseScore2023-06-15 849
-
基于Arduino UNO的电子钢琴键盘2022-12-21 1591
-
制作钢琴瓷砖自动机器人2022-11-29 570
-
用键盘和Piezos构建Netduino复音钢琴2022-11-08 718
-
Arduino DUE和电阻器制作钢琴2022-11-07 657
-
带预设歌曲的电子钢琴键盘开源分享2022-10-24 718
-
如何使用Arduino制作触控电容式钢琴2022-07-28 4574
-
全键盘模拟钢琴64位版源代码及操作2021-03-10 1075
-
钢琴手套的制作2019-10-10 3483
-
用纸板制作钢琴2019-02-13 18333
-
The ONE在北京发布了The ONE钢琴+智能古典钢琴,钢琴还能玩智能?2018-06-05 5930
-
用malab GUI做的钢琴键盘,但是callbacks一直没搞懂2015-01-04 4550
-
梦幻钢琴2012-10-12 56599
-
基于labview的键盘钢琴程序2012-05-04 25384
全部0条评论

快来发表一下你的评论吧 !
