

自制物联网语音交互设备教程
电子说
描述
步骤1:组件
选项1蓝牙版本:
Arduino Uno
HC-06蓝牙设备
继电器2种方式
2 * 220 uhm
电阻器
9v电池
电线
BreadBoard或PCB
2 * LED灯
选项2 WIFI版本:
NodeMcu开发板(ESP8266)
电线
继电器2路
2 * 220 uhm电阻器
2 * LED灯
9v电池
BreadBoard或PCB
可选组件:
语音识别模块v3
第2步:中继电路
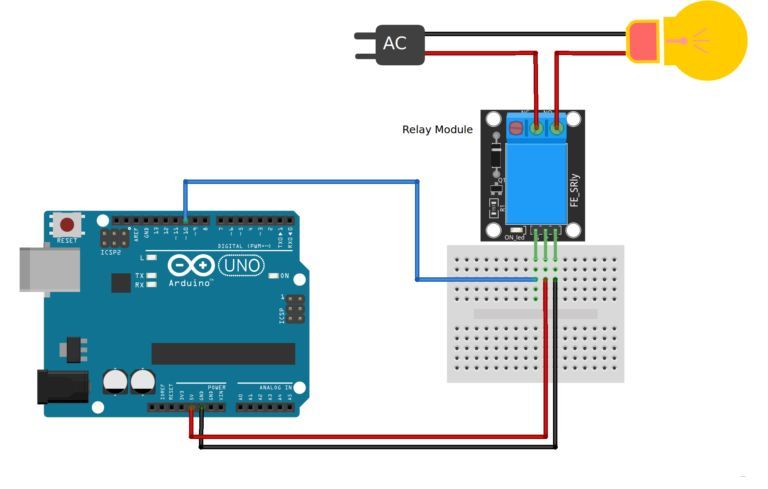
如何向ARDUINO或NodeMCU添加中继
这是它能够用于切换主电源设备的继电器类型。这些继电器将处理家庭中使用的大多数设备,除了房间加热器,炉子和电机等最高功率设备。确保要打开/关闭的设备的VA(伏特x安培)小于继电器额定值。
警告:在进行AC试验时要特别小心,电击会导致严重的伤害。连接交流电源时,底部的继电器模块打开,请勿触摸电路。
对于电路的直流部分:
Arduino数字引脚10 - 》模块引脚S
Arduino GND - 》模块引脚 -
Arduino + 5V - 》模块引脚+
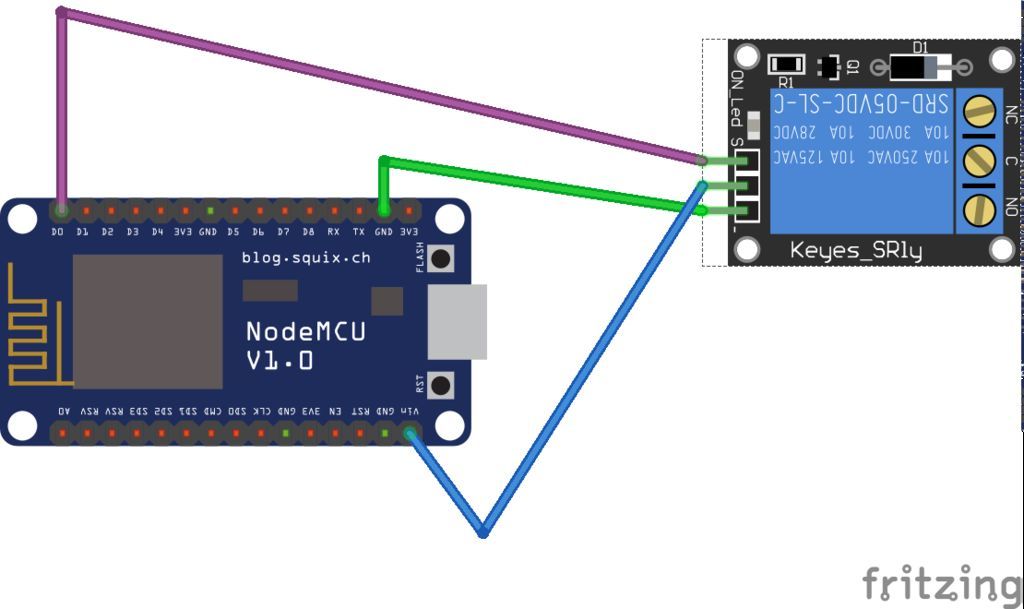
步骤3:NodeMcu配置
与其他组件不同,ESP8266模块需要在使用之前进行
设置,因为它是独立模块,您可以使用许多方法将代码上传到它。
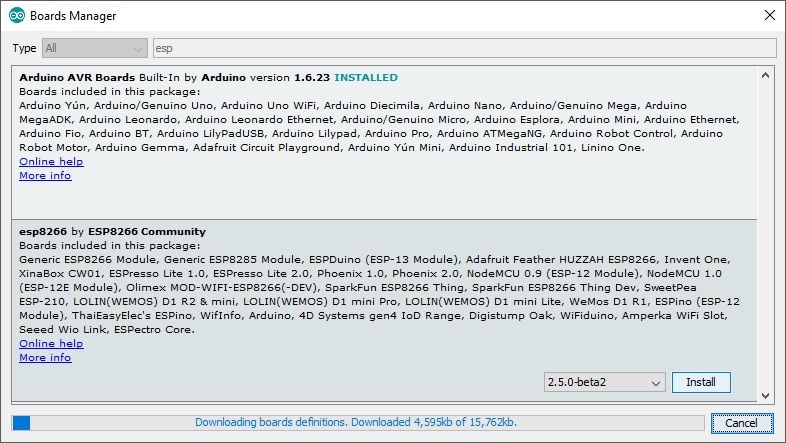
打开Adruino IDE
转到文件》参考文献
输入http://arduino.esp8266.com/stable/package_esp8266.。.
进入其他Board Manager URL字段。
您可以添加多个网址,用逗号分隔。
从工具》 Board菜单打开Boards Manager,找到esp8266平台。
从下拉框中选择所需的版本。
单击安装按钮。安装后,不要忘记从工具》板菜单中选择您的ESP8266板
。
重新启动Arduino IDE
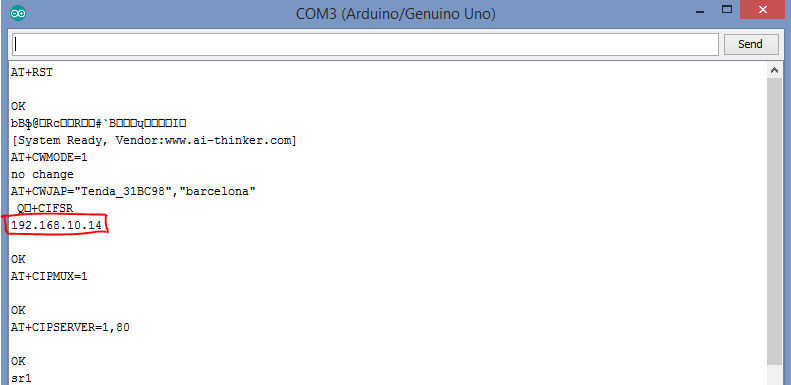
检查您的主板的IP地址:
打开Arduino IDE
工具》板》选择NodeMCU 1.0
工具》上传速度》 115200
#include ESP8266WiFi.h
#include
int8_t pin_led = 16; // initiate 8 Bit unsigned variable
const char* ssid = “WIFI user name”;
const char* password = “WIFI password”;
void setup() {
pinMode(pin_led, OUTPUT);
// put your setup code here, to run once:
WiFi.begin(ssid,password);
Serial.begin(115200);
while(WiFi.status()!= WL_CONNECTED)
{
Serial.print(“。.”); // Connection Failed! Rebooting
delay(100);
}
Serial.println(“”);
Serial.print(“IP Address: ”);
Serial.print(WiFi.localIP());
myserver.on(“/”,[](){myserver.send(200,“text/plain”,“Hello World”);});
myserver.on(“/toggle”,toggleLED);
myserver.begin();
}
void loop() {
// put your main code here, to run repeatedly:
myserver.handleClient();
}
void toggleLED()
{
digitalWrite(pin_led,!digitalRead(pin_led)); // toggle on/off led according to its status
myserver.send(204,“”); // send response ‘204’
}
打开串口并复制IP地址如图所示。现在您的设备已准备好您可以打开任何浏览器并检查URL:
HTTP://192.168.40.10 (change the IP address as giving in your serial monitor)
步骤4:语音识别安装
有两种方法可以使用语音识别应用程序:
1 :谷歌语音识别SDK通过移动应用程序。
谷歌有一个多语言语音识别SDK,能够指挥任何第三方软件或填写网站上的表格。除了听写,还提供语音命令功能,允许您搜索网络,打开文件,程序和网站,查找信息,设置提醒,记笔记等等。自动化流程并提高您的个人和企业工作效率。
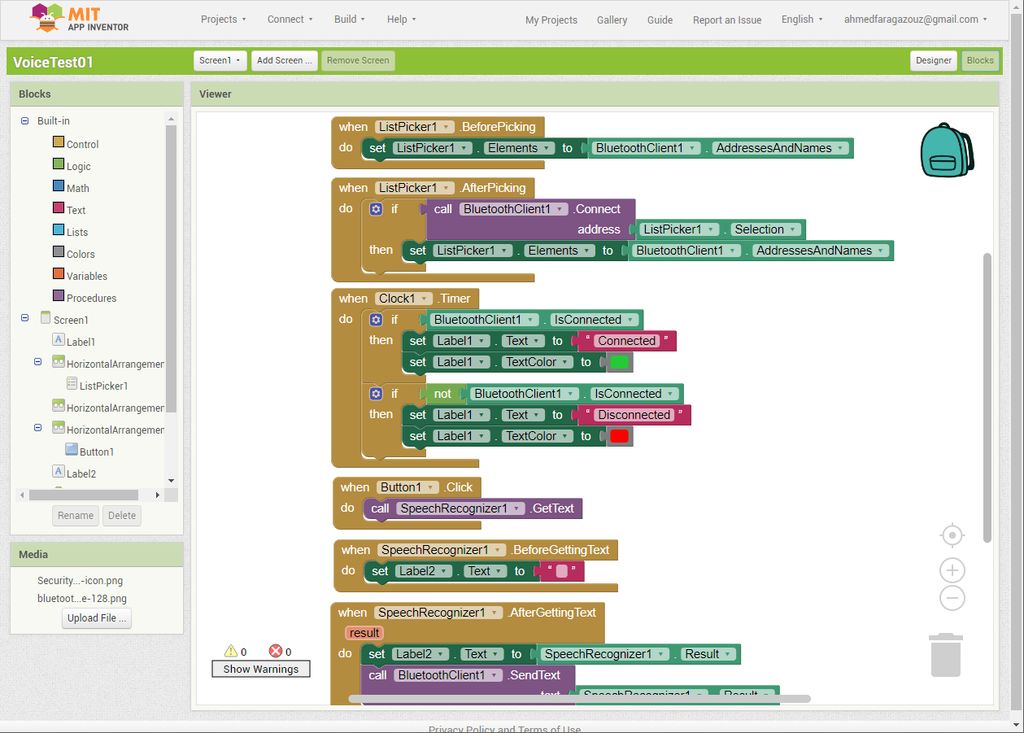
您可以使用 App Inventor for Android
Arduino和蓝牙的示例代码:
上传当前代码,然后将您的蓝牙设备连接到TX和RX,然后使用移动应用程序来控制它。
int line1 = 8; // relay line
void setup()
{
Serial.begin(9600);
pinMode(line1,OUTPUT);
digitalWrite(line1,HIGH);
}
void loop()
{
if(Serial.available())
{
String value = Serial.readStringUntil(‘ ’);
Serial.println(value);
if(value == “*close#”)
{
digitalWrite(line1,HIGH);
Serial.print ( “Light Closed”);
}
else if(value == “*open#”)
{
digitalWrite(line1,LOW);
Serial.print ( “Light Opened”);
}
} }
2。安装语音识别模块
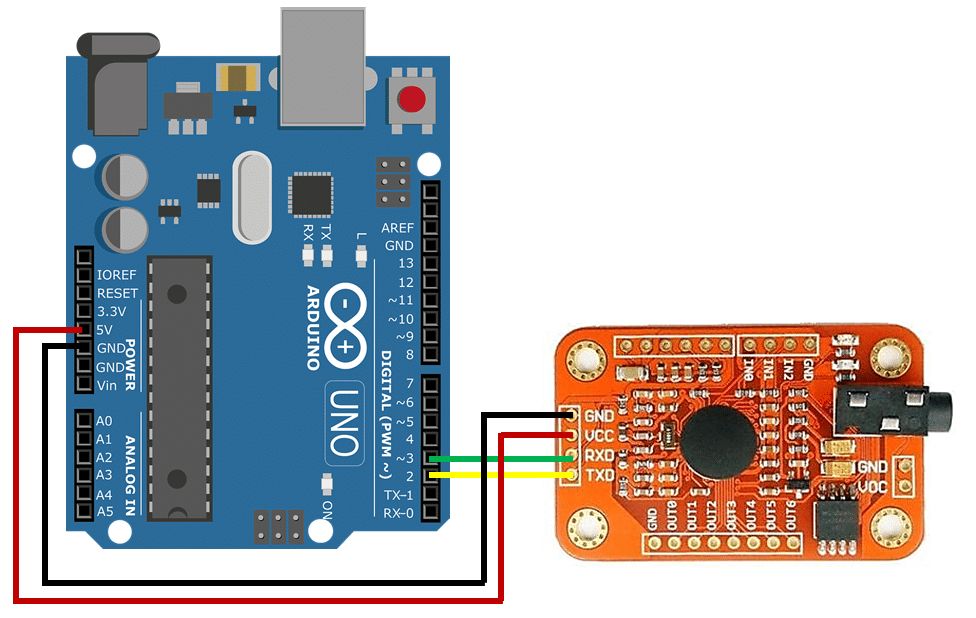
A。连接引脚
5v 5v
Tx 2
Rx 3
GND GND
B。安装库
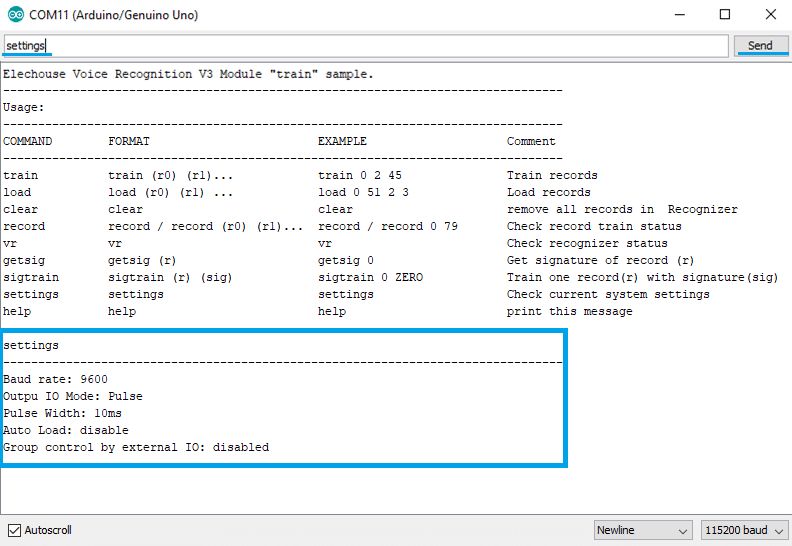
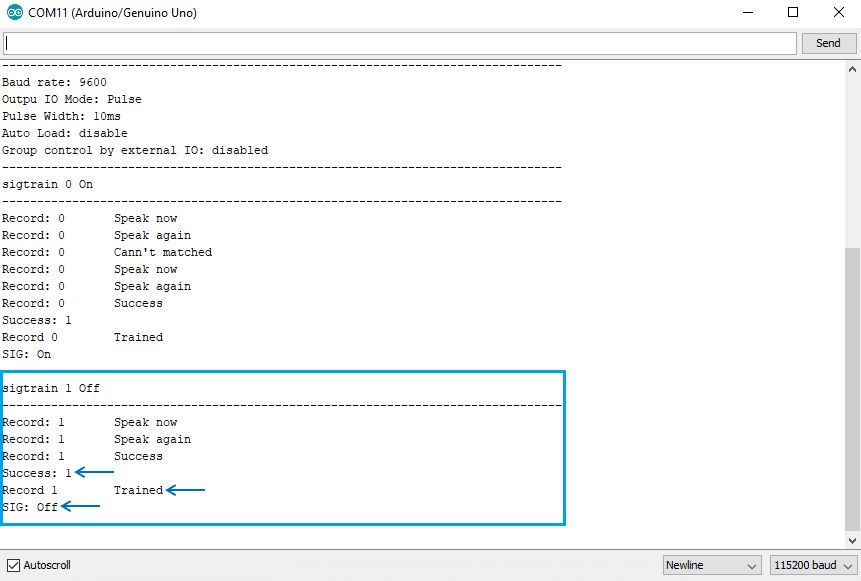
C。文件 - 》示例 - 》 VoiceRecognitionV3 - 》 vr_sample_train
D. 打开串行监视器并键入:settings
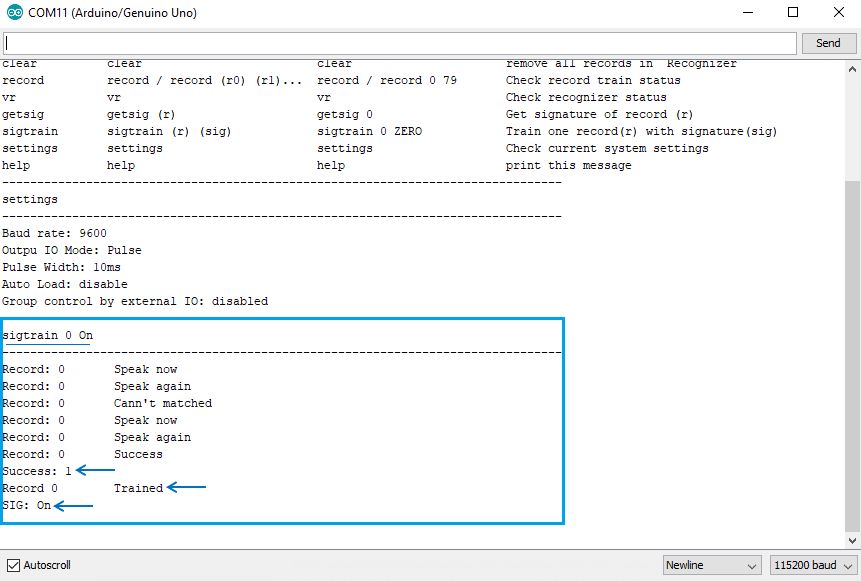
E。输入sigtrain 0开》发送
F。录制您的声音
G。关闭串口并打开新文件并粘贴此代码:
现在您可以使用语音识别模块关闭并打开LED
#include “VoiceRecognitionV3.h”
VR myVR(2,3); // 2:RX 3:TX, you can choose your favourite pins.
uint8_t records[7]; // save record
uint8_t buf[64];
int led = 13;
#define onRecord (0)
#define offRecord (1)
void printSignature(uint8_t *buf, int len)
{
int i;
for(i=0; i0x19 && buf[i]《0x7F){
Serial.write(buf[i]);
}
else{
Serial.print(“[”);
Serial.print(buf[i], HEX);
Serial.print(“]”);
}
}
}
/** @brief Print signature, if the character is invisible, print hexible value instead. @param buf --》 VR module return value when voice is recognized.
buf[0] --》 Group mode(FF: None Group, 0x8n: User, 0x0n:System
buf[1] --》 number of record which is recognized.
buf[2] --》 Recognizer index(position) value of the recognized record.
buf[3] --》 Signature length
buf[4]~buf[n] --》 Signature
*/
void printVR(uint8_t *buf)
{
Serial.println(“VR Index Group RecordNum Signature”);
Serial.print(buf[2], DEC);
Serial.print(“ ”);
if(buf[0] == 0xFF){
Serial.print(“NONE”);
}
else if(buf[0]&0x80){
Serial.print(“UG ”);
Serial.print(buf[0]&(~0x80), DEC);
}
else{
Serial.print(“SG ”);
Serial.print(buf[0], DEC);
}
Serial.print(“ ”);
Serial.print(buf[1], DEC);
Serial.print(“ ”);
if(buf[3]》0){
printSignature(buf+4, buf[3]);
}
else{
Serial.print(“NONE”);
}
Serial.println(“ ”);
}
void setup()
{
/** initialize */
myVR.begin(9600);
Serial.begin(115200);
Serial.println(“Elechouse Voice Recognition V3 Module Control LED sample”);
pinMode(led, OUTPUT);
if(myVR.clear() == 0){
Serial.println(“Recognizer cleared.”);
}else{
Serial.println(“Not find VoiceRecognitionModule.”);
Serial.println(“Please check connection and restart Arduino.”);
while(1);
}
if(myVR.load((uint8_t)onRecord) 》= 0){
Serial.println(“onRecord loaded”);
}
if(myVR.load((uint8_t)offRecord) 》= 0){
Serial.println(“offRecord loaded”);
}
}
void loop()
{
int ret;
ret = myVR.recognize(buf, 50);
if(ret》0){
switch(buf[1]){
case onRecord:
/** turn on LED */
digitalWrite(led, HIGH);
break;
case offRecord:
/** turn off LED*/
digitalWrite(led, LOW);
break;
default:
Serial.println(“Record function undefined”);
break;
}
/** voice recognized */
printVR(buf);
}
}
第5步:激光切割
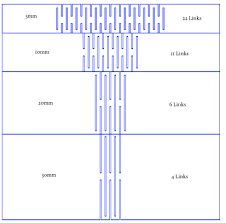
设备设计非常简单,但这是我第一次使用木材使用激光切割机的弯曲技术。
这是最常见的格子铰链和最可靠的。格子铰链依靠材料的扭转来弯曲,在这张照片中很容易看到。弯曲的半径取决于切口的长度,它们之间的距离和材料的厚度。
第6步:设备组装
最后设备可以使用了。
-
【原创】Meterial Design 交互设计2016-07-26 3468
-
物联网卡与智能音响具体实现了哪些功能?-中亿物联网2018-06-01 3900
-
交互设计自检清单的设计原则2019-06-17 1403
-
对语音交互技术感兴趣的童鞋戳进来!2020-03-11 5621
-
物联网卡,设备联网的好方法2020-09-07 2597
-
Nuvoton ISD9160带语音功能的物联网开发板方案资料2020-10-10 4073
-
飞睿科技代理乐鑫WiFi芯片模组,物联网无线终端应用,WiFi模块智能发展2021-08-20 1689
-
【IoT毕设】机智云物联网平台+STM32F103+语音交互空调遥控器2022-10-27 21164
-
如何使用Alexa语音服务集成在受约束的物联网设备上设置语音命令2023-08-02 749
-
人机交互设备及其接口2009-03-10 784
-
交互设备2011-04-20 793
-
扎克伯格曝光Oculus 最新VR交互设备:手套2017-02-10 1326
-
语音交互设备中的ASR和TTS技术2022-06-16 5202
-
物联网系统中音频方案的“大脑”_语音芯片2024-09-26 1448
-
从‘指令接收器’到‘语音伙伴’:Aircall让物联网设备实时通话能力落地!2025-07-06 704
全部0条评论

快来发表一下你的评论吧 !
