

如何制作张力秤
电子说
描述
步骤1:安装称重传感器

首先,我们要安装称重传感器。您的坐骑将是唯一的,但是这里是您需要遵循的准则:
1。钢制称重传感器是一块板,中间装有应变片。称重传感器通过感应称重传感器弯曲多少来测量力。
2。支架通过称重传感器梁两端的孔连接。托架的形状使拉力施加在测力传感器梁的中心。由于其形状和固定位置,拉动托架时称重传感器梁会弯曲。
3。将括号钩到要测量的内容上。为此,最好使用可以自由移动的东西(例如链,钩,结实的绳子或扎带)。您希望称重传感器和托架组件能够使其自身在称重方向上居中,以便测量准确。
步骤2:为称重传感器和HX711接线
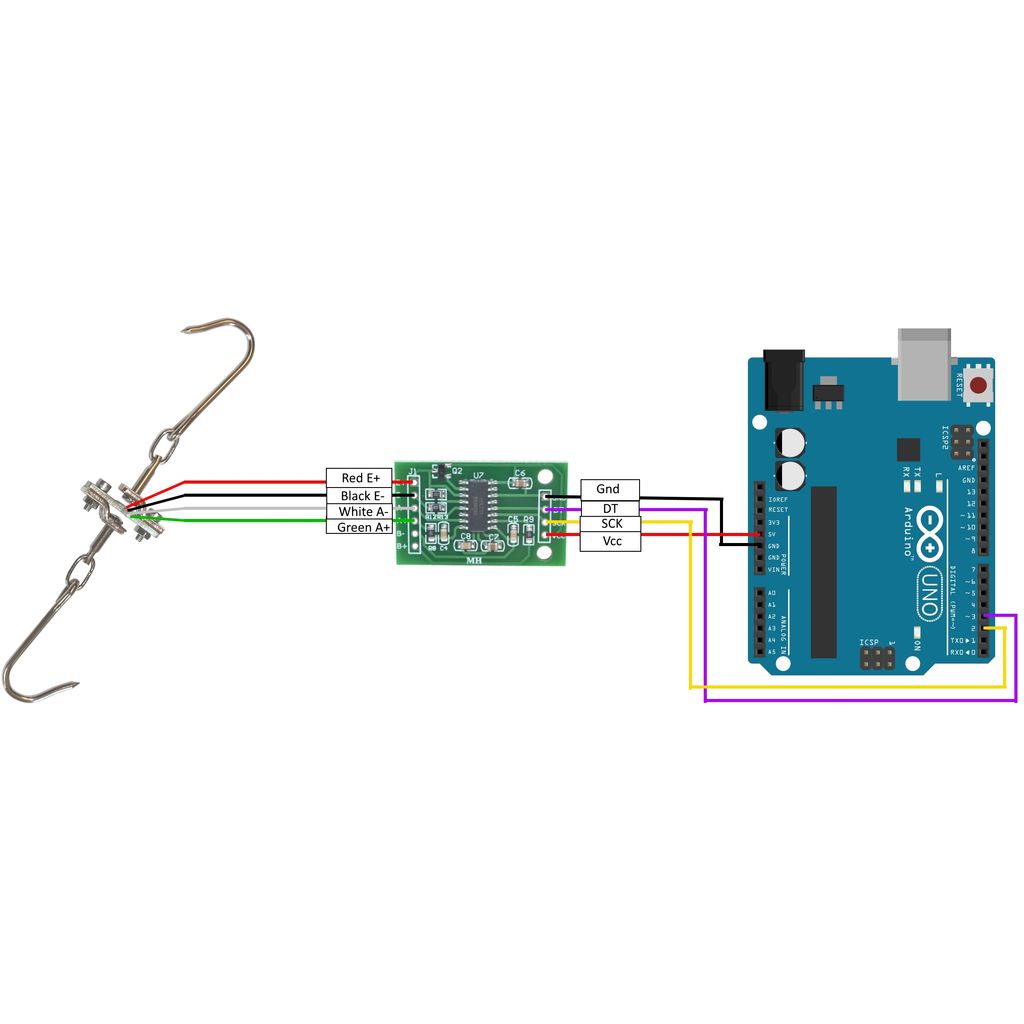
请参阅接线图,以了解如何连接称重传感器,HX711和Arduino。
在所示的行李箱式称重传感器上,有多个应变仪已经连接到惠斯通电桥。您所需要做的就是以正确的方向将导线连接到HX711板上。
步骤3:将HX711库添加到Arduino IDE
HX711库位于此处:https://github.com/bogde/HX711
有关如何将库添加到Arduino IDE的说明,请参见Arduino网站上的此链接:https://www。 arduino.cc/zh-CN/Guide/Libraries
步骤4:校准并称重!
Sparkfun有出色的Arduino程序可以运行规模。最新版本可以在GitHub上找到,并在下面转载:https://github.com/sparkfun/HX711-Load-Cell-Amplifier
第一步是确定秤的校准因子。为此,请运行以下代码
/*
Example using the SparkFun HX711 breakout board with a scale
By: Nathan Seidle
SparkFun Electronics
Date: November 19th, 2014
License: This code is public domain but you buy me a beer if you use this and we meet someday (Beerware license)。
This is the calibration sketch. Use it to determine the calibration_factor that the main example uses. It also
outputs the zero_factor useful for projects that have a permanent mass on the scale in between power cycles.
Setup your scale and start the sketch WITHOUT a weight on the scale
Once readings are displayed place the weight on the scale
Press +/- or a/z to adjust the calibration_factor until the output readings match the known weight
Use this calibration_factor on the example sketch
This example assumes pounds (lbs)。 If you prefer kilograms, change the Serial.print(“ lbs”); line to kg. The
calibration factor will be significantly different but it will be linearly related to lbs (1 lbs = 0.453592 kg)。
Your calibration factor may be very positive or very negative. It all depends on the setup of your scale system
and the direction the sensors deflect from zero state
This example code uses bogde‘s excellent library:“https://github.com/bogde/HX711”
bogde’s library is released under a GNU GENERAL PUBLIC LICENSE
Arduino pin 2 -》 HX711 CLK
3 -》 DOUT
5V -》 VCC
GND -》 GND
Most any pin on the Arduino Uno will be compatible with DOUT/CLK.
The HX711 board can be powered from 2.7V to 5V so the Arduino 5V power should be fine.
*/
#include “HX711.h”
#define DOUT 3
#define CLK 2
HX711 scale;
float calibration_factor = -7050; //-7050 worked for my 440lb max scale setup
void setup() {
Serial.begin(9600);
Serial.println(“HX711 calibration sketch”);
Serial.println(“Remove all weight from scale”);
Serial.println(“After readings begin, place known weight on scale”);
Serial.println(“Press + or a to increase calibration factor”);
Serial.println(“Press - or z to decrease calibration factor”);
scale.begin(DOUT, CLK);
scale.set_scale();
scale.tare(); //Reset the scale to 0
long zero_factor = scale.read_average(); //Get a baseline reading
Serial.print(“Zero factor: ”); //This can be used to remove the need to tare the scale. Useful in permanent scale projects.
Serial.println(zero_factor);
}
void loop() {
scale.set_scale(calibration_factor); //Adjust to this calibration factor
Serial.print(“Reading: ”);
Serial.print(scale.get_units(), 1);
Serial.print(“ lbs”); //Change this to kg and re-adjust the calibration factor if you follow SI units like a sane person
Serial.print(“ calibration_factor: ”);
Serial.print(calibration_factor);
Serial.println();
if(Serial.available())
{
char temp = Serial.read();
if(temp == ‘+’ || temp == ‘a’)
calibration_factor += 10;
else if(temp == ‘-’ || temp == ‘z’)
calibration_factor -= 10;
}
}
在校准秤后,您可以运行以下示例程序,然后将其用于自己的目的:
/*
Example using the SparkFun HX711 breakout board with a scale
By: Nathan Seidle
SparkFun Electronics
Date: November 19th, 2014
License: This code is public domain but you buy me a beer if you use this and we meet someday (Beerware license)。
This example demonstrates basic scale output. See the calibration sketch to get the calibration_factor for your
specific load cell setup.
This example code uses bogde‘s excellent library: “https://github.com/bogde/HX711”
bogde’s library is released under a GNU GENERAL PUBLIC LICENSE
The HX711 does one thing well: read load cells. The breakout board is compatible with any wheat-stone bridge
based load cell which should allow a user to measure everything from a few grams to tens of tons.
Arduino pin 2 -》 HX711 CLK
3 -》 DAT
5V -》 VCC
GND -》 GND
The HX711 board can be powered from 2.7V to 5V so the Arduino 5V power should be fine.
*/
#include “HX711.h”
#define calibration_factor -7050.0 //This value is obtained using the SparkFun_HX711_Calibration sketch
#define DOUT 3
#define CLK 2
HX711 scale;
void setup() {
Serial.begin(9600);
Serial.println(“HX711 scale demo”);
scale.begin(DOUT, CLK);
scale.set_scale(calibration_factor); //This value is obtained by using the SparkFun_HX711_Calibration sketch
scale.tare(); //Assuming there is no weight on the scale at start up, reset the scale to 0
Serial.println(“Readings:”);
}
void loop() {
Serial.print(“Reading: ”);
Serial.print(scale.get_units(), 1); //scale.get_units() returns a float
Serial.print(“ lbs”); //You can change this to kg but you‘ll need to refactor the calibration_factor
Serial.println();
}
责任编辑:wv
-
绳子张力测量2013-02-27 2126
-
数字式电子秤传感器的设计与制作2019-09-12 2040
-
表面张力仪的原理是什么?2020-04-02 1685
-
张力传感器的测量原理2008-01-07 4233
-
拉压式传感器制作的电子秤电路图2009-07-29 3196
-
电子秤设计与制作解析2018-06-26 1992
-
如何制作一个简易的磁力秤?2018-08-03 7137
-
使用51单片机制作的电子秤电路原理图和PCB资料免费下载2020-06-10 2804
-
手工制作高精度电子秤(非常详细)2022-01-13 2223
-
电子秤的设计与制作2022-07-14 1602
-
什么是张力 原理是什么2023-08-01 9461
-
什么是张力变频器?张力变频器的优点有哪些?2024-07-31 3406
全部0条评论

快来发表一下你的评论吧 !
