

如何通过使用加热器和风扇调节任何温室的湿度和温度
电子说
描述
步骤1:设置字符LCD
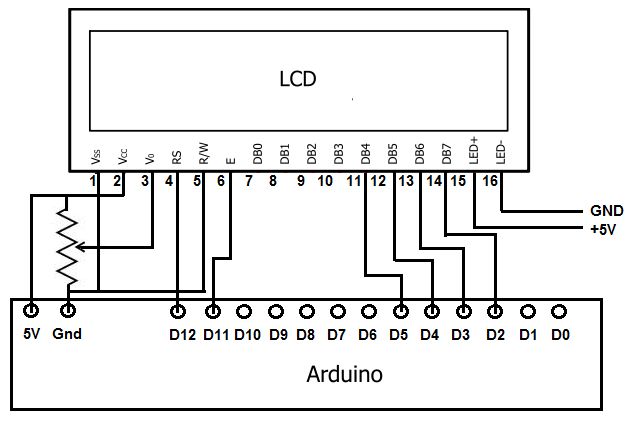
这是该项目接线中最棘手的部分。上图显示了LCD的每个连接如何连接到Arduino。使用正/负面包板导轨进行设置要容易得多,但是我没有一个可用的导轨。在我的设置中,我在引脚3和引脚1之间使用了电位计,因为它可以轻松调节背光。但是,这不是必需的,一个10K电阻将代替它工作。
步骤2:连接湿度和温度传感器
设置两个非常简单为此使用了单独的传感器,但是我使用了一个同时读取湿度和温度的传感器。 DHT传感器价格便宜,能够读取温度和湿度。它们有四个引脚,其连接方式如下:
VCC(3V-5V电源)
数据输出
无连接
接地
在VCC和数据线之间也连接一个10K电阻。上方显示一个图。
要使用DHT传感器,您需要下载DHT库。这是Adafruit的一款。为了使用它,请下载DHT.cpp和DHT.h文件,并将它们放在arduino“ libraries”文件夹中的“ DHT”文件夹中。
以下是adafruit的DHT传感器示例代码:
// Example testing sketch for various DHT humidity/temperature sensors
// Written by ladyada, public domain
#include “DHT.h”
#define DHTPIN 2 // what pin we‘re connected to
// Uncomment whatever type you’re using!
//#define DHTTYPE DHT11 // DHT 11
#define DHTTYPE DHT22 // DHT 22 (AM2302)
//#define DHTTYPE DHT21 // DHT 21 (AM2301)
// Connect pin 1 (on the left) of the sensor to +5V
// NOTE: If using a board with 3.3V logic like an Arduino Due connect pin 1
// to 3.3V instead of 5V!
// Connect pin 2 of the sensor to whatever your DHTPIN is
// Connect pin 4 (on the right) of the sensor to GROUND
// Connect a 10K resistor from pin 2 (data) to pin 1 (power) of the sensor
// Initialize DHT sensor for normal 16mhz Arduino
DHT dht(DHTPIN, DHTTYPE);
// NOTE: For working with a faster chip, like an Arduino Due or Teensy, you
// might need to increase the threshold for cycle counts considered a 1 or 0.
// You can do this by passing a 3rd parameter for this threshold. It‘s a bit
// of fiddling to find the right value, but in general the faster the CPU the
// higher the value. The default for a 16mhz AVR is a value of 6. For an
// Arduino Due that runs at 84mhz a value of 30 works.
// Example to initialize DHT sensor for Arduino Due:
//DHT dht(DHTPIN, DHTTYPE, 30);
void setup() {
Serial.begin(9600);
Serial.println(“DHTxx test!”);
dht.begin();
}
void loop() {
// Wait a few seconds between measurements.
delay(2000);
// Reading temperature or humidity takes about 250 milliseconds!
// Sensor readings may also be up to 2 seconds ’old‘ (its a very slow sensor)
float h = dht.readHumidity();
// Read temperature as Celsius
float t = dht.readTemperature();
// Read temperature as Fahrenheit
float f = dht.readTemperature(true);
// Check if any reads failed and exit early (to try again)。
if (isnan(h) || isnan(t) || isnan(f)) {
Serial.println(“Failed to read from DHT sensor!”);
return;
}
// Compute heat index
// Must send in temp in Fahrenheit!
float hi = dht.computeHeatIndex(f, h);
Serial.print(“Humidity: ”);
Serial.print(h);
Serial.print(“ % ”);
Serial.print(“Temperature: ”);
Serial.print(t);
Serial.print(“ *C ”);
Serial.print(f);
Serial.print(“ *F ”);
Serial.print(“Heat index: ”);
Serial.print(hi);
Serial.println(“ *F”);
}
步骤3:测试字符LCD和DHT传感器
上面是对Character LCD和DHT22传感器的测试设置的详细了解。加载到其上的代码会定期显示传感器的湿度和温度读数。我将尽快上传代码。
责任编辑:wv
-
陶瓷ptc加热器的优缺点有哪些2024-09-20 11256
-
电磁加热器开始生产后温度下降的原因及解决办法2023-12-19 1772
-
采用双向可控硅开关的冰箱加热器设计2022-05-28 4190
-
智能温湿度控制器的操作步骤及注意事项2021-06-15 11494
-
加热器短线报警器原理、分类和选型2021-03-10 2188
-
恒温加热器的工作原理_恒温加热器保养2019-07-22 21211
-
加热器种类2018-12-12 24331
-
蒸汽消声加热器的选型2018-11-26 3500
-
PTC加热器原理及功能2018-03-04 246798
-
加热器2017-03-16 6550
-
智能毛巾加热器2014-04-12 4839
-
PTC热敏电阻与PTC加热器的区别2013-09-29 4962
-
浸没式汽水混合加热器2010-10-27 883
-
HGL 046紧凑型风扇加热器2009-11-27 679
全部0条评论

快来发表一下你的评论吧 !
