
LED矩阵编辑器的制作
电子说
描述
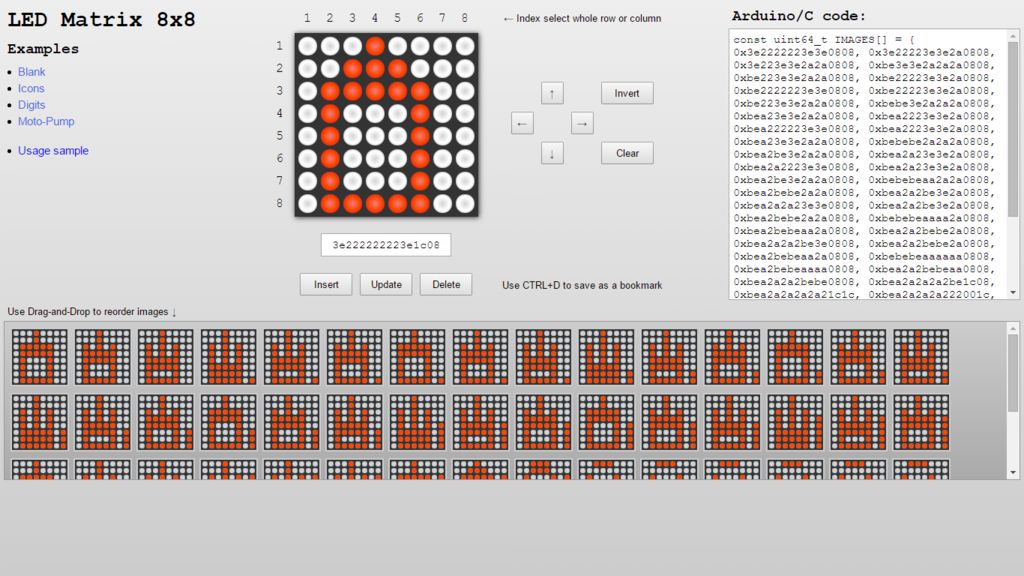
步骤1:LED矩阵编辑器

LED矩阵编辑器-用于对矩阵进行动画处理的在线工具。
它看起来非常简单,但是它具有一些方便的功能:
在线,免费,安全。不需要其他软件。
使用鼠标切换LED
通过单击相应矩阵的索引来切换整行或整列
将矩阵上移,下移,通过单击鼠标左键或右键
反转或清除矩阵
在底部窗格中收集矩阵,然后使用拖放操作
更新它们的顺序图像以及插入新图像或删除现有图像
将图像另存为Arduino的C代码
使用浏览历史记录并将图像另存为链接或书签,这样您就不会丢失自己的作品
步骤2:LED矩阵Arduino代码
制作动画,然后将生成的代码放入Arduino项目:
如此处:
#include
const int DIN_PIN = 7;
const int CS_PIN = 6;
const int CLK_PIN = 5;
const uint64_t IMAGES[] = {
0x3e2222223e3e0808, 0x3e22223e3e2a0808, 0x3e223e3e2a2a0808, 0xbe3e3e2a2a2a0808,
0xbe223e3e2a2a0808, 0xbe22223e3e2a0808, 0xbe2222223e3e0808, 0xbe22223e3e2a0808,
0xbe223e3e2a2a0808, 0xbebe3e2a2a2a0808, 0xbea23e3e2a2a0808, 0xbea2223e3e2a0808,
0xbea222223e3e0808, 0xbea2223e3e2a0808, 0xbea23e3e2a2a0808, 0xbebebe2a2a2a0808,
0xbea2be3e2a2a0808, 0xbea2a23e3e2a0808, 0xbea2a2223e3e0808, 0xbea2a23e3e2a0808,
0xbea2be3e2a2a0808, 0xbebebeaa2a2a0808, 0xbea2bebe2a2a0808, 0xbea2a2be3e2a0808,
0xbea2a2a23e3e0808, 0xbea2a2be3e2a0808, 0xbea2bebe2a2a0808, 0xbebebeaaaa2a0808,
0xbea2bebeaa2a0808, 0xbea2a2bebe2a0808, 0xbea2a2a2be3e0808, 0xbea2a2bebe2a0808,
0xbea2bebeaa2a0808, 0xbebebeaaaaaa0808, 0xbea2bebeaaaa0808, 0xbea2a2bebeaa0808,
0xbea2a2a2bebe0808, 0xbea2a2a2a2be1c08, 0xbea2a2a2a2a21c1c, 0xbea2a2a2a222001c,
0xbea2a2a22222001c, 0xbea2a2222222001c, 0xbea222222222001c, 0xbe2222222222001c,
0x3e2222222222001c, 0x3e2222222222001c, 0x3e22222222221c1c, 0x3e222222223e1c08
};
const int IMAGES_LEN = sizeof(IMAGES) / sizeof(uint64_t);
LedControl display = LedControl(DIN_PIN, CLK_PIN, CS_PIN);
void setup() {
display.clearDisplay(0);
display.shutdown(0, false);
display.setIntensity(0, 10);
}
void displayImage(uint64_t image) {
for (int i = 0; i 《 8; i++) {
byte row = (image 》》 i * 8) & 0xFF;
for (int j = 0; j 《 8; j++) {
display.setLed(0, i, j, bitRead(row, j));
}
}
}
int i = 0;
void loop() {
displayImage(IMAGES[i]);
if (++i 》= IMAGES_LEN ) {
i = 0;
}
delay(100);
}
步骤3:LED矩阵动画
然后连接Arduino和Matrix,上传代码并玩得开心
责任编辑:wv
-
vim编辑器:4.1 vim编辑器介绍及打开文件 #硬声创作季充八万 2023-07-12
-
十六进制编辑器2009-11-10 1437
-
文本编辑器的实现2010-11-11 534
-
CAM350 NC 编辑器编辑菜单(Edit)2007-01-25 4040
-
代码编辑器UE2016-12-19 956
-
迅捷pdf编辑器2017-11-06 867
-
PADS的元件编辑器的使用方法2020-05-27 9222
-
开源编辑器的多个功能2020-06-04 1994
-
原理图编辑器基础2021-04-16 818
-
Vim编辑器的使用学习和使用技巧2022-06-23 2248
-
PDF文档编辑器下载2023-03-17 404
-
UltraEdit十六进制编辑器2023-05-28 2759
-
Java电子病历编辑器源码,B/S电子病历编辑器源码2023-06-01 1043
-
Ultraedit数据库编辑器和文本编辑器的区别2023-08-17 503
-
vim编辑器如何使用2024-08-30 487
全部0条评论

快来发表一下你的评论吧 !

