
如何使用中断将消息写入LCD屏幕
电子说
描述
步骤1:连接LCD屏幕

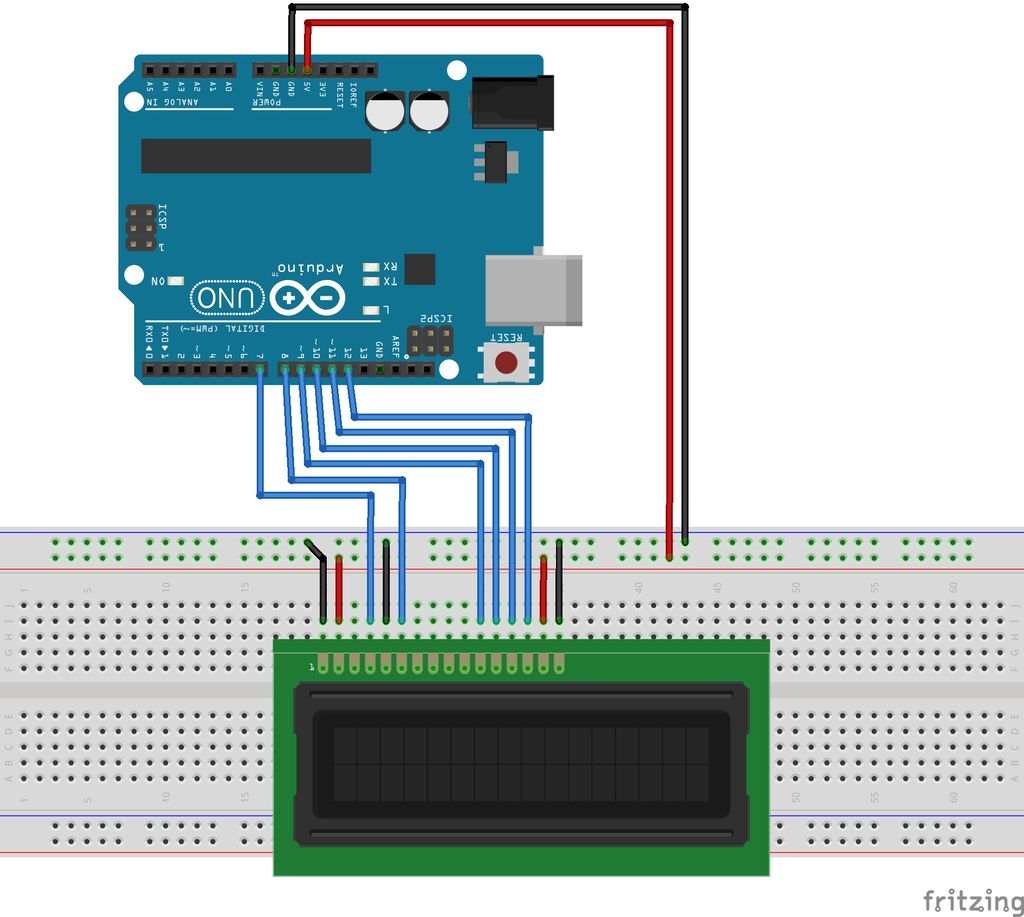
首先,我们将连接LCD显示。
LCD屏幕使用Arduino上的6个引脚板。首先,将LCD显示屏的两个外部引脚以及引脚5都接地。接下来,将引脚2和倒数第二个引脚连接到5V。
下一步,使用以下映射连接这些引脚:
LCD 4 =》 Arduino 7
LCD 6 =》 Arduino 8
LCD 11 =》 Arduino 9
LCD 12 =》 Arduino 10
LCD 13 =》 Arduino 11
LCD 14 =》 Arduino 12
就是LCD显示器了!
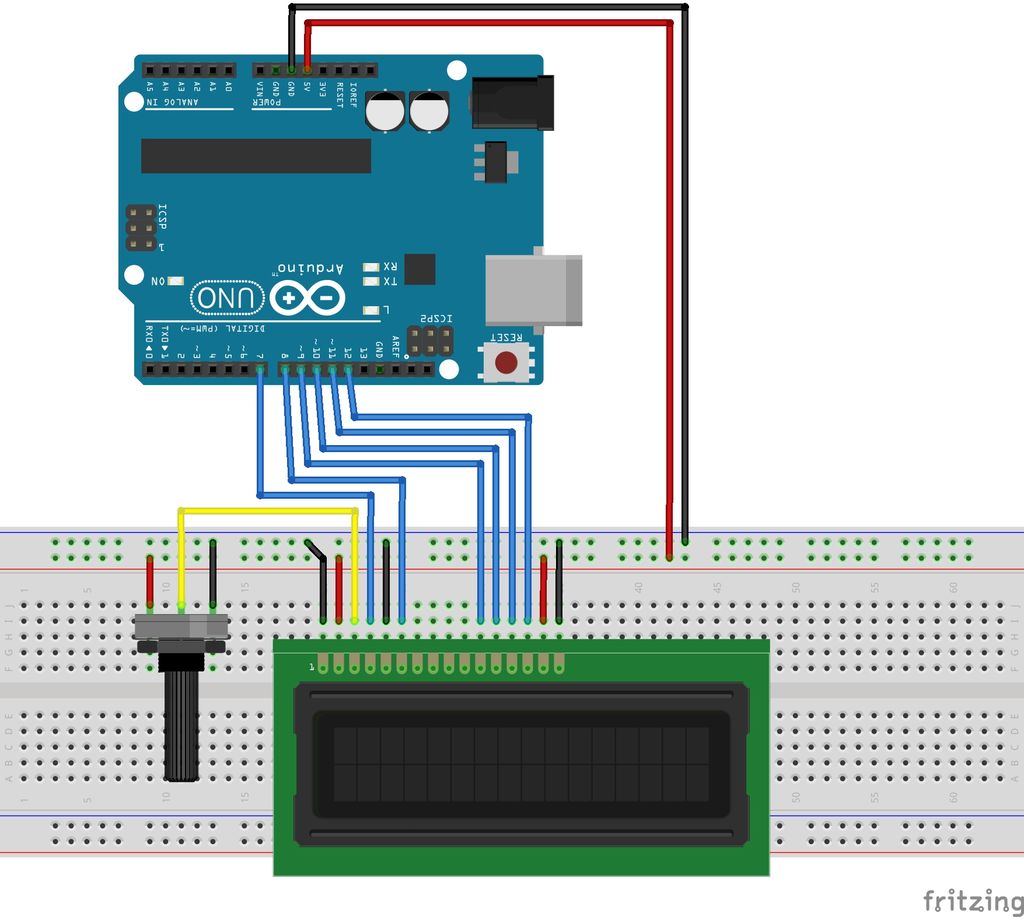
步骤2:连接电位计

下一步使用基本电位器。电位器的中间引脚连接到LCD显示屏上的引脚3。电位器的左侧引脚为5V,而右侧引脚接地。
在此之后,又有一块硬件,然后我们继续进行代码操作。
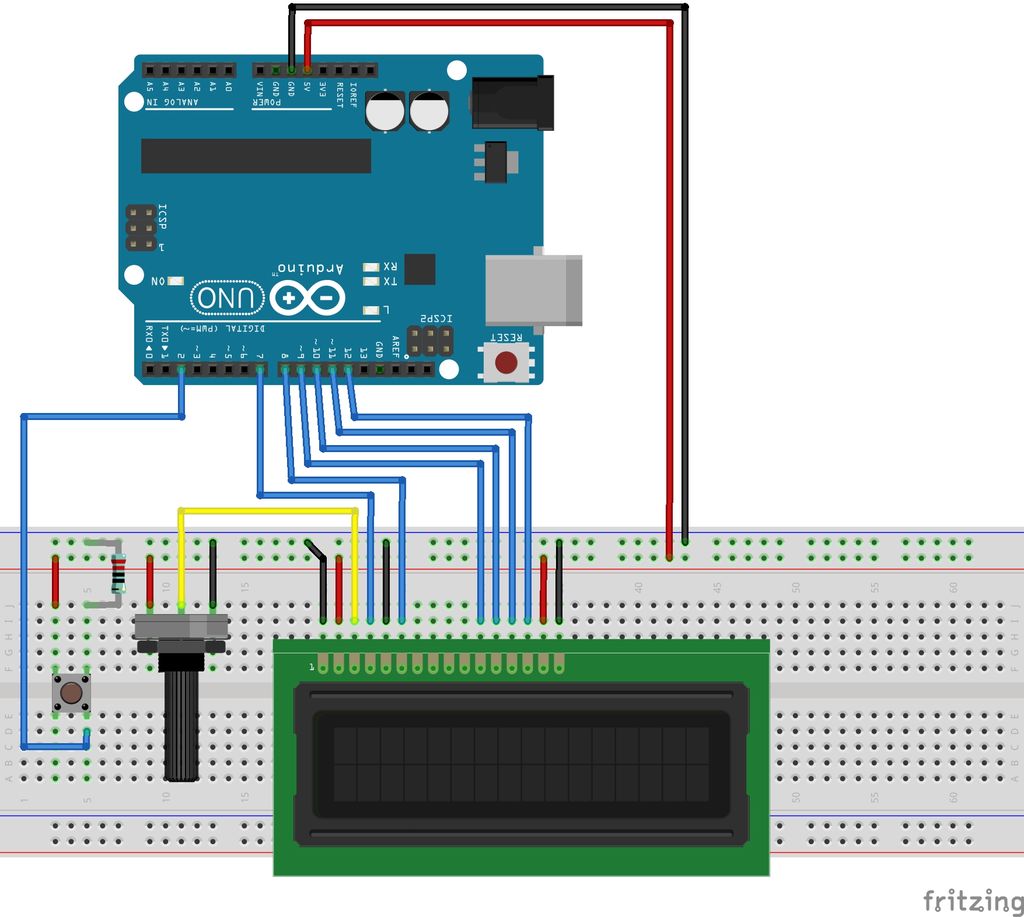
第3步:添加按钮

现在已经连接了带有电位计的LCD显示屏,我们需要一个按钮来引起硬件中断。将Arduino上的引脚2连接到按钮的一侧,使另一侧的电路继续接地。在与地面相同的一侧,将另一个引脚连接到5V。
这完成了硬件设置。
步骤4:实现代码
我已经上载了用于该项目的代码,因此您可以根据需要为您的电路板或您要执行的操作对其进行修改。
关于在Arduino Uno上实现硬件中断的注意事项是您必须使用引脚2或3,因为这是唯一可用于中断的引脚。除此之外,如果需要,可以更改其他大多数引脚。
另一个警告是,为了使这种类型的设置正常工作,您需要使用millis()方法来实现延迟,因为它在后台工作,所以不同于delay()方法,该方法暂停CPU并实际上使用CPU周期,即使它看起来处于静止状态也是如此。 millis()使用Arduino的内置硬件计时器之一完成工作,因此它在后台运行,并且在主循环期间不会停止CPU。
下面是代码:
#include
// initialize the library with the numbers of the interface pins
LiquidCrystal lcd(7, 8, 9, 10, 11, 12);
const int buttonPin = 2; // Button pin
volatile bool buttonPressed = false; // Gauge if the button is pressed
int wait = 500; // ms to wait between messages
int messageWait = 3000; // ms to display an interrupt message
unsigned long current = 0; // Holds current timestamp
void setup()
{
Serial.begin(9600); // For debugging, remove if you want
pinMode( buttonPin, INPUT_PULLUP ); // Setup for hardware interrupt
// [interrupt, method used, when to call]
attachInterrupt( digitalPinToInterrupt( buttonPin ), showMessage, RISING );
lcd.begin(16, 2); // set up the LCD‘s number of columns and rows:
lcd.print(“Timer:”); // Print on the top line
current = millis(); // Set up the current time
} // setup
void loop()
{
if( buttonPressed )
{
delay( 3000 ); // Put this in the main loop to stop
// the message from being erased
buttonPressed = false; // After the delay, continue the loop
lcd.setCursor(0, 1); // Set the cursor to char 0 on line 1
lcd.print( “ ” ); // Clear the display
}
else if( millis() 》 current + wait )
{
// set the cursor to column 0, line 1
// (note: line 1 is the second row, since counting begins with 0):
lcd.setCursor(0, 1); // Set the cursor to char 0 on line 1
lcd.print( (String) ( millis() / (float) 1000 ) ); // Output sec passed
current = millis(); // Set current time
} // if.。.else if
} // loop
void showMessage()
{
String message = “Intrpt: ” + (String) millis();
lcd.setCursor(0, 1); // Set the cursor to char 0 on line 1
lcd.print( “Intrpt: ” + (String) ( millis() / (float) 1000 ) ); // Output interrupt
buttonPressed = true; // Indicate button was pressed.
// Handle the button press in
// the main loop.
Serial.println(“=================================”); // debug
Serial.println( message ); // debug
} // showMessage
现在您可以使用中断了,做点很酷的事情!
-
GPIOB模拟spi的方法及lcd屏幕的接入2025-10-30 127
-
请问如何实现单片机从串口接收图像数据,并在LCD屏幕上显示2019-01-14 11070
-
发生中断时LCD将停止计数2020-04-20 1468
-
请问pwm-backlight能否将lcd屏幕初始化为黑屏?2022-01-10 1549
-
苹果不全面靠拢OLED屏幕,将推出TFT-LCD廉价版iPhone X2017-11-25 1468
-
苹果将推出搭载LCD屏幕的全新iPhone机型2018-07-12 1846
-
olcd屏幕和lcd屏幕区别是什么2020-03-08 19805
-
Redmi已经成功地在LCD屏幕上实现了屏幕指纹2020-03-14 1142
-
手机的OLED屏幕和LCD屏幕有什么不同?2020-07-13 6682
-
lcd屏幕会烧屏吗_lcd屏幕伤眼睛吗2021-01-08 60657
-
LCD屏幕和AMOLED屏幕哪个使用寿命更长更护眼2021-08-03 49155
-
将LCD屏幕连接到Arduino mega的最简单方法2022-10-19 1110
-
如何将柔性传感器与树莓派连接并在LCD屏幕上显示其值2022-12-31 5103
-
告别LCD,新款iPhone SE将搭载OLED屏幕2024-02-21 4589
-
tft屏幕属于lcd屏幕的一种吗2024-10-12 6141
全部0条评论

快来发表一下你的评论吧 !

