
如何使用Arduino在智能手机上编写文本并通过蓝牙在LCD上打印文本
电子说
描述
步骤1:所需的硬件
对于该项目,您将需要:
-一个Arduino UNO
-一个LCD(液晶显示器)
-一个面包板
-一个10K电位器
-一个BT模块(我使用HC-05)
-跳线
-一个蓝牙应用程序。对于Android用户,我建议使用BlueTerm。对不起,iOS用户,BlueTerm仅适用于Android 。..但是您仍然可以下载等效的应用程序。
不需要任何工具
2:构建电路

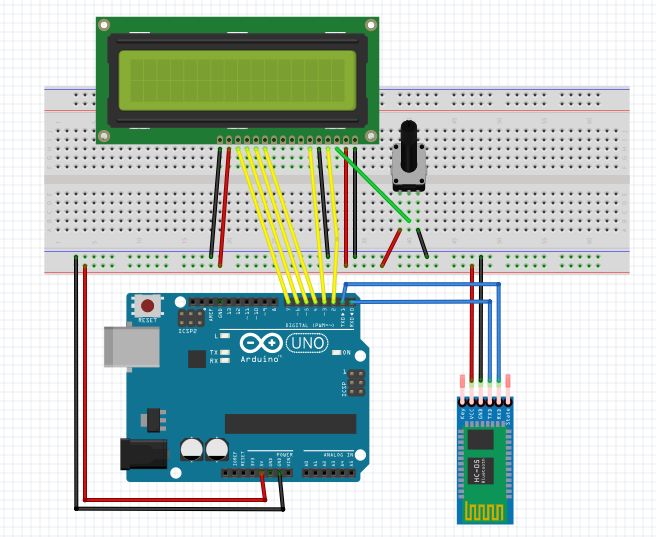
上面的图像对应于以下准则:
首先,将LCD固定在面包板上,并通过以下方式为面包板供电将Arduino的“ 5V”(电源)线连接到面包板上的正极行,另一根从“ GND”线(接地或0V)连接到负极行。
然后将LCD连接到Arduino:
LCD引脚4-Arduino引脚2
引脚6-引脚3
引脚11-引脚4
引脚12-引脚5
引脚13-引脚6
引脚14-引脚7
之后,为LCD供电:
LCD引脚1 =面包板上的GND
Pin 2 = 5V
Pin 5 = GND
Pin 15 = 5V
Pin 16 = GND
然后将LCD上的引脚3连接到10K电位器的中心引脚,并用GND上的一个引脚和面包板上5V上的另一个引脚为电位器供电。
然后将蓝牙模块上的Tx(发送)引脚连接到Arduino上的Rx(接收),并将BT模块上的Rx引脚连接到Arduino上的Tx。
最后,给BT供电通过将VCC(或5V)连接到面包板上的正极行并将GND连接到面包板上的负极端。
步骤3:代码
现在让我们编写代码:
#include //Include the library that enables you to use the LCD
LiquidCrystal lcd(2,3,4,5,6,7);//Declare that your LCD is connected to pins 2,3,4,5,6 & 7 on your Arduino
void setup() {
lcd.begin(16,2);//16 by 2 are the dimensions of the LCD (in number of characters)
Serial.begin(9600);//launch the process of receiving serial data (via bluetooth) at 9600 bits/s
}
void loop() {
if(Serial.available()){
lcd.write(Serial.read());//these two lines mean that if there is data coming from the BT module, the Arduino prints it on the LCD.
}
}
//Before uploading the code to the Arduino, disconnect the Tx and Rx pins, otherwise you won‘t be able to upload. Once the code uploaded, reconnect them.
现在打开BlueTerm,打开蓝牙并连接HC-05。然后只需输入您的文本,它就应该在LCD上打印!
-
在适用Arduino的Adafruit NeoPixel Shield上显示文本2023-06-09 1046
-
如何用智能手机模拟15693标签的源代码?2022-12-28 966
-
带远程arduino的蓝牙智能手机控制2022-12-06 801
-
插入蓝牙模块并通过我们的安卓智能手机进行通信2022-11-25 676
-
LCD显示屏上的程序文本打印2022-11-10 580
-
用8051通过HC-05蓝牙模块与智能手机通信控制门锁2022-09-14 1846
-
谷歌开发了高性能AI 可以在低端智能手机上运行2020-03-02 654
-
如何设计智能手机省电系统?2019-11-05 2636
-
如何通过BLE发送一个变量存储在一个智能手机上?2019-10-25 1718
-
自动对焦在智能手机的应用2019-07-16 3964
-
你怎么定义智能手机壳,觉得高科技+手机壳=智能手机壳吗?!2018-01-05 5756
-
智能手机或许在10年内被智能穿戴设备所取代?2016-09-08 3743
-
什么?智能手机都能用于3D打印了?2015-12-28 7264
-
OCR在智能手机中的应用2015-01-16 4293
全部0条评论

快来发表一下你的评论吧 !

