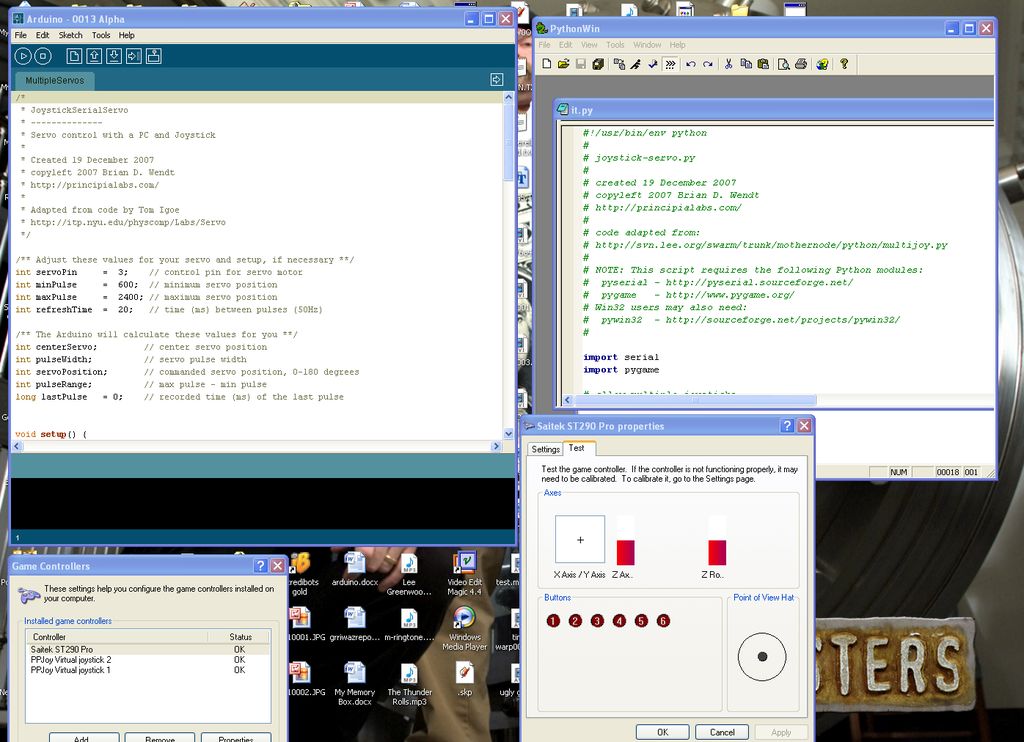

如何使用操纵杆控制Arduino
电子说
描述
步骤1:需要的事情
1.arduino(duh )结果2。计算机(如果您正在阅读此书,除非您不是 _ ,否则您将拥有一个计算机)
3.usb端口(大多数计算机都具有这些端口)
4.time(花了我5个小时来计算)
5.servo
6.JOYSTIK
第2步:您需要的软件

arduino编程器
python
pyserial(用于python的插件)
pygame(用于python的插件)
操纵杆驱动程序
步骤3:程序

我已经添加了您需要的程序
arduino:
/*
JoystickSerialServo
--------------
使用PC和操纵杆的伺服控制
*
创建于2007年12月19日
copyleft 2007年,Brian D. Wendt
http://principialabs.com/
*
通过Tom Igoe
http://itp.nyu.edu/physcomp/Labs/Servo
*/
/**为伺服和设置调整这些值,如果必需**/
int当地伺服Pin = 3;//伺服电机的控制销
int minPulse = 600;//最小伺服位置(要使用google)
int maxPulse = 2400;//最大伺服位置(要使用google)
int refreshTime = 20;//脉冲之间的时间(ms)(50Hz)
/** Arduino将为您计算这些值**/
int centerServo;//中心伺服位置
int pulseWidth;//伺服脉冲宽度
int舵机位置;//指令的伺服位置,0-180度
int pulseRange;//最大脉冲-最小脉冲
long lastPulse = 0;//记录的最后一个脉冲的时间(ms)
void setup(){ pinMode(servoPin,OUTPUT);//将伺服引脚设置为输出引脚
pulseRange = maxPulse-minPulse;
centerServo = maxPulse-((pulseRange)/2);
pulseWidth = centerServo;//给伺服器一个起点(或者它浮动)
Serial.begin(9600);
}
void loop(){
//等待串行输入
if(Serial .available()》 0){
//读取传入的字节:
servoPosition = Serial.read();
//从伺服位置计算PulseWidth
pulseWidth = minPulse +(servoPosition *(pulseRange/180));
//在min和max处停止伺服脉冲,如果(pulseWidth》 maxPulse){pulseWidth = maxPulse; }
if(pulseWidth //debug
//Serial.println(servoPosition);
}
//每20毫秒(当前时间)使用当前pulseWidth
//脉冲伺服,这将保持伺服的如果未更改,则将其置于位置;如果更改,则将其置于位置。
if(millis()-lastPulse》 = refreshTime){//启动脉冲
delayMicroseconds(pulseWidth);//脉冲宽度
digitalWrite(servoPin,LOW);//停止脉冲
lastPulse = millis();//保存最后一个脉冲的时间
}
}
python:
#!/usr/bin/env python
#
#joystick-servo.py
#
#创建于2007年12月19日#copyleft 2007 Brian D.Wendt
#http://principialabs.com/
#
#代码改编自:#http://svn.lee.org/swarm/trunk/mothernode/python/multijoy.py
#
#注意:此脚本需要以下Python模块:
#pyserial-http://pyserial.sourceforge。 net/
#pygame-http://www.pygame.org/
#Win32用户可能还需要:
#pywin32-http://sourceforge.net/projects/pywin32/
#
导入序列
导入pygame
#允许多个操纵杆
joy = []
#Arduino USB端口地址(在Win32上尝试“ COM5”)
usbport =“ COM8”
#定义与Arduino的USB串行连接
ser = serial.Serial(usbport,9600)
#处理操纵杆事件
def handleJoyEvent(e):
如果e.type == pygame.JOYAXISMOTION:
axis =“未知” if(e.dict [‘axis’] == 1):
axis =“ X”
if(e.dict [‘axis’] == 0 ):
axis =“ Y”
if(e.dict [‘axis’] == 2):
轴=“油门”
if(e.dict [‘axis’] == 3):
轴=“ Z”
if(轴!=“未知” ):
str =“轴:%s;值:%f“%(轴,e.dict [‘value’])
#取消注释调试
#output(str,e.dict [‘joy’])
#Arduino游戏杆伺服hack
if(axis ==“ X”):
pos = e.dict [‘value’]
#将操纵杆位置转换为伺服增量,0-180
move = round(pos * 90,0)
if(move 《0):
servo = int(90-abs(move))
else:
servo = int(move + 90)##转换位置到ASCII字符
servoPosition = chr(servo)
#并通过串行连接发送到Arduino write(servoPosition)
#取消调试调试注释
#print Servo,ServoPosition
elif e.type == pygame.JOYBUTTONDOWN:
str =“ Button:%d”%(e.dict [‘button’])
#不建议调试
#output(str,e.dict [‘joy’])
#按钮0(触发)以退出
if(e.dict [‘button’] == 0):
打印“ Bye! n”
ser。 close()
quit()
else:
pass
#打印操纵杆位置 def输出(线,杆):
打印“操纵杆:%d; %s“%(操纵杆,行)
#等待操纵杆输入
def joystickControl():
而True:
e = pygame.event.wait()
if(e。类型== pygame.JOYAXISMOTION或e.type == pygame.JOYBUTTONDOWN):
handleJoyEvent(e)
#main方法
def main():
#初始化pygame
pygame.joystick .init()
pygame.display.init()
如果不是pygame.joystick.get_count():
打印“ n请连接操纵杆并再次运行。 n”
quit()
打印“检测到 n%d个操纵杆。”%pygame.joystick.get_count()
对于我在范围内(pygame.joystick.get_count()):
myjoy = pygame.joystick。操纵杆(i)
myjoy.init()
joy.append(myjoy)
打印“操纵杆%d:”%(i)+ joy [i] .get_name()
print“压下触发器(按钮0)退出。 n“
#运行游戏杆侦听器循环
joystickControl()
#如果 name =,则可以用作模块或独立脚本
=“ main ”:
main()
步骤4:对其进行测试_
我没有编写python脚本
我在
http://principialabs.com/jo上找到了它ystick-control-of-a-servo/
有趣的是
4伺服版本
http://principialabs.com/joystick-control-of-a-servo/
-
labview操纵杆2016-04-13 3300
-
如何使用Arduino UNO、操纵杆模块和NRF24L01模块控制伺服电机?2021-06-28 1312
-
基于arduino的超级无尾卡丁车操纵杆2022-06-24 941
-
怎样用Arduino和操纵杆控制伺服电机2019-08-01 6436
-
arduino超级无尾卡丁车操纵杆2022-07-05 801
-
使用Arduino Leonardo将操纵杆作为游戏控制器的方式2022-09-01 8342
-
使用模拟操纵杆控制Arduino 4WD智能汽车2022-10-18 730
-
使用Arduino Uno制作操纵杆控制的PC鼠标2022-11-04 937
-
如何使用Arduino和操纵杆控制BLDC电机2022-11-24 659
-
如何使用Arduino创建操纵杆控制器2022-12-06 667
-
Arduino之使用PS2操纵杆控制LED2022-12-22 1166
-
基于Arduino Pro Mini的操纵杆手柄和DIY相机滑块2022-12-27 830
-
Arduino操纵杆到LCD显示屏2023-01-31 515
-
Arduino基于网络的操纵杆2023-02-01 524
-
如何使用操纵杆和Arduino控制伺服电机2023-07-27 2971
全部0条评论

快来发表一下你的评论吧 !

