

fireflyROC-RK3328主板串口调试简介
描述
串口调试
如果正在进行 U-Boot 或内核开发,USB串口适配器(USB 转串口TTL 适配器的简称)对于检查系统启动日志非常有用,特别是在没有图形桌面显示的情况下。
准备 USB 串口适配器
选择 USB 串口适配器
ROC-RK3328-CC 的 UART 调试口默认使用1,500,000波特率和 TTL 电平。
一些串口适配器不能支持如此高的波特率。因此在购买之前,请确保它符合要求并有可用的驱动。参考在线商城上带 CP2104 芯片的 USB 转串口适配器。
连接适配器和调试口
用三根线将 TX/RX/GND 引脚分别连接在一起:

如果在使用某些适配器时串口控制台没有输出,可以尝试将适配器的 TX 引脚连接到开发板的 RX 引脚,适配器的 RX 引脚连接到开发板的 TX 引脚,即交换一下 TX、RX 引脚。
串口参数配置
ROC-RK3328-CC 使用如下配置:
波特率:1,500,000
数据位:8
停止位:1
奇偶检查:无
流控:无
接下来,根据操作系统的不同,为你介绍详细的操作说明。
Windows 下的串口调试
安装驱动
安装卖家推荐的 USB 串口适配器驱动。如果没有,可以检查芯片组并尝试以下驱动
CH340
PL2303
CP210X
提示:如果 PL2303 在 Win8 下无法工作,则可以尝试将驱动程序降级到版本 3.3.5.122 或之前。
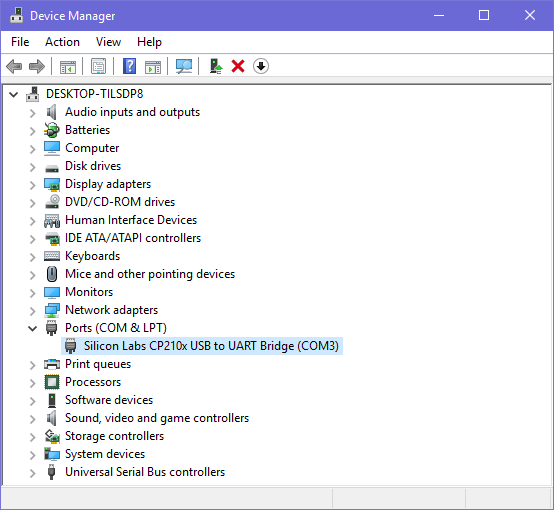
安装驱动后,将适配器连接到主机的 USB 端口。操作系统将提示检测到新硬件。完成后,可以在设备管理器中找到新的COM端口:
安装工具
Windows 中有很多串口终端工具,例如 putty 和 SecureCRT。以下介绍Putty这款流行的开源软件的使用。
Putty 下载地址
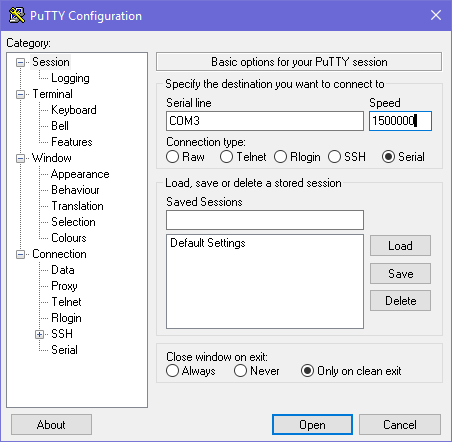
下载 putty.zip,解压并运行 PUTTY.exe:
选择 “Connection type” 为 “Serial”。
将 “Serial line” 修改为在设备管理器中找到的 COM 端口。
设置 “Speed” 为 1500000 。
点击 “Open” 按钮。
Linux 下的串口调试
如果 USB 串口适配器的芯片组受 Linux 内核支持,驱动程序将自动加载。
连接串口适配器,并通过如下命令检查相应的串口设备文件:
$ ls -l /dev/ttyUSB* crw-rw---- 1 root uucp 188, 0 Apr 10 16:44 /dev/ttyUSB0
将你的 Linux 用户添加到 uucp 组中,以便获得访问此设备的权限(否则每次需要在命令前加sudo来运行相应命令):
sudo gpasswd -a $(whoami) uucp
用户组的更改将在注销并重新登录 Linux 后生效,或使用 newgrp 命令进入带有新组的 shell:
newgrp uucp
然后根据偏好,使用自己喜欢的串口控制台工具。以下介绍 picocom 和 minicom 。
picocom
picocom 轻便小巧, 容易使用。
安装 picocom 命令:
sudo apt-get install picocom
启动 picocom:
$ picocom -b 1500000 /dev/ttyUSB0 picocom v3.1 port is : /dev/ttyUSB0 flowcontrol : none baudrate is : 1500000 parity is : none databits are : 8 stopbits are : 1 escape is : C-a local echo is : no noinit is : no noreset is : no hangup is : no nolock is : no send_cmd is : sz -vv receive_cmd is : rz -vv -E imap is : omap is : emap is : crcrlf,delbs, logfile is : none initstring : none exit_after is : not set exit is : no Type [C-q] [C-h] to see available commands Terminal ready
上面的信息显示 Ctrl-a 是转义键。 按下 Ctrl-a Ctrl-q 将退出 picocom 并返回到 shell 。
minicom
安装 minicom 命令:
sudo apt-get install minicom
启动 minicom:
$ minicom Welcome to minicom 2.7 OPTIONS: I18n Compiled on Jan 1 2014, 17:13:19. Port /dev/ttyUSB0, 15:57:00 Press CTRL-A Z for help on special keys
根据以上提示: 按 Ctrl-a,然后按 z(而不是 Ctrl-z )调出帮助菜单:
+-------------------------------------------------------------------+ | Minicom Command Summary | | | | Commands can be called by CTRL-A | | | | Main Functions Other Functions | | | | Dialing directory..D run script (Go)....G | Clear Screen.......C | | Send files.........S Receive files......R | cOnfigure Minicom..O | | comm Parameters....P Add linefeed.......A | Suspend minicom....J | | Capture on/off.....L Hangup.............H | eXit and reset.....X | | send break.........F initialize Modem...M | Quit with no reset.Q | | Terminal settings..T run Kermit.........K | Cursor key mode....I | | lineWrap on/off....W local Echo on/off..E | Help screen........Z | | Paste file.........Y Timestamp toggle...N | scroll Back........B | | Add Carriage Ret...U | | | | Select function or press Enter for none. | +-------------------------------------------------------------------+
按提示按 O 进入设置屏幕:
+-----[configuration]------+ | Filenames and paths | | File transfer protocols | | Serial port setup | | Modem and dialing | | Screen and keyboard | | Save setup as dfl | | Save setup as.. | | Exit | +--------------------------+
选择 Serial port setup,然后按选项前面的大写字母并设置为如下所示的值:
+-----------------------------------------------------------------------+ | A - Serial Device : /dev/ttyUSB0 | | B - Lockfile Location : /var/lock | | C - Callin Program : | | D - Callout Program : | | E - Bps/Par/Bits : 1500000 8N1 | | F - Hardware Flow Control : No | | G - Software Flow Control : No | | | | Change which setting? | +-----------------------------------------------------------------------+
注意:
Hardware Flow Control 和 Software Flow Control 应该设置为 No 。
结束设置之后, 按 ESC 键回到之前的菜单, 选择 Save setup as dfl 保存覆盖掉默认配置。
-
RK3328的软件调试操作使用方法是什么2022-03-09 1917
-
fireflyROC-RK3328主板PC Adb简介2019-12-21 2274
-
fireflyCORE-RK3328主板JD4启动模式简介2019-12-18 3464
-
firefly ROC-RK3328-CC介绍2019-11-13 3511
-
RK3328硬件参考设计资料合集免费下载2019-04-19 3297
-
ROC-RK3328-CC超小型开源主板2018-03-08 5653
全部0条评论

快来发表一下你的评论吧 !
