
如何使用LCD显示屏显示温度和光强度
电子说
描述
概述
在本课程中,您将基于在第11课中学到的内容并使用LCD显示屏显示温度和光强度。
使用第9课中使用的同一光电管测量光强度。
要测量温度,您将使用温度测量芯片。该设备只有3条导线,两条分别用于5V和GND,第三条导线直接连接到Arduino上的模拟输入。
零件
零件 数量
LCD显示(16x2个字符)
1
10kΩ可变电阻器(电位器)
1
1kΩ电阻(棕色,黑色,红色条纹)
1
光电管(光敏电阻)
1
TMP36温度传感器
1
半面包板
1
Arduino Uno R3
1
跳线包
1
TMP36的外观类似于PN2222晶体管,但是如果看封装体的平坦侧面,则应该看到它被标记为TMP36。
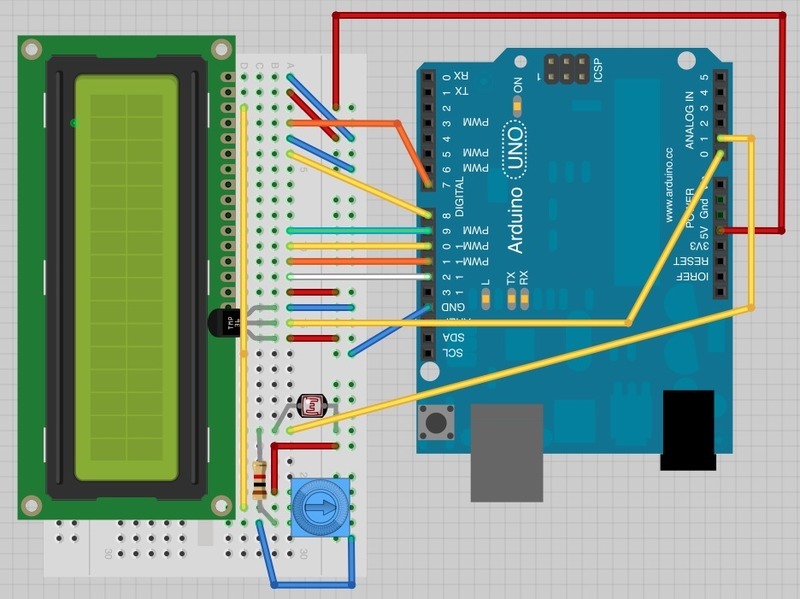
面包板布局
面包板布局基于第11课的布局,因此,如果您仍将其放在面包板上,它将大大简化操作。

有一些跳线在此版式上已稍有移动。尤其是锅底附近的那些。
光电管,1kΩ电阻和TMP36都是板子的新添加。 TMP36的曲面朝向显示器。
Arduino代码
此草图基于第11课的草图。将其加载到Arduino上,您应该发现将手指放在上面即可加热温度传感器会增加温度读数。
此外,如果您将手放在光电管上,遮挡了一些光,读数也会降低。
下载:文件
复制代码
/*
Adafruit Arduino - Lesson 12. Light and Temperature
*/
#include
int tempPin = 0;
int lightPin = 1;
// BS E D4 D5 D6 D7
LiquidCrystal lcd(7, 8, 9, 10, 11, 12);
void setup()
{
lcd.begin(16, 2);
}
void loop()
{
// Display Temperature in C
int tempReading = analogRead(tempPin);
float tempVolts = tempReading * 5.0 / 1024.0;
float tempC = (tempVolts - 0.5) * 100.0;
float tempF = tempC * 9.0 / 5.0 + 32.0;
// ----------------
lcd.print(“Temp F ”);
lcd.setCursor(6, 0);
lcd.print(tempF);
// Display Light on second row
int lightReading = analogRead(lightPin);
lcd.setCursor(0, 1);
// ----------------
lcd.print(“Light ”);
lcd.setCursor(6, 1);
lcd.print(lightReading);
delay(500);
} /*
Adafruit Arduino - Lesson 12. Light and Temperature
*/
#include
int tempPin = 0;
int lightPin = 1;
// BS E D4 D5 D6 D7
LiquidCrystal lcd(7, 8, 9, 10, 11, 12);
void setup()
{
lcd.begin(16, 2);
}
void loop()
{
// Display Temperature in C
int tempReading = analogRead(tempPin);
float tempVolts = tempReading * 5.0 / 1024.0;
float tempC = (tempVolts - 0.5) * 100.0;
float tempF = tempC * 9.0 / 5.0 + 32.0;
// ----------------
lcd.print(“Temp F ”);
lcd.setCursor(6, 0);
lcd.print(tempF);
// Display Light on second row
int lightReading = analogRead(lightPin);
lcd.setCursor(0, 1);
// ----------------
lcd.print(“Light ”);
lcd.setCursor(6, 1);
lcd.print(lightReading);
delay(500);
}
I
下载:文件
复制代码
// BS E D4 D5 D6 D7
LiquidCrystal lcd(7, 8, 9, 10, 11, 12); // BS E D4 D5 D6 D7
LiquidCrystal lcd(7, 8, 9, 10, 11, 12);
如果您决定更改使用的引脚,这将使事情变得更容易。
在“循环”功能中,现在发生了两个有趣的事情。首先,我们必须将温度传感器的模拟量转换为实际温度,其次,我们必须弄清楚如何显示它们。
首先,让我们看一下计算温度。
下载:文件
复制代码
int tempReading = analogRead(tempPin);
float tempVolts = tempReading * 5.0 / 1024.0;
float tempC = (tempVolts - 0.5) * 100.0;
float tempF = tempC * 9.0 / 5.0 + 32.0; int tempReading = analogRead(tempPin);
float tempVolts = tempReading * 5.0 / 1024.0;
float tempC = (tempVolts - 0.5) * 100.0;
float tempF = tempC * 9.0 / 5.0 + 32.0;
首先将温度传感器的原始读数乘以5,然后除以1024,以得到‘tempPin处的电压(0至5之间)模拟输入。
要将TMP36的电压转换为摄氏度,必须从测量值中减去0.5V,然后乘以100。
要将其转换为温度。在华氏温度下,您必须将其乘以9/5,然后再加上32。
在LCD显示屏上显示变化的读数可能很棘手。主要的问题是读数不一定总是相同的位数。因此,如果温度从101.50变为99.00,则旧读数的多余数字有留在显示器上的危险。/p》
下载:文件
复制代码
// ----------------
lcd.print(“Temp F ”);
lcd.setCursor(6, 0);
lcd.print(tempF); // ----------------
lcd.print(“Temp F ”);
lcd.setCursor(6, 0);
lcd.print(tempF);
一个相当奇怪的注释用来提醒您显示屏的16列。然后,您可以打印该长度的字符串,并在其中带有实际读数的空格。
要填充空格,请设置光标所在位置,然后显示读数。
完全相同的方法用于显示光照水平。光线水平没有单位,我们只显示模拟读数的原始读数。
其他要做的事情
尝试更改示例,使其以摄氏度而不是华氏度显示温度。
责任编辑:wv
-
oled是什么显示屏 OLED与LCD的区别2024-10-21 7579
-
液晶显示屏与led显示屏的区别2024-10-12 6107
-
LCD显示屏、LED显示屏、OLED显示屏有什么区别?2023-12-11 26385
-
带Arduino和LCD显示屏的秒表2023-06-12 621
-
LCD显示屏显示字符实验的资料介绍2020-11-27 1421
-
什么原因导致lcd显示屏画面闪烁2020-06-26 7059
-
LCD显示屏上闪烁的原因分析2020-06-24 12554
-
LCD1602显示屏的资料合集免费下载2020-05-27 2030
-
苹果iPhone明年将会完全放弃LCD显示屏转而采用OLED显示屏2019-01-23 1465
-
基于STM32芯片的LCD显示屏的BMP图片显示2016-01-18 1748
-
1602LCD显示屏电路图设计+资料2015-12-24 1624
-
LED显示屏与LCD拼接屏各自特点分析2013-07-01 3118
-
LCD显示屏出现闪烁的原因与解决2010-01-14 15056
-
LCD显示屏的器件选择和驱动电路设计2009-10-05 3312
全部0条评论

快来发表一下你的评论吧 !

