

力敏电阻的使用
电子说
描述
概述
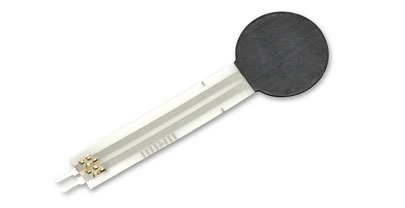
FSR是传感器,可让您检测物理压力,挤压和重量。它们易于使用且成本低廉。这是FSR(特别是Interlink 402模型)的照片。直径为1/2“的圆形部分是敏感位。

FSR由2组成
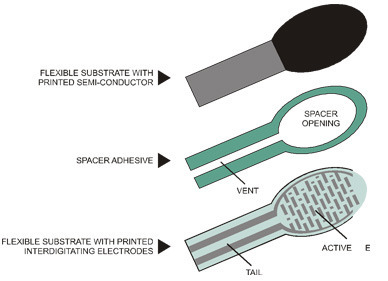
FSR基本上是一个电阻,其电阻值会根据变化而变化(以欧姆Ω为单位)这些传感器的成本相当低廉,易于使用,但精确度极低。每个传感器之间的误差也可能相差10%,因此,基本上,当您使用FSR时,您应该只期望得到响应范围。尽管FSR可以检测体重,但对于准确检测体重是多少,这是一个错误的选择。
但是,对于大多数触摸感应应用,例如“这被挤压了吗或推高了多少”,这笔钱真是物超所值!
一些基本统计信息
这些统计信息专门针对Interlink 402,但几乎所有FSR都是相似的。检查数据表将始终发现任何差异
尺寸:直径为1/2英寸(12.5毫米)的有效区域乘以0.02英寸厚(Interlink确实有一些大小为1.5“ x1.5”)
价格 $ 7.00来自Adafruit商店
电阻范围:无限/开路(无压力),100K Ω(轻压力)至200Ω(最大压力)
力范围:0到20磅(0到100牛顿)均匀地施加在0.125平方米的表面积上
电源:任何!使用小于1mA的电流(取决于使用的任何上拉/下拉电阻器和电源电压)
数据表(请注意,此处存在一些数学上的矛盾之处) )
如何使用FSR测量力/压力 我们已经说过,随着施加更大的压力,FSR的阻力会发生变化。当没有压力时,传感器看起来就像一个无限电阻(开路),随着压力的增加,电阻会降低。该图表明在不同的力测量下传感器的电阻。 (请注意,力不是以克为单位,而是真正意义上的牛顿* 100!)
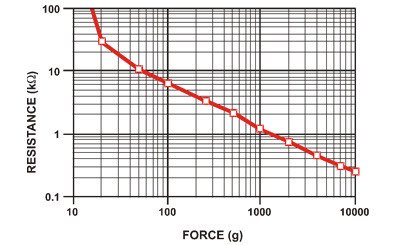
重要的是要注意该图并不是真正的 linear (它是一个对数/对数图),并且在极低的力测量下,它迅速从无穷大变为100KΩ。
测试FSR
确定FSR工作方式的最简单方法是将万用表以电阻测量模式连接到传感器的两个选项卡,并查看电阻如何变化。由于电阻变化很大,因此自动量程仪表在这里可以很好地工作。否则,只需确保在“放弃”之前尝试在1 Mohm和100 ohm之间的不同范围。
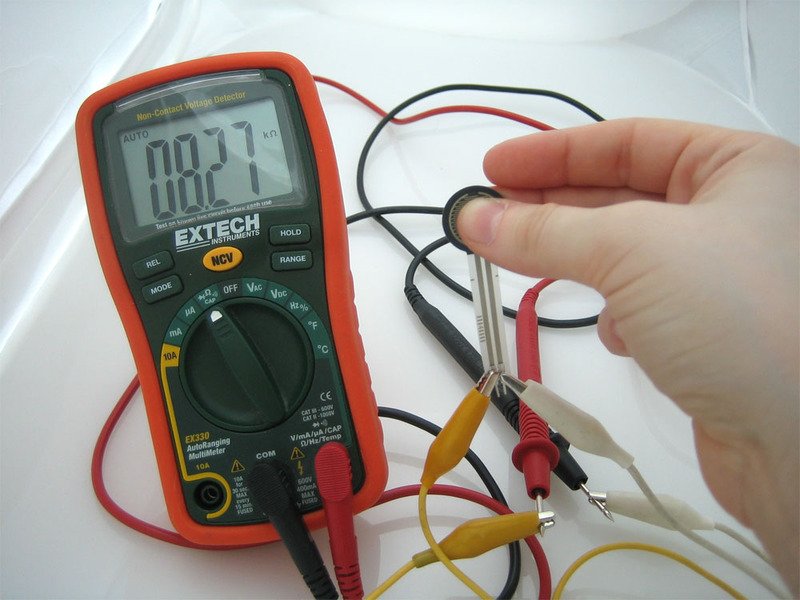
连接到FSR
由于FSR本质上是电阻器,因此它们是无极性的。这意味着您可以将它们“以任何一种方式”连接起来,它们就可以正常工作!
,或使用诸如鳄鱼夹或阴头的夹子式连接器。
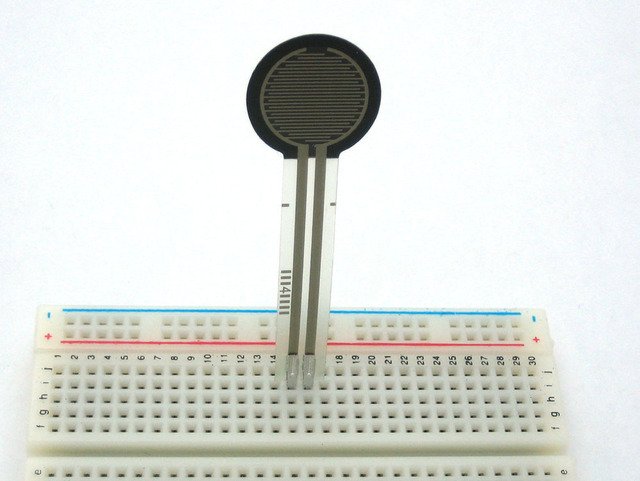
FSR通常是丝网印刷导电材料的聚合物。这意味着它们是塑料的,连接接线片压在有些精致的材料上。最好的连接方法是将它们插入面包板。
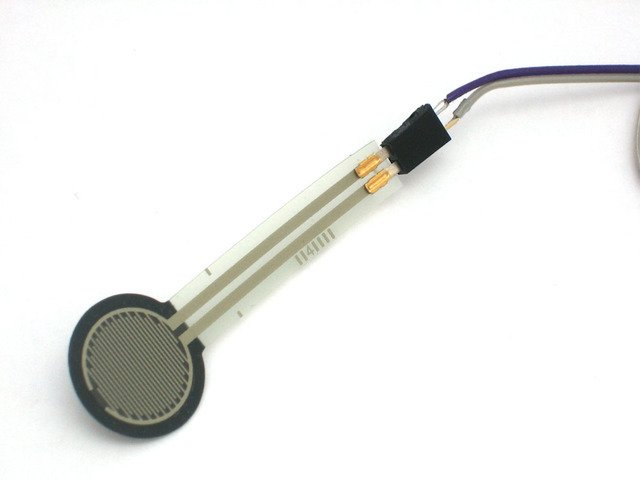
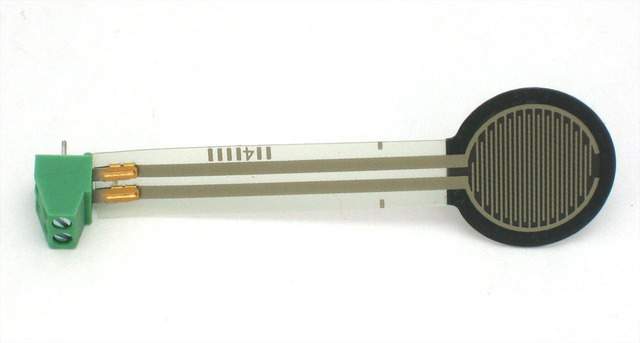
或接线端子,例如 Phoenix#1881448
可以焊接到突舌上,但是 您必须非常快 ,因为如果您的熨斗质量不好或者您甚至会发硬几秒钟,您将熔化塑料并破坏FSR! 除非您绝对确定自己有技能,否则不要尝试直接将其焊接到FSR。
使用FSR
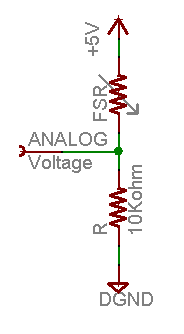
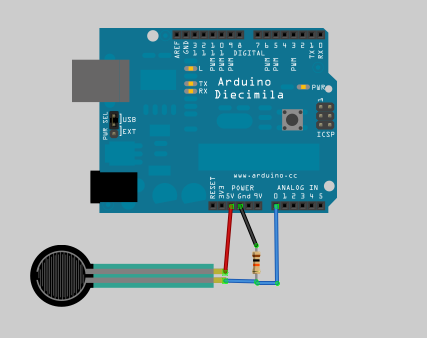
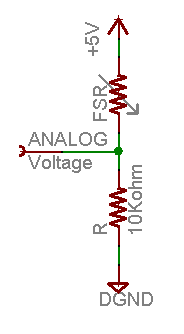
模拟电压读数方法 测量电阻传感器的最简单方法是将一端连接到电源,另一端连接到下拉电阻器到地面。然后,将固定下拉电阻器和可变FSR电阻器之间的点连接到诸如Arduino之类的微控制器的模拟输入(如图所示)。
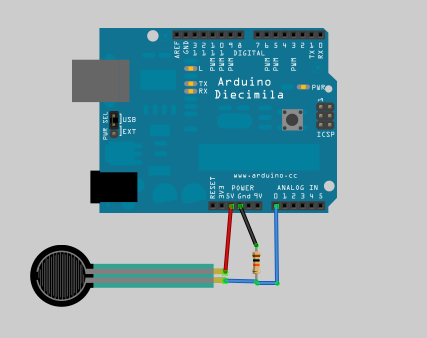
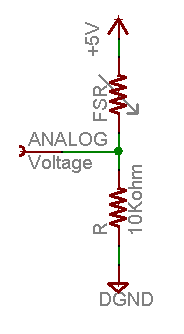
在此示例中,我显示的是5V电源,但请注意,您可以将其与3.3v电源一样容易地使用。在这种配置下,模拟电压读数的范围为0V(接地)至大约5V(或与电源电压大致相同)。
工作原理是,随着FSR的电阻减小,电容FSR和下拉电阻的总电阻从大约100Kohm降低到10Kohm。这意味着流过两个电阻器的电流增加,这又导致固定的10K电阻器两端的电压增加。
力(磅)力(N)FSR电阻(FSR + R)ohm流过FSR + RR两端的电压的电流》无无无限无限!0 mA0V
0.04磅0.2 N30 Kohm40 Kohm0.13 mA1.3 V
0.22磅1 N6 Kohm16 Kohm0.31 mA3.1 V
2.2 lb10 N1 Kohm11 Kohm0.45 mA4.5 V
22磅100 N250欧姆10.25 Kohm0.49 mA4.9 V
该表根据传感器力/电阻(带5V电源和10K下拉电阻)显示了近似模拟电压。
请注意,我们的方法采用的电阻率有些线性,但不提供线性电压!这是因为电压等式为:
Vo = Vcc(R/(R + FSR))
即电压成比例到FSR电阻的 倒 。
简单的使用演示与上面的示例相同,将FSR接线,但是这次允许在引脚11上添加一个LED。
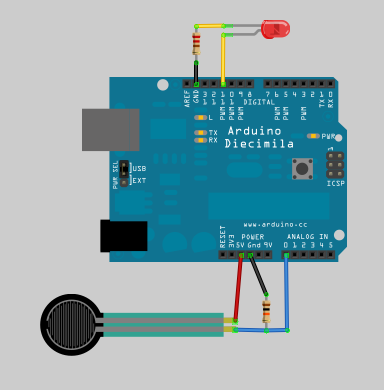
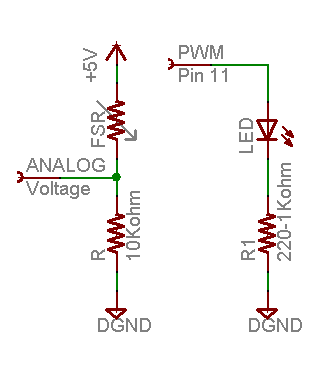
此草图将采用模拟电压读数,并以此来确定红色LED有多亮。按下FSR的力度越大,LED将会越亮!请记住,LED必须连接到PWM引脚才能正常工作,在此示例中,我使用引脚11。
这些示例假定您知道一些基本的Arduino编程。如果您不愿意,也许花一些时间在Arduino教程中复习基础知识?
下载:file
复制代码
/* FSR testing sketch.
Connect one end of FSR to 5V, the other end to Analog 0.
Then connect one end of a 10K resistor from Analog 0 to ground
Connect LED from pin 11 through a resistor to ground
For more information see www.ladyada.net/learn/sensors/fsr.html */
int fsrAnalogPin = 0; // FSR is connected to analog 0
int LEDpin = 11; // connect Red LED to pin 11 (PWM pin)
int fsrReading; // the analog reading from the FSR resistor divider
int LEDbrightness;
void setup(void) {
Serial.begin(9600); // We‘ll send debugging information via the Serial monitor
pinMode(LEDpin, OUTPUT);
}
void loop(void) {
fsrReading = analogRead(fsrAnalogPin);
Serial.print(“Analog reading = ”);
Serial.println(fsrReading);
// we’ll need to change the range from the analog reading (0-1023) down to the range
// used by analogWrite (0-255) with map!
LEDbrightness = map(fsrReading, 0, 1023, 0, 255);
// LED gets brighter the harder you press
analogWrite(LEDpin, LEDbrightness);
delay(100);
} /* FSR testing sketch.
Connect one end of FSR to 5V, the other end to Analog 0.
Then connect one end of a 10K resistor from Analog 0 to ground
Connect LED from pin 11 through a resistor to ground
For more information see www.ladyada.net/learn/sensors/fsr.html */
int fsrAnalogPin = 0; // FSR is connected to analog 0
int LEDpin = 11; // connect Red LED to pin 11 (PWM pin)
int fsrReading; // the analog reading from the FSR resistor divider
int LEDbrightness;
void setup(void) {
Serial.begin(9600); // We‘ll send debugging information via the Serial monitor
pinMode(LEDpin, OUTPUT);
}
void loop(void) {
fsrReading = analogRead(fsrAnalogPin);
Serial.print(“Analog reading = ”);
Serial.println(fsrReading);
// we’ll need to change the range from the analog reading (0-1023) down to the range
// used by analogWrite (0-255) with map!
LEDbrightness = map(fsrReading, 0, 1023, 0, 255);
// LED gets brighter the harder you press
analogWrite(LEDpin, LEDbrightness);
delay(100);
}
用于模拟FSR测量的简单代码 这是用于测量模拟引脚上FSR的代码示例。
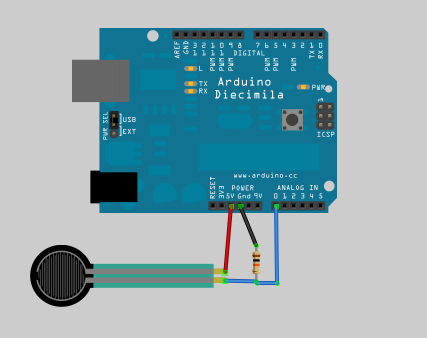
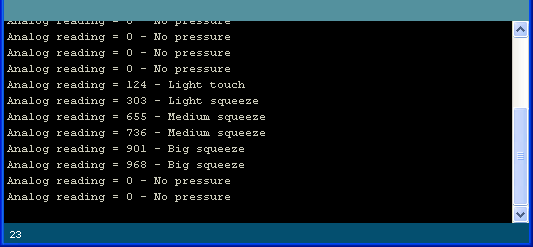
此代码不进行任何计算,只是以定性的方式打印出其解释为压力的大小。对于大多数项目,这几乎就是所有需要的东西!
下载:file
复制代码
/* FSR simple testing sketch.
Connect one end of FSR to power, the other end to Analog 0.
Then connect one end of a 10K resistor from Analog 0 to ground
For more information see www.ladyada.net/learn/sensors/fsr.html */
int fsrPin = 0; // the FSR and 10K pulldown are connected to a0
int fsrReading; // the analog reading from the FSR resistor divider
void setup(void) {
// We‘ll send debugging information via the Serial monitor
Serial.begin(9600);
}
void loop(void) {
fsrReading = analogRead(fsrPin);
Serial.print(“Analog reading = ”);
Serial.print(fsrReading); // the raw analog reading
// We’ll have a few threshholds, qualitatively determined
if (fsrReading 《 10) {
Serial.println(“ - No pressure”);
} else if (fsrReading 《 200) {
Serial.println(“ - Light touch”);
} else if (fsrReading 《 500) {
Serial.println(“ - Light squeeze”);
} else if (fsrReading 《 800) {
Serial.println(“ - Medium squeeze”);
} else {
Serial.println(“ - Big squeeze”);
}
delay(1000);
} /* FSR simple testing sketch.
Connect one end of FSR to power, the other end to Analog 0.
Then connect one end of a 10K resistor from Analog 0 to ground
For more information see www.ladyada.net/learn/sensors/fsr.html */
int fsrPin = 0; // the FSR and 10K pulldown are connected to a0
int fsrReading; // the analog reading from the FSR resistor divider
void setup(void) {
// We‘ll send debugging information via the Serial monitor
Serial.begin(9600);
}
void loop(void) {
fsrReading = analogRead(fsrPin);
Serial.print(“Analog reading = ”);
Serial.print(fsrReading); // the raw analog reading
// We’ll have a few threshholds, qualitatively determined
if (fsrReading 《 10) {
Serial.println(“ - No pressure”);
} else if (fsrReading 《 200) {
Serial.println(“ - Light touch”);
} else if (fsrReading 《 500) {
Serial.println(“ - Light squeeze”);
} else if (fsrReading 《 800) {
Serial.println(“ - Medium squeeze”);
} else {
Serial.println(“ - Big squeeze”);
}
delay(1000);
}
用于模拟FSR测量的深度代码 该Arduino草图假定您已将FSR像上面一样以10K接线?下拉电阻,并在模拟0引脚上读取传感器。它相当先进,可以测量FSR测得的近似牛顿力。这对于校准您认为FSR会受到的作用力非常有用。
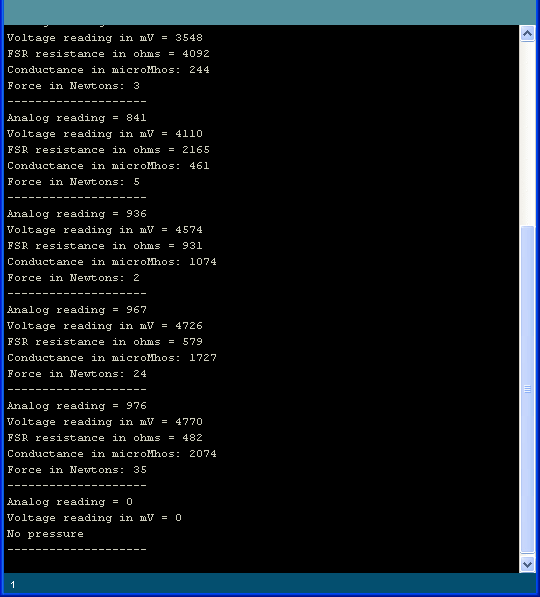
下载:文件
复制代码
/* FSR testing sketch.
Connect one end of FSR to power, the other end to Analog 0.
Then connect one end of a 10K resistor from Analog 0 to ground
For more information see www.ladyada.net/learn/sensors/fsr.html */
int fsrPin = 0; // the FSR and 10K pulldown are connected to a0
int fsrReading; // the analog reading from the FSR resistor divider
int fsrVoltage; // the analog reading converted to voltage
unsigned long fsrResistance; // The voltage converted to resistance, can be very big so make “long”
unsigned long fsrConductance;
long fsrForce; // Finally, the resistance converted to force
void setup(void) {
Serial.begin(9600); // We‘ll send debugging information via the Serial monitor
}
void loop(void) {
fsrReading = analogRead(fsrPin);
Serial.print(“Analog reading = ”);
Serial.println(fsrReading);
// analog voltage reading ranges from about 0 to 1023 which maps to 0V to 5V (= 5000mV)
fsrVoltage = map(fsrReading, 0, 1023, 0, 5000);
Serial.print(“Voltage reading in mV = ”);
Serial.println(fsrVoltage);
if (fsrVoltage == 0) {
Serial.println(“No pressure”);
} else {
// The voltage = Vcc * R / (R + FSR) where R = 10K and Vcc = 5V
// so FSR = ((Vcc - V) * R) / V yay math!
fsrResistance = 5000 - fsrVoltage; // fsrVoltage is in millivolts so 5V = 5000mV
fsrResistance *= 10000; // 10K resistor
fsrResistance /= fsrVoltage;
Serial.print(“FSR resistance in ohms = ”);
Serial.println(fsrResistance);
fsrConductance = 1000000; // we measure in micromhos so
fsrConductance /= fsrResistance;
Serial.print(“Conductance in microMhos: ”);
Serial.println(fsrConductance);
// Use the two FSR guide graphs to approximate the force
if (fsrConductance 《= 1000) {
fsrForce = fsrConductance / 80;
Serial.print(“Force in Newtons: ”);
Serial.println(fsrForce);
} else {
fsrForce = fsrConductance - 1000;
fsrForce /= 30;
Serial.print(“Force in Newtons: ”);
Serial.println(fsrForce);
}
}
Serial.println(“--------------------”);
delay(1000);
} /* FSR testing sketch.
Connect one end of FSR to power, the other end to Analog 0.
Then connect one end of a 10K resistor from Analog 0 to ground
For more information see www.ladyada.net/learn/sensors/fsr.html */
int fsrPin = 0; // the FSR and 10K pulldown are connected to a0
int fsrReading; // the analog reading from the FSR resistor divider
int fsrVoltage; // the analog reading converted to voltage
unsigned long fsrResistance; // The voltage converted to resistance, can be very big so make “long”
unsigned long fsrConductance;
long fsrForce; // Finally, the resistance converted to force
void setup(void) {
Serial.begin(9600); // We’ll send debugging information via the Serial monitor
}
void loop(void) {
fsrReading = analogRead(fsrPin);
Serial.print(“Analog reading = ”);
Serial.println(fsrReading);
// analog voltage reading ranges from about 0 to 1023 which maps to 0V to 5V (= 5000mV)
fsrVoltage = map(fsrReading, 0, 1023, 0, 5000);
Serial.print(“Voltage reading in mV = ”);
Serial.println(fsrVoltage);
if (fsrVoltage == 0) {
Serial.println(“No pressure”);
} else {
// The voltage = Vcc * R / (R + FSR) where R = 10K and Vcc = 5V
// so FSR = ((Vcc - V) * R) / V yay math!
fsrResistance = 5000 - fsrVoltage; // fsrVoltage is in millivolts so 5V = 5000mV
fsrResistance *= 10000; // 10K resistor
fsrResistance /= fsrVoltage;
Serial.print(“FSR resistance in ohms = ”);
Serial.println(fsrResistance);
fsrConductance = 1000000; // we measure in micromhos so
fsrConductance /= fsrResistance;
Serial.print(“Conductance in microMhos: ”);
Serial.println(fsrConductance);
// Use the two FSR guide graphs to approximate the force
if (fsrConductance 《= 1000) {
fsrForce = fsrConductance / 80;
Serial.print(“Force in Newtons: ”);
Serial.println(fsrForce);
} else {
fsrForce = fsrConductance - 1000;
fsrForce /= 30;
Serial.print(“Force in Newtons: ”);
Serial.println(fsrForce);
}
}
Serial.println(“--------------------”);
delay(1000);
}
奖金!读取没有模拟引脚的FSR测量值。由于FSR基本上是电阻器,因此即使您的微控制器上没有任何模拟引脚(或者说您想连接的数量超过模拟输入引脚),也可以使用它们我们这样做的方法是利用电阻器和电容器的基本电子特性,事实证明,如果您使用最初不存储电压的电容器,然后通过电阻器将其连接到电源,则它将充电电压越大,电阻就越大。
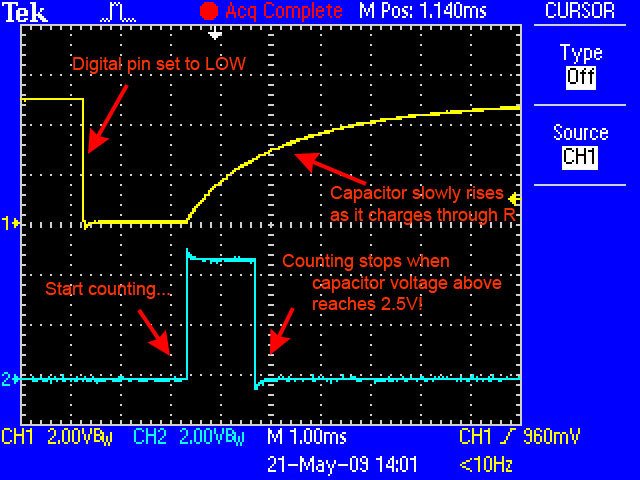
此示波器捕获的图像显示了数字引脚上发生的情况(黄色),蓝线表示草图何时开始计数以及完成计算的时间,大约1.2毫秒后。
这是因为电容器的作用就像桶,电阻的作用就像一根细管。足够的时间,您可以通过计时将桶装满一半所需的时间来确定管道的宽度。
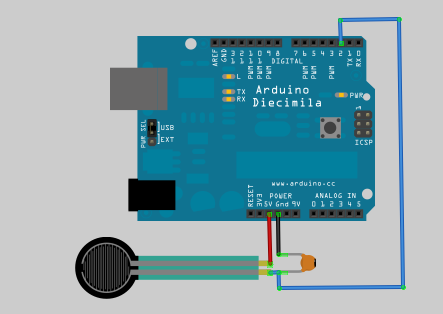
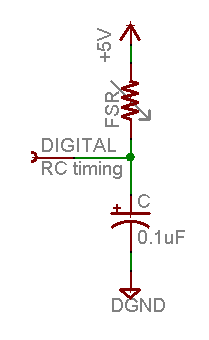
在这种情况下,我们的“桶”是一个0.1uF的陶瓷电容器。您几乎可以随意更改电容器,但时序值也会改变。对于这些FSR,0.1uF似乎是一个不错的起点。
下载:文件
复制代码
/* FSR simple testing sketch.
Connect one end of FSR to power, the other end to pin 2.
Then connect one end of a 0.1uF capacitor from pin 2 to ground
For more information see www.ladyada.net/learn/sensors/fsr.html */
int fsrPin = 2; // the FSR and cap are connected to pin2
int fsrReading; // the digital reading
int ledPin = 13; // you can just use the ‘built in’ LED
void setup(void) {
// We‘ll send debugging information via the Serial monitor
Serial.begin(9600);
pinMode(ledPin, OUTPUT); // have an LED for output
}
void loop(void) {
// read the resistor using the RCtime technique
fsrReading = RCtime(fsrPin);
if (fsrReading == 30000) {
// if we got 30000 that means we ’timed out‘
Serial.println(“Nothing connected!”);
} else {
Serial.print(“RCtime reading = ”);
Serial.println(fsrReading); // the raw analog reading
// Do a little processing to keep the LED blinking
fsrReading /= 10;
// The more you press, the faster it blinks!
digitalWrite(ledPin, HIGH);
delay(fsrReading);
digitalWrite(ledPin, LOW);
delay(fsrReading);
}
delay(100);
}
// Uses a digital pin to measure a resistor (like an FSR or photocell!)
// We do this by having the resistor feed current into a capacitor and
// counting how long it takes to get to Vcc/2 (for most arduinos, thats 2.5V)
int RCtime(int RCpin) {
int reading = 0; // start with 0
// set the pin to an output and pull to LOW (ground)
pinMode(RCpin, OUTPUT);
digitalWrite(RCpin, LOW);
// Now set the pin to an input and.。.
pinMode(RCpin, INPUT);
while (digitalRead(RCpin) == LOW) { // count how long it takes to rise up to HIGH
reading++; // increment to keep track of time
if (reading == 30000) {
// if we got this far, the resistance is so high
// its likely that nothing is connected!
break; // leave the loop
}
}
// OK either we maxed out at 30000 or hopefully got a reading, return the count
return reading;
} /* FSR simple testing sketch.
Connect one end of FSR to power, the other end to pin 2.
Then connect one end of a 0.1uF capacitor from pin 2 to ground
For more information see www.ladyada.net/learn/sensors/fsr.html */
int fsrPin = 2; // the FSR and cap are connected to pin2
int fsrReading; // the digital reading
int ledPin = 13; // you can just use the ’built in‘ LED
void setup(void) {
// We’ll send debugging information via the Serial monitor
Serial.begin(9600);
pinMode(ledPin, OUTPUT); // have an LED for output
}
void loop(void) {
// read the resistor using the RCtime technique
fsrReading = RCtime(fsrPin);
if (fsrReading == 30000) {
// if we got 30000 that means we ‘timed out’
Serial.println(“Nothing connected!”);
} else {
Serial.print(“RCtime reading = ”);
Serial.println(fsrReading); // the raw analog reading
// Do a little processing to keep the LED blinking
fsrReading /= 10;
// The more you press, the faster it blinks!
digitalWrite(ledPin, HIGH);
delay(fsrReading);
digitalWrite(ledPin, LOW);
delay(fsrReading);
}
delay(100);
}
// Uses a digital pin to measure a resistor (like an FSR or photocell!)
// We do this by having the resistor feed current into a capacitor and
// counting how long it takes to get to Vcc/2 (for most arduinos, thats 2.5V)
int RCtime(int RCpin) {
int reading = 0; // start with 0
// set the pin to an output and pull to LOW (ground)
pinMode(RCpin, OUTPUT);
digitalWrite(RCpin, LOW);
// Now set the pin to an input and.。.
pinMode(RCpin, INPUT);
while (digitalRead(RCpin) == LOW) { // count how long it takes to rise up to HIGH
reading++; // increment to keep track of time
if (reading == 30000) {
// if we got this far, the resistance is so high
// its likely that nothing is connected!
break; // leave the loop
}
}
// OK either we maxed out at 30000 or hopefully got a reading, return the count
return reading;
}
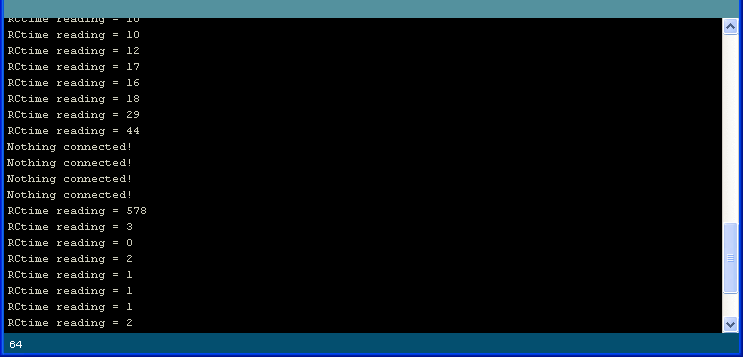
可以根据读数计算实际电阻,但是不幸的是,IDE和arduino板的变化会使其不一致。请注意,如果您更改OS的IDE版本,或者使用3.3V arduino而不是5V,或者从16mhz Arduino更改为8Mhz Arduino(例如lilypad),可能会有所不同由于读取引脚的值需要多长时间。通常这没什么大不了的,但是如果您不期望的话,它会使您的项目难以调试!
示例项目
这里仅是使用FSR的项目的一些示例!
控制LED(有点暗,但他按了FSR)。
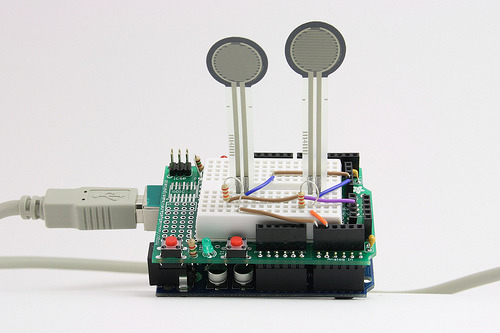
FSR拇指摔跤(来自斯坦福大学课程的示例)
Tapper,一种音乐界面,可通过点击您的音乐手指
责任编辑:wv
- 相关推荐
- 热点推荐
- FSR
-
AN3408-如何将12位ADC用于力敏电阻2025-01-21 178
-
什么是力敏电阻的作用2024-09-25 1772
-
什么是力敏电阻?力敏电阻的主要特性2023-12-20 2137
-
压敏电阻与力敏电阻是什么?深圳比创达电子EMCjf_99355895 2023-12-12
-
压敏电阻与力敏电阻是什么?2023-11-27 1299
-
电阻详细基础知识大全2023-11-10 6290
-
力敏电阻如何使数码管上显示其压力值?2023-10-19 375
-
新手电工必学压敏、光敏、力敏电阻基础知识 #零基础学电工#电工基础 #电阻 #硬声创作季Hello,World! 2022-10-25
-
什么是 Arduino 力敏电阻器?2022-04-02 8602
-
敏感电阻的种类有哪些2020-01-11 10086
-
有没有做力敏电阻的2017-12-27 2904
-
力敏电阻主要参数有哪些?2009-12-04 4034
全部0条评论

快来发表一下你的评论吧 !

