

利用ZEGO EXPRESS SDK轻松实现Android端四人视频聊天
今日头条
描述
前言 (闲聊)
之前在上移动平台开发课的过程中,对android的开发算是有一个大概的初步了解,但是知之甚浅。印象最深刻的就是但凡遇到图片视频方面的处理就会变得非常复杂以及容易出错。那时对于我这个小白来说想调用一个视频播放器来播放一小段视频都是一个"大"工程了,至于什么实时的视频对话想都不想去想,因为太复杂且麻烦!!!
但是有了功能齐全的SDK ,这次的实时视频开发,却是与以前完全不同的体验。直观感受就好像是我这种菜鸡做机器学习模型有了Python的sklearn库,菜鸡的大雄有了多啦A梦那样,拥有了一个万能的百宝箱。当你想实现一个想着就十分复杂的功能时例如直播的推拉流之类的,这里面就已经集成了对应的函数。
所用SDK介绍
关于SDK的安装本文不做过多描述,我使用的是ZEGO EXPRESS SDK,相应的安装详细过程请直接看链接
https://doc-zh.zego.im/zh/215.html,同时记得按照步骤申请对应的AppID以及AppSign.
使用此SDK的优点:代码简单易懂,文档内容较为全面,实现简单。
本文实际内容可以有些长,所以可以根据目录筛选查看内容
目录
一.所实现项目的功能
1.项目实现核心截图
2.所实现的功能
3.适用的应用场景
二.实现流程
1.布局的设计
2.核心逻辑代码
2.1推流和拉流的概念
2.2正式开始及全局变量的声明
2.2.1 onCreate函数内操作
1.申请AppID
2.初始化SDK
3.初始化用户及登录房间
4.获取所在房间内的所有推流
2.2.2 点击事件
1.推拉流
2.麦克风按钮处理
3.与本地相机美颜、改变摄像头前后置等本地扩展功能
4.退出按钮
三.源代码
四.不足以及可以继续开发的地方
一.所实现项目的功能
1.项目实现核心截图
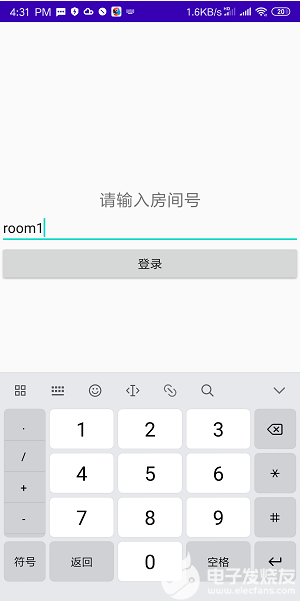
登录界面
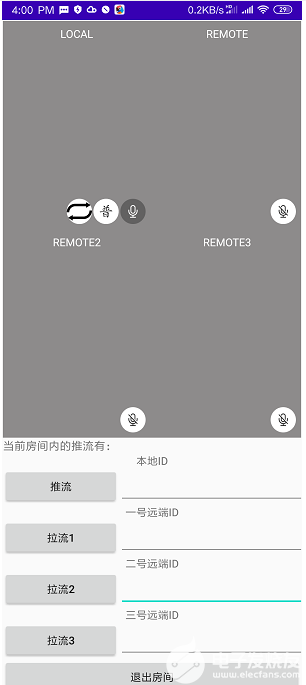
核心视频UI
2.所实现的功能
(1).从登录界面到视频界面的跳转,以及传递所输入的房间号ID。以及在核心视频UI界面的退出到登录界面的跳转.
(2) 四人可同时正常视频通话,且对应每个流所呈现的画面进行打开关闭收音.
(3).实时的将同一房间号的正在推流的流ID全部显示在第二排视频下的TextView上(在该房间的用户可根据次项流ID内容)
(4).实现对本地界面中的前后置摄像头进行切换,美颜效果的实现。
3.适用的应用场景
家庭聊天,同事或者同学聊天以及简单的面对面会议。
二.实现流程
**1.**先说简单说一下界面布局的设计。这个相对简单,看上述的界面也大概也能明白一些,说一下我做的过程中遇到的问题吧。
第一个因为只需要输入房间ID,所以登陆界面很简单,线性布局垂直方向, 再加上TextView + EditText + Button就解决了的最简单登陆界面。实在不懂可以直接看第三部分的源代码。
第二个界面对于新手来说还是有些困难的,首先由于四人视频所占空间很大,一个屏幕的大小不能轻易放下,这种需要滚动条的情况就可以采用三种手段来解决分别是RecyclerView,ListView以及ScrollView来解决。本文采用的是相对来说最简单的ScrollView来解决。这里就要注意了,**ScrollView当中只有一个子元素**,所以如果你想像我一样,把ScrollView作为最外层的话,需要在内部再嵌套一个线性布局,这样才能用。
相连视频的画面采用的是相对布局,这样更加方便做微调,视频本身使用TextureView来做。
我代码的整体设计布局框架如下(要注意的是本文对于核心视频UI的布局上图片的点击事件,都是在图片的属性中添加的android:onClick处理解决方法,这里看不懂没关系,后面也会说。)
```xml
...(省略拉流1和2的TextView+LinearLayout的组合,写法类似下面这个框架的)
```
更详尽的代码见第三部分的全部源码
**2.**下面就是核心逻辑代码的实现了
**注意:以下只展示核心的代码,并不能直接运行,具体操作请看第三部分。**
**2.1**首先,如果不理解**推流**和**拉流**的概念的话,首先要快速理解一下。
实际上我们可以用一个简单过程来帮助理解。
首先来说,推流就是你发送出去一串代码(流ID)以及你本地的照相机所拍摄的实时画面(所谓的流) 上网络且到达服务器并存储。且如果你不停止推流就要一直发送,就好像水流一样源源不断,但是服务器里面就好像是有门堵着的,水是不能轻易漏出来。
别人想在这个服务器上看你的视频咋办? 他就要拉你对应的流,咋拉呢?就通过你发的那个推出去的流ID来拉。如果他知道这个流ID ,就好像是找到了服务器对应一扇门的一把锁钥匙似的,把你不断发送到服务器的"流"大门打开,水流涌出来了一直到他的手机上,这样他就看到你的画面了。
而你如果停止了推流,水就没了,他自然就接收不到画面了。他停止拉流,等于是把之前那扇门又关上了,他手机上也不会再接收你的画面。
**2.2**理解之后,如果你的SDK已经按照最顶上链接集成完毕后,开发过程就可以正式开始了!
以下要用到很多的全局变量,首先展示一下他们的声明以及初始值,如果下面的有些看不懂的可以返回过来看一看这里所写的内容,以及注释。
```java
public static ZegoExpressEngine engine = null;
boolean publishMicEnable = true; // 初始的自己麦克风为开着的
boolean playStreamMute = true; //其余屏幕人的初始状态都为静音
boolean playStreamMute2 = true;
boolean playStreamMute3 = true;
boolean isBeauty = false;//初始无美颜
boolean isFrontCamera = true; // 初始为前置摄像头
ImageButton ib_local_mic; //本地麦克风
ImageButton ib_remote_stream_audio;//拉流1外部视角的音量
ImageButton ib_remote_stream_audio2;//拉流2外部视角的音量
ImageButton ib_remote_stream_audio3;//拉流3外部视角的音量
ImageButton ib_beauty; //美颜按键
String LocalStreamID; //本地推流ID
String RemoteStreamID; //拉流1 ID
String RemoteStreamID2; //拉流2 ID
String RemoteStreamID3;//拉流3 ID
ArrayList
private String userID;//用户ID
String roomID;//房间ID
//写好自己的ID和sign,以下为我所申请的ID,如果要自己使用或者商用请自行申请并修改
long appID = ; // 请通过官网注册获取,格式为 123456789L
String appSign = ""; //64个字符,请通过官网注册获取,格式为"0123456789012345678901234567890123456789012345678901234567890123"
```
**2.2.1** onCreate函数部分
**(1).**申请AppID,这一步如果不做的话根本后面做不了!!所以要先申请一各APPID,可以看我最上方附的那个链接
**(2)**根据你的appID以及appsign进行初始化SDK,使用测试环境,通用场景接入。如果这一步成功了,那么恭喜你,你已经获得了一个强大的神奇engine,他功能强大,后面所有所有都是依靠他来实现的,什么推流拉流就是一行代码的事情.
```java
engine = ZegoExpressEngine.createEngine(appID, appSign, true, ZegoScenario.GENERAL, getApplication(), null);
```
**(3).**初始化用户,并将用户登录至房间内。这步也是在进行视频通话之前的必须一步,我们每个人都是在服务器上一个独立的个体,想要实现特定用户群体之间的交流。房间是很好的一个工具。这个userid和name在全局中不能有任何重复,最好有一定意义,但我面向的场景主要是家庭场景,不太需要,如果是商用开发还是很有必要开发的。为了防止重复,我采用的是生成随机数,这样的话重复的概率就小很多了。
我这里的roomID,从登录界面时的intent的所传递的数据来定义的
```java
//用户注册
String randomSuffix = String.valueOf(new Date().getTime() % (new Date().getTime() / 1000));
userID = "user" + randomSuffix;
ZegoUser user = new ZegoUser(userID);
...
//房间登录
ntent intent = getIntent();
roomID = intent.getStringExtra("room_id");//getXxxExtra方法获取Intent传递过来的roomID
engine.loginRoom(roomID, user);//有了房间号,将用户登录到该房间
```
**(4).**获取所在房间内的所有推流。这里面主要就是要用到监听房间相关事件回调来实现主要用到的是回调中的onRoomStreamUpdate 要注意的是:这里的流更新指的是房间内其他用户的,用户自己的流产生变化,自己的这个回调函数是没有反应的。
想实现此功能,首先要创建一个ArrayList来记录房间内存在的所有的流ID。可以看到如下的RoomStreamList我是在全局变量的地方事先声明过了。(其他全局变量的声明我会放到后面函数部分说明) 这里放入的第一个元素的目的是为了方便在后面讲ArrayList中所有元素连接成为一行具体的内容.
```java
RoomStreamList = new ArrayList
RoomStreamList.add("当前房间内的推流有:");
```
onRoomStreamUpdate的具体写法如下所示,看起来好像挺长,实际上思路就是如果有一个流ID状态发生改变,我就看我的列表当中是不是有这个流ID如果有那就去掉,如果没有就加入进去。实在不懂,根据注释也能看个大概,这里面需要提一下的是sentenceId += 这个并不是真正的加法,而是java中的字符串拼接,将ArrayList中所有元素拼成一句话,并找到要显示的TextView并显示出来。
```java
engine.setEventHandler(new IZegoEventHandler() {
...
public void onRoomStreamUpdate(String roomID, ZegoUpdateType updateType, ArrayList
/* 流状态更新,登陆房间后,当房间内有用户新推送或删除音视频流时,SDK会通过该回调通知 */
//自己的推流不会被记入
for (int i = 0; i < streamList.size(); i++)//加入或退出房间流的所有推流id全都遍历一遍
{
Toast.makeText(getApplicationContext(), streamList.get(i).streamID + " room stream changed", Toast.LENGTH_LONG).show();
if (RoomStreamList.contains(streamList.get(i).streamID)) {//如果现有列表中包含这个,就移除
RoomStreamList.remove(streamList.get(i).streamID);
} else {//如果现有列表中不包含这个就加入
RoomStreamList.add(streamList.get(i).streamID);
}
}
String SentenceId = "";// 用于记录下当前房间内还有的流ID
for (int i = 0; i < RoomStreamList.size(); i++) {
SentenceId += RoomStreamList.get(i) + " ";//利用字符串拼接,将当前房间还在的所有流ID全部记下
}
TextView ViewIdlist = findViewById(R.id.stream_id_list);//找到用于显示流ID的TextView
ViewIdlist.setText(SentenceId);//设置文字信息在TextView上体现出来
}
});
```
**(5).**动态权限申请,代码如下。若需要申请更多权限则自行添加。
```java
String[] permissionNeeded = {
"android.permission.CAMERA",
"android.permission.RECORD_AUDIO"};
if (Build.VERSION.SDK_INT >= Build.VERSION_CODES.M) {
if (ContextCompat.checkSelfPermission(this, "android.permission.CAMERA") != PackageManager.PERMISSION_GRANTED ||
ContextCompat.checkSelfPermission(this, "android.permission.RECORD_AUDIO") != PackageManager.PERMISSION_GRANTED) {
requestPermissions(permissionNeeded, 101);}
}
```
**2.2.2** 接下来要做的就是逐步完成每个在视图中注册的点击事件,其中包括四个部分,分别是1.推拉流 2.麦克风按钮处理
**3.**与本地相机美颜、改变摄像头前后置等本地扩展功能 4.退出按钮
**(1)**.推拉流
这也是视频通话最为主要的部分。但是却是十分简单的,核心的代码就只需要调用两个接口也就是两行代码就可以解决。但是还是有些要注意的事项。如下为推流**核心**代码,有所省略,具体实现详见第三部分。 实际上可以看出来,核心的逻辑就是判断推流按钮上的字是否是"推流",如果是的话就就行推流再把文字设置称为"停止推流"。
其中也包含了核心的接口就是startPublishingStream,stopPublishingStream以及startpreview和stoppreview来获取本地图像。
```java
public void ClickPublish(View view) {
...
if (button.getText().equals("推流")) {//若上面的文字是推流,则说明还未推流。
/* 开始推流 */
EditText et = findViewById(R.id.ed_publish_stream_id);//找到,旁边的EditText的实例
LocalStreamID = et.getText().toString();//获取其文字内容,并赋值给全局变量LocalStreamID
engine.startPublishingStream(LocalStreamID);//推流
/* 开始预览并设置本地预览视图 */
/* Start preview and set the local preview view. */
View local_view = findViewById(R.id.local_view);//获取预览图像的TextureView实例
engine.startPreview(new ZegoCanvas(local_view));//开始预览
button.setText("停止推流");//文字从推流改变为停止推流
} else {//若上面文字不是推流
/* 停止推流 */
engine.stopPublishingStream();//停止推流
/* 停止本地预览 */
/* Start stop preview */
engine.stopPreview();//停止预览
button.setText("推流");//文字变为推流
}
}
```
以拉流1按钮为例,拉流的实现实际上与推流十分类似甚至还简单一些。核心逻辑也是相似的判断按钮上的字是否为拉流1。核心的接口就是startPlayingStream和stopPlayingStream两个。
要注意的是,我这里首先对要拉的流默认是先静音的。这里的playStreamMute是一个全局变量默认值为True.
```java
public void ClickPlay(View view) {
...
if (button.getText().equals("拉流1")) {//若文字为拉流1
/* 开始拉流 */
/* Begin to play stream */
EditText et = findViewById(R.id.ed_play_stream_id);//获取拉流旁的EditText实例
RemoteStreamID = et.getText().toString();//获取其字符串,作为1号拉流ID
View play_view = findViewById(R.id.remote_view);//获取播放实例
engine.startPlayingStream(RemoteStreamID, new ZegoCanvas(play_view));//开始拉流
engine.mutePlayStreamAudio(RemoteStreamID, playStreamMute);//首先对各用户采取静音
button.setText("停止拉流");//文字变为停止拉流
} else {
/* 停止拉流 */
/* Begin to stop play stream */
engine.stopPlayingStream(RemoteStreamID);//停止拉流
button.setText("拉流1");//文字转变为拉流1
}
}
```
**(2)**.麦克风按钮处理
首先来说本地话筒,如下的publishMicEnable是一个bool类型的全局变量,初始值为true,根据注释可以大概看懂。
要注意的就是核心接口engine.muteMicrophone(!publishMicEnable);这里括号中是对于publishMicEnable进行了取反的,原因可以根据变量的名字就能看出来,他**mute**Microphone我们是publishMic**Enable**,二者意义本身就相反,所以取反之后才能体现原本意义。
```java
//本地麦克风
public void enableLocalMic(View view) {
publishMicEnable = !publishMicEnable;//将bool变量先取反,即状态改变
if (publishMicEnable) {//本地麦克风经取反后为真,那么就把图标变为开启状态的图标
ib_local_mic.setBackgroundDrawable(getResources().getDrawable(R.drawable.ic_bottom_microphone_on));
} else {//反之,则变为关闭状态的图标
ib_local_mic.setBackgroundDrawable(getResources().getDrawable(R.drawable.ic_bottom_microphone_off));
}
/* Enable Mic*/
engine.muteMicrophone(!publishMicEnable);//因为这个函数是mute,而我们是enable,所以取反才与本义相同
}
```
其次对于远端拉流麦克风的控制,以拉流1所收画面的麦克风为例。与本地麦克风相似,核心函数有所不同。此处的核心函数为engine.mutePlayStreamAudio(RemoteStreamID, playStreamMute),这里面的两个参数也都是全局变量,playStreamMute也是一个bool类型的变量,初始值为true。而这个RemoteStreamID这个全局变量在之前的拉流时所进行赋值的。
```java
public void enableRemoteMic(View view) {
playStreamMute = !playStreamMute;//先将此bool变量取反,即状态改变
if (playStreamMute) {//若此时该bool变量为真,则说明是静音状态,则图标变为关闭状态图标
ib_remote_stream_audio.setBackgroundDrawable(getResources().getDrawable(R.drawable.ic_bottom_microphone_off));
} else {//反之则变为开启状态
ib_remote_stream_audio.setBackgroundDrawable(getResources().getDrawable(R.drawable.ic_bottom_microphone_on));
}
/* Enable Mic*/
engine.mutePlayStreamAudio(RemoteStreamID, playStreamMute);//此处因为bool变量实际意义与函数本义相同,故不用取反
}
```
**(3)**.与本地相机美颜、改变摄像头前后置等本地扩展功能
这部分功能就比较简单了,实现的逻辑与麦克风相似,也是对于一个bool型全局变量进行判断。
相机美颜实现如下,核心的接口就是engine.enableBeautify(WHITEN);代码当中的isBeauty为一个全局变量的bool值。
这里我只使用了美白参数进行使用,还可以添加其他的参数,详情见顶部连接中点开API文档。
```java
public void enableBeauty(View view) {
isBeauty = !isBeauty;//取反
//更换图标
if (isBeauty) {//若现在为真,则变为使用美颜对应图标
ib_beauty.setBackgroundDrawable(getResources().getDrawable(R.drawable.beauty_ps));
} else {//若现在为假,则对应普通状态图标
ib_beauty.setBackgroundDrawable(getResources().getDrawable(R.drawable.normal));
}
if (isBeauty) {//如果处于美颜状态
//这里只采用一个较为明显的美白功能
engine.enableBeautify(WHITEN);
} else {//反之则关闭所有美颜设置
engine.enableBeautify(NONE);
}
}
```
改变摄像头方向,因为不需要更换图标所以更为简单,核心接口是engine.useFrontCamera(isFrontCamera);其中isFront为bool类型的全局变量
```java
public void frontCamera(View view)
{
isFrontCamera = !isFrontCamera;//先去反
engine.useFrontCamera(isFrontCamera);//根据现有布尔值带入是否使用前置摄像头的函数中
}
```
**(4)**.退出按钮
这部分要注意的是,退出按钮要同时考虑到退出之后还要回到房间登录界面,以及若当前是推流状态要停止当前推流,以及退出用户对于房间的登录。实现起来还是比较简单的代码如下,其中使用了显示intent来进行活动的启动,roomID为一个全局变量。在初始化的主函数中就以及赋值为了从之前登录界面所带来的roomID.
```java
public void Logout(View view) {
Intent intent = new Intent(this, Login.class);//设置一个从当前活动到Login活动的intent
engine.stopPublishingStream();//停止推流
engine.logoutRoom(roomID);//退出该房间
startActivity(intent);//重新进入房间的登录界面
finish();//结束当前活动
}
```
这样就写完了,怎么样是不是非常简单!真正要自己去想的也就是一些逻辑的处理,大大节省了开发的时间。
三.源代码
**1.**两组layout
登录界面layout
```xml
android:layout_width="match_parent"
android:layout_height="match_parent"
android:orientation="vertical"
>
android:layout_width="match_parent"
android:layout_height="557dp"
android:gravity="center_vertical"
android:orientation="vertical">
android:layout_width="match_parent"
android:layout_height="wrap_content"
android:text="请输入房间号"
android:textSize="22dp"
android:layout_gravity="center_horizontal"
android:textAlignment="center"
/>
android:id="@+id/room_login"
android:layout_width="match_parent"
android:layout_height="wrap_content"
android:layout_gravity="center_vertical" />
android:id="@+id/btn_login"
android:layout_width="match_parent"
android:layout_height="wrap_content"
android:layout_gravity="center_vertical"
android:text="登录"
android:textSize="16dp"
/>
```
核心视频UI的layout (有点长。。)
```xml
android:layout_width="match_parent"
android:layout_height="match_parent"
android:padding="1dp">
android:orientation="vertical"
android:layout_width="match_parent"
android:layout_height="wrap_content">
android:layout_width="match_parent"
android:layout_height="273dp"
android:background="#8D8B8B"
android:orientation="horizontal">
android:id="@+id/view"
android:layout_width="3dp"
android:layout_height="match_parent"
android:layout_centerHorizontal="true"
/>
android:id="@+id/local_view"
android:layout_width="wrap_content"
android:layout_height="match_parent"
android:layout_marginBottom="3dp"
android:layout_marginEnd="4dp"
android:layout_marginLeft="3dp"
android:layout_marginRight="4dp"
android:layout_marginStart="3dp"
android:layout_marginTop="3dp"
android:layout_toLeftOf="@id/view"
android:layout_toStartOf="@id/view" />
android:id="@+id/textView"
android:layout_width="match_parent"
android:layout_height="33dp"
android:layout_marginEnd="0dp"
android:layout_marginRight="0dp"
android:layout_toLeftOf="@id/view"
android:layout_toStartOf="@id/view"
android:gravity="center"
android:text="LOCAL"
android:textColor="#ffffff"
/>
android:id="@+id/ib_local_camera_change"
android:layout_width="33dp"
android:layout_height="33dp"
android:layout_alignParentBottom="true"
android:layout_marginRight="77dp"
android:layout_marginBottom="7dp"
android:layout_toStartOf="@id/view"
android:layout_toLeftOf="@id/view"
android:background="@drawable/arrow"
android:onClick="frontCamera" />
android:id="@+id/ib_local_beauti"
android:layout_width="33dp"
android:layout_height="33dp"
android:layout_alignParentBottom="true"
android:layout_marginRight="42dp"
android:layout_marginBottom="7dp"
android:layout_toStartOf="@id/view"
android:layout_toLeftOf="@id/view"
android:background="@drawable/normal"
android:onClick="enableBeauty" />
android:id="@+id/ib_local_mic"
android:layout_width="33dp"
android:layout_height="33dp"
android:layout_alignParentBottom="true"
android:layout_marginRight="7dp"
android:layout_marginBottom="7dp"
android:layout_toStartOf="@id/view"
android:layout_toLeftOf="@id/view"
android:background="@drawable/ic_bottom_microphone_on"
android:onClick="enableLocalMic" />
android:id="@+id/remote_view"
android:layout_width="wrap_content"
android:layout_height="match_parent"
android:layout_marginBottom="3dp"
android:layout_marginEnd="3dp"
android:layout_marginLeft="6dp"
android:layout_marginRight="3dp"
android:layout_marginStart="6dp"
android:layout_marginTop="3dp"
android:layout_toEndOf="@id/view"
android:layout_toRightOf="@id/view" />
android:id="@+id/textView2"
android:layout_width="match_parent"
android:layout_height="33dp"
android:layout_toEndOf="@id/view"
android:layout_toRightOf="@id/view"
android:gravity="center"
android:text="REMOTE"
android:textColor="#ffffff" />
android:id="@+id/ib_remote_mic"
android:layout_width="33dp"
android:layout_height="33dp"
android:layout_alignParentRight="true"
android:layout_alignParentBottom="true"
android:layout_marginEnd="7dp"
android:layout_marginRight="7dp"
android:layout_marginBottom="7dp"
android:background="@drawable/ic_bottom_microphone_off"
android:onClick="enableRemoteMic" />
android:layout_width="match_parent"
android:layout_height="273dp"
android:background="#8D8B8B"
android:orientation="horizontal">
android:id="@+id/view2"
android:layout_width="3dp"
android:layout_height="match_parent"
android:layout_centerHorizontal="true"
/>
android:id="@+id/remote_view2"
android:layout_width="wrap_content"
android:layout_height="match_parent"
android:layout_marginBottom="3dp"
android:layout_marginEnd="5dp"
android:layout_marginLeft="3dp"
android:layout_marginRight="5dp"
android:layout_marginStart="3dp"
android:layout_marginTop="3dp"
android:layout_toLeftOf="@id/view2"
android:layout_toStartOf="@id/view2" />
android:id="@+id/textView3"
android:layout_width="match_parent"
android:layout_height="33dp"
android:layout_marginEnd="0dp"
android:layout_marginRight="0dp"
android:layout_toLeftOf="@id/view2"
android:layout_toStartOf="@id/view2"
android:gravity="center"
android:text="REMOTE2"
android:textColor="#ffffff"
/>
android:id="@+id/ib_remote_mic2"
android:layout_width="33dp"
android:layout_height="33dp"
android:layout_alignParentBottom="true"
android:layout_marginRight="7dp"
android:layout_marginBottom="7dp"
android:layout_toStartOf="@id/view2"
android:layout_toLeftOf="@id/view2"
android:background="@drawable/ic_bottom_microphone_off"
android:onClick="enableRemoteMic2" />
android:id="@+id/remote_view3"
android:layout_width="wrap_content"
android:layout_height="match_parent"
android:layout_marginBottom="3dp"
android:layout_marginEnd="3dp"
android:layout_marginLeft="0dp"
android:layout_marginRight="3dp"
android:layout_marginStart="0dp"
android:layout_marginTop="3dp"
android:layout_toEndOf="@id/view2"
android:layout_toRightOf="@id/view2" />
android:id="@+id/textView4"
android:layout_width="match_parent"
android:layout_height="33dp"
android:layout_toEndOf="@id/view2"
android:layout_toRightOf="@id/view2"
android:gravity="center"
android:text="REMOTE3"
android:textColor="#ffffff" />
android:id="@+id/ib_remote_mic3"
android:layout_width="33dp"
android:layout_height="33dp"
android:layout_alignParentRight="true"
android:layout_alignParentBottom="true"
android:layout_marginEnd="7dp"
android:layout_marginRight="7dp"
android:layout_marginBottom="7dp"
android:background="@drawable/ic_bottom_microphone_off"
android:onClick="enableRemoteMic3" />
android:id="@+id/stream_id_list"
android:layout_width="match_parent"
android:layout_height="wrap_content"
android:text="当前房间内的推流有:"
android:textSize="15dp"
/>
android:layout_width="match_parent"
android:layout_height="wrap_content"
android:text="本地ID"
android:layout_gravity="center_horizontal"
android:textAlignment="center"
/>
android:layout_width="wrap_content"
android:layout_height="wrap_content">
android:id="@+id/btn_start_publish"
android:layout_width="152dp"
android:layout_height="wrap_content"
android:onClick="ClickPublish"
android:text="推流" />
android:id="@+id/ed_publish_stream_id"
android:layout_width="275dp"
android:layout_height="match_parent">
android:layout_width="match_parent"
android:layout_height="wrap_content"
android:text="一号远端ID"
android:layout_gravity="center_horizontal"
android:textAlignment="center"
/>
android:layout_width="wrap_content"
android:layout_height="wrap_content">
android:id="@+id/btn_start_play"
android:layout_width="152dp"
android:layout_height="wrap_content"
android:text="拉流1"
android:onClick="ClickPlay"
/>
android:id="@+id/ed_play_stream_id"
android:layout_width="275dp"
android:layout_height="match_parent">
android:layout_width="match_parent"
android:layout_height="wrap_content"
android:text="二号远端ID"
android:layout_gravity="center_horizontal"
android:textAlignment="center"
/>
android:layout_width="wrap_content"
android:layout_height="wrap_content">
android:id="@+id/btn_start_play2"
android:layout_width="152dp"
android:layout_height="wrap_content"
android:text="拉流2"
android:onClick="ClickPlay2"
/>
android:id="@+id/ed_play_stream_id2"
android:layout_width="275dp"
android:layout_height="match_parent">
android:layout_width="match_parent"
android:layout_height="wrap_content"
android:text="三号远端ID"
android:layout_gravity="center_horizontal"
android:textAlignment="center"
/>
android:layout_width="wrap_content"
android:layout_height="wrap_content">
android:id="@+id/btn_start_play3"
android:layout_width="152dp"
android:layout_height="wrap_content"
android:text="拉流3"
android:onClick="ClickPlay3"
/>
android:id="@+id/ed_play_stream_id3"
android:layout_width="275dp"
android:layout_height="match_parent">
android:id="@+id/btn_logout"
android:layout_width="match_parent"
android:layout_height="wrap_content"
android:onClick="Logout"
android:text="退出房间" />
```
**2.**活动java源代码
登录界面.java
```java
import androidx.appcompat.app.AppCompatActivity;
import android.content.Intent;
import android.os.Bundle;
import android.view.View;
import android.widget.Button;
import android.widget.EditText;
import android.widget.Toast;
public class Login extends AppCompatActivity {
protected void onCreate(Bundle savedInstanceState) {
super.onCreate(savedInstanceState);
setContentView(R.layout.activity_login);//设置布局
Button login = findViewById(R.id.btn_login);//获取登录按钮实例
login.setOnClickListener(new View.OnClickListener() {
@Override
public void onClick(View v) {//匿名类实现监听功能
EditText roomIDx = findViewById(R.id.room_login);//获取用于输入的EditText的实例
String roomID = roomIDx.getText().toString().trim();//获取其中的文字,也就是对应的roomID
if (roomID.equals("")) {//检查此ID是否为空,为空则弹出,请输入信息。
Toast.makeText(Login.this, "请输入roomID", Toast.LENGTH_LONG).show();
}
else {//反之启动活动UI
Intent intent =new Intent(Login.this, UI.class);//创建一个显式intent
intent.putExtra("room_id", roomID);//并将房间号作为夸活动传输的数据传输到UI活动当中
startActivity(intent);//启动Activity
finish();//结束活动
}
}
});
}
}
```
核心视频UI.java
```java
import android.content.pm.PackageManager;
import android.os.Bundle;
import androidx.appcompat.app.AppCompatActivity;
import androidx.core.content.ContextCompat;
import im.zego.zegoexpress.ZegoExpressEngine;
import im.zego.zegoexpress.constants.ZegoRoomState;
import im.zego.zegoexpress.constants.ZegoUpdateType;
import im.zego.zegoexpress.entity.ZegoCanvas;
import im.zego.zegoexpress.entity.ZegoStream;
import im.zego.zegoexpress.entity.ZegoUser;
import im.zego.zegoexpress.callback.IZegoEventHandler;
import im.zego.zegoexpress.constants.ZegoScenario;
import android.content.Intent;
import android.os.Build;
import android.view.View;
import android.widget.Button;
import android.widget.EditText;
import android.widget.ImageButton;
import android.widget.TextView;
import android.widget.Toast;
// 导入对应美颜参数的常量值
import static im.zego.zegoexpress.constants.ZegoBeautifyFeature.*;
import org.json.JSONObject;
import java.util.ArrayList;
import java.util.Date;
public class UI extends AppCompatActivity {
public static ZegoExpressEngine engine = null;
boolean publishMicEnable = true; // 初始的自己麦克风为开着的
boolean playStreamMute = true; //其余屏幕人的初始状态都为静音
boolean playStreamMute2 = true;
boolean playStreamMute3 = true;
boolean isBeauty = false;//初始无美颜
boolean isFrontCamera = true; // 初始为前置摄像头
ImageButton ib_local_mic; //本地麦克风
ImageButton ib_remote_stream_audio;//拉流1外部视角的音量
ImageButton ib_remote_stream_audio2;//拉流2外部视角的音量
ImageButton ib_remote_stream_audio3;//拉流3外部视角的音量
ImageButton ib_beauty; //美颜按键
String LocalStreamID; //本地推流ID
String RemoteStreamID; //拉流1 ID
String RemoteStreamID2; //拉流2 ID
String RemoteStreamID3;//拉流3 ID
ArrayList
private String userID;//用户ID
String roomID;//房间ID
//写好自己的ID和sign,以下为我所申请的ID,如果要自己使用或者商用请自行申请并修改
long appID = ; // 请通过官网注册获取,格式为 123456789L
String appSign = ; //64个字符,请通过官网注册获取,格式为"0123456789012345678901234567890123456789012345678901234567890123"
protected void onCreate(Bundle savedInstanceState) {
super.onCreate(savedInstanceState);
/* 填写 appID 和 appSign */
/* 初始化SDK,使用测试环境,通用场景接入,此为自动初始化,无需点击按钮*/
engine = ZegoExpressEngine.createEngine(appID, appSign, true, ZegoScenario.GENERAL, getApplication(), null);
setContentView(R.layout.activity_main);
//登录
/* 创建用户 */
/* 生成随机的用户ID,避免不同手机使用时用户ID冲突,相互影响 */
/* Generate random user ID to avoid user ID conflict and mutual influence when different mobile phones are used */
String randomSuffix = String.valueOf(new Date().getTime() % (new Date().getTime() / 1000));
userID = "user" + randomSuffix;
ZegoUser user = new ZegoUser(userID);
//初始化房间内流id数组
RoomStreamList = new ArrayList
RoomStreamList.add("当前房间内的推流有:");
/* 开始登陆房间 */
//房间状态改变,时间处理
engine.setEventHandler(new IZegoEventHandler() {
/** 以下为常用的房间相关回调 */
public void onRoomStateUpdate(String roomID, ZegoRoomState state, int errorCode, JSONObject extendedData) {
//房间状态改变,提示信息
Toast.makeText(getApplicationContext(), "room state changed", Toast.LENGTH_SHORT).show();
}
public void onRoomUserUpdate(String roomID, ZegoUpdateType updateType, ArrayList
/* 用户状态更新,登陆房间后,当房间内有用户新增或删除时,SDK会通过该回调通知 */
//....
//用户加入提示信息
Toast.makeText(getApplicationContext(), userList.get(0) + "加入房间", Toast.LENGTH_LONG).show();
}
public void onRoomStreamUpdate(String roomID, ZegoUpdateType updateType, ArrayList
/* 流状态更新,登陆房间后,当房间内有用户新推送或删除音视频流时,SDK会通过该回调通知 */
//自己的推流不会被记入
for (int i = 0; i < streamList.size(); i++)//加入或退出房间流的所有推流id全都遍历一遍
{
Toast.makeText(getApplicationContext(), streamList.get(i).streamID + " room stream changed", Toast.LENGTH_LONG).show();
if (RoomStreamList.contains(streamList.get(i).streamID)) {//如果现有列表中包含这个,就移除
RoomStreamList.remove(streamList.get(i).streamID);
} else {//如果现有列表中不包含这个就加入
RoomStreamList.add(streamList.get(i).streamID);
}
}
String SentenceId = "";// 用于记录下当前房间内还有的流ID
for (int i = 0; i < RoomStreamList.size(); i++) {
SentenceId += RoomStreamList.get(i) + " ";//利用字符串拼接,将当前房间还在的所有流ID全部记下
}
TextView ViewIdlist = findViewById(R.id.stream_id_list);//找到用于显示流ID的TextView
ViewIdlist.setText(SentenceId);//设置文字信息在TextView上体现出来
}
});
//房间ID为Login活动传递过来的
Intent intent = getIntent();
roomID = intent.getStringExtra("room_id");//getXxxExtra方法获取Intent传递过来的roomID
engine.loginRoom(roomID, user);//有了房间号,将用户登录到该房间
// 麦克风
ib_local_mic = findViewById(R.id.ib_local_mic);//找到本地麦克风图标
/* 音频播放是否静音的开关 */
/* Switch for mute audio output */
ib_remote_stream_audio = findViewById(R.id.ib_remote_mic);//找到拉流1麦克风图标并赋值给之前定义的全局变量
ib_remote_stream_audio2 = findViewById(R.id.ib_remote_mic2);//找到拉流2麦克风图标并赋值给之前定义的全局变量
ib_remote_stream_audio3 = findViewById(R.id.ib_remote_mic3);//找到拉流3麦克风图标并赋值给之前定义的全局变量
ib_beauty = findViewById(R.id.ib_local_beauti);//找到美颜图标
//动态申请权限
String[] permissionNeeded = {
"android.permission.CAMERA",
"android.permission.RECORD_AUDIO"};
if (Build.VERSION.SDK_INT >= Build.VERSION_CODES.M) {
if (ContextCompat.checkSelfPermission(this, "android.permission.CAMERA") != PackageManager.PERMISSION_GRANTED ||
ContextCompat.checkSelfPermission(this, "android.permission.RECORD_AUDIO") != PackageManager.PERMISSION_GRANTED) {
requestPermissions(permissionNeeded, 101);
}
}
}
// Part I 推拉流按钮处理
/*点击推流按钮进行推流 */
/*
Click Publish Button
*/
public void ClickPublish(View view) {
if (engine == null) {//之前自动初始化的SDK若未初始化成功则会弹出以下内容
Toast.makeText(this, "please initiate your sdk first!", Toast.LENGTH_SHORT).show();
return;
}
Button button = (Button) view;//获取推流这个按钮的实例
if (button.getText().equals("推流")) {//若上面的文字是推流,则说明还未推流。
EditText et = findViewById(R.id.ed_publish_stream_id);//找到,旁边的EditText的实例
LocalStreamID = et.getText().toString();//获取其文字内容,并赋值给全局变量LocalStreamID
/* 开始推流 */
/* Begin to publish stream */
engine.startPublishingStream(LocalStreamID);//推流
Toast.makeText(this, "published", Toast.LENGTH_SHORT).show();//推流成功文字提示
/* 开始预览并设置本地预览视图 */
/* Start preview and set the local preview view. */
View local_view = findViewById(R.id.local_view);//获取预览图像的TextureView实例
engine.startPreview(new ZegoCanvas(local_view));//开始预览
Toast.makeText(this, "preview is set", Toast.LENGTH_SHORT).show();//提示预览设置成功
button.setText("停止推流");//文字从推流改变为停止推流
} else {//若上面文字不是推流
/* 停止推流 */
/* Begin to stop publish stream */
engine.stopPublishingStream();//停止推流
/* 停止本地预览 */
/* Start stop preview */
engine.stopPreview();//停止预览
Toast.makeText(this, "publishing has stopped", Toast.LENGTH_SHORT).show();//提示停止已成功
button.setText("推流");//文字变为推流
}
}
/* 点击拉流1按钮*/
/*
Click Play Button
*/
//由于如下三个按钮,实现代码大同小异所以就只 详写 此按钮注释,其他实现原理一致
public void ClickPlay(View view) {
if (engine == null) {//之前自动初始化的SDK若未初始化成功则会弹出以下内容
Toast.makeText(this, "please initiate your sdk first!", Toast.LENGTH_SHORT).show();
return;
}
Button button = (Button) view;//获取按钮实例
if (button.getText().equals("拉流1")) {//若文字为拉流1
EditText et = findViewById(R.id.ed_play_stream_id);//获取拉流旁的EditText实例
RemoteStreamID = et.getText().toString();//获取其字符串,作为1号拉流ID
/* 开始拉流 */
/* Begin to play stream */
View play_view = findViewById(R.id.remote_view);//获取播放实例
engine.startPlayingStream(RemoteStreamID, new ZegoCanvas(play_view));//开始拉流
engine.mutePlayStreamAudio(RemoteStreamID, playStreamMute);//首先对各用户采取静音
Toast.makeText(this, "Remote1 played successfully", Toast.LENGTH_SHORT).show();//提示拉流画面播放成功
button.setText("停止拉流");//文字变为停止拉流
} else {
/* 停止拉流 */
/* Begin to stop play stream */
engine.stopPlayingStream(RemoteStreamID);//停止拉流
Toast.makeText(this, "Remote1 stopped successfully", Toast.LENGTH_SHORT).show();//提示停止拉流成功
button.setText("拉流1");//文字转变为拉流1
}
}
/* 点击拉流2按钮 */
/*
Click Play Button
*/
//与拉流1按钮相似
public void ClickPlay2(View view) {
if (engine == null) {//之前自动初始化的SDK若未初始化成功则会弹出以下内容
Toast.makeText(this, "please initiate your sdk first!", Toast.LENGTH_SHORT).show();
return;
}
Button button = (Button) view;
if (button.getText().equals("拉流2")) {
EditText et = findViewById(R.id.ed_play_stream_id2);
RemoteStreamID2 = et.getText().toString();
/* 开始拉流 */
/* Begin to play stream */
View play_view = findViewById(R.id.remote_view2);
engine.startPlayingStream(RemoteStreamID2, new ZegoCanvas(play_view));
engine.mutePlayStreamAudio(RemoteStreamID2, playStreamMute2);
Toast.makeText(this, "Remote2 played successfully", Toast.LENGTH_SHORT).show();
button.setText("停止拉流");
} else {
/* 停止拉流 */
/* Begin to stop play stream */
engine.stopPlayingStream(RemoteStreamID2);
Toast.makeText(this, "Remote2 stopped successfully", Toast.LENGTH_SHORT).show();
button.setText("拉流2");
}
}
/* 点击拉流按钮3 */
/*
Click Play Button
*/
//与拉流1按钮相似
public void ClickPlay3(View view) {
if (engine == null) {//之前自动初始化的SDK若未初始化成功则会弹出以下内容
Toast.makeText(this, "please initiate your sdk first!", Toast.LENGTH_SHORT).show();
return;
}
Button button = (Button) view;
if (button.getText().equals("拉流3")) {
EditText et = findViewById(R.id.ed_play_stream_id3);
RemoteStreamID3 = et.getText().toString();
View play_view = findViewById(R.id.remote_view3);
/* 开始拉流 */
/* Begin to play stream */
engine.startPlayingStream(RemoteStreamID3, new ZegoCanvas(play_view));
engine.mutePlayStreamAudio(RemoteStreamID3, playStreamMute3);
Toast.makeText(this, "Remote3 played successfully", Toast.LENGTH_SHORT).show();
button.setText("停止拉流");
} else {
/* 停止拉流 */
/* Begin to stop play stream */
EditText et = findViewById(R.id.ed_play_stream_id3);
engine.stopPlayingStream(RemoteStreamID3);
Toast.makeText(this, "Remote3 stopped successfully", Toast.LENGTH_SHORT).show();
button.setText("拉流3");
}
}
// Part II 麦克风按钮处理
//本地麦克风
public void enableLocalMic(View view) {
if (engine == null) {//之前自动初始化的SDK若未初始化成功则会弹出以下内容
Toast.makeText(this, "please initiate your sdk first!", Toast.LENGTH_SHORT).show();
return;
}
publishMicEnable = !publishMicEnable;//将bool变量先取反,即状态改变
if (publishMicEnable) {//本地麦克风经取反后为真,那么就把图标变为开启状态的图标
ib_local_mic.setBackgroundDrawable(getResources().getDrawable(R.drawable.ic_bottom_microphone_on));
} else {//反之,则变为关闭状态的图标
ib_local_mic.setBackgroundDrawable(getResources().getDrawable(R.drawable.ic_bottom_microphone_off));
}
/* Enable Mic*/
engine.muteMicrophone(!publishMicEnable);//因为这个函数是mute,而我们是enable,所以取反才与本义相同
}
//一号拉流麦克风处理,二三号也大同小异
public void enableRemoteMic(View view) {
if (engine == null) {//之前自动初始化的SDK若未初始化成功则会弹出以下内容
Toast.makeText(this, "please initiate your sdk first!", Toast.LENGTH_SHORT).show();
return;
}
playStreamMute = !playStreamMute;//先将此bool变量取反,即状态改变
if (playStreamMute) {//若此时该bool变量为真,则说明是静音状态,则图标变为关闭状态图标
ib_remote_stream_audio.setBackgroundDrawable(getResources().getDrawable(R.drawable.ic_bottom_microphone_off));
} else {//反之则变为开启状态
ib_remote_stream_audio.setBackgroundDrawable(getResources().getDrawable(R.drawable.ic_bottom_microphone_on));
}
/* Enable Mic*/
engine.mutePlayStreamAudio(RemoteStreamID, playStreamMute);//此处因为bool变量实际意义与函数本义相同,故不用取反
}
//二号拉流麦克风处理,与一号类似
public void enableRemoteMic2(View view) {
if (engine == null) {//之前自动初始化的SDK若未初始化成功则会弹出以下内容
Toast.makeText(this, "please initiate your sdk first!", Toast.LENGTH_SHORT).show();
return;
}
playStreamMute2 = !playStreamMute2;
if (playStreamMute2) {
ib_remote_stream_audio2.setBackgroundDrawable(getResources().getDrawable(R.drawable.ic_bottom_microphone_off));
} else {
ib_remote_stream_audio2.setBackgroundDrawable(getResources().getDrawable(R.drawable.ic_bottom_microphone_on));
}
/* Enable Mic*/
engine.mutePlayStreamAudio(RemoteStreamID2, playStreamMute2);
}
//三号拉流麦克风处理,与一号类似
public void enableRemoteMic3(View view) {
if (engine == null) {//之前自动初始化的SDK若未初始化成功则会弹出以下内容
Toast.makeText(this, "please initiate your sdk first!", Toast.LENGTH_SHORT).show();
return;
}
playStreamMute3 = !playStreamMute3;
if (playStreamMute3) {
ib_remote_stream_audio3.setBackgroundDrawable(getResources().getDrawable(R.drawable.ic_bottom_microphone_off));
} else {
ib_remote_stream_audio3.setBackgroundDrawable(getResources().getDrawable(R.drawable.ic_bottom_microphone_on));
}
/* Enable Mic*/
engine.mutePlayStreamAudio(RemoteStreamID3, playStreamMute3);
}
// Part III 本地相机美颜、改变摄像头前后置等扩展功能
//美颜功能
public void enableBeauty(View view) {
if (engine == null) {//之前自动初始化的SDK若未初始化成功则会弹出以下内容
Toast.makeText(this, "please initiate your sdk first!", Toast.LENGTH_SHORT).show();
return;
}
isBeauty = !isBeauty;//取反
//更换图标
if (isBeauty) {//若现在为真,则变为使用美颜对应图标
ib_beauty.setBackgroundDrawable(getResources().getDrawable(R.drawable.beauty_ps));
} else {//若现在为假,则对应普通状态图标
ib_beauty.setBackgroundDrawable(getResources().getDrawable(R.drawable.normal));
}
if (isBeauty) {//如果处于美颜状态
//这里只采用一个较为明显的美白功能
engine.enableBeautify(WHITEN);
} else {//反之则关闭所有美颜设置
engine.enableBeautify(NONE);
}
}
//调用后置摄像头
public void frontCamera(View view)
{
if (engine == null) {//之前自动初始化的SDK若未初始化成功则会弹出以下内容
Toast.makeText(this, "please initiate your sdk first!", Toast.LENGTH_SHORT).show();
return;
}
isFrontCamera = !isFrontCamera;//先去反
engine.useFrontCamera(isFrontCamera);//根据现有布尔值带入是否使用前置摄像头的函数中
}
// Part IV 退出按钮
public void Logout(View view) {
Intent intent = new Intent(this, Login.class);//设置一个从当前活动到Login活动的intent
engine.stopPublishingStream();//停止推流
engine.logoutRoom(roomID);//退出该房间
startActivity(intent);//重新进入房间的登录界面
finish();//结束当前活动
}
}
```
四.功能上的不足以及可以继续开发的地方
1.为了更加方便人的使用,可以将对应房间的推流id自动进行拉流。
2.扩展功能可以增加一些其他其他的,类似像是只听见其他用户的声音关闭其画面
3.利用其他技术,实现手机端的屏幕共享。
4.可以通过RecyclerView等或其他方式,从而实现房间内一个用户界面能显示更多画面,使得最多拉的流数>3
5.当前拉的某个流停止时,画面静止,可以考虑让其转换为黑屏。
-
定制开发俄罗斯轮盘视频聊天chatroulette聊天轮盘2010-03-19 21390
-
高清端在线视频聊天插件软件平台2010-12-16 3495
-
WIN7系统笔记本,视频聊天的问题,求教2012-11-08 1976
-
【分享】DIY android版手机机器人2015-08-14 19822
-
局域网的在线视频聊天,如何将其结合起来完成局域网内的远程的视频聊天2018-01-05 6787
-
快速实现玩具车远程驾驶和视频通讯2020-03-10 2249
-
快速实现智能小车,支持远程驾驶、视频通讯2020-03-11 3305
-
四人抢答器电路图2020-12-21 8382
-
如何实现HarmonyOS Java端的气泡聊天框?2022-06-13 1599
-
三星新LED液晶电视加入视频聊天功能2010-03-04 1491
-
Facebook开发视频聊天设备:将集成人工智能技术2017-08-02 990
-
Facebook发布Portal视频聊天设备 互联网巨头展开直接对抗2018-01-10 1142
-
Snapchat移动应用再添功能,新群组视频聊天中强调AR2018-04-06 6304
-
Facebook推出智能视频聊天设备2018-10-21 922
-
Facebook推出Portal TV,可进行广角视频聊天2019-09-19 2964
全部0条评论

快来发表一下你的评论吧 !
