
 java高级语言制作智能小车编程实例
今日头条
描述
第一部分:
控制中心:树莓派
操作系统:centos arm64
针对树莓派4b操作系统,需要安装不同于2,3系列的安装包。由于4b有运行内存 1g,2g,4g,8g多个版本。由于支持4g以上内存的系统必须是64位系统。所以4g,8g需要选择64位系统。
centos操作系统也一样,需要使用和3b,3b+不同的安装包。
附件分享一个操作系统可用的4b的操作系统下载地址:
下面是32位系统,支持1g,2g版本
一.链接:https://pan.baidu.com/s/1zeTyMqfjykX9AVbvKz60oQ
提取码:gh8g
二.sd卡格式化,需要使用SDCardFormatterv5_WinEN;
三. 烧录系统需要使用balenaEtcher-Setup-1.4.7-x64
具体下载地址:链接: https://pan.baidu.com/s/1vMlymt-DllyARvEry8Y0vQ 提取码: cguu
其他操作系统也可以从centos官网下载,centos8现在在4b-4g上能启动,不过进入不了系统。这个是需要注意的。
8g版本需要使用下面的连接:
链接: https://pan.baidu.com/s/1xyYFAh4vftg-37r_f2m7ZQ 提取码: 48hw
购买树莓派并安装操作系统成功以后,进入第二部分
第二部分:
我们知道树莓派提供一个硬件pwm引脚,可以通过脉冲宽度调制进行控制电机的速度。实际上在精度要求不是非常高的情况下,普通引脚也可以通过软件模拟来控制电机,实现pwm一样的功能。
一.准备
树莓派4b
电机驱动L298N
直流电机
电源盒(4节1.5v电池)
电源线若干
二.电路连接示意图
使用方式如下:

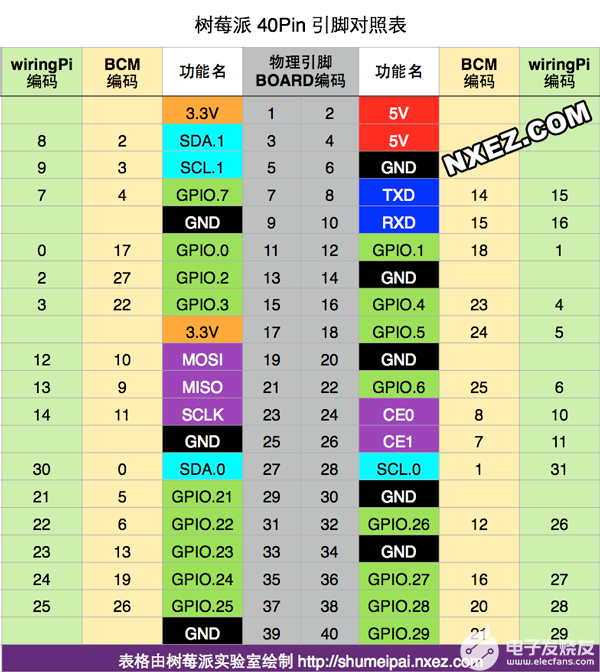
https://shumeipai.nxez.com/raspberry-pi-pins-version-40
L298N示意图

详细的针脚


其中,IN1,IN2控制电机A,IN3,IN4控制电机B
L298N12符输入,接电源盒正极;L298N的GND接电源盒的负极,同时接树莓派GND,以实现共地。
电路连接设计思路:使用gpio 1控制IN1;GUIO 02控制IN2;GPIO29控制ENA(A通道使能;通过使能接口接成pwm模式,控制速度)。
关于跳线帽:
关于ENA和ENB键帽,拆下后ENA和ENB分别有两根线,与IN1-4平行的是ENA和ENB使能端,剩下的是5V电源针脚。由于必须在ENA或ENB处于高电平时,才能使相应的电机运转,所以通过键帽把它们默认接到5V电源上,使之默认为高电平。
故若只需控制电机的正反转,可以不用管键帽,只关心IN1-4即可。若要对电机进行调速,则需拆下键帽,对ENA和ENB使能端输入PWM脉冲,而剩下的5V电源针脚空闲即可。
不知道你买的是什么型号的L298N。有些型号标记了EA、EB和5V,就算没标记也没关系,自己实际试一下就知道了。
实际上,可以用万用表测试一下两个针脚的电压,如果红色的(万用表的正极)连接的一端显示出来的数字是正数,那么这端就是高电压(实际测试下来是2v,不到5v).所以在将低电压的那一段外接到树莓派即可。
测试下来,我买的红板,是靠近字符 ENA这边更近的那根针是需要外接的,是低电平。
https://www.zhihu.com/question/50074435/answer/140589620
三。程序
原理:GPIO使用GPIO模式进行工作,通过GPIO接口,设置脉冲幅度数值(默认值是100,通过调整数值来控制电流的强弱,从而控制电机的运动速度)。
官网的例子
/* * #%L * ********************************************************************** * ORGANIZATION : Pi4J * PROJECT : Pi4J :: Java Examples * FILENAME : SoftPwmExample.java * * This file is part of the Pi4J project. More information about * this project can be found here: http://www.pi4j.com/ * ********************************************************************** * %% * Copyright (C) 2012 - 2019 Pi4J * %% * This program is free software: you can redistribute it and/or modify * it under the terms of the GNU Lesser General Public License as * published by the Free Software Foundation, either version 3 of the * License, or (at your option) any later version. * * This program is distributed in the hope that it will be useful, * but WITHOUT ANY WARRANTY; without even the implied warranty of * MERCHANTABILITY or FITNESS FOR A PARTICULAR PURPOSE. See the * GNU General Lesser Public License for more details. * * You should have received a copy of the GNU General Lesser Public * License along with this program. If not, see * . * #L% */import com.pi4j.io.gpio.*;import com.pi4j.platform.PlatformAlreadyAssignedException;import com.pi4j.util.CommandArgumentParser;import com.pi4j.util.Console;/** *
* This example code demonstrates how to setup a software emulated PWM pin using the RaspberryPi GPIO pins. *
* * @author Robert Savage */public class SoftPwmExample {/** * [ARGUMENT/OPTION "--pin (#)" | "-p (#)" ] * This example program accepts an optional argument for specifying the GPIO pin (by number) * to use with this GPIO listener example. If no argument is provided, then GPIO #1 will be used. * -- EXAMPLE: "--pin 4" or "-p 0". * * @param args * @throws InterruptedException * @throws PlatformAlreadyAssignedException */public static void main(String[] args) throws InterruptedException, PlatformAlreadyAssignedException {// create Pi4J console wrapper/helper// (This is a utility class to abstract some of the boilerplate code)final Console console = new Console();// print program title/headerconsole.title("<-- The Pi4J Project -->", "SoftPWM Example (Software-driven PWM Emulation)");// allow for user to exit program using CTRL-Cconsole.promptForExit();// create gpio controllerfinal GpioController gpio = GpioFactory.getInstance();// by default we will use gpio pin #01; however, if an argument// has been provided, then lookup the pin by addressPin pin = CommandArgumentParser.getPin(RaspiPin.class, // pin provider class to obtain pin instance fromRaspiPin.GPIO_01, // default pin if no pin argument foundargs); // argument array to search in// we will provision the pin as a software emulated PWM output// pins that support hardware PWM should be provisioned as normal PWM outputs// each software emulated PWM pin does consume additional overhead in// terms of CPU usage.//// Software emulated PWM pins support a range between 0 (off) and 100 (max) by default.//// Please see: http://wiringpi.com/reference/software-pwm-library/// for more details on software emulated PWMGpioPinPwmOutput pwm = gpio.provisionSoftPwmOutputPin(pin);// optionally set the PWM range (100 is default range)pwm.setPwmRange(100);// prompt user that we are readyconsole.println(" ... Successfully provisioned PWM pin: " + pwm.toString());console.emptyLine();// set the PWM rate to 100 (FULLY ON)pwm.setPwm(100);console.println("Software emulated PWM rate is: " + pwm.getPwm());console.println("Press ENTER to set the PWM to a rate of 50");System.console().readLine();// set the PWM rate to 50 (1/2 DUTY CYCLE)pwm.setPwm(50);console.println("Software emulated PWM rate is: " + pwm.getPwm());console.println("Press ENTER to set the PWM to a rate to 0 (stop PWM)");System.console().readLine();// set the PWM rate to 0 (FULLY OFF)pwm.setPwm(0);console.println("Software emulated PWM rate is: " + pwm.getPwm());// stop all GPIO activity/threads by shutting down the GPIO controller// (this method will forcefully shutdown all GPIO monitoring threads and scheduled tasks)gpio.shutdown();}}
其中console是java控制台,打日志用的,方便调试。
// by default we will use gpio pin #01; however, if an argument// has been provided, then lookup the pin by addressPin pin = CommandArgumentParser.getPin(RaspiPin.class, // pin provider class to obtain pin instance fromRaspiPin.GPIO_01, // default pin if no pin argument foundargs); // argument array to search in
这里的含义是,如果输入控制引脚,则使用输入的引脚,如果不输入,就使用默认的GPIO_01引脚
具体程序,可以根据例子,进行设置针脚的高低电平实现
需要源码请关注专栏,留言
-
java 网络编程语言2015-12-09 619
-
JAVA编程实例:多种风格的窗口2008-12-06 0
-
【NanoPi Duo开发板试用申请】智能家居,Java高级语言控制2017-09-21 0
-
Java 7编程高级进阶2018-03-08 0
-
智能小车机器人制作大全2019-05-05 0
-
Raspberry Pi机器人制作实例 用PYTHON、LINUX和传感器搭建智能小车2020-04-03 0
-
怎么制作一个智能循迹小车2021-04-23 0
-
关于嵌入式系统高级编程语言的基本知识点都在这里2021-04-27 0
-
java多线程编程实例 (源程序)2008-10-22 577
-
Java高级编程2008-12-14 701
-
基于单片机制作C语言寻迹小车程序2016-09-14 1220
-
当下最热门最好就业的编程语言还是java2016-12-19 3131
-
最流行的编程语言java,python2017-09-26 550
-
Java编程和c语言哪一种更有优势_C语言与JAVA的区别是什么2018-02-05 24786
-
最适合单片机编程的高级语言,除了C语言,别无选择!2021-11-23 839
全部0条评论

快来发表一下你的评论吧 !

