
MR-16 LED Driver with a 5V Aux
电源设计应用
453人已加入
描述
MR-16 LED Driver with a 5V Auxiliary Output to Power a Pulsating LED Cooler
Abstract: This application note presents a reference design for a 4S1P MR-16 LED driver that provides 750mA to a string of four white LEDs (WLEDs). The circuit operates from a 24V source and is based around the MAX16820 hysteretic LED driver. Also included is a MAX5033 24V-to-5V, 150mA switching power supply to power a Nuventix® pulsating LED cooler.
Overview
This reference design details a driver circuit using the MAX16820 hysteretic LED driver for a 4-LED MR-16 lamp with an associated power source (MAX5033) for a pulsed air cooler.The following are the electrical input requirements and output capabilities.
VIN: 24VDC ±5%
Temperature: +80°C (max) ambient
VLED configuration: 4 LEDs in series (16VDC, max), 750mA
Auxiliary output power: 5V at 150mA (average), 300mA (peak)
The reference design is discussed in detail below, with analysis of the main circuit blocks and layout considerations.

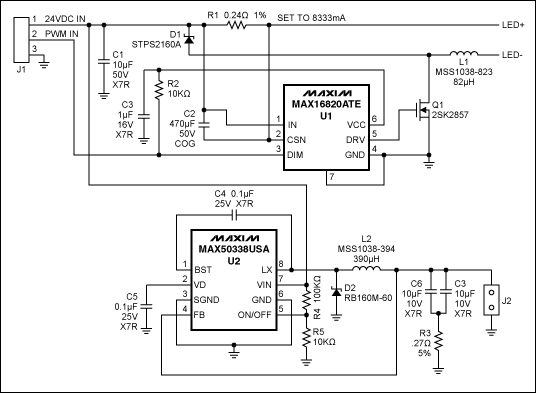
Figure 1. Schematic of the driver design.

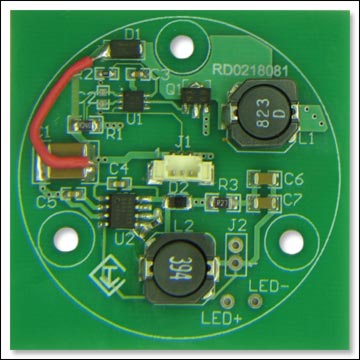
Figure 2. Photo of the PCB. The board was designed to fit directly into an MR-16 assembly.
Figure 3. Revised layout of the PCB (updated from the board in Figure 2).
Design Analysis
Designed to fit directly into an MR-16 assembly, this reference design delivers 750mA to a string of 4 LEDs from a 24V power source. The MAX16820 provides hysteretic control and regulates the current through the inductor and the LEDs. Meanwhile, the MAX5033 provides power to a pulsating cooler through the J2 connector. The cooler presents a sinusoidal load of 300mA peak and 150mA average to the power supply.The R3 resistor is in the circuit to satisfy the stability requirements (with a ceramic output capacitor) of the MAX5033.
A provision was made for PWMing, but not tested. The center pin of J1 was routed directly to the DIM input of the MAX16820.
Power-Up Procedure
- Connect 4 LEDs in series to the LED+ (anode) and LED- (cathode) pins.
- Attach a 300mA load to J2.
- Attach a 24V, 1A power supply to J1.
- Turn on the power supply.
| Designator | Component | Description | Footprint | Quantity |
| C1 | Nonpolarized capacitor | 10µF, 50V, X7R | 2220 | 1 |
| C2 | Nonpolarized capacitor | 470pF, 50V, COG | 0402 | 1 |
| C3 | Nonpolarized capacitor | 1µF, 16V, X7R | 0603 | 1 |
| C4, C5 | Nonpolarized capacitors | 0.1µF, 25V, X7R | 0603 | 2 |
| C6, C7 | Nonpolarized capacitors | 10µF, 10V, X7R | 1206 | 2 |
| D1 | Schottky diode | STPS2L60A | SMA | 1 |
| D2 | Schottky diode | RB160M-60 | SOD123F | 1 |
| J1 | 3 x 1 connector | — | 1.25mm | 1 |
| J2 | 2 x 1 connector | — | 100mil | 1 |
| L1 | Inductor | 82µH, MSS1038-823 | 10.2mm x 10mm | 1 |
| L2 | Inductor | 390µH, MSS1038-394 | 10.2mm x 10mm | 1 |
| Q1 | n-channel MOSFET | 2SK2857 | SOT89 | 1 |
| R1 | Resistor | 0.24Ω, 1% | 1206 | 1 |
| R2 | Resistor | 10kΩ, 1% | 0603 | 1 |
| R3 | Resistor | 0.27Ω, 5% | 1206 | 1 |
| R4 | Resistor | 100kΩ, 1% | 0603 | 1 |
| R5 | Resistor | 10kΩ, 1% | 0603 | 1 |
| U1 | LED driver | MAX16820ATT | 6-TDFN | 1 |
| U2 | Buck DC-DC converter | MAX5033BUSA | 8-SO | 1 |
声明:本文内容及配图由入驻作者撰写或者入驻合作网站授权转载。文章观点仅代表作者本人,不代表电子发烧友网立场。文章及其配图仅供工程师学习之用,如有内容侵权或者其他违规问题,请联系本站处理。
举报投诉
-
能否用SPI接口控制5V LED Driver IC呢?2022-12-26 479
-
SD42522设计MR16 LED射灯2009-12-05 607
-
MR-16 LED驱动器和用于脉冲LED冷却器供电的5V辅助2009-09-05 1293
-
MR-16 LED驱动器和用于脉冲LED冷却器的5V辅助电源2009-12-12 1438
-
1-5W MR16 LED驱动GreenPoin解决方案2010-02-10 1051
-
FP7102 LED Driver For MR16应用电路2010-05-22 2324
-
LED driver solution for MR16 a2010-08-07 2406
-
MR16模块驱动电源说明2011-03-22 1394
-
MR16 LED驱动MR16 LED灯与电子变压器兼容2013-04-01 5326
-
Maxim MR16 Evaluation Demo2017-03-29 769
-
TPS40211为SEPIC设计MR-16的LED驱动概述2018-04-13 1145
-
电子变压器驱动LED-MR16 射灯电源的问题及BP1361 解决方案,BP1361 LED DRIVER2018-09-20 2933
-
LTM8042 Demo Circuit - Buck-Boost LED Driver (7-18V to 13.5V @ .5A)2021-02-01 800
-
MR16 LED的1wto 5 W LED驱动器参考设计2021-10-20 779
-
MR-16 LED驱动器,带5V辅助输出为脉动LED冷却器供电2023-06-13 1677
全部0条评论

快来发表一下你的评论吧 !

