
ENC28J60以太网模块与Arduino的连接方案介绍
电子说
描述
在本篇文章中,我们将学习如何将ENC28J60以太网模块与Arduino Web服务器进行连接,以在LAN局域网或无线网络中的计算机与Arduino之间建立通信。我们将ENC28J60以太网控制器与Arduino连接,以便我们的Arduino成为该网络的成员之一。一旦完成,arduino可以控制该网络中的事物,或者arduino可以由该网络的其他设备控制。 ENC28J60以太网模块与Arduino的连接将进一步为我们提供在Arduino上自由使用互联网。
ENC28J60以太网模块简介
ENC28J60以太网模块使用Microchip ENC28J60独立式以太网控制器IC,具有许多功能,可满足大多数网络协议要求。该板通过标准SPI接口直接连接到大多数微控制器,传输速度高达20MHz。
该以太网网模块是向基于微控制器的产品和项目添加LAN连接的最简单方法。
1. 使用此模块为您的产品启用以太网接口。它可与任何工作于3. 3V或5V的微控制器一起使用。
2. 该模块工作在3.3V电压下,并与5V接口兼容。
3. 使用SPI进程与其他连接。
4. 托管Web服务器,对模块执行ping操作或通过Internet将其添加到家庭自动化中。
5. 该模块的核心是Microchip的ENC28J60以太网控制器。
6. 使用集成磁性装置的RJ45网口可以减小电路板的尺寸。
框图和连接方式:
以下是一个简单的框图,介绍了Arduino和ENC28J60模块如何与路由器和计算机连接。

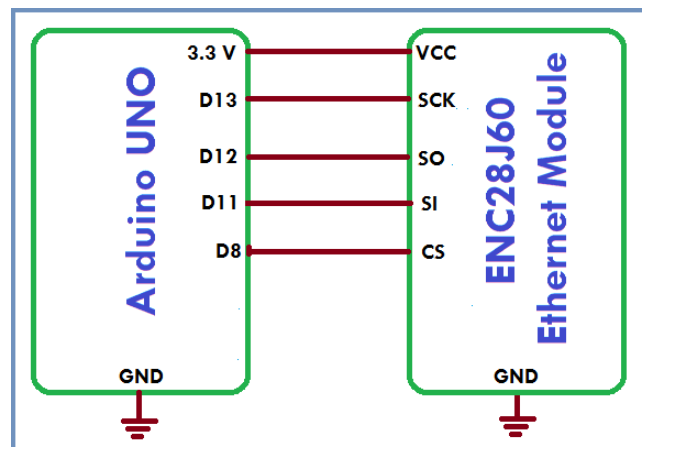
路由器应与LAN连接,并应具有多个输入输出端口。从路由器将一根以太网电缆连接到计算机系统,将另一根以太网电缆连接到ENC28J60模块。同样,ENC28J60模块连接到Arduino。 Arduino和ENC28J60之间的连接如下。

如何将ENC28J60以太网模块与Arduino Web服务器连接:
1. 从此处下载ENC28J60库:ENC28J60库
2. 将库文件添加到您的Arduino IDE库中:
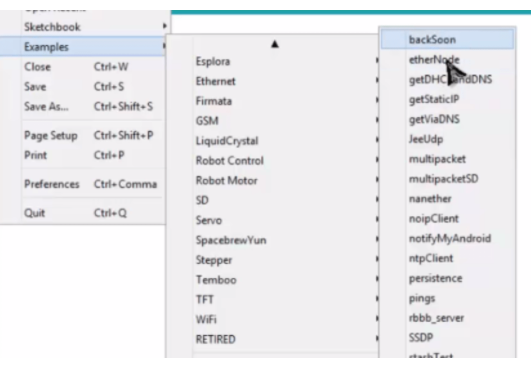
3. 添加完成后,打开示例,然后从 Master Library中选择以下示例:

4. 编译代码,然后将代码上传到Arduino UNO开发板:
5. 打开串口监视器并复制IP地址:
6. 打开网络浏览器并粘贴IP地址,然后按下Enter:
Arduino连接ENC28J60以太网模块的示例代码:
#include
#define STATIC 0 // set to 1 to disable DHCP (adjust myip/gwip values below)
#if STATIC
// ethernet interface ip address
static byte myip[] = { 192,168,1,200 };
// gateway ip address
static byte gwip[] = { 192,168,1,1 };
#endif
// ethernet mac address - must be unique on your network
static byte mymac[] = { 0x74,0x69,0x69,0x2D,0x30,0x31 };
byte Ethernet::buffer[500]; // tcp/ip send and receive buffer
const char page[] PROGMEM =
"HTTP/1.0 503 Service Unavailable "
"Content-Type: text/html "
"Retry-After: 600 "
" "
""
"
"
""
This service is currently unavailable
""
"
"The main server is currently off-line.
"
"Please try again later."
"
"""
""
;
void setup(){
Serial.begin(57600);
Serial.println(" [backSoon]");
if (ether.begin(sizeof Ethernet::buffer, mymac) == 0)
Serial.println( "Failed to access Ethernet controller");
#if STATIC
ether.staticSetup(myip, gwip);
#else
if (!ether.dhcpSetup())
Serial.println("DHCP failed");
#endif
ether.printIp("IP: ", ether.myip);
ether.printIp("GW: ", ether.gwip);
ether.printIp("DNS: ", ether.dnsip);
}
void loop(){
// wait for an incoming TCP packet, but ignore its contents
if (ether.packetLoop(ether.packetReceive())) {
memcpy_P(ether.tcpOffset(), page, sizeof page);
ether.httpServerReply(sizeof page - 1);
}
}
编辑:hfy
-
enc28j60以太网芯片原理图AD源文件2022-03-22 1247
-
如何将ENC28J60以太网模块与Arduino Web服务器进行连接2022-02-15 1055
-
arduino loar_ENC28J60以太网模块与Arduino的连接方案介绍2021-12-16 996
-
ENC28J60以太网控制器的电路原理图免费下载2020-12-03 2091
-
使用ENC28J60实现嵌入式网络接口的设计论文说明2020-07-14 1054
-
ENC28J60的网口资料详细资料说明2020-06-15 1391
-
微雪电子ENC28J60以太网模块简介2019-12-30 3479
-
ENC28J60使用2016-05-25 4003
-
ENC28J60 spi 接口 以太网 网络模块 提供 代码2016-05-17 1889
-
基于ENC28J60以太网控制器及其应用2016-03-01 1238
-
ENC28J60以太网模块【教程】2016-01-12 1283
-
arduino学习笔记26 - ENC28J60以太网模块实验2014-10-24 5260
-
新型以太网控制器ENC28J60及其接口技术2010-01-19 871
-
基于ENC28J60的嵌入式网络接口的设计Design of2009-06-01 889
全部0条评论

快来发表一下你的评论吧 !

