
如何在 TFX 中使用 NSL 框架实现计算图正则化
描述
神经架构学习 (Neural Structured Learning,NSL) 是 TensorFlow 中的一个框架,可以利用结构化信号来训练神经网络。这种框架接受 (i) 显式计算图或 (ii) 隐式计算图,处理结构化输入,并在模型训练过程中动态生成邻接点(Neighbors)。显式计算图的 NSL 通常用于基于神经网络的图学习(Neural Graph Learning),而隐式计算图的 NSL 通常用于 对抗学习。这两种技术均以 NSL 框架中的正则化形式实现。所以,它们只对训练工作流有影响,而工作流的模型保持不变。我们将在本文中探讨如何在 TFX 中使用 NSL 框架实现计算图正则化(Graph Regularization )。
神经架构学习
https://tensorflow.google.cn/neural_structured_learning
使用 NSL 构建计算图正则化模型的高级工作流包含以下步骤:
如果没有可用的计算图,则需要先构建一个计算图。
使用计算图和输入样本特征扩充训练数据。
使用扩充的训练数据对给定模型进行计算图正则化。
这些步骤不会立即映射到现有的 TFX (TensorFlow Extended) 流水线组件上。但是,TFX 支持自定义组件,允许用户在其 TFX 流水线中实现自定义处理。如需了解 TFX 中的自定义组件,请参阅这篇文章。
TFX
https://tensorflow.google.cn/tfx/guide#tfx_standard_components
自定义组件
https://tensorflow.google.cn/tfx/guide/understanding_custom_components
为了在 TFX 中创建一个包含上述步骤的计算图正则化模型,我们将利用扩展自定义 TFX 组件。
为展示如何使用 NSL,我们构建了一个示例 TFX 流水线,对 IMDB 数据集进行情感分类。我们提供了一个基于 Colab 的教程,演示了如何使用 NSL 与原生 TensorFlow 来完成这项任务,我们以此作为示例 TFX 流水线的基础。
IMDB 数据集
https://tensorflow.google.cn/datasets/catalog/imdb_reviews
Colab 教程
https://tensorflow.google.cn/neural_structured_learning/tutorials/graph_keras_lstm_imdb
自定义 TFX 组件的计算图正则化
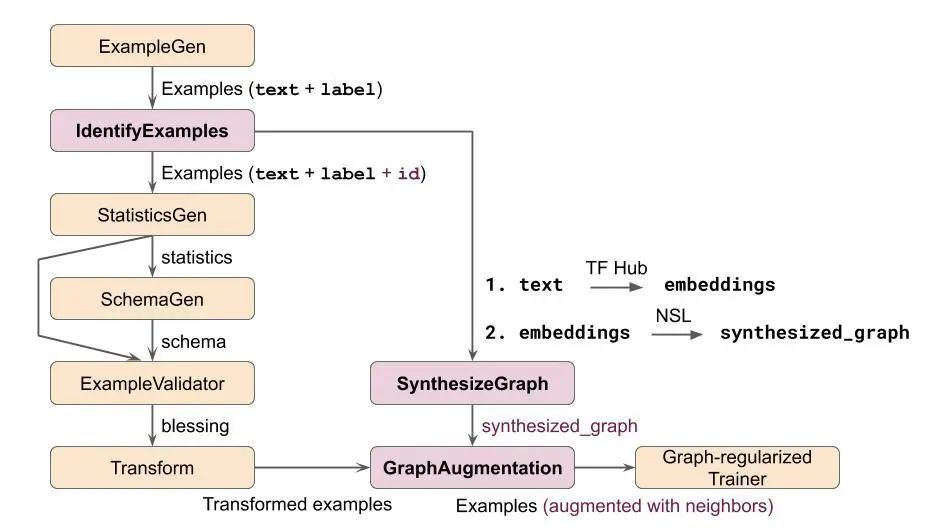
为了在 TFX 中构建一个计算图正则化的 NSL 模型来完成这项任务,我们将使用自定义 Python 函数方法自定义三个组件。以下是使用这些自定义组件实现我们示例的 TFX 流水线示意图。为了简洁起见,我们省略了通常在 Trainer 之后的组件,例如 Evaluator、 Pusher 等。
自定义 Python 函数
https://tensorflow.google.cn/tfx/guide/custom_function_component

图 1:TFX 流水线示例:使用计算图正则化进行文本分类
在此图中,仅有自定义组件(粉色)与计算图正则化的 Trainer组件具备 NSL 相关逻辑。值得注意的是,此处展示的自定义组件仅作例证,还可以通过其他方式构建类似功能的流水线。接下来,我们进一步详细描述各个自定义组件,并展示相应的代码段。
IdentifyExamples
此自定义组件为每个训练样本分配一个唯一的 ID,将每个训练样本与其在计算图中相应的邻接点关联起来。
@component def IdentifyExamples( orig_examples: InputArtifact[Examples], identified_examples: OutputArtifact[Examples], id_feature_name: Parameter[str], component_name: Parameter[str] ) -> None: # Compute the input and output URIs. ... # For each input split, update the TF.Examples to include a unique ID. with beam.Pipeline() as pipeline: (pipeline | 'ReadExamples' >> beam.io.ReadFromTFRecord( os.path.join(input_dir, '*'), coder=beam.coders.coders.ProtoCoder(tf.train.Example)) | 'AddUniqueId' >> beam.Map(make_example_with_unique_id, id_feature_name) | 'WriteIdentifiedExamples' >> beam.io.WriteToTFRecord( file_path_prefix=os.path.join(output_dir, 'data_tfrecord'), coder=beam.coders.coders.ProtoCoder(tf.train.Example), file_name_suffix='.gz')) identified_examples.split_names = orig_examples.split_names return
make_example_with_unique_id() 函数可以更新给定样本,将包含唯一 ID 的额外特征包括在内。
SynthesizeGraph
如上所述,在 IMDB 数据集中,没有提供显式计算图作为输入。因此,在演示计算图正则化之前,我们将构建一个计算图。在此示例中,我们使用一个预训练的文本嵌入向量模型将电影评论中的原始文本转换为嵌入向量,然后通过生成的嵌入向量构建计算图。
SynthesizeGraph自定义组件负责处理计算图构建,请注意,它定义了一个新的 Artifact,名为 SynthesizedGraph,作为此自定义组件的输出。
"""Custom Artifact type""" class SynthesizedGraph(tfx.types.artifact.Artifact): """Output artifact of the SynthesizeGraph component""" TYPE_NAME = 'SynthesizedGraphPath' PROPERTIES = { 'span': standard_artifacts.SPAN_PROPERTY, 'split_names': standard_artifacts.SPLIT_NAMES_PROPERTY, } @component def SynthesizeGraph( identified_examples: InputArtifact[Examples], synthesized_graph: OutputArtifact[SynthesizedGraph], similarity_threshold: Parameter[float], component_name: Parameter[str] ) -> None: # Compute the input and output URIs ... # We build a graph only based on the 'train' split which includes both # labeled and unlabeled examples. create_embeddings(train_input_examples_uri, output_graph_uri) build_graph(output_graph_uri, similarity_threshold) synthesized_graph.split_names = artifact_utils.encode_split_names( splits=['train']) return
create_embeddings() 函数通过 TensorFlow Hub 上的一些预训练模型将电影评论中的文本转换为相应的嵌入向量。build_graph() 函数调用 NSL 中的 build_graph()API。
TensorFlow Hub
https://tensorflow.google.cn/hub
build_graph()
https://tensorflow.google.cn/neural_structured_learning/api_docs/python/nsl/tools/build_graph
GraphAugmentation
此自定义组件的目的在于将样本特征(电影评论中的文本)与通过嵌入向量构建的计算图结合起来,生成一个扩充的训练数据集。由此得出的训练样本也将包括其相应邻接点的特征。
@component def GraphAugmentation( identified_examples: InputArtifact[Examples], synthesized_graph: InputArtifact[SynthesizedGraph], augmented_examples: OutputArtifact[Examples], num_neighbors: Parameter[int], component_name: Parameter[str] ) -> None: # Compute the input and output URIs ... # Separate out the labeled and unlabeled examples from the 'train' split. train_path, unsup_path = split_train_and_unsup(train_input_uri) # Augment training data with neighbor features. nsl.tools.pack_nbrs( train_path, unsup_path, graph_path, output_path, add_undirected_edges=True, max_nbrs=num_neighbors ) # Copy the 'test' examples from input to output without modification. ... augmented_examples.split_names = identified_examples.split_names return
split_train_and_unsup() 函数将输入样本拆分成带标签和无标签的样本,pack_nbrs() NSL API 创建扩充的训练数据集。
pack_nbrs()
https://tensorflow.google.cn/neural_structured_learning/api_docs/python/nsl/tools/pack_nbrs
计算图正则化的 Trainer
我们目前所有的自定义组件都已实现,TFX 流水线的 Trainer 组件中增加了其他 NSL 相关的内容。下方展示了一个计算图正则化 Trainer 组件的简化视图。
... estimator = tf.estimator.Estimator( model_fn=feed_forward_model_fn, config=run_config, params=HPARAMS) # Create a graph regularization config. graph_reg_config = nsl.configs.make_graph_reg_config( max_neighbors=HPARAMS.num_neighbors, multiplier=HPARAMS.graph_regularization_multiplier, distance_type=HPARAMS.distance_type, sum_over_axis=-1) # Invoke the Graph Regularization Estimator wrapper to incorporate # graph-based regularization for training. graph_nsl_estimator = nsl.estimator.add_graph_regularization( estimator, embedding_fn, optimizer_fn=optimizer_fn, graph_reg_config=graph_reg_config) ...
如您所见,创建了基础模型后(本例中指一个前馈神经网络),就可以通过调用 NSL 封装容器 API 将其直接转换为计算图正则化模型。
一切就这么简单。现在,我们已补充完在 TFX 中构建计算图正则化 NSL 模型所需的步骤。此处提供了一个基于 Colab 的教程,在 TFX 中端到端地演示这个示例。不妨尝试一下,并可根据您的需要进行自定义。
此处
https://tensorflow.google.cn/tfx/tutorials/tfx/neural_structured_learning
对抗学习
如前文简介中所述,神经架构学习的另一个方面是对抗学习,即不使用计算图中的显式邻接点来进行正则化,而是动态、对抗性地创建隐式邻接点来迷惑模型。
因此,使用对抗样本进行正则化是提高模型鲁棒性的有效方式。使用神经架构学习的对抗学习可以轻松集成到 TFX 流水线中。无需任何自定义组件,只需要更新 Trainer 组件即可在神经架构学习中调用对抗正则化封装容器 API。
总结
我们演示了如何利用自定义组件在 TFX 中使用神经架构学习构建计算图正则化模型。当然,也可以用其他方式构建计算图,或者按照另外的方式来构建整体流水线。
我们希望这个示例能够为您构建自己的神经架构学习工作流提供帮助。
相关链接
有关神经架构学习的更多信息,请查阅以下资源:
TFX 中的 NSL Colab 教程
https://tensorflow.google.cn/tfx/tutorials/tfx/neural_structured_learning
NSL 网站
https://tensorflow.google.cn/neural_structured_learning
NSL GitHub
https://github.com/tensorflow/neural-structured-learning
更多 NSL 教程与视频
https://github.com/tensorflow/neural-structured-learning#videos-and-colab-tutorials
致谢:
我们特此鸣谢 Google 神经架构学习团队、TFX 团队以及 Aurélien Geron 的支持与贡献。
责任编辑:xj
原文标题:TensorFlow Extended + 神经架构学习:构建计算图正则化模型
文章出处:【微信公众号:TensorFlow】欢迎添加关注!文章转载请注明出处。
- 相关推荐
- 热点推荐
- 神经网络
- 计算图
- 正则化
- tensorflow
-
如何在IDF框架中使用自定义的静态库和动态库?2024-06-25 628
-
改善深层神经网络--超参数优化、batch正则化和程序框架 学习总结2020-06-16 1489
-
Matlab中使用S函数实现离散化数值计算的问题有哪些2021-08-27 1419
-
dropout正则化技术介绍2017-10-10 1414
-
如何在典型的DSP应用(框架)中使用IRTC接口的详细资料概述2018-05-03 1505
-
如何在UltraScale+设计中使用UltraRAM模块2018-11-22 8771
-
如何在您选择的边缘计算框架中使用EdgeScale2019-01-23 2807
-
谷歌发布机器学习框架:一个名叫NSL的神经结构学习框架2019-09-20 3918
-
详解机器学习和深度学习常见的正则化2020-01-29 3427
-
基于AdaBoost框架的弹性正则化多核学习算法2021-06-03 689
-
用于弱监督大规模点云语义分割的混合对比正则化框架2022-09-05 2030
-
OpenHarmony中使用正则表达式2023-06-06 2300
-
如何在Linux中使用htop命令2023-12-04 4093
-
工业计算机是什么?如何在不同行业中使用?2024-04-01 1850
-
如何在USB视频类(UVC)框架中使用EZ-USB™FX3实现图像传感器接口USB视频类(UVC)2025-02-28 298
全部0条评论

快来发表一下你的评论吧 !

